TapTapTap
-
Posts
137 -
Joined
-
Last visited
Content Type
Profiles
Forums
Events
Blogs
Gallery
Store
Everything posted by TapTapTap
-
Cics, I have been dealing with the Tannery you are doing your basic leatherwork course with for well over 30 years and am surprised at your comments about them focusing on kangaroo leather. From my experience the roo skins are mainly used for thonging and the quality of their product is excellent. I have been making objects out of leather for close on 50 years and at one stage ran a leatherwork supply shop on the Central Coast. The Instructor on your course would have explained the pros and cons of the various types of leather during the course. I mainly use veg tanned double shoulders from 1 - 1.5mm to 4.00mm. The quality is excellent. If you use Birdsall's Antique and apply a finish like Leather Lac you can minimise the affect of water damage. Check out my website at Myleatherwork.com and you will see some examples. Best of luck with your course, Regards, TapTapTap
-
Welcome to the best source of leatherwork knowledge on the Web. If you can't find out what you need to do to to improve your standards you are in the wrong place. As Tom said show us some photos and we can guide you. regards, TapTapTap
-
I Am Fairly New To Leatherwork And Will Post A Few Photos
TapTapTap replied to Queenslander2's topic in Member Gallery
i can't see any pics? what am i doing wrong ? -
Welcome to Leatherworker.net. The people who use this Forum are only too happy to advise you. KEEP AT IT
-
How Many Prototypes Do You Make Till It Is Sellable?
TapTapTap replied to DavidL's topic in Leatherwork Conversation
DavidL, Interesting question. Back in the eighties I used to work the local markets. What I noticed was the comments from customers about the items I was making and I made notes for later reference. There are plenty of books available on how to build everything from a saddle to a keycase. If you are doing "your own thing" then the WOW factor is your goal. There are heaps of tutorials available that are designed to ensure you produce an item without the need to 'tweak it. Check out - Myleatherwork.com and you will see an example of a tutorial. I hope this advice gives you some guidance. Regards, TapTapTap -
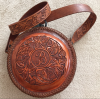
This is a leather covered water bottle which happened to be the same size as the Round Bag on page 32 of Al Stohlmans Book "How to Carve Leather". I used 2mm thick embossing leather.
-
Hi Frans, If you haven't bought any tools yet you could try Tandy at MINTO. They have a special on sale until 24th December which is a BASIC HAND STITCHING KIT for $43.19 (normal retail $86.29). Regards, TapTapTap
-
G'Day Mate (had to throw that in). The Tandy shop in Sydney is situated in Minto which puts it within your reach for a visit. If you contact them and speak to Rod (the Manager) ask him for a catalogue. They are very efficient with mail orders. I live on the Central Coast which is a two and a half hour drive so use Tandy quite often. The quality of the leather at Birdsalls is better that Tandy in my opinion. The contacts at Birdsalls are Tracy and Noel and their mail order is also excellent. There is another supplier in Queensland that has good quality kangaroo lacing called MACLACE. The best book to get you started is "The art of hand sewing leather" by Al Stohlman. There is also available a "Motorcycle Accessory Pattern Pak". Both Birdsalls and Tandy stock these publications. Any time you get stuck give me a call and we will work a solution. My web page is http://www.myleatherwork.com. regards, TapTapTap
-
Hi Sudden66, I noticed you recently visited my site. Is there anything i can help you with? My Website looks like a dogs breakfast at the moment but is still worth a look. regards, TapTapTap
-

Hi, thanks for asking! I'm just looking round. Soaking information wherever i can get it! Thanks for sharing!
-
-
Joce, Very nice clean work. To add the professional touch I would very carefully colour the leather on the inside of the slots and also trim the lumpy bits where you have used a slot punch. regards, TapTapTap
-
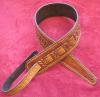
Guitar Strap Braided Edges
TapTapTap commented on TapTapTap's gallery image in Gallery- Our Leatherwork
 We use mm in Australia. I use 3mm for the top which equates to about 7 oz. The lining material is less than 1mm. TapTapTap
 -
From the album: Latest items
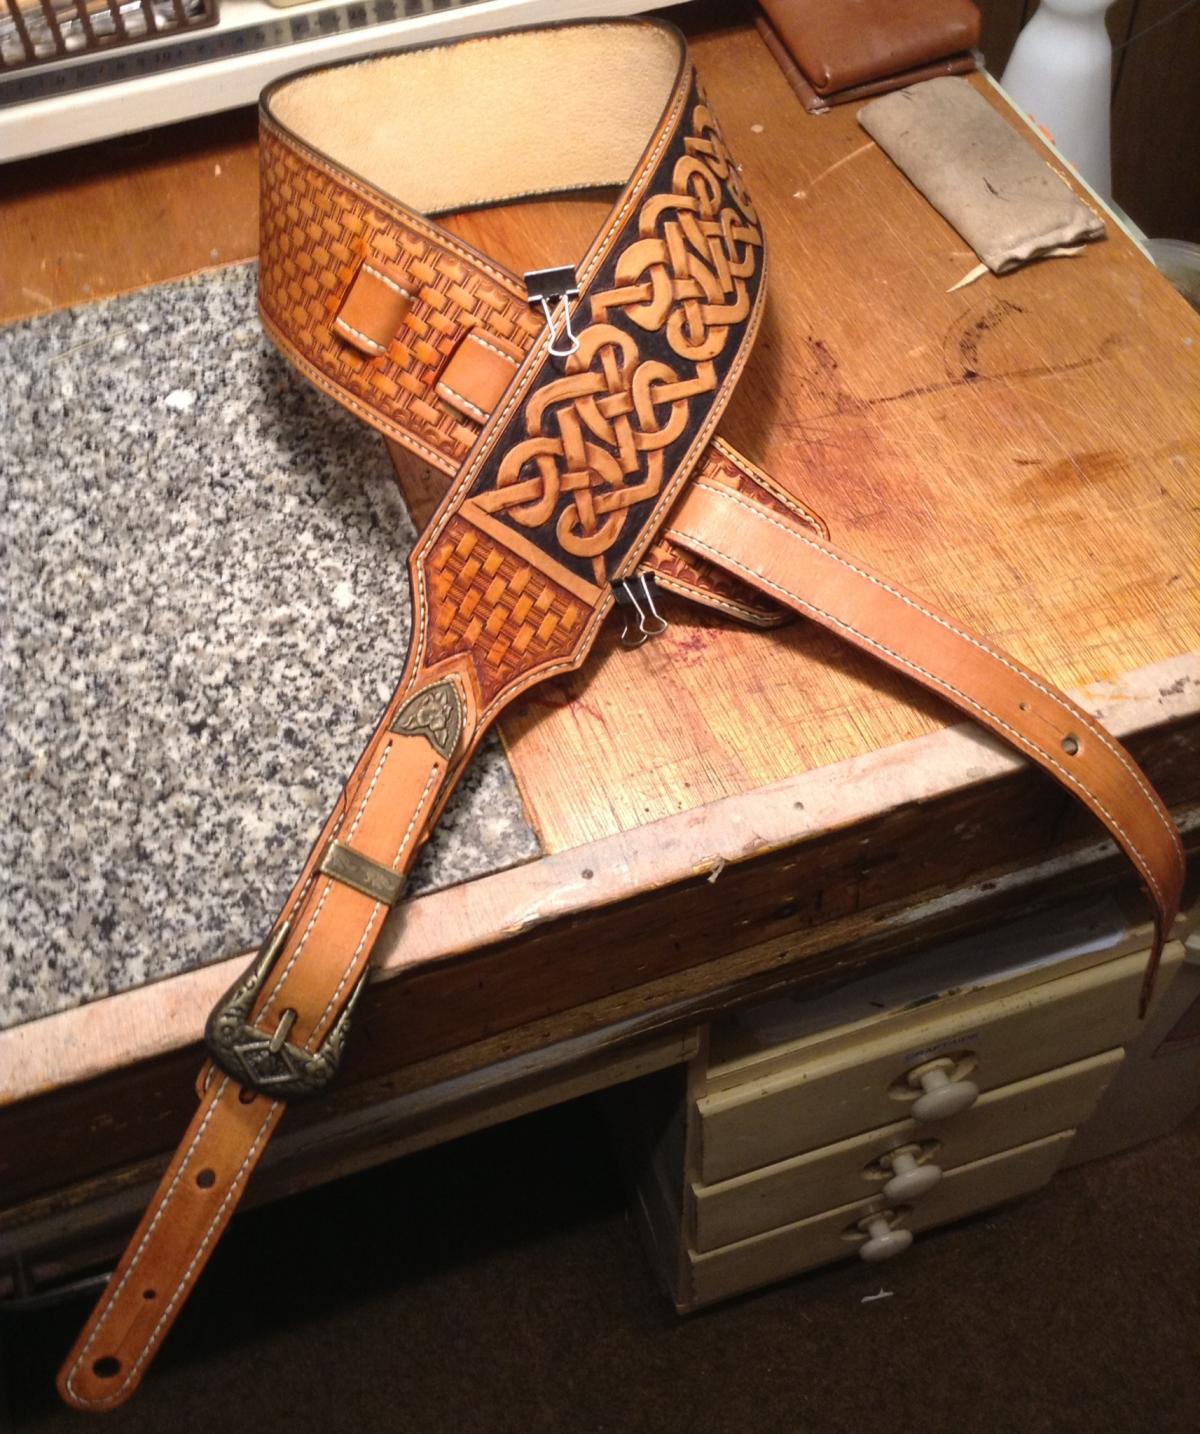
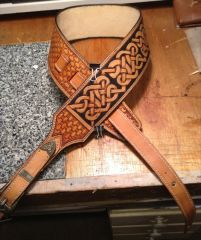
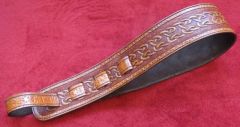
This strap is 3 inches wide and 58 inches long. The adjustment strap allows another 6 inches and the western buckle set a further 2 inches. The Celtic weave section has a black background with the antique dye over it. The strap is lined with a light colour pigskin and the edges are burnished and hand sewn with a white thread. -
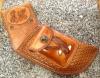
From the album: Latest items
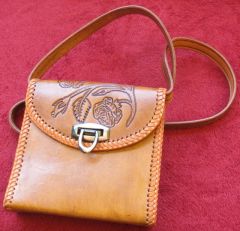
The Client wanted a small bag that would hold the essentials - phone, car keys, make-up, when out on the town. This bag was the result. It is 6 inches wide, 5 and a half inches tall and 1 and 3/4 inches deep. Lined with tan colour pigskin split suede and coloured using a tan antique. The edges are covered with the Double Cordovan braid. -
From the album: Latest items
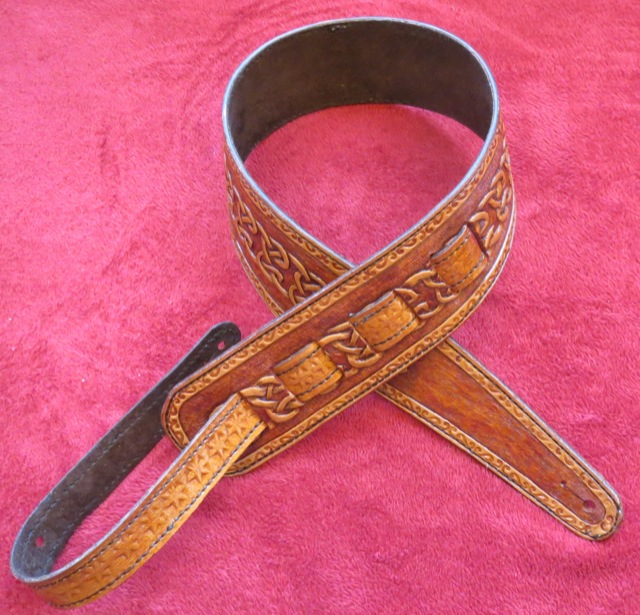
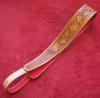
This guitar strap is 2.5 inches wide and 45 inches long. It can be adjusted out to 51 inches. The design is a Celtic weave.. The colour is a dark tan background with a "whisky" antique applied with a brush and the excess wiped off. The lining is a dark brown pigskin split suede. The edges are burnished and saddle stitched using black thread. -
From the album: Latest items
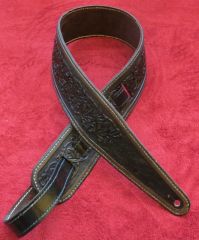
This guitar strap is 2.5 inches wide and 45 inches long. It can be adjusted out to 51 inches. The design is an interwoven scroll. The colour is black. The lining is a dark brown pigskin split suede. The edges are burnished and saddle stitched with white thread.. -
From the album: Latest items
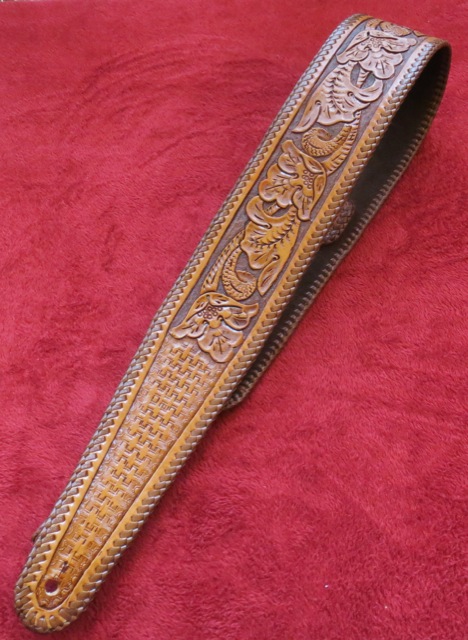
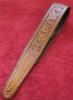
This guitar strap is 2.5 inches wide and 45 inches long. It can be adjusted out to 51 inches. The design is a western floral. The colour is a dark tan background with a "whisky" antique applied with a brush and the excess wiped off. The lining is a dark brown pigskin split suede. The edges are covered with the Double Cordovan braid using 3mm kangaroo thong. -
Hi Cyberthrasher, you hit the nail right on the head! I have only done a couple of belts and one guitar strap with the celtic design and I am now practicing my celtic work to correct the mistakes i made in this strap. Looking back at my tracing of the design I found that the problem started there and in my rush to get the strap completed and posted I just lost the plot. I note that your photo shows you with a guitar. From your personal experience could you advise which width is the most popular - 21/2 inches or 3 inches. Thanks for your comments, I appreciate the advice. regards, TapTapTap
-
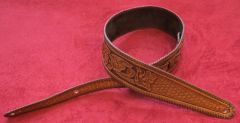
In my last post on guitar straps (a variety of guitar straps) I said I was working on a wide strap with basket weave and celtic weave. The strap is 3 inches wide and the overall length is 58 inches. It can be extended to 64 inches for the well built musician. The basket weave stamp is the Tandy Craftool X510. The strap is lined with pigskin suede and all edges are hand sewn. It has a "Ranger Buckle Set" fitted for the western look. The buckle set allows for another 2 inches of adjustment. As usual, comments are appreciated - Positive or negative. Regards, TapTapTap Myleatherwork.com

-
Sherkhan1962, I am a great believer in the theory that "Hand Crafted" or "Hand Made" means what it says. All work is done by hand NOT with a sewing machine! Perhaps if I was relying on my work to survive I would have a different attitude. I hope I haven't offended anybody that uses a machine but that is my opinion. Adjusting the length is a simple process depending on the particular pattern. The guitar strap you like is adjustable from 46 inches to 52 inches. You can see the adjustment strap on image number 3. This part can be made longer if required. When you sew by hand do you use a stitching pony to hold the workpiece? regards, TapTapTap
-
Thought I would try making some guitar straps. Hand stitched or braided edges. Lined with suede or pigskin. As the width is 2.5 inches I managed to use belt patterns for the decoration. The next one will be 3 inch wide with basket weave and celtic pattern. Would appreciate any comment - positive or negative.
-
Thank you folks for your comments. Jaymack, I agree with your comment about too much colour. The tips of the feathers were painted a darker brown by hand after the original coat of antique had dried. The white feathers were then painted in and when the quiver was dry it was given a coat of "Top Coat". The antique dye that i use on just about everything is called "Easy Toner Antique" and always gives that light colour. Both are made in Sydney by Birdsall's Leather and Crafts. The completed quiver was then given a light coat of Fiebings "Saddle Lac".
-
This is my latest Hip Quiver made for a customer in Germany. As usual, I appreciate any comments - positive or negative. Visit my site: myleatherwork.com
-
Seeking Japanese Bag/satchel Patterns/ideas
TapTapTap replied to ATLeather's topic in Patterns and Templates
Hi there ATLeather, I have good news and bad news (sorry about that). I have 4 leatherwork books (full size templates) for Japanese designs. The bad news is I am in Australia and have no way of getting them to you. I have had them since the 80's and use them quite often. The only words in english are printed on the back cover. This is the name and address of the Company. TAMON LEATHERCRAFT SEMINAR Co, Ltd. 16-10 IWAMOTOCHO 2-CHOME CHIYODA, TOKYO 101, JAPAN. Phone: 03(866)2111. Cable: TAMON AUDIO TOKYO. TLX: J26284 TAMON. As I said earlier, I have had them for some years however if you know anybody from Japan they would be able to steer you in the right direction. Regards, TapTapTap
-
Hi Veedub3, you have indeed stumbled across a technique that was very popular in the 60's and 70's. Tandy called it the "Nature Tanned" dyeing technique. They published a couple of books on the subject - "Ideas for Leather Belts you can make" 1973 and "Ideas for Leather Projects" 1974. These two books may be available from TLF where they are reprinting the old books and doodle pages. There were various techniques to get the "two-tone" effect such as spraying, using wool daubers or the lint free cloth wrapped around a wood block. The method I used at the time (1962) was to complete all stamping, clean up with oxalic acid, when dry apply background colour with block of wood wrapped in cloth and dipped in the dye (in the flower-power days either yellow or green). When dry, the top coat was applied with cloth wrapped around the block. More coats on the edges and faded into the centre. If you wanted a multi-coloured pattern you used Cova Dyes with a fine brush to highlight certain areas. This was a trip down memory lane - hope it helped in some way. regards, TapTapTap
-
First Craft Show....i Actually Went, Lol
TapTapTap replied to DoubleC's topic in All About Us and Off Topic
Cheryl, Seeing the photo of you sitting at the table at your first show brought back memories of the time I ventured into weekly markets (saturday and Sunday). On my first time out I made $7.50 on a small knife pouch ( this was in 1983). Did not cover the cost of the stall. I asked my friends what would be handy that they would buy from me. I ended up making what I called my "bread & butter items". They were mostly made from offcuts from my scrap bin. I used these "volume sellers" to pay for the stall while I carved wallets, key cases, etc. Demonstrating your skills is a crowd magnet - people browsing markets are interested in how you produce your stock. The "bread & butter" items that I (and my kids) made were key tags (1" X 21/2" with a key ring and words such as "Back Gate" - "Shed" - "Trailer Lock" - "Boat" - etc. The list is endless. We also used a 11/2" wad punch and made key rings with alphabet letters or the heavy Tandy stamps with animal and bird images on them. By keeping the price low they sold quickly which covered the cost of the stall. The trick is to find out what people want and meet the demand. I hope you stay with your new venture because the satisfaction of selling your hand made product makes it all worthwhile. Regards, TapTapTap