Art
-
Posts
4,138 -
Joined
-
Last visited
Content Type
Profiles
Forums
Events
Blogs
Gallery
Store
Everything posted by Art
-
You can get leather with pasted backs from a lot of Tanneries, but if you are in GB, try Baker or Sedgwick leathers. Art
-
Hi Bill, I have welded cast iron with good, bad, and ugly results. You need to tap the welds pretty hard with the peining end of a ball pein hammer, takes a lot of practice. Brazing might be more successful. I would make a claim through eBay and PayPal. I always use PayPal with eBay and the few times I have had problems, I let them fix it. They usually guarantee transactions and in my instances they came through, usually a full refund. They like to take some time to let things clear, but they do come through. They (both eBay and PayPal) get their vig on the other end, but as a buyer, it works. If you really want a Chase splitter, have Bruce Johnson keep an eye open for one in the condition you want, Bruce has probably forgot more about those than anyone else knows, and he seems to find them pretty regularly. Art
-
It is an old tank of a machine that I still see in trimmer (car upholstery) shops; they are very good machines. It falls into the class of medium weight leather machine. Putting a servo on it would be a good idea and even a servo with speed reduction would be better. Bob Kovar sells a "speed reduction servo" motor that would bolt right up. If you don't want to go that way, get the smallest v-pulley you can get for the shaft on your motor and a new belt. It will slow it down some, but you are still going to have to "ride the wheel" and "slip the clutch". Check that it is tight and replace anything with slop. Art
-
What Sewing Machine Do You Use?
Art replied to Sixer's topic in Gun Holsters, Rifle Slings and Knife Sheathes
2 Production Highlead 441 clones like the Artisan 4000P Campbell hook and awl machine for period work (linen thread) Cobra Class 4 (set up with brownish red thread) ASE No 9 occasionally for straight belt and strap work I could get by with fewer or even just one machine, however, I have 12 and counting production machines (for sewing, I have way more for other leatherworking). More machines reduces setup time and allows for a little less planning of workflow; you can sew things "out of order" and not have to worry about setups. Most shops can get by with one machine, but eventually buy the "other" size so they can have a large and a medium machine. Don't worry which brand machine you buy, the dealers on here sell good machines. Make sure it is a 441 clone so parts are not a problem. Just buy the longer arm machine, period. If you ever have to make the long or short decision and the price is a couple hundred different, go long unless you have a compelling reason to go short. They resell better and with leather, rolling that stuff up and trying to fit it in there on a big job can be a real pain (even with the long arm, but most definitely with the short arm). At least 50% or more of my machines are Cobra, the rest are Highlead, Pfaff, and older Campbell and Landis machines. The only short throat machines I have are the Campbell and two shoe machines, and that was the only way they made them. Art -
It is missing the leather washer on top. It is a pegging awl haft. Used for putting peg holes in shoe soles or shanks, also for attaching boot heels. It is struck with a hammer. Art
-
Some folks use the edge guide attachment to sew the desired amount from the edge. I use a screw crease to lay in a crease and then I sew in that. I use a Dixon screw crease usually, but for intricate or tight places like belt slots I use a Tandy screw crease or a Gomph that is smaller than the Tandy. For stitching inside the work, I use a tickler freehand or against a straight edge. You have to practice in the beginning to get used to making the machine go where you want it to go. Art
-
Knipper, I don't know what they use today, but whatever they used to use as a binder, my dog (long gone) loved it, so much so that I used to have to hide the bars of polishing compound up high where he couldn't get them. He finished a whole bar one time, well when I found him he had all but consumed a couple of inches of it, and I thought it would kill him. I called the vet and he told me to put him outside with a lot of water and see what happened, but he thought he would be ok but to keep an eye on him. Didn't phase him one bit, and I didn't check to see if he was all smooth and shiny inside. Art
-
Hi Knut, Yes, I understand I may have my nomenclature backwards, but that is what I was taught by someone I totally respect. I looked at the CSO website and they are also leaning toward your definition. Guess my old master wasn't always correct, too bad I can't call her up and ask her. Checking the literature and 19th century catalogs, it appears that the terms round and head knives meant entirely different things to different manufacturers, and scholars seem to go out of their way NOT to make a distinction, so in their deference, I will do the same. So from now on, it is the round/head knife. As to 410 stainless, it has carbon content more in line with structural steel and shouldn't be expected to harden appreciably even if dumped into a tub of cold superquench; there won't be any free carbides, they will all be absorbed. The only respectable property is that it will be easy to sharpen, albeit you'll be doing that pretty often. The primary kitchen use of 410 is in pots and pans. Bill Buchman used 440C a lot, but he also used a couple of Swedish variants. D2 is also a popular steel for knives, Dozier uses it a lot. CSO knives of current production use 1075. This is a higher carbon steel that can, with proper heat treatment be hardened into the upper 50s on the Rockwell C scale. This will make an acceptable knife at a good price point. A company as big and as old as CSO will have metallurgists on staff, or contract firms who do, for engineering services. I am thinking that maybe Tandy didn't do that, they wanted stainless and stainless is stainless, right? Some ask why AS would a allow his name to be on something like this. I don't think he had a whole lot to do with it. Tandy uses AS to maximum benefit. The consumer figures AS on the knives, AS on the books, they are certified by Al. Not so much I think; he passed long ago. Older CSO knives (turn of the century, 1900-1920 or before) were probably of a higher carbon tool steel, like an O-1 or so, there were few distinctions, tool steel, structural steel, etc., etc. You could (and still can) order tool steels off the shelf, and drop forging was the manufacturing method of choice in those days. If it hasn't been mistreated, you will get a better old knife or new custom knife in this day and age. The new steels from Crucible are absolutely state of the art, and some were designed with custom knives (and semi customs in the last 20 years) in mind. Usually, custom knifemakers are the first with new steel, then the knife manufacturers get on board about 5 to 10 years later. With head/round knives, you are only going to get the good stuff from custom makers, there just isn't the volume for one of the big companies to get on board, for a tactical or pocket knife yes, but for head/round or skiving knives, not so much. The availability of product in roll form and sheet form (usually from rolls) had heightened the availability of computerized water cutting of the complex steels. This allows the custom maker to go into "semi" production and keep the costs, and price of finished product reasonable. My hat is off to the custom and semi-custom makers that produce knives for the leather/shoe trades and hobbyists. There just isn't real money in it anymore (as the leather and shoe industries are gone) and it is more for love than money that they keep doing it. Unfortunately, there is more to be made on a drop point knife, a "tactical" urban combat knife, or a simple but beautifully executed folder than a head/round knife. As beautiful or ugly as they are (do I mean makers or knives here?), every one of these makers' leather knives are users. Art
-
The Press-n-Snap can be attached to the bench with a bench mounting accessory. Art
-
The Press-n-Snap and the Snapmaster are made for the canvas/sail/awning trade as they can set ligne 24 (Durable Dot) fasteners and grommets. You set so many snaps in that industry that you load the machine up for whatever you are doing and that's that. That is why they also sell them bare bones as you buy one with dies and one without and make two setters out of them, one for each side. An active shop or loft is going to have 10 of these things for all the different fasteners they set. They will also have 4 or more Snapmasters for the Common Sense and Lift the Dot fasteners. You can't imagine how many of those things you set in a year, way over the 100K mark. For the average leatherworker (or even hobbyist), one of the Little Wonder presses from Weaver would be better as you can set anything you can buy dies for, and Weaver sells a whole lot of dies. It comes with gear for rivets, and you can buy dies for the snaps you need. Art
-
There is a little table here that covers thread and appropriate needle sizes. As to needle point, a round point doesn't cut through leather properly, a chisel point or a D point would be better. Your needle and thread sizes are appropriate, some like the 346 thread better, for which you would use a 230 (Singer 26) needle. Art
-
When I first started leatherwork a few (?) years ago, I was a computer pro, a gunsmith, and a machinist. I figured a #3 edger was a standard of the leather industry and it really didn't matter who made it. Oh how wrong I was. My Tandy #3 was taking off huge amounts from 6-7oz leather. I learned a lot in my first years on what NOT to do. I took a week and visited a leather pro in Coty, Wyoming and learned or is it relearned so much that I took another week a couple of years later. She had a bunch of tools, but probably not a quarter of what I have now. I got to play with a lot of different edgers, and found that they all cut differently and surprisingly (remember strict technical background here), the numbers didn't mean anything remotely resembling a system, even within the same maker. What have I learned? Start with the smallest edger you have, probably a zero or #1. If you are buying new, start with a #1, you will be suprised that it will often do the job, or you might have to go to a #2. You need to learn what edging is before you get enough knowledge to know you need more. So for the average leatherworker, a #0, #1, and #2 by the same maker might do you pretty well, if you are a little tight on dollars, get just the #1 and buy more if needed. If you work on very thin leather, like 2oz, you can't really use a standard edger of any type, you need one with very narrow toes, not turned up toes, but very narrow, look at Ron's Montana edgers to see what I mean. Modern edgers by custom makers are, in my opinion, superior to the antique Osborne and Gomph edgers in a lot of ways, but usually because the older edgers have been resharpened and sometimes modified, and most of the older ones are designed for BIG harness, where horses were pulling huge wagons full of some commodity or another. That is why sizing is non-standard. Even with the custom makers though, you can't expect consistency between makers only within the same maker. Art
-
As well you should be, the knife at the linked Tandy website is a round knife. Then they also go and call it a head knife. Now the AS book on the page you have posted: The first knife (on the left) is actually a Head knife, the tips come back to the bolster or ferrule. The second knife (in the center) is a round knife, note the tips don't come anywhere near the ferrule. The third knife (on the right) is a head knife and is properly identified. Sometimes (often) head knives have semi-circular cutouts on the back unsharpened edge, whereas round knives are often straight across on those edges or have a slight angle. The small knife below the second and third knives has been modified through the sharpening process; I have no idea what it started out as. The round knife is used for intricate cutting and the head knife for straighter or long curved cuts. Head knives are generally bigger than round knives, but I have seen quite a few remarkable exceptions to that rule. Art
-
This Tandy knife is a round knife, not a head knife. Blade of round knife is usually a circle if extended. Blade of head knife is a oval if extended. Stainless steel can be anything with a chromium content over 12%. I would expect carbon over .85% for the production of cutting carbides during quench. For good blade production, I would expect martensitic steel (it should attract a magnet). This is all just technical crap; it should be made of good steel acceptable to the function and should be acceptably hard, i.e. RC-58 or better. I think they should declare the steel if they have nothing to hide. The problem with mass produced knives is that they make them to a price point, they actually shop for how inexpensive a knife they can have made, that looks good and will cut something. They don't go to the manufacturer and ask how much to make a knife with certain specifications or criteria. Honestly, I would stick to a box cutter with a sharpened, stropped blade and save up until I could afford something better in an older knife or one of the new hi-tech customs. We've went over and over this and there is advice all over the board. Good utility knife handle -- Hardware store or Amazon Irwin Blue Blade Bi-metal utility knife blades -- Amazon A good strop with micro fine honing compound -- Tutorial in How to forum The above will cost a little more than that knife from Tandy, but will probably serve pretty well. Art
-
I can't remember the model number, but some of the old Singer chain stitch machines had rotating heads. Mainly used for chainstitching names on shirts. Art
-
You should probably get both although I get along fine with just a post. The 52w22 should be classified along with the 51s as a "real" 52 is a 1 to 10 needle flat bed chain stitch machine. I am thinking $500 is a little high unless the machine is set up, tight, on a table, and has a slow motor like a servo. When they say medium to heavy leather, they really mean light to medium chrome tan, not heavy veg tanned leather like skirting. Max ix probably 3/8 chrome tan. Glue your seams before sewing, the roller foot isn't the greatest for multiple layers if not glued, 2 layers ok not 3 or 4 unglued. Art
-
I need to know how long
Art replied to PENSKE's topic in Dyes, Antiques, Stains, Glues, Waxes, Finishes and Conditioners.
I don't know if I would want to be giving the birds that big a target for that long. It can be a day, or as long as a week, it just depends: Where you are, Season, Bright Sun, or not so, Dry or Moist climate, If the Moon is in the Seventh House, etc. Playing Neil Diamond records during the process can mellow the color. Art -
The Snapmaster sets (means you can buy dies for) a lot of different closure systems. In sail and canvas work, this is handy, but if you only do snaps, it is just more expensive. I have two press-n-snaps, one fitted for posts and one for caps, they still cost less than one Snapmaster, I know, I have one Snapmaster too for lift-the-dots and common-sense fittings we used a lot on sailboats. Whatever you use, if you work on boats, tie a line to the tool and yourself, so when it goes overboard you can haul it out. They are darned near impossible to find on the bottom. Sailrite has about the highest price I have seen, whoops, --Edited-- their prices are better than they used to be, actually reasonable now at $118. Pretty good price here. Art
-
Some Sort Of Edge Finish For Horween Shell Cordovan?
Art replied to onsh's topic in How Do I Do That?
Most times, shell cordovan is used to make shoes. In shoes of that quality, you seldom if ever leave an exposed edge. The edges are sewn to the insole where the outsole will hide them completely, or they are skived and lap sewn where again the edge will be sewn and practically invisible. I don't know what you are making, but could I suggest skiving the edge, then rolling it over the liner as in shoes, where your foot enters the shoe. This would also be a good method for a wallet or folio or album etc. Art -
Issues Selling/shipping To Canada?
Art replied to evandailey's topic in Gun Holsters, Rifle Slings and Knife Sheathes
Just a note about shipping and delivery conformation, both overseas or here in the US. Just because the Post Office SAYS the delivery is confirmed, doesn't necessarily mean it was delivered to the right address/person. I recently had a knife sent to me and was getting a little worried about the delay in receiving it. Well, I hadn't paid for it in advance, so no worry, I would get it when I got it. I get an irate call from the vendor wanting his money, and he says he has a delivery conformation from the Post Office, and indeed he did; problem was, I didn't have the knife. Now this vendor, wants ME to go to the Post Office and see what happened. This has happened to me before, and basically the Post Office wants to hear from the PERSON WHO SHIPPED THE PACKAGE. I told him this and got a very POed reply and a hangup. Ok, I wasn't out any money. The knife did arrive about a week after the Post Office confirmed they delivered it, and I made payment to the vendor. The moral of the above story is that the Postal Services do mess up, often quite badly, by delivering something that is lost or destroyed in a clear plastic bag (containing just an envelope or box or pieces picked from a sorting machine) or even worse delivered to the wrong person. It is not the recipient's problem, but the senders, and if you do enough shipping, it WILL happen. Put the recipient's email into the delivery confirmation system, then you and he will be the first ones to know if something was miss-delivered. Don't EVER tell the recipient that he paid for the postage, so it is his problem (exact words). Art -
Hi Bob, I have many of the old "first" version of that tool that I have set to different depths to do multiple line parallel borders. I recently bought a few more of them and found the quality control to be abyssimal. The holes were drilled every which way but usable. I have noticed this kind of perfomance in the last few years. Tandy would take them back, but a trip to a Tandy is 2 hours each way and shipping is as much as the tools cost. If my experience is any indication, there is every chance you might have a tool that was manufactured incorrectly. When that tool is well made, it is extremely easy to use. Art
-
Well, the horsehide is pretty hard and even at 8oz., you don't have to worry about rolling the edge. If you used 8oz. cowhide, unjacked, you can actually get a lot of give when pressing down. If I were to use cow, I would either use something hard jacked like a sole bend, or 3-4oz so there is not much flesh to push into. Horse butt is reasonably priced and hard, and I always have a lot of it around, so that is a good reason. It tends to fall off in thickness as you go down the flanks (the ends) so you will get only 2 or so strops my size out of one, but with 2 inch wide strops, you could get a few more. They compare favorably to the conveyor belt strops. I have not really done much testing to see if one type of strop is better than another. Anything is better than nothing. Art
-
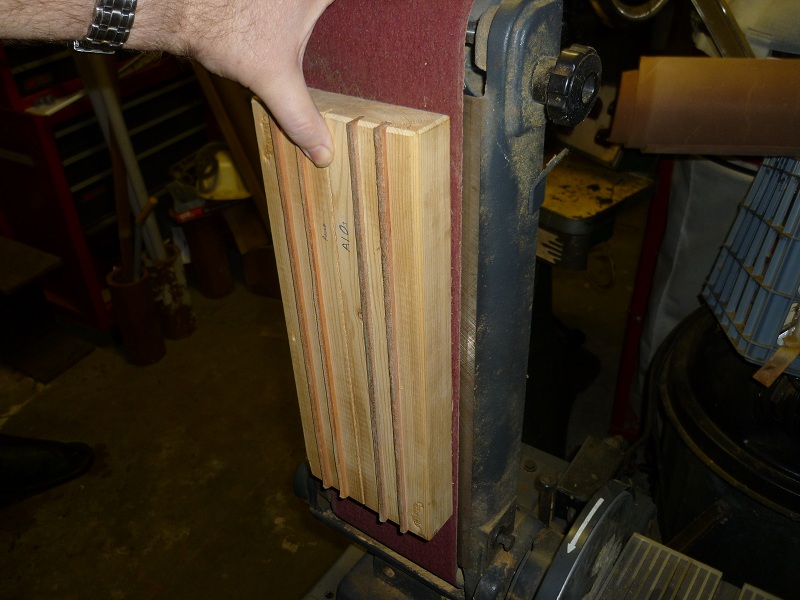
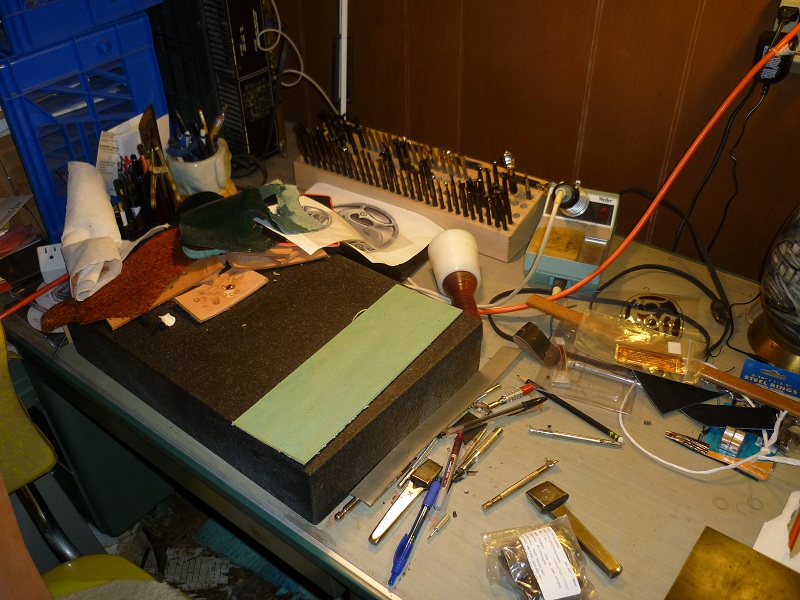
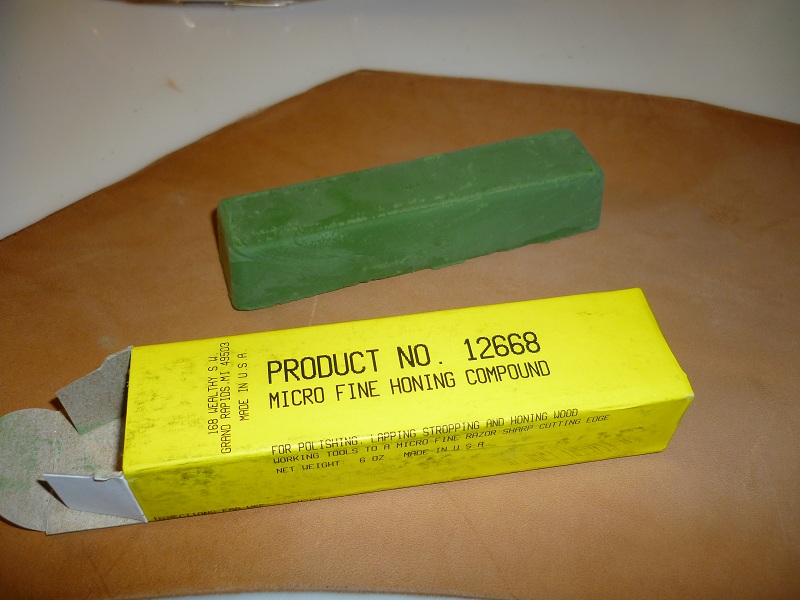
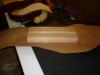
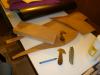
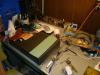
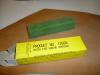
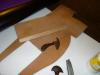
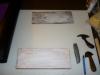
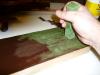
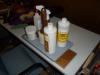
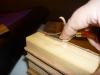
Making a strop seems simple, but how many times have we seen those without one or who go any buy one. Here is how to make one that is plenty big enough for the biggest of head knives. Please forgive the pictures, but this is a one man show. If all you need is a strop for swivel knives, they are pretty easy to make. Put stropping compound on anything fairly substantial and hard (even a business card will do) and set it on a hard surface. The green thing is a strop made out of conveyor belting, you can get it from Weaver or Bob Beard. This is a horse butt, it is hard jacked between 7 and 9 oz., this one is 8oz. These are available from Springfield Leather, Sheridan Outfitters, RJF, Maverick, and many others, make sure it is hard jacked if you can. This cut is taken right ahead of where the shell cordovan ovals come off. While not absolutely necessary, it is good to get your strop up off the table or bench surface so you can get the proper angle of attack. I chose a 5x14 piece of 2x pine that is a Weaver edger strop on one side and now this new strop for other knives on the opposite. Make sure that the edges are NOT routed as sometimes you will need to use all the way out to the edge. Sand only if you need it, it is good to have it flat, but not baby's butt smooth as you need some tooth for the glue. I am using an 80 grit ceramic belt, but a 60 or even a 36 would work just fine. I also scored up the surface in a hatch pattern with a utility knife after sanding. After cutting out the strop, it fits pretty ok on the board. You can cut the strop out a little oversize and trim it later. I used a Leather Wrangler's Head knife by Paul Zalesak to cut it out, but my trusty Buchman was nearby. The Zalesak knife preformed very well in the hard jacked horsehide, it was easier to cut than some others I have tried. I could have gotten by with a Utility knife (well sharpened and stropped), but it is a little easier for me to see where I am going with the head knife. I used PVA glue (Fiebing's Tanners Bond) on both pieces, let it dry for at least 10 minutes to even 15 minutes before sticking together, if you don't it will be like your first time on ice skates as it is like an oil bearing till it gets tacky. A couple of hours pressing, but I let it go overnight at about 70 degrees. I am using a French Edger to trim up the strop that is a little oversize for the board. Any good saddle type oil, even neatsfoot or in a pinch mineral oil can be used to oil the strop and make it easier to adhere the stropping compound. I used #1 saddle oil with fungicides from Bee Natural. This is a microfine compound I get from toolsforwoodworking.com, works for me, bought two (just because of shipping) and have never used the second one. While the oil is still wet, just wipe off and pooling excess and get to applying the compound. Just rub it all over. and when you get little bits rolling up you can stop and rub them in with your fingers or a knife blade (what else?). Let it dry up for a while and then strop, strop, strop. You can add a little compound when needed. This work took about an hour and twenty minutes with fooling around with the camera and all, and like I said I let the glue dry overnight. Art


-
You have to call Wickett & Craig and talk to them. Tell them exactly what you are looking for. When I first started (long ago) I used the old Tandy, but quickly switched to Hermann Oak even at ten side minimum. Took me a while to find Wickett & Craig within driving distance. Except for Baker and Rendenbach, W&C have served me well. When it comes to chrome tan, I buy from dozens. Wickett & Craig 1-800-Tannery, talk to Glenn, or Linda. Art
-
I have been to a few packing plants and to a US tannery. From what I can see, there is just no way to tell. At the packing plant, the animals go in and meat, offal, and hides come out. At the tannery, the hides may be sorted a very little by weight and then they are in line for tanning. They do some experimenting with longer tan times etc, and maybe this is the only place to get some data, but generally not. There is little chance of any correlation to hides at the packer so there any trail is lost. Meat is their business, and I am sure their buyers are getting data about quality and quantity, but they could care less about the hide. W&C uses a lot of hides from their owner, a large Canadian packer, generally you get cleaner hides from Canada, but they sometimes need to buy elsewhere. I just think there isn't enough data. Art