


WinterBear
-
Posts
900 -
Joined
-
Last visited
Content Type
Profiles
Forums
Events
Blogs
Gallery
Store
Everything posted by WinterBear
-
You have the stitching book, so I would recommend the Stohlman "Art of Making Cases-Vol. 1" which is a great partner book to the stitching book. Many things in Vol 1 reference the Stitching book. Volumes 2 and 3 expand on Volume 1, and deal with handles and more elaborate things. I have all three Volumes and the Stitching book and find them invaluable, but Vol. 1 gets the most use.
-
I'd suggest myself, but all of my state is pretty much rural, and shipping anything even out of state is iffy. I and several other people have been having a problem with theft (has to be a postal employee, and they've even admitted the thefts likely occurred there, but fat chance on getting anywhere) and excessive damage for anything that goes through one of the sort-centers in Denver. All I can do insure and hope for the best, and then hope I actually get somewhere with a claim. They don't even sort most of our mail in the state--most of it goes to Denver or Salt Lake, then gets shipped back for anything that is supposed to be delivered in-state. It takes a week sometimes to get a letter to Casper, which isn't all that far away. If there is a bad snowstorm, outgoing mail can take a long time to reach a sort-center, and we can expect our first storms any day now (usually already have had one by now, kinda off that we haven't).
-
Hey there. I am working on similar for my Troop. I won't be able to get to pictures or sketches until next week at the earliest (Eagle project this weekend and I'm in the middle of packing up house for a move), but the Troop has some old axe sheaths (hopefully they didn't get tossed this past week when they cleaned the storeroom). I am hoping to be able to use those old sheaths to build new ones, with a few improvements to hopefully avoid what caused the originals to fail in the first place, based on what I have learned here. (I found I shouldn't using rivets to keep the blade from damaging the stitching--I should use a nice thick welt instead! That way the blade doesn't get dulled or damaged by metal-to-edge content. Not to mention on the old sheaths that failed, most of them tore and/or rotted around the rivets. Some of the axes had pitting from contact with the rivets too.) This guy had a pretty good idea for one sheath, the second axe with the stud closure: http://leatherworker.net/forum/index.php?showtopic=24159&view=findpost&p=204808. I might replace the stud with a heavy duty snap and reinforced attachments, as teen boys tend to be rougher than norm on the gear, and I can see the hole wearing through. The first one might also work with a buckle or snap arrangement, for the same reason. I'd like to make similar to this for the hatchets: http://leatherworker.net/forum/index.php?showtopic=33688&st=0&p=208874&hl=axe%20sheath&fromsearch=1entry208874, but since the blade angle is a little different at the cutting face, I'd make it more of a pocket for the cutting edge. If you notice on that example, the bottom edge is not sewn. I think I'd like to have at least a stitch or two at the bottom edge, with the sheath slightly over-sized to accommodate. The strap will hold the cover on and in place. Rob Bennett, RMB Custom Leather on this site, has a great sheath for WWII axes on his website (http://www.allaboutpocketknives.com/knife_store/item799-26319.html). It's for a crash axe, so the sheath is short and has the bit for the spike. But the part I like is the double stitching. Lastly, there is a tree-saw sheath here: http://leatherworker.net/forum/index.php?showtopic=34497&st=0&p=213834&hl=+axe%20+sheath&fromsearch=1entry213834
-
You may be right about them being rare. I'm not having any luck finding them, not even the bus. Which is odd, because earlier this summer I was able to find several. I'll keep my eyes peeled.
-
The one third from the right looks something like what was labeled as a bookbinder's tool in a museum I've been to. It was apparently used to add decoration in gold foil along the spine and on the covers. According to the label I saw, the tool was heated and used to sort of press/quasi-burn/stamp/bind the foil to the leather--with some sort of glue.
-

Bringing Floral Carving To "life"
WinterBear replied to figthnbullrider's topic in How Do I Do That?
What I've learned about background dying from my mucking about with watercolor paint, fabric dye, leather dye, and various other things: Until you are used to your dye and how it spreads/bleeds/absorbs, start by using a small pointed paintbrush. Never let dye or paint touch the ferule (the metal part)--Once it wicks up under there, it bleeds out at the worst possible moment. Clean your brushes well, especially between colors. When working with dye, I use a separate brush for each color family, as the dye can cling to bristles and contaminate the next color. Touch the loaded brush to a scrap of leather before every stroke (it helps bleed off globs), and if you use a piece of the same leather you made your project from, you'll get a good idea of what it'll look like (keeping in mind that dye usually lightens when it dries). Always touch the brush down in the center of a large area, and stroke into tight areas and towards edges. If you touch down in a narrow spot or near an edge, you run a good change of dye bleeding into areas it shouldn't. Not only will the dye color your hide, your fingers can easily transfer dye to something else. Wear gloves (Nitrile seem to work pretty well), and wipe or wash any dye off of the surface of the gloves as you work. Clean any spatter off of your work area so your piece doesn't pick up color in the wrong spot. Don't dye unless you have a full spectrum light or daylight. It is amazing how much a color looks different under the wrong light--I wound up with a freakish purple carousel horse some years ago, instead of a buckskin. Penetrating dyes are a lot like translucent watercolor paint. You can always come back and make it darker and more intense with another coat. You can't make it lighter again. Add color in layers to build up what you want. Intense colors (sometimes dark colors) will tend to come forward, as will those with a warm tone. Less intense colors appear to recede, as do cool tones. Put the dye into smaller containers. I now eye-dropper dye into a white plastic painter's pallet, like what watercolor artists use. Less to spill or spatter and get all over when the cat sneaks in and hops on the desk to see what you're doing, a fly goes skinny dipping followed by a hike across the piece, or the dog barrels under the desk because somebody let him into the garage. Plus dye is the pits to get off of a cat. -
E-Bay has one of them right now. Texas Ranger Also, VW logo stamp on Ebay: Logo
-
Troy called it an extended pineapple, but I would ask him and the other knotters and braiders. Maybe ask them how they finish and wrap the butt of a whip? Or the decorative knots they put on their knifes, fids, marlin spikes, and walking sticks? I'm afraid I have no idea how to make a pineapple, and the instructions are way over my head still. All I can manage is simple Turk's heads, and haven't figured out how to extend them. The pineapples are a whole 'nother layer of complexity I haven't even begun to attempt yet.
-
What about something similar to the sheath in this thread? http://leatherworker.net/forum/index.php?showtopic=33393&view=findpost&p=207387 I think you might also pick the user Knothead's (Brian's) brains. He does a lot of fid work and covers handles with various braids, many of which are round-ends.
-
No, not the wrong stuff, exactly, but stuff that is meant to be rubbed or wiped onto the tooling after the leather is sealed in whole or in part. Use the search bar up top with the words Hi-lite and Antiquing, or Hi-lite and Antique, or just hi-lite, and you'll get some idea of how to use that stuff. Look in the sub-forum for Dyes and Finishes--(http://leatherworker.net/forum/index.php?showforum=18)-- there are a lot of great threads in there about which to use when, in what order, what not to do, and comparisons of the different types of dyes and methods. This thread has a video of how the antiquing gel or paste is generally used: http://leatherworker.net/forum/index.php?showtopic=33980&st=0&p=210550&hl=+hi-lite%20+antiquing&fromsearch=1entry210550 Pay close attention to where he says that he's put neatsfoot oil and Neat-Lac on the piece before he started rubbing the paste on there. If you don't all of the leather will dye dark, and the same color. He also seals the antique on there with Tan-Kote and Neat-Lac. You can also dye your project, seal it, antique it, and seal again to keep the antique on. I haven't used hi-lite, but expect its purpose is similar--it's meant to get down in the cuts and tooling marks and darken them.
-
By the "dye in the starter pack", what is the stuff exactly? Some of those starter kits come with one or more of the following: antiquing gel, all-in-one, hi-lite, and those just labeled "dye". I have quite a few of the Eco-Flo dyes (not the hi-lites, all-in-one, or gel), and they are all very liquid, much like Rit fabric dye, and mix easily with water. As far as the tips with the undercuts, the nice folks here tell me to not join cuts at narrow tips as they'll lift up, so instead, I stop just short of cutting all the way to the point. There are some really great figure carvers and dyers on here, and they'll be able to offer you some better advice than I. I expect they'll be along shortly. With more practice with your swivel knife and tooling under your belt, you'll really knock the socks off of people with this design. It certainly is pretty dang good for a first try! The design itself is great. I do have one structural concern with it though. That wing feather that extends past anything else will be prone to a lot of wear and will probably get mangled. It isn't wide enough by itself to support more than a very-light-to-light amount of wear. It'd be ok for something that was going to get very little abuse and direct wear, such as a barrette or hair ornament, or as part of a mask, but as a spur strap, if that feather gets rubbed with a jean leg or clipped with a boot, it's going to get mauled and maybe torn off.
-
Ok, the joke among painters is, if it doesn't move paint it, and if it does move, drip paint on it! After seeing all of the fantastic stuff here, and doing some thinking of my own, is the joke among leatherworkers similar? If it doesn't move, make a case for it, and if it does move, make a saddle/collar/belt for it?
-
Moscow Hide and Fur, Etsy sellers, Chichester Inc., and check with any nearby taxidermists/game meat processors. Also, I don't know what the laws are in your state, but in mine, If I wish to buy whole or mostly whole antler, they must be a shed (button is intact). If the antler is attached to any skull portion or been sawn off, it has to have an interstate game tag (runs about $8 in most states, I think). Once made into an object (mount, decoration, furniture, carvings, etc.) the interstate tag no longer has to be attached, but should be kept by the buyer (me), along with sales receipts from both the seller of the raw antler and the end buyer, in case a question ever arises as to where the antler came from. No question about it, I prefer to buy sheds with intact buttons, or antler pieces (which do not require game tags, just a receipt).
-
Edvin wants it to lie perfectly flat as it is meant for a lid--the front flap? See how the piece is cupped or bowed, especially in the corner? He doesn't want that.
-
Hi! Good looking seat. I can offer a spot of advice on the tri-weave. It it's not a real quality stamp, the three sides aren't 100% matched. Put a spot of enamel on one of the corners near the shaft where you can see it when stamping, and make that side always point in the same direction as you go along.
-
Luckily, it wasn't a customer, but a friend. The chimes were her birthday present that I had shipped a little early to surprise her. After the day she had, a cow pat was the least of the problems. She was thrilled that she go an unexpected present and after all that happened to it, it wasn't damaged. Friends tend to be more forgiving than customers though, by a long shot!
-
I'm not sure, but I think oxalic acid is sold as "Wood Bleach" at hardware and home improvement stores, it is usually near the area where floor finishes and spackling is. However, peroxide compounds and chlorine compounds can also be marketed as wood bleach, so check the label.
-
I tend to go overboard when wrapping things for shipping. It could just be I'm jinxed when it comes to having ridiculous things happen to my packages though. What I would do, is after wrapping it in something that will protect theitem from picking up something from the wrapping materials (white tissue wrapping paper, unprinted brown craft paper are all probably good--never newspaper or something colored directly on your product--the ink rubs off onto everything during shipping), I'd grab a few plastic grocery sacks and wrap them around it and tape them down. Then, put it inside of a box that is just barely large enough, then use peanuts or air baggies to wedge it in there nice. Then tape the box up well. I always add a card at this point -- basically a copy of the mailing label that will be on the outside of the second box--and tape that on the box. Then I get a box that is at least 2" bigger all the way around, put peanuts or airbags to half-full, then cover with newspapers so it forms a "floor", and put the smaller box in and secure it with straps of tape in the the middle of the bigger box, Sometimes another layer of paper, then finish padding with peanuts and bags, and seal all the edges of the box with tape. The two-box method really protects against drops and having other items fall and crush it during transit. The securing of the smaller box in the middle of the larger, making a newspaper floor, and strapping the inner box there keeps the smaller box from shifting from the middle and jiggling its way to the outside of the box where it won't be well protected. The label on the inner box will insure my package gets delivered even if the outer box is destroyed (and the padding in the inner box will protect it to some degree while it continues its journey). The plastic on the inside of the inner box protects against moisture if the shipper spills a coffee or large glass of sticky soda on the box, of the shipper delivers it in the rain, and/or/leaves it on the porch of someone's house in the rain. It's a pain, but by doing this, I have successfully shipped boxes of fragile to fairly fragile items that at the end-point have been ripped open by a bored dog (inner package protected the product), been left in the rain, left by a mailbox and buried by a plow, been placed in a 4" deep mud puddle, been sat on, had coffee and soda spilled on them, been dropped, been mangled, been completely separated from the outer box, clawed by cats, kicked around the yard by the neighbor's kids, and so on. The most absurd thing that happened is when the shipper left the package by the gate at a rural location, and the cattle being grazed in the area on a grazing lease decided they liked the taste of it and ate the cardboard boxes (inner and outer), and all the packing peanuts... they weren't interested in the plastic bags, so the glass wind chimes were safe--and protected from the cow pat the buyer found on them when she got home from town. (ew).
-
By all means, charge extra for expediting. If you have employees, you have to be paying them to do the work you normally do so you can work on this last-minute thing, or you have to be doing what they normally do so they can work on the last-minute project. If you don't have employees, you have to charge them for the extra overhead and for the inconvenience and extra hassles that come of having your non-work portion of your day become work. But, as others said, make sure you charge enough that it doesn't get to be a regular habit, or to where most of your work is "priority". Put a limit on the number of "priority" orders you're willing to accept. It can easily spiral out of control and come back to bite you. I came across this a lot when I still worked in retail. At one job, the policy that any late or last-minute order was to be accepted, no exceptions. It was a terrible policy. We wound up with a lot more priority orders than regular orders, and the regular orders began to suffer, especially at peak periods. We obtained more sales overall, yes, but it was outweighed by the amount that had to be paid in overtime to finish those extra orders, and loss of the goodwill of the customers who had contacted us in plenty of time to get their product and found out that someone else's order was given priority over theirs. It made our regular, conscientious customers feel pretty unimportant, and when somebody feels like that, they tend to let their wallets do the talking and go somewhere else. And it seems the people who often were the worst about giving us last minute orders were often the ones we didn't really want to have as a customer anyway--always complaining about the price, finding fault with everything, always trying to finagle the price down, rude to the employees and other customers, and constantly returning product for "just one thing" more to be done. However, sometimes you can accept a last-minute order and waive that priority fee to help a good or new customer out of a jam without too much of an imposition on yourself or your shop, and that person will greatly appreciate it. Just don't do it too often, or you'll lose your shirt or your sanity in the end.
-
Texas Rattle Snake Skins?
WinterBear replied to lonestar tactical's topic in Exotics, Reptiles, Furs and others
I think the smaller guys might be selling to the larger? Anyway, good luck finding a source. -
Thanks Art. I went and mixed up piping and binding too. How embarrassing. That'll teach me to comment when I'm tired. Edvin, look online for "quilt binding" and "quilt piping", and you'll see examples of pinking to go around curves and how to handle sharp corners. It'll all be for fabric, but you'd be able to adjust for leather as needed. Binding is usually a flat strip that wraps around the raw edges and is attached front and back to the project, usually tying two or more layers together. Piping is usually a flat strip that is wrapped around a cord, with the cord sewn in place along the middle of the lenghth. Piping is sewn with the flat side between layers and the covered cord extends from the project edges as a round edge. Since you are working with leather, fraying isn't a problem on the front side, and the piping would cover part of the leather edge. On the back side, where your silk would be, the silk would need to be turned under, and the hem placed against the piping. The piping would protect the stitching to some degree, but the silk would not be secured between layers of leather.
-
If you need me to, I'll see if I can't get off work in time to get across town to the local one here and get the numbers off the tools. (I just need people not to send me work or call me 10 minutes before I'm supposed to leave!)
-
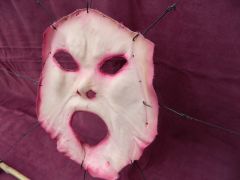 Creepy! I could scare half the kids in the neighborhood if I put that in the window for Halloween. The other half would be trying to pinch it.
 -
Texas Rattle Snake Skins?
WinterBear replied to lonestar tactical's topic in Exotics, Reptiles, Furs and others
I haven't purchased any rattlesnake, so I don't know a thing about what I should be looking for as far as permits, quality, pricing, etc. Depending on what your state's game laws are regarding wildlife imports from other states--California and Oregon forbid the sale of rattlesnake, for instance.. Here's a Texas source: http://www.chichesterinc.com/RattlesnakeSkins.htm Do they have to be Texas hides? You might try contacting Moscow Hide and Fur. I have heard really good things about Moscow Hide and Fur on LW about them: http://hideandfur.com/inventory/5540.html These guys also have skins--have no clue how reliable they are or if their product is good. http://www.alabamarattlesnakes.com/index.html http://www.clawantlerhide.com/no-frames/fursskins.htm http://genuineostrichhides.com/5-traditional-rattle-snake-strip5.html -
They don't have a link for them yet, but you should be able to email or call them. If your nearest store doesn't have them, contact the Cheyenne store (307-632-1761 or cheyenne@tandyleather.com) and ask them. You might also ask ClayB (here in this thread), as I believe he said something in another thread about his store having them too.