


WinterBear
-
Posts
900 -
Joined
-
Last visited
Content Type
Profiles
Forums
Events
Blogs
Gallery
Store
Everything posted by WinterBear
-
Ok, here are the pictures. The first shows the two, with a quarter between so you can get some idea of the size of the whole leg, as well as the shin scales. I've poke a petaler tool through the slit in the black so you can see where that lies. The second picture is of the right-hand end of the buttercup, with the quarter to show you the size of the scales at the end of the shin scales. The size of the other scales range from the shin scales, to this size, to the smallest, which are about the size of a pinhead. You can see some of the damaged scales to the bottom left of the quarter. Both legs, although flawed, will still provide me with enough shin scale with careful cutting for a small billfold, or inlays for several knife sheaths. As an aside, I haven't been to Tandy to see their legs, so I can't offer you a comparison between what they offer to what I received from Springfield. It could be that theirs are a #1, or a #1-2, and might be larger or have more of the usable portion of the hide.
-
This was a #2 leg in the "buttercup" color from Springfield leather. I bought two legs from them, the other is black. Both are of a good size, but they both have some flaws (which is why they are #2, of course) that I will need to work around when I decide what to make with them. The black has a slit along the shin and the buttercup has some small scales that are torn off along the center along either side of the shin, leaving fleshy patches. I'll upload a picture of both in just a moment with a quarter or something in the picture to help you judge sizes.
-
If you're using any part of the "shin" where the large, flat scales are, the scales will lift up unless your stone is very flat with little height to it. The scales are somewhat flexible, but can't conform to curves well across the long axis of the scale (I've uploaded a picture of the scale so you can see how stiff they are). They don't mold as the scales are somewhat like fingernails--made of keratin--and they don't absorb water like veg-tan leather will. When comparing python and ostrich leg, the leather of the python skin is about half the thickness of the ostrich, but the scales are thinner and more flexible on the snake. Towards the knee of the ostrich, or on either side of of the shin scales, the scales are smaller, and more round than oblong, and might work for what you need. Sorry, it didn't attach the file. Let's try that again.
-
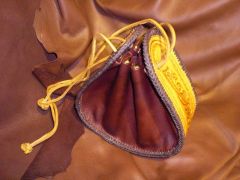
 Gorgeous. What are you making with it?
 -
I'll have to look around, I should have a couple of instruction sheets on turksheads, maybe one of them will explain a step a little bit better and you'll get the hang of it? And maybe try a latigo lace or a bit of paracord first, until you get the weave down? It took me quite a few attempts, but can make 3lead5bight turkshead practically in my sleep after making a series of them as a demo for Boy Scouts.
-
Eas Leather Stuff
WinterBear replied to Eas's topic in Gun Holsters, Rifle Slings and Knife Sheathes
Well, it won't do you much good if you never use the leather either, right? Take the plunge, have fun, and learn from it? As for tips, this is the best place I have found for when you need a little help. Whatever it is you want to make, there is someone here who can give you advice every step of the way. -
Try WyomingSlick's blog? He has quite a bit of his research on Craftools, Midas, and others. http://leatherworker.net/forum/index.php?app=blog&module=display§ion=blog&blogid=31
-
Steel plates can be found at most machinist's shops, and you can usually get a 6x6 inch cold-steel plate from most hardware stores that sell threaded rods and small angle iron. You can also ask the machinists about modifying the ram for holding different tools, or the tools to fit bushings in the ram, and see what their rates are (they usually charge er-hour + supplies). I plan on heading to the machinist's shop with a press when I get to that stage-can't be driving the neighbors bonkers by whacking away at stuff at 2am after all. You might want to look at these two threads for some ideas from users who have modified their presses and tools. http://leatherworker.net/forum/index.php?showtopic=34181 http://leatherworker.net/forum/index.php?showtopic=32770
-
Glad the fid is working out for you. Just be careful, if you get too enthusiastic, it gives you enough of a grip you can overtighten and pucker your leather, pop the lace, or overstretch the holes (if you ask me how I know this, I'll tell you--experience! Usually followed by a lot of swearing). If you really want to get into knots, I suggest the Braiding subforum here, and also looking up the user "Knothead" here on this site. He does fantastic knots, and he and other people have some great tutorials and tips here on Leatherworker, and on Knot Heads World Wide (http://khww.net/news.php). Most knots are completely above my head for now. All I can manage right now is the 3-lead turksheads, with 4, 5, or 7 bights, and crown knots. I haven't figured out the "long" turksheads, or any of the 4 or 5 bight knots yet, let alone a pineapple knot. Most braids are still beyond me as well, I can do various 3 and 4 strand braids, but that's about it so far.
-
I use my fid quite a bit, but not to enlarge holes so much (the edges of a fid should not be sharp, but more rounded than a lacing awl). Instead, I use the fid to help me make the lacing tight and smooth. Rather than trying to pick at the lace with my fingernails and scarring it, I slide the fid under the lace, press my thumb on top of the lace, so the lace is now sandwiched between the fid and the pad of my thumb, and gently pull. I find the fid indispensable when making turkshead knots and getting the flat lace to lie evenly, or when working a twist or kink out of a bit I'm lacing.
-
Looks like some are cobbler's tools. You might be able to identify those by asking some of the bootmakers here. The tool at the middle at the bottom left (dark handle with a crack) might be a lacing fid. The wheeled thing looks like a speedy stitcher of sorts, but missing the needle. See if the end unscrews--if so, there might be a needle in there--it's a good place to store extra needles and the tool used to tighten the collet. I'm afraid I don't use the stitcher much--I have a similar model--but I prefer a strong handsewn saddle stitch to the lockstitch the stitcher produces. If a thread pops, several stitches will unravel (or possibly the entire stitching if you've got a bored Boy Scout who yanks on a loose thread), where with the saddle stitch, only one stitch will unravel if the thread breaks. It's good for patching canvas though.
-
What Can You Do With A Veggie Tan Split?
WinterBear replied to MHolzer's topic in Leatherwork Conversation
I've seen chaps made with heavy splits, and thinner splits get used for linings, especially for rifle slings and luggage straps where you don't want the strap to slip off the shoulder. -
Carved Travelling Bag
WinterBear replied to boma's topic in Purses, Wallets, Belts and Miscellaneous Pocket Items
Very nice boma. It seems like the zipper is always the first thing to wear out on a good bag anyway. Is that a brass rod at the front of the flap--that's a good touch that makes the bag sturdier, right? Your work is inspiring, too bad I don't have the skills. -
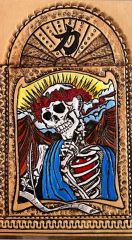
Wow! If the new owner decides to wear this to a convention, every fan in the place is going to be all over him. And Joker is gonna plotz.
-
 Nice job. The knots are an especially nice touch.
 -
Noobie Question (Spots Appearing After Moulding)
WinterBear replied to Willbury's topic in All About Leather
I could be wrong, but it looks like the leather picked up a little iron contamination somewhere. A little invisible speck of rust can cause that to happen. There are some expert molders on the site, I'm sure they'll be along shortly with some pointers and will have a few ideas on how to keep it happening again. Nice molding job, by the way. Future cigar case maybe? -
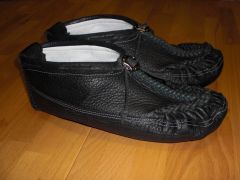 Nice mocs!
 -
Handstitched Small Dog Harness
WinterBear replied to Mijo's topic in Collars, Cuffs, Leashes and Leads
Nice. I like that you made all of the straps adjustable, it will make it a lot easier to customize the fit to the dog. The eyelets and the wide keepers are nice touches too (are they eyelets or mini-grommets? They look more finished than simple eyelets). As for the latigo, I have noticed similar with some of the brighter latigo I've used as well. Maybe it's a layer of dye and dye sealer that makes a nice bright sort of second skin/synthetic layer? I'm not to crazy about the way it finishes either. The only way I've been able to get that stuff to "bevel" halfway decently is to take a flexible and newly stropped double sided "callus shaver" blade and cut the edge at a slight angle, flesh and grain side. It's hard to keep the cut even enough to make a nice edge though, so I'm torn between trying to make it look better and making a bad cut and ruining the whole project, or just keeping the ripples and the ragged bits. -
Nice. I like the way the case becomes a camera holster. Did you make this cover for your camera, or is it for a customer?
-
422776_10150550016462530_755412529_8883697_1985078961_n.jpg
WinterBear commented on tatehunt's gallery image in Our Leatherwork Galleries
 I am liking the progression of pictures on this. It really showcases the work well. Can't wait to see the finished piece!
 -
Hi Don. Try this thread: leatherworker.net/forum/index.php?showtopic=37013&st=0&p=228743 You can also use the search feature and look up past topic on "stringy", "flesh side", and "underside of leather", maybe also "gum back" and "moss back". Also, poke around in the Gun Holsters subforum, and talk to the folks who make a lot of holsters. They'll be able to let you know what else they've found that works to finish the back/inside without the holster losing grip on the gun.
-
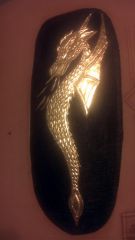
January 2012 Challenge
WinterBear replied to TwinOaks's topic in Special Events, Contests and Classes
Sketched freehand from a drawing of a rather smug looking golden eagle, but I think I made the eagle to "chinny" under the mandible in the finished piece--it seems to be throwing off a strong "raven" vibe to me. Oh well, something to watch out for next time. I also made it on a piece of leather that was too thin, so I couldn't get much depth, so instead of about 4 or 5 oz, I'll try a 8 or 9 oz instead next time. Anyway, here is my eagle. The two tools were the swivel knife, and in keeping with the spirit of the challenge, only the larger side of the petal tool was used. The background was lightly crosshatched with the swivel knife to give the impression of "matting" and then burnished with the yoke of the swivel knife and the petal tool. The blade of the swivel knife was used to edge the piece--difficult, and not at all even, but it worked more or less. The side of the swivel knife was used to burnish the edges. The tip of the petal tool was used to burnish shading and striations on the bill and the rays in the eye, as well as provide some of the feather barbs. The tip of the swivel knife formed other barbs and the bristles around the mandibles, the base of the cere, and around the eye. -
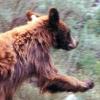
Mink And Otter Furs Gifted To Me...
WinterBear replied to Rayban's topic in Exotics, Reptiles, Furs and others
Well, for the otter? Otter headdress or dance dragger (often worn with the head peeking over the shoulder so the otter can watch). I've also heard of otter quiver or pipe bag? Make a "grizzly" claw necklace with antler tips and an otter base? http://www.powwows.com/gathering/showthread.php?t=50566 http://www.elkuta.com/Joomla/images/pdf/resources/Otter%20Dragger.pdf http://frenchinwisconsin.yolasite.com/my-blog/grizzly-claw-necklace http://www.etsy.com/listing/72096914/imitation-bear-claw-necklace-in-the http://battlecreekstudio.blogspot.com/2011/10/carved-elk-antler-claw-necklace.html This last link has lots of pictures of otter/grizzly necklaces and pictures of otter "turbans" as well. Some turbans have the tip of the tail completely beaded and worn as a triangular flap to one side of the front of the head. -
Ornamental Stamping
WinterBear replied to King's X's topic in Purses, Wallets, Belts and Miscellaneous Pocket Items
Thanks! Please do let my know--I hope it works marvelously. I'd love to have a nice leather mat and wrist pad for at work. I may work in cubeville, but I can dang well make myself a nice leather mouse pad and pencil cup, right? Or I may have just opened my mouth to insert feet. Whoops, sorry McJeep. I didn't get a notification that you had replied too. Where I work, we've come across a couple of mouse pads the opticals hated too. My current pad works just fine with the mouse. But it's boring and a little too small when working on two screens, so this may be the perfect solution! : ) -
Getting Ready For Summer Shows... What Are You Doing?
WinterBear replied to UKRay's topic in Leatherwork Conversation
Wow, is that all stuff that you've made already? Or is it from a prior show and you've sold it all and have to make more? It looks like you've been a busy little critter regardless. As far as project ideas, I don't know how popular e-readers and i-devices are in your neck of the woods, but custom leather covers might be a possibility. (The black rats are a scream by the way, I love them. I might have to make a few for quilt weights for when I'm sewing).