WinterBear
-
Posts
900 -
Joined
-
Last visited
Content Type
Profiles
Forums
Events
Blogs
Gallery
Store
Everything posted by WinterBear
-
I'm afraid I don't know of anyone, but I could suggest the Help Wanted section of this board (link below)? You might be able to contract out someone with experience do the repousse panels, and perhaps have your local leather shop finish the jacket. http://leatherworker.net/forum/index.php?showforum=54
-
I definitely understand. Most of my stuff seems to be of the making do with what I have because I can't wait until something can be shipped and can't find what I need locally. I have been thinking about dying the linen thread myself because I have not been able to find the right shades of purple and harvest gold I need for a future project, and I can at least get the fabric and leather dyes locally.
-
Great idea! Question though--Have you ever considered buying unwaxed linen thread and dying that with Rit or leather dyes? That way you could skip the step of stripping off the wax and it might open up even more color options for you.
-
Hi. Welcome. I think what you want is called repousse or sometimes repousse embossing. The basics are given on the Tandy website (http://blog.leatherc...rlie-davenport/). In a nutshell, you press the design forward from the flesh side of the cased leather, raising the pattern up. I can also recommend you look at some of Clay B's stuff, he's an excellent artist who does "extreme embossing". Edit: I forgot. You'll have to use veg tan (tooling) leather. You won't be able to repousse anything else.
-
Happy St. Patty's Day!
WinterBear replied to Kevin King's topic in Purses, Wallets, Belts and Miscellaneous Pocket Items
@rosiart I'll take your word for it. I don't mess around with either type, so I wasn't aware of the differences. I'm not a jeweler, you see, and can't really get into it (even though I'd like to). I rent, and the landlords tend to get a little hyper about oxy-acetelene gas, kilns, torches.... -
Happy St. Patty's Day!
WinterBear replied to Kevin King's topic in Purses, Wallets, Belts and Miscellaneous Pocket Items
Yah. It has it's advantages, but the fact that the binder burns out, it's really hard to get a high polish on it because bits of carbon remain microscopically bound to the silver. I know someone who does tufa, investment, and cuttlebone for her casting (she's not really set up for lost-wax), and she refuses to use PMC because the carbon--a lot of her work is mirror polished, and the PMC looks greyed next to the other stuff because of that. -
Happy St. Patty's Day!
WinterBear replied to Kevin King's topic in Purses, Wallets, Belts and Miscellaneous Pocket Items
PMC is "precious metal clay". It's metal mixed with an organic binder that burns away when the clay is fired in a kiln. It comes in several metals, including copper, silver, and bronze. The clay can be molded easily, and many faceted stones can be fired in place, so it has quite a following among some jewelers and crafters. Er, edit. "Organic" meaning carbon-based. Not "organic" as in veggies grown without chemicals. -
Head Knife, Swivel Blades, One Ceramic 3 Steel
WinterBear replied to ouchmyfinger's topic in Old/Sold
Am I reading that correctly? $8 for the head knife? -
Impressive! And it looks sharp.
-
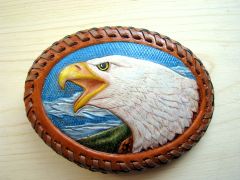 Sorry guys. This is a pre-embossed kit. All I did was color it.
 -
A more detailed description of how this kit was colored is in the "Show Off " subforum.
-
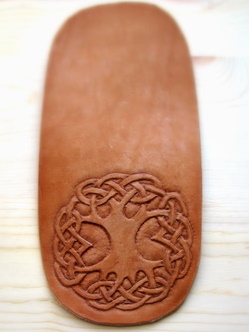
From the album: WinterBear's Stuff
© © leatherworker.net
-
Anytime. You have some nice stamps, I like the frame stamps and the curved pear/thumbprints.
-
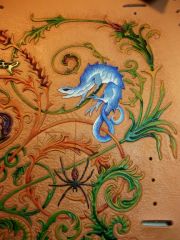
Cheryl managed to convince me that I should post this thing, so here goes nothing. This is a pre-embossed Boy Scout buckle kit sold as a kit for around $8. (I think I got this one from Hobby Lobby). I bought this kit and finished it up in early summer of last year. As it was meant for an example for the Scouts for their leatherworking merit badge, and I already had a sewn buckle, I decided to lace this one. Lace is the imitation/bonded stuff, so not the best, plus it was my first lacing attempt and I made a mistake at the bottom. You can see that there is just not a lot of physical depth to it (first picture). From the sky to the head, there is less relief than the thickness of a dime, and that is about as much depth as there is anywhere. But, I'm going to go ahead and explain how I colored it. I have no idea if this method is "right" or not, it was just me fooling around. The first thing I did was dye the whole thing with Ecoflo saddle tan. If I had planned things out better, I would have resisted the area of the eagle's feathers and the clouds first, so those areas would have been paler to begin with. But I didn't, which means I did a lot of mixing of cova and dye throughout, and since I used thinned dyes and Covas, the colors seeped and blended together, which I think turned out rather well. Cova colors were mostly used for the white feathers, the highlighting on the sky, the outer portions of the bill, the clouds, and the eye, while dyes were used for everything else and to wash over the Covas to tint and blend. I don't like coloring with Cova and acrylic so much that I lose the aspect of the leather--at this point, it's plastic looking, and I might have well just painted the whole thing with spray paint. So, I keep it thin enough that the leather shows through. Everywhere you see brown, that's the leather dyed saddle tan. Dilute blues and purples were washed over the sky, the clouds, the trees, and the brown body feathers to recede them back. Cool shades were also washed into the back of the mouth and portions of the bill, within the gape, and face to move them back. The eagle's brown feathers are left saddle tan, but thinned washes of Ecoflow java brown, which settled into the creases and "antiqued" the feathers, were used to bring out the detail. The upper portions of the trees and the nearer portions of the head and bill were washed with yellows and oranges to bring the "nearer", as were the hump and tip of the bill, and the lower mandible. The crevices among the trees, the base of the clouds, and the sky nearest the ground was washed with a muddy purple to move them further back. The bill was dyed yellow, while the gape and the nostril was dyed with tints of red, rose, and orange. Where the gape was tinted with cool colors, the reds and yellows were muted. The eye was dyed yellow. The feathers were drybrushed with white in several layers so that the details of the feathers would show through, then washed with thinned dye in yellow and blue to help shade the head, and drybrushed once more with white. Some blue-grey dye mixed in with the Cova white was used to detail some of the edges and barbs of the feathers. Cova white and yellow were drybrushed onto the bill and the lower bill. The trees were dyed green, and yellow dye was washed over the green to bring them slightly closer. The sky was highlighted with Cova blue, and white was also brushed onto the clouds.Yellow, black and white Cova were used to finish the eye, then the whole thing was sealed with two coats of Super Sheen before being laced together.


-
March 2012 Challenge
WinterBear replied to chancey77's topic in Special Events, Contests and Classes
Well, that was the whole point, right? 3 tools. I'll have to decide on the back. If I can work out the bugs and get this pattern down, I might do the back with a "dragon scale" pattern, or maybe just use the swivel, a beveler and seeder and make a "quilted" pattern on the back. I like lacing, but I think this one might have to be saddle-sewn chancey. I don't think I have enough room around the knot to do a lacing without getting too close to either the edge or the knot. And yes, once I got over being annoyed with my shortcomings, I had fun. Thanks. If I can manage what I'd like to do with it, the rest of the structure is going to be based loosely off of boma's purse for the front (under the flap) and part of the side gusset, and it will have a molded pocket inside on the back flap for my phone. Hey, I had no idea either, but I muddled through. Look at "triquetra" on Google for some elegant knots that don't make you dizzy trying to figure out which strand goes where. You're going to give me a big head, you know. -
March 2012 Challenge
WinterBear replied to chancey77's topic in Special Events, Contests and Classes
Or a tiny purse just barely big enough for phone and wallet. To get into the tight spots and sharpen corners, to bevel the crossings, and to round and smooth the knot. Nope. I plan to fold it in half with that knot on the front. It'll be the closing flap, the blank portion will be the back and undecorated. -
March 2012 Challenge
WinterBear replied to chancey77's topic in Special Events, Contests and Classes
Here is my knot. It was still too dark from being oiled to take a picture of this morning. Knot is around 4" in diameter, strands are about 1/4 inch. Tools were a regular Tandy swivel knife, A beveler (modern Tandy-purchased Craftool #B801) and a tiny ball point stylus. I am never doing this again unless I use a filigree blade. The leather was just a bit of scarred shoulder, so it's not pretty, but I did case it properly, which helped. It might also be prettier if I used an undercut beveler for the crossings, a series of checkered background tools, and better leather, but all in all, I'm pretty pleased with how it turned out.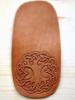
-
March 2012 Challenge
WinterBear replied to chancey77's topic in Special Events, Contests and Classes
I'll post a picture of mine tomorrow. -
March 2012 Challenge
WinterBear replied to chancey77's topic in Special Events, Contests and Classes
Yeah, see, here's the thing. I have no clients. I'm only making stuff for myself and family, and to take care of the Boy Scouts' needs. I need hours more of practice, probably weeks worth of hours of practice before I'd even consider selling any of this stuff. -
March 2012 Challenge
WinterBear replied to chancey77's topic in Special Events, Contests and Classes
Ok, you guys are officially evil, you know that? I'm trying to do this knot with a swivel knife, a stylus, and a checkered beveler, and I may just go bonkers before I finish the matting between the strands. It doesn't help that this is my second attempt after I managed to botch the first attempt when a cut a strand "over" when it should have been "under". -
That turned out really nice. I have to ask though-- How did you keep from going bonkers while doing this? Intricate doesn't begin to describe it.
-
Nice one.
-
Hello Larry Welker. Nice stamps. You have a bad link on your website's landing page. Clicking on the link for Stamp 272 on your home page (http://elwelker.com/elwelker/Welcome.html) leads to http://elwelker.com/elwelker/No._926.html, not to http://elwelker.com/elwelker/No._272.html as it should.
-
That's looking really great and looks sharp. On pouches with flaps that I've seen that others have laced, they've tried to address this by starting lacing at the middle of the flap and working all the way down to the center of the pouch, and the doing the same on the opposite side. But it means that the lace goes in opposite directions in the center of the flap and the bottom of the pouch, and doesn't look quite right either. I hope someone can help you figure out the lacing on this.
-
 Beautiful. The shading is sublime.