


WinterBear
-
Posts
900 -
Joined
-
Last visited
Content Type
Profiles
Forums
Events
Blogs
Gallery
Store
Everything posted by WinterBear
-
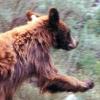
"classic Fur Hat" Expressed In Skunk
WinterBear replied to SandSquid's topic in Historical Reenactment
BARGE CEMENT WILL BE YOUR BEST FRIEND..... Barge cement is exactly what I was told to use for repairing a fur hat for a re-enactment group--only mine is coyote in this case. I spent quite a bit of time speaking with a great leatherworker during Frontier Days here in Cheyenne, and asking for his help in repairing and fixing this absolutely scary coyote. He told me to pull the holes gently closed, and glue the hide side with a patch of barged buckskin--it will make a patch that will be invisible from the fur side, but strong and flexible on the inside. He also suggested barging a buckskin patch at the tail, at the join of the tail and body, or tail and hat, as it will be the weakest point and will be prone to ripping. -
Stirrup Purse
WinterBear replied to rscow's topic in Purses, Wallets, Belts and Miscellaneous Pocket Items
Forgot to say that I very much approve of the tooling pattern! -
Just call Springfield leather up and talk to them about your wants and needs. They're great folks and can give you suggestions on what they can sell you that will suit your needs, and will happily ship it. I found their shipping to be pretty reasonable too.
-
I have a Hobby Lobby here, and I know what you are speaking of--don't buy that stuff. It's not very good chrome tanned leather and it bleeds dye pretty easily. It can't be tooled, and it tends to have weak spots too. If you want practice tooling scrap, just about any leather supply will sell veg tanned tooling leather by the pound.
-
Stirrup Purse
WinterBear replied to rscow's topic in Purses, Wallets, Belts and Miscellaneous Pocket Items
I like the idea of the handles. I've never been a fan of the stirrups that require being carried by the drawstring. -
Lion Mask for Aerosmith
WinterBear commented on Logans Leather's gallery image in Our Leatherwork Galleries
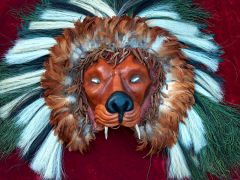 That is just too cool. I have been actually using a still of the mask from the music video to help me plan a full face mask--I've been asked to remake a Lions Club mascot, and the head has been giving me fits. The video gave me the idea to make the face of the mascot out of leather.
 -
Funny pete! wind power: maybe try here for starters? http://website.lineone.net/~lindave/singer.htm
-
Ok, the lighter case is great, I love the idea, and it looks like it really made a strong case. I see some similar sharpie holsters in my future as soon as my friend sees this.
-
Yeah, I'll sketch something out and post some pictures. Not today though. I have Scout meetings and likely won't get home until after 11.
-
This opens all sorts of possibilities. I'm considering a mold for some super nice camp utensils I got for my sister and her husband. I'd covered the sets with tape and foam to make a sort of approximate shape to mold over, but was unable to get a good and consistent rim/edge, let alone repeat it. It'll be at least August before I can experiment though. Frontier Days starts Friday (and ends pretty much at the end of the month) and things are going to be a zoo. If I don't get supplies by Thursday, I'll have to wait until the 31st when things calm down again.
-
I might have to try this. I wonder if I could lay a piece of fiberglass cloth and coat it with resin into the negative side of the mold before (lining the negative with a release gel or plastic sheet first) and then using the expanding foam, so the foam attaches to the fiberglass. If I have imagined right, I think I'd wind up with a wooden mold half (negative side), and a foam positive with a fiberglass shell for added strength for the other half. Hope I'm making sense.
-
Some New Pictures Taken
WinterBear replied to Felton Leatherworks's topic in All About Us and Off Topic
The pictures are a big improvement, and really let people see the work. I'd say your best work is probably the portfolio, the cross wallet, and possibly the badge wallet, but I'd like to see more views of things. Drum up the descriptions some. People LOVE details."cowhide wallet, saddle stitched by hand, dyed mahogany and with a rich hand-rubbed wax finish" engages your reader--you got to grab them because they can't pick the items up. Let them know. What weight is the leather? Is that wallet horse with a goat lining, or cowhide with a pig liner--knowing the material is important to a lot of people. Some don't want a leather item that's made of horse, or goat, or pig--but they seldom message you to find out. The next thing I would suggest is to have pictures of different angles (such as the back, as mentioned above), and maybe get a friend to be your model in exchange for a beer/soda (or get a fiberglass dummy--they don't talk back--PM me if you want links to some dummy suppliers that won't kill your wallet--hands and heads are pretty inexpensive). Things in online stores sell best if you can showcase what you make, if people can get a good idea of what it will look like when worn, and if the pictures are crisp and focused on what you want to sell people. You have only seconds to grab someone's eye. -
Ooh, thanks. I couldn't get the profile page to load. Gonna go gawp.
-
So you going to post us a link to your etsy store?
-
Argh, I hate it when a class degenerates into an exhibition of yard apes. You did what you had to. Sometimes the best way to get the point across is to end the class. And even if the point isn't gotten across, sometimes it has to end before someone gets hurt or the tools or facilities are destroyed. Were your stamps and tools badly damaged from the abuse? I'm not going to even ask about the arrows--I'm sure a lot were shattered.
-
benlilly has some great advice. You can also use your window or outdoor light with two other cheap items that will help with the glare. Neither item shows in the final picture, they just help distribute the light. 1) Glue or sew a piece of tightly-woven white cloth (such as a piece of sheet, broadcloth, or even a piece of white unprinted tyvek) onto a frame of some sort. You want the fabric taut, unwrinkled, and light should shine diffusely through without any shadows. You can place this frame between the sunlight (or a separate camera flash unit) to soften and diffuse the glare during a sunny day. 2) Get a piece of white cardboard and paint one side black. You use the white side to reflect light on the opposite side of your item to lighten shadows. It can help concentrate light if it's just a little too overcast. If it is a bright day, the black side can be used to "eat" some light and reduce the overall lighting. You can use your posterboard to bounce light from a lamp to augment light a project indoors as well. You can get fancier, and make frames that fold and collapse, or that have pegs that allow you to poke them in the ground, or make diffusion covers for your camera, you can even get strips of gold and silver mylar glued to a board to change the quality of the reflected light (usually gold mylar for warmth and portraits, silver for technical photos, a mix of alternating strips for a moderate balance). You might consider making a photobox as well. I think there are some instructions on this site, and on photographer's forums as well. A couple of lamps with full-spectrum lights and a photobox can give really good photos.
-
Spew in this instance means the wax used in the preparation of some hides has worked out to the surface of the leather, leaving a dull white coating on the leather.
-
Springfield would probably be a good place to start. They have ostrich shin, ostrich whole hides, ostrich scrap, some stingray, black frog, scrap exotics, caiman, some sea snake and python, rattlesnake, off-white cobra, a cognac color elephant, and will sometimes have shark. They often have odds and ends that are too few to wind up on their online store, so it's a good idea to give them a call and see what else they have. http://springfieldleather.com/ ST Leather has rattlesnake, frog, shark, sea snake and other snakes, python, American alligator, ostrich hide, croc backstraps, whip snake, cobra, lizard, frog, and stingray. http://stleather.com/
-
I can offer these: http://1.bp.blogspot...00/IMG_5766.JPG http://hidden-prairi...hp?topic=1339.0 Also, the homepage of thecoonskincap (http://thecoonskincap.com/) has three-step-by-step videos of the hat or a similar hat made from the same or similar pattern as the one in the second link there. Ugh, bad video link. Try here instead: http://video.google.com/videoplay?docid=-263320978690588548 Looks like only the first part is available anymore. Oh well, it at least shows some pretty good tips.
-
St. Peter Bible Cover
WinterBear replied to Tim Schroeder's topic in Books, Journals and Photo Albums
Came out beautiful. Your AC tech is going to have to slap a lot of fingers because everybody is going to want to touch. -
Horseshoe Font Or Maybe Help With A Basic Logo?
WinterBear replied to Iron Pounder's topic in Computer Help
Well shoot. Ok, Plan B? I'll see if I can't get a hold of someone I know that does vector and logo work and see how much he would charge to make a vector of your desired logo (rather than a full alphabet, which might prove too costly). -
Well, it's not stitched yet, and when it is stitched, the thread will be part of the design and a contrasting color. Those marks are where the stitching will be, and where I've marked the stitching holes. I didn't use a groover to mark the stitch lines as I didn't want to remove any of the grain and potentially weaken the thin parts, like the base of the ears and the legs, so the stitch lines are just beveled in. It is also a very thick piece of leather, and was lightly hammered and well burnished before being cut out to compress the grain and make it tougher.
-
It will be hand stitched. Glue wouldn't be as aesthetically pleasing as a contrasting stitch, plus I tend to always make a mess with glue. I'll show it as it progresses, but it will be a long wait I'm afraid. Much of my "free" time is eaten up by Scouts and projects in the summer, so I don't get to do much with leather.
-
These are fantastic. I liked the first set, and then I saw where you had redone them, and they are even better. Will you finish these into a Bible cover or something similar?
-
I agree with sandycreek now that I see the end. A setter for fasteners of some sort. The end of that thing looks like one of these snap setters: http://www.tandyleatherfactory.com/en-usd/home/department/Tools/Setters-Anvils/8105-00.aspx