


WinterBear
-
Posts
900 -
Joined
-
Last visited
Content Type
Profiles
Forums
Events
Blogs
Gallery
Store
Everything posted by WinterBear
-
Hiya. I can offer some advice on what has and has not worked with the younger boys in the Troop. First big questions. How many boys? and--Will you have at least 1 helper who knows what to do? Without that help you are going to have a lot of impatient kids. Pre-casing has met with limited success with a really limited time frame--sometimes it takes too long to dry out enough. You might be able to get away with wetting with a sponge on-site. I'd suggest coloring using the Tandy highlighter dyes--Dye and antigue in one. Make the kids wear gloves, use sponge brushes or daubers to apply the dye (so YOU can control the amout of dye each kid has at a time, not the kid), maybe even pop a poncho or garbage bag over the kid dyeing at the moment so the uniform doesn't bite the dust, and cover the dye area with a plastic drop cloth covered with a piece of canvas or sheet to make it less slippery. Bring only a few colors of dye. The more choices, the more the kids will dither and cut into the time the other kids need. Make sure they know that they should NOT dye the back (it will increase the time needed to dry and they can put too much on the back if the back is fuzzy). If you sponge wet the leather, stamp, very lightly oil (a bit of t-shirt with oil on it will help prevent too much--too little is better than too much), highlight dye as soon as the surface doesn't look shiny any more, and as soon as the dye dries, hit it with super sheen or satin sheen, front, sides, and back (because the kids won't be so good about keeping their leather dry when out in rainy weather). The sheen can be applied with a bit of white T-shirt and wiped on-it may help control the amount used. Shape the leather a bit around a dowel, sew together using waxed braided cord or small plastic lace (I find that real leather lace is harder for smaller kids to handle and they have a difficult time pulling it through the holes--plastic is "slippier" as one boy put it). Best way to pull these together is with an "X" stitch as if pulls the edges so they butt together (I'll post some pictures this weekend). Cord ends can be left longish and finished with pony beads and an overhand knot. Send the project home with them in a plastic ziploc style bag (so if it is not 100% dry it won't get stuck to the car seat), and tell them to let it dry at home overnight outside of the bag before wearing it. That way those that were over generous with any dye, oil, or sheen will be less likely to get those liquids all over their kerchief or uniform.
-
I wasn't a huge fan of lacing myself until I laced my first piece with a double-loop edge. It's the tactile features I've learned to appreciate with lacing. When I do it right, it feels nice, and gives a visual "weight" to anything I want to embellish, but where a tooled or stamped border would be worn away or scuffed if the edges were sewn. I sew more than I lace, and I sew where I don't want bulk or want a clean appearance, but I'll lace where I want wear resistance and protection of the tooled portion (like on belt buckles).
-
How Do I Achieve This Distressed Leather Technique?
WinterBear replied to Chad Von Lind's topic in How Do I Do That?
*snerk* HAHAHA! Sorry that's too funny. I immediately had the mental image of me dodging traffic on the interstate to pry a wallet back or belt off the road. I do tend to threaten to throw recalcitrant projects out into the street to be run over. -
Koi Purse!
WinterBear replied to jeremiahsavoy's topic in Purses, Wallets, Belts and Miscellaneous Pocket Items
Very nice! Love the colors, the flow, and the details. -
I hope you find it to your liking. I have some of the Tandy gold lambskin to use for a wolf-track underlay, and I think it is terrific looking stuff.
-
Biggest advantage for handsewing--I can take it with me. A small pony, a pillbottle with harness needles and a piece of beeswax, the awl, and some cord, and I can sew just about anywhere, as long as I don't have to worry about jabbing someone with a needle accidentally. I can also scoop it up in a hurry and get it out of the way, and store everything in a drawer.
-
Leatherburnishers.com Signing Off...
WinterBear replied to Spinner's topic in Leatherwork Conversation
Beary and the Bearman have the Leatherburnishers site up and they are taking orders sinpac. http://www.leatherburnishers.com/ -
Springfield has a soft, draping veg-tan calfskin in a 3-4 oz weight. They also sell finished kidskin (goat) in a variety of colors in a 2 oz weight, and some lambskin too. http://springfieldleather.com/25864/Side%2CSoft-Veg-Tan%2C12-17sqft/ http://springfieldleather.com/category/17/229/Lining-Leathers/ http://springfieldleather.com/29911/Lamb%2CTobacco/ If you can get to a Tandy to see it in person, they are having a sale on their lambskins in a very thin 1.5-2 oz weight. It is very soft, drapey, and somewhat stretchy. The metallic are less supple than the others, but they are very soft. I managed to get a really nice hide for binding edges and for lining a clutch. They do sell it in their online store, but I prefer to pick it out in person. The manager of my local Tandy is pretty good about not sending ugly leather to the mail customers, but you never know if she will be the one pulling the order. http://www.tandyleatherfactory.com/en-usd/home/99270-04.aspx Tandy is also closing out their tooling goat in a 2-3 oz if you wanted something a little less supple, but tooling goat is probably stiffer than what you're describing. I've found it only slightly more flexible than the tooling pig. http://www.tandyleatherfactory.com/en-usd/home/9153-00.aspx
-
From my monkeying around with both Sheen and Resolene I can offer my observations. Super Sheen/Satin Sheen are water-based acrylic-type finishes--they can dissolve or erode when subjected to antiquing and wiping and rubbing, allowing the antique to be absorbed into the underlying leather and making a mucky mess. The advantage to Sheen is that it is flexible and is less likely to craze. It is easily applied, and good as a top coat on things you don't expect to be subjected to a lot of weather. It is more of a water repellant finish than a water resistant finish. Resolene is harder to apply evenly, but less prone to erosion during antiquing. It can crack or craze where the leather flexes if applied too thickly, so 2-3 very thin coats is better than 1 thin coat and much better than 1 thick coat. It is not waterproof by any means, but it does make a finish that repels moisture better than Sheen. A lot of people here will supply yet another top coat over the finish with the atom wax as it adds another layer or water protection and mellows the gloss. Others will add an additional top coat with sno-seal instead of atom wax. I have not tried either of these as most of what I've done so far isn't going to be subject to much abuse.
-
Both pliers and hammering actually. But no hammering the dickens out of them. Instead, you want to first use pliers (needle-nose or round-nose work best) and rather than bending the prongs flat against the backside (as making a sharp kink makes a weak area at the bend), the people I know curl the prongs over so they meet at the middle and the tips are pointing towards the underside of the dome. They then pinch the curled prongs slightly with the pliers and gently tap the curls to drive the tips into the leather behind the dome. This link explains it pretty well. http://www.willghormley-maker.com/MakingRingoRig2.html Oh, and I've done some reading on that prong setting thing, and the slits it makes may be too large for very small studs. If that's the case, your best bet may be to fall back to the dividers and a small thonging chisel, and lots of practice on scrap.
-
Adjustable spot setter? http://www.greyowlcr...isc/IC-250.html Let me see if I can scare up something similar in your neck of the woods. Edit: I'm not having any luck. I think it's primarily due to differing terminologies. You might try emailing that picture to the places you get your supplies from and see if they carry something similar under a different name. Edit 2: http://studsandspikes.com/buy/dual-blade-awl.html?osCsid=05e104aa6522db959502975389e9f46c If you are getting your studs from this company, they do sell the setter. Looks like the only difference is that it isn't painted.
-
The one tool in the middle of the second picture is really clever. I love old tools that have the look of years of loving use.
-
Ask the owners to file a report on NetPosse.com if they haven't already. It's a site primarily for locating stolen horses, but they have also had success with helping track down stolen gear and trailers as well. A lot of stables will print out reports for their bulletin boards so then a whole bunch of equestrians will be aware, and it gives a lot of eyes out on the internet and at auctions. If the stuff is spotted, they can contact the LEO in charge of the case. http://www.netposse.com/default.asp (it might help if I could spell worth a darn today)
-
I'm intrigued. Seems to me that you could trim that out, or portions of it, and use it as decorative sewn-on elements.
-
He doesn't really have a website. Just the etsy store listed above, and his Artfire store (http://www.artfire.com/ext/shop/studio/CustomMadeStuff), but he's easier to reach by email.
-
Basic bead reamer: http://www.riogrande...ps/111020?pos=1 http://www.firemount...sp?pn=H203263TL They make electric and battery operated reamers as well, and dremel reamer tips, but if you're working with glass, you need to go at a slow speed with those and it helps to keep the cutting area of the whole bead immersed in water (running cool water is best). If too much heat builds up, the glass will fracture from thermal shock, so the water keeps the bead cool. I'd suggest using water if using a motor-driven reamer on the silver-cored beads too as the metal could potentially transfer heat the the glass portions. If using a hand powered reamer, heat buildup is unlikely because the strokes are slower and the heat doesn't build. For the murano beads, and possibly the ring beads, you might be able to enlarge the hole slightly by thinning the metal core from the inside. But, it will depend on the thickness of the metal and how much you'd need to enlarge the hole balanced against the need to maintain the integrity of the bead. (whoops, looks like KnotHead beat me to it)
-
Technical editor and general screwball. Non-paying positions that I consider my other job(s) are volunteering in Scouts, Venturing, OA, and Lions.
-
Putting The Pony To Pasture
WinterBear replied to renegadelizard's topic in Gun Holsters, Rifle Slings and Knife Sheathes
Supporter Springfield leather (http://springfieldleather.com/) sells 277 and 207 bonded nylon thread in 1 lb spools, colors in black, white, and brown. Another supporter is Tippman Industrial (http://www.tippmannindustrial.com). They have the 277 and 207 in z-twist spools in bonded nylon, colors are black, white, brown, dark brown, and natural. -
A Serious Question For Leather Carvers.
WinterBear replied to KnotHead's topic in Leatherwork Conversation
I'm learning too, and I ruin more leather than anything at this stage. I do like the maul more than a mallet. I get better impressions with fewer strikes on a big stamp. But I do have to be careful with a seeder and a maul--the greater (or rather, more focused) impact you get from a maul can drive a seeder too deep. I've learned I have to be delicate with seeders and other small-ended stamps. -
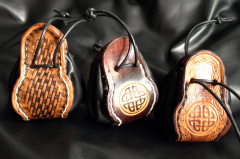 These are terrific, I love little pouches. I bet they would be a big hit with the college crowd--just the thing to carry bus tokens in, or quarters in for the laundromat, or flash drives and cards.
 -
"classic Fur Hat" Expressed In Skunk
WinterBear replied to SandSquid's topic in Historical Reenactment
It looks really neat. I can see why it was worth the wait on the 3rd pelt. Well, you can always pin the tail or face on with a safety pin stuck through a bit barged leather, or with a few thin stitches where they won't show, and see what you think about them for a couple of days. You did such a nice job. If this coyote I'm working on comes out looking 1/5 as nice as your skunks, I'll be very happy. -
"classic Fur Hat" Expressed In Skunk
WinterBear replied to SandSquid's topic in Historical Reenactment
Nice effect on the striping across the crown and around the sides. Is the hat "tailed"? -
Adult area on Leatherworker.net
WinterBear replied to Johanna's topic in Announcements and Administrivia
If you still can't see it, you might have a cache issue? Have you hit Ctrl+F5 from the Board Index to force the page to dump anything it might have in cache and reload from the server? -
Adult area on Leatherworker.net
WinterBear replied to Johanna's topic in Announcements and Administrivia
If you haven't gotten access cajun, just post and let her know and she'll check. -
Is the back of the foil glued? I'm not certain as far as heat embossing foil goes, but I thought either the foil or the area to be foiled had to be treated with a "heat activated" glue to get the foil to grab a hold on the hide.