Cyberthrasher
-
Posts
2,397 -
Joined
-
Last visited
Content Type
Profiles
Forums
Events
Blogs
Gallery
Store
Everything posted by Cyberthrasher
-

Storing And Organizing Scrap Material
Cyberthrasher replied to horseplay's topic in Leatherwork Conversation
Why the putty, or why do I keep it all separate? -
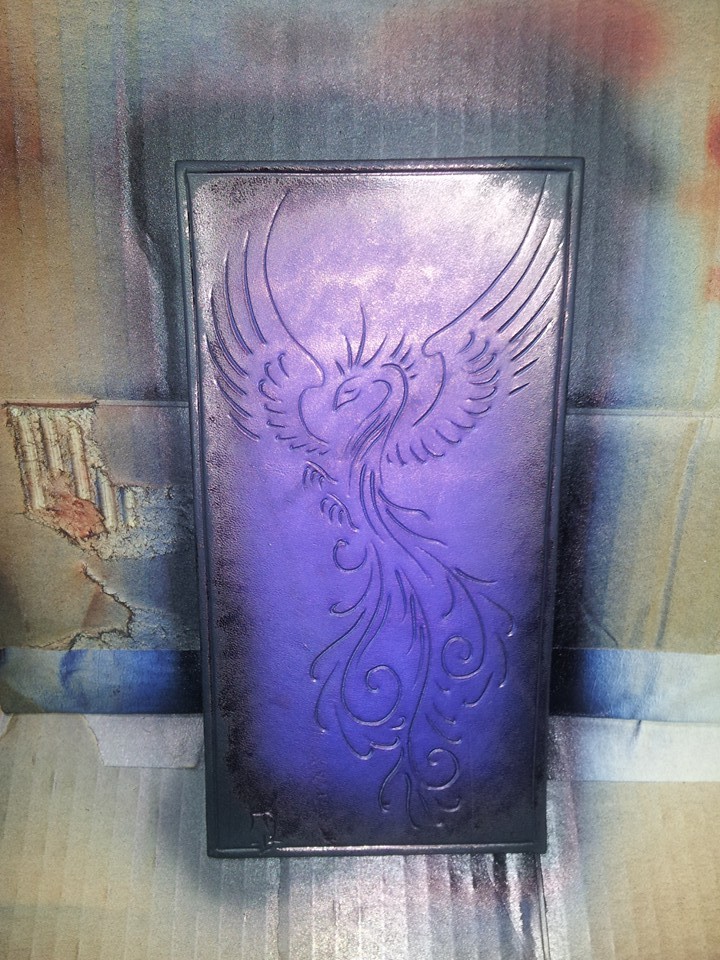
Yeah, I learned that one the hard way. Didn't mess anything up, but sprayed it on and thought "how is this LIGHT blue???" I have Turquoise and Light Blue in the regular spirit dyes and Royal Blue in Oil Dye. The picture above is actually thinned light blue over turquoise since I found it gives it a kind of electric blue feel that way.
-
Storing And Organizing Scrap Material
Cyberthrasher replied to horseplay's topic in Leatherwork Conversation
I theory: Separate bins for chrome tan, veg tan, exotic, liners In practice, since I have neither the shelf space or bins needed for the above: One big bin with Veg bellies rolled up and the weight/grade written on the flesh side, several rolled up straps with tape holding them closed that has the weight and grade written on them, larger pieces of various weights along the side, several bags with the lightweight liners in them, a couple more bags with heavier weight cut-offs that might be good for something the size of a wallet back or cuff or even a sheath. I also have another box sitting there with exotics in it, even though I do have a new bin sitting there for them that just needs to be cleaned out. Then, I have another box for chrome-tan scraps. All of the tiny stuff that's usable for swivel practice or dye testing is in a small box at my feet. The microscopic trimmings and edging stuff is in a separate box. Why do I keep it? because it's good to grind up later and make leather putty with to fill the back of embossing jobs. For me it saves a lot of time to not have to dig around for the piece I need. Some sort of organization at least cuts down on my searching time. I also learned that it's a good idea to keep chrome-tanned and veg-tanned separate, as well as oil-tanned. I figure I don't have that much of those, so it doesn't hurt to set them aside. -
Thanks, it was a practice piece that I decided to color and finish up for my Buddy.
-
That right there is a problem Here's a blue one I did yesterday. This is Fiebing's Light Blue spirit dye - just after I finished airbrushing the black border.

-
Yeah, you have more room than I do in my designated area. But, it's a section of my basement. Sometimes when I'm spraying black I'll look up and go upstairs and see a cloud of particles filling the basement. Someday I need to figure out how to retrofit a hood system above my work area.
-
Swivel Knife Vs. Leather Quality
Cyberthrasher replied to Widget's topic in Leatherwork Conversation
I'm getting ready to spring on my SK-3 soon. Seems once a year I find a couple of really nice expensive tools that I really want and treat myself -
Fiebing's Blue, either Professional Oil Dye or Regular Dye. You'll probably want to take a look at the Royal Blue in the Pro Oil Dye. They have a few different blues between the two types though. Some people say the Tandy Pro Waterstain is good stuff, but everything of theirs I've tried (aside from that) has always been weak in color and susceptible to color fade/bleed.
-
Applying Oil And Wax With Air Compressor?
Cyberthrasher replied to MrLentz's topic in How Do I Do That?
A lot of people have come to the conclusion that oil will prevent dye from absorbing in. This just isn't the case. I think it's because we've all learned at some point that oil on metal will prevent paint adhesion. Since the dye isn't adhering to, but is soaking into the leather, it's really no problem at all. In fact, the oil HELPS the dye penetrate. Keep in mind that the whole point of oiling is to replenish the natural oils that the animal produced on its own. For a good wax, I love Montana Pitch Blend. It's a mixture of Mink Oil, Pine Pitch, and Beeswax. You'll never spray it on though - it should be rubbed in with your fingers and then buffed as a final step. -
A Little Guidance With Dying Leather
Cyberthrasher replied to Meinshnake's topic in How Do I Do That?
If you can't dip-dye because of the need for other colors on the piece, airbrushing works well to get black nice and even every time. -
I use my respirator all the time and I still end up with black snot. It's kind of a reminder to turn the air down a little, but it still happens. Nowhere near as bad for me as when I didn't have the respirator.
-
Not even. It applies a lot easier than Resolene, but isn't quite as resilient to abuse. It will also wash off with water on a rag where, once cured, Resolene won't because it's water and UV resistant.
-
Swivel Knife Vs. Leather Quality
Cyberthrasher replied to Widget's topic in Leatherwork Conversation
Then yeah, I'd definitely start with either the upgraded blade for $15 or a whole new rig. Honestly, a year in, I'd say you can treat yourself to a whole BK swivel knife and get something that spins with ease and has a sharp blade that will stay sharp. I've had mine for almost 2 years now and just sharpened it a couple of weeks ago. Good steel will only require frequent stropping. -
Probably not. My method for guitar straps would probably help you. I work with 7/8 oz when doing guitar straps, so it can stand to get a little more water. I run it under the tub with warm water front and back then let it sit for a couple of hours until it's turning natural color in the center with some darker spots around the edges. At that time, I wrap it up in plastic wrap and stick it in the fridge at least over night, though I feel my results are better with 2 nights. When I wrap it, I use multiple pieces of plastic and wrap it in sections that I think I can do in one sitting. If I can't do them in one sitting, they're at least logical spots to work on one at a time. Then, when it's time to work, I only unwrap that one section and leave the rest in plastic so that it doesn't lose its moisture. Sometimes as I'm working I'll need to spray the flesh side with a mist of water (it will pull UP through the leather to the surface and not over-saturate your tooling you've already done). Once I'm done with a section, or for the night, I spray the back with a little water again and wrap it up to put back in the fridge. This ensures that the part you've been working on won't suck the moisture out of the wrapped sections and will maintain a consistent moisture level throughout the project. This is pretty much what I do with anything that will require more than one sitting.
-
Swivel Knife Vs. Leather Quality
Cyberthrasher replied to Widget's topic in Leatherwork Conversation
Ditto Kings X, BUT, you gotta get rid of that kit knife if it's anything like mine was. It's NOT sharp. Mine had a round edge on it when it came and I assumed that that must be how it's supposed to be. I ended up buying a "deluxe" model shortly after since it was adjustable ($15) and saw that it was supposed to have an edge - imagine that. It wasn't long though before I realized it wasn't holding an edge for very long and I just couldn't control it that well because of the lack of spin on the yoke. That's when I upgraded to a Barry King. Of all the blades out there, for the price you can't beat a Barry King. I use mine all the time and even bought some separate blades from him to fit Tandy barrels (for those tasks that don't happen frequently). The leather will make a difference though, as will proper casing. While you're looking for a knife, I'd stop by Leatherwranglers and check out Paul's sharpening videos - If you have a LOT of money burning a hole - grab one of his SK-3's. For your level though, I'd hold off on that and get a Barry King . The videos will show you how to keep it sharp though. http://leatherwranglers.com/tips.html -
Belts will benefit from a groove since they get worn down by the belt loops on our pants and can run into things. Guitar straps don't necessarily need one as long as the stitching is clean. For bag straps, make a judgement call based on where the strap is and how it will be used.
-
A formula for sizing: Width item + thickness of item + thickness of leather = width of pattern. You HAVE to count for the thickness of the leather. If you just go off of a paper template, things will end up too small because the thickness of the leather will throw off your measurement. There's a long lesson here in regards to linear inches and stuff. I'll save it though. Actually, there's a good tutorial from Nigel Armitage on making a cell phone slip case that explains a lot of it for this purpose. http://www.youtube.com/watch?v=ktbbT9-EpVo
-
Why don't you put some ice on those internet balls before they swell up any bigger. Want my address?
-
Wow, way to keep being arrogant. The OP ASKED if there was a better tool for the job and he was answered. anyway - the Sheridan bevelers have steeper pitch and therefore allow you to MORE EASILY get into tight spaces without effecting the adjacent work. You can use any tool you want, but the right tool for the job will yield the same results with greater ease and pleasure - allowing you to spend your time in other places.
-
I've managed to get a plastic look off of RTC in the past, but it was a lot harder to do. I really do like the finish on it. However, I did notice that it wears easier than the Resolene I'm used to. So, I need to use more coats on pocket items. I put it on a personal business card holder that I carry every day and it's like it doesn't have any on it at all. So, I just have to go a little heavier with it.
-
Need Some Help In Choosing Leather
Cyberthrasher replied to BusyMonkeys's topic in Leatherwork Conversation
It's only been a day - patience man Do you want vegetable tanned leather for tooling, or are you just after the grain pattern? Most Veg-Tan isn't going to have that kind of grain pattern to it because it's not the best for tooling. If it does have it, it's usually embossed on there. BUT, there are tons of options out there for leather with these textures if you're not interested in tooling it. Looking at "Mullberry's" pictures on their site, it looks like all of their stuff is chrome-tanned leather. -
I can't see the second set of holes anywhere. Maybe I'm just missing it all together.
-
Yes on all points. You'll want a "Sheridan" style beveler. Most aren't labeled as such. They're just steeper angles. All of Barry King's bevelers are Sheridan style, as well as many of the other makers that aren't associated with Tandy. The "Sheridan" tools are designed to work in those tight places that you find in that type of work. I use Barry King's smooth bevelers. Also, a modeling tool is a beveler as well and can/should be used for those tight spots. Most importantly, practice
-
Yeah, you'll just need to thin the yellow you have. I know Fiebing's yellow is tan when used full strength. Start with 50/50 and go from there.
-
I have some leather that looks somewhat crystalline at times. So, it might just be something that's being accented by the Resolene. Different rate of absorption is another reason why it's important to do several really light coats as opposed to 1 or 2 heavy ones. Just be sure the last coat has had plenty of time to cure before adding another. If you don't, it will reactivate some areas and end up removing the last - making it hard to fix due to the differing levels of gloss. I've experienced that way too many times during fits of impatience. Also, I have some cheap sponges I use. There are times where they each react differently and may sometimes have something in them from the manufacturing process. The downside to 10 sponges for $1....