


Cyberthrasher
-
Posts
2,397 -
Joined
-
Last visited
Content Type
Profiles
Forums
Events
Blogs
Gallery
Store
Everything posted by Cyberthrasher
-
I avoided this post because barn finds always make me jealous - this just proves that I was right
-
Love that sandpapered look.
-
 thin it 50/50 with water. It's too thick to get a clean application straight from the bottle. If you thin it and use a moist sponge (no dripping water at all when you squeeze), you'll be able to apply clean coats. And remember, it's always better to do multiple light coats than it is to do one heavy coat.
 -
Like all the people who ride my style of horse and think it's cool to cover it in chrome and toys like they see on all the tv shows . I admit that I was there in the beginning too....
-
The Paasche VL series is one of the most popular kits, and the parts are readily available, even at a lot of leather supply houses. It averages at about $50 for a starting kit with 3 different tips, a hose, a metal cup, and 2 paint bottles. You also can't go wrong with a Badger in the same price range (I think it's a 155 model), but I can't recall if they come with different tips, and parts aren't as common (but still out there). Up until now I've actually been using a Harbor Freight deluxe, which has worked well, but it has room for improvement. For a compressor, you just need something that spits out air in the 25 - 35 PSI range. If noise is an issue, get a compressor designed for airbrushes. Many people like the Iwata compressors, and Paasche has some available as well, but I can't comment on any of them. I use a Harbor Freight 3 gallon shop compressor and it works fine for me, but it can be loud as well. I also have a basement work space and a family who's used to me being the loudest person in the house. TCP Global is a good place for various supplies, but I usually look at Coast Airbrush for things first since they offer excellent support and educational resources. They're devoted to airbrushing/pinstriping and other Kustom Kulture stuff, so I just kind of prefer to support them if the price is right. You already bought stuff, just quit stressing and practice when it gets there!!!!
-
Just play with it Recommended air brushes will be double-action, so you can control both the air flow and dye with a single pull of the trigger. The fades are done with a combination of letting off the air and dye, as well as varying your distance from the work. There's no need to thin the dye any further to get different fades within the same color. Most dyes will be between 25 and 35 PSI - usually toward the lower end, but it varies depending on how thick your mix is. Here's a good starting spot for tutorials, but there are TONS of resources out there. If you buy a Paasche, it comes with a book of lessons as well. http://www.airbrusht...ush-lesson-one/ BTW - For practice, a little food coloring and water is cheap and effective.
-
Dark purple chevron cuff bracelet
Cyberthrasher commented on Destrier's gallery image in Gallery- Our Leatherwork
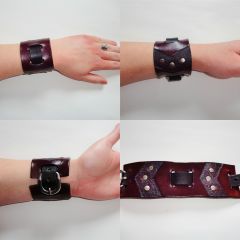 I saw this AFTER the message I sent....oh well Looking good though.
 -
Interesting....I'm not really into western stuff at all, but somehow I always end up living in rodeo towns and I hauled semi loads of hay for a while (up close and personal with a lot of tack and saddles in barns). Thinking about it, I don't think I've seen many black setups outside of pictures. Guess it never occurred to me that that's not a common color choice.
-
Little off topic, but any reason why that's the case? Is there something about black that doesn't work for saddles or other gear (other than heat if they're out for a while)?
-
Difference Between Craftool 101 And 106 Bar Grounder?
Cyberthrasher replied to 5shot's topic in Floral and Sheridan Carving
That's great, but I have to ask. Which came first? Yours or the one on Tandy's library? For clarity, I'm NOT trying to discredit your index, just curious -
That's a pretty good one. One common thing I found was that most of the tutorials out there are for that pouch style sheath, which wasn't what I, or that customer, wanted. Also, I couldn't get over the fact that most people expose the flesh of the leather for either the belt loop or the back of the sheath. It seemed like they were always making a compromise that required flesh to be shown somewhere.The tutorial that I posted was the only one I could find that addressed both of those issues. It's a little more work (and therefore a little more confusing at first), but I think the finished result is just that much better.
-
I can't predict the colors that I use, and rarely do I get a request for "pure" black. So, for me, it's dye all the way. But, if I ever get to a point where a lot of people want straight black stuff, then I'd look into a pre-dyed side.
-
For grey, I stumbled upon Royal Blue (Fiebing's pro oil) thinned with alcohol to about 25/75. I was surprised because I had never expected it. Your reddish brown is a common one I do, but I use either light or dark brown and mix with red. A lot of times I just put it on blotchy and then wipe red over the top - gives it a cool cloudy texture. If you just want the true color, mix it up in a cup to taste. The color is commonly referred to as oxblood, but can span a lot of different shades from mahogany to cordovan or any other name you'd like to give it.
-
Resolene thinned down will give a satin finish, especially with an airbrush.
-
Difference Between Craftool 101 And 106 Bar Grounder?
Cyberthrasher replied to 5shot's topic in Floral and Sheridan Carving
I'm looking at the craftool conversion chart available from Tandy and it looks like the difference is both length and the size of the individual dots. This document is a staple item for me. I have it on all of my computers so I can look up various sizes and options when I'm doing different patterns. https://www.leathercraftlibrary.com/c-85-free-leathercraft-tooling-patterns-and-leathercraft-how-tos.aspx?pagenum=3 -
Softail's Saddle With Self-Supporting Fender
Cyberthrasher replied to ivarian's topic in Motorcycles and Biker Gear
I have some guides that clarify what I mean and how to execute it, if that will help. -
Well then, Happy Accident it is
-
I forget, was that supposed to look like a cylinder in the center of the wings? If not, it's a cool accident
-
Shhhhhhhh No, I've got it down to a pretty good science. I'm actually always looking for ways to speed up and charge less!! airbrushing a 50/50 on a 50" guitar strap usually takes about 2 minutes for general coverage, 10 minutes if I've gotta slow down and do specific sections. If it would take any longer than that, I'm likely brushing it by hand anyway due to the multi-color detail involved. I just haven't gotten good at that kind of airbrushing. That's the main reason I got an airbrush. It was just taking me too long to get an even coating by using a brush or dauber.
-
Even if I'm going for full strength color (which is usually the case) I always do a base pass at 50/50. I found that I get better penetration that way.
-
I'm just glad Billy caught it. That's what I get for multi-tasking so much while I'm at work - king of lose my mind at times
-
paperwork and paperwork and paperwork...I REALLY need a new filing system!!
- Show previous comments 1 more
-

Shred it and act like you never saw a thing!
-

Me too! Mostly for patterns and such. If I keep nailing holes in the wall I don't think I will be able to repair the wall at some point lol
-
I shred a lot of stuff, but there have been too many times where I've dug through the paperwork to save my butt when someone tries making a false claim, such as claiming they never received payment for something.
The patterns just get taped to the wall

-
Springfield is a Horween dealer now, so you might give them a call and see what they can do. Other than that, Tannery Row is Horween's retail outlet.
-
Softail's Saddle With Self-Supporting Fender
Cyberthrasher replied to ivarian's topic in Motorcycles and Biker Gear
I looked at it when you first posted and I've been trying to find a way to say this. I like your work and it's good, but one common thing I see it almost every piece, especially this one, is that it all looks really busy because there's no variation in the depth. The illusion of space is critical and makes things appear that much more realistic to the viewer while also setting things within the design apart from each other. In this example, the roses are supposed to be 3D and overlap each other, but since it's all tooled at the same depth they lose their beauty and appear to be 2D. If you cut and tool the overlapping ones lighter when they're above another rose and deeper when they're above the "infinite space" of the background (because they are technically closer and have more space behind them), it will give a lot more depth and personality to the work. I really hope that none of this sounds mean. It's just something that I feel needs pointed out in order to take your work to the next level -
that does help. Thanks!!