ouchmyfinger
-
Posts
178 -
Joined
-
Last visited
Content Type
Profiles
Forums
Events
Blogs
Gallery
Store
Everything posted by ouchmyfinger
-
hey everyone, i was wondering if anyone knew of a sheridan style tooled item out there by chan geer or any other excellent sheridan style carver. i just want it to look at and learn from.
-
Totally New To Sheridan/floral Style
ouchmyfinger replied to Wolfsax's topic in Floral and Sheridan Carving
he is exactly right, you won't need anything other than he described. it is actually fairly simple to do also, even easier that you have the pattern right there to work off of. i would rather do that all day than basket weave the whole thing lol. when your done i think you'll say the same thing too. you should be able to knock that tooling out in less time than the basketweave easy, also it goes by faster to me. -
where can i get this holster dvd everyone is ranting about lol. sounds like a good thing to have
-
To All Swivel Knife Aficionados And Collectors
ouchmyfinger replied to gtwister09's topic in Leather History
im jealous of all of you guys, i just received my barry king tools and i was currently doing some research on a new swivel knife, i have medium size hands for a guy nothing special. what would you guys recommend? i do mostly sheridan and i am currently using a stohlman with stohlman hollow ground blade. i just got my beader blade from barry also and love it. also what blade should i use. I'm sticking with smaller projects like wallets and purses. thanks -
everyone has it right of course but the new tandy bargrounder is not as good as the older ones, they don't have the detail and seem to smush the leather, try and find an old one or shell out a few more bucks for a good one. also they come in multiple sizes, 3 hole, 7 holes, etc...i just use a 3 and 7 hole and that just about covers everything i do, barry king makes them in diffents sizes depending on the size of projects you do, not sure about other makers but anything is better than the newer tandy ones, you'll be surprised how much practice that takes to use the tool that consistently at the speed he is going at. good luck
-
i know that tooling has evolved like everything else in the world. I was wondering if anyone knew something about this or could provide some sample pics of older tooled leather goods. an example of why i am curious- what if someone wanted a tooled item and they wanted it to look like it was from a certain period. what tools were used and how were they made. i see on some of the older things that their flowers are very simple and they don't have the detail that i see in more modern goods. I'm sure you can get the idea of what I'm asking so post any info that you feel would be relevant for the topic thanks
-
the beader blades are the way to go, if your ordering custom tools i think you should try out a good swivel knife, I'm glad i dropped the cash on one. they last forever basically and i also wanted to say good job on that holster, i wanted to do one myself and i think u motivated me to. lol my other alternative advice to the parallel lines....since you will not always need the size that you have you may need to do them the old fashioned way. first make sure you have all the advantages at your side (leather cased proper and evenly, a good sharp blade, and hopefully a swivel knife that turns smooth and has dependable control). i have done straight lines using a metal ruler and using that as a guide for my knife. think about which line to do first, sometimes you need to do the inside first so you can place your ruler and see your previous line and the ruler does not cover it up (you'll get it when u try it) if your knife catches from being dull or hit a dry spot on the leather this may cause a little jerky action and oops, this also happens with imperfections in the leather. good job on the holster though,
-
great work, what did you antique and finish it with? i love that color
-
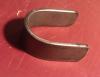
i have access to a metal shop that has every type of metal imaginable so does anyone know what i should be using exactly, I'm a decent sized guy and pretty strong and bending that around the pipe with 2 pair of pliers wasn't that bad how would i bend that after it is stitched in? thanks everyone
-
i heard that some of these schools have ways of accepting military benefits, this would help because it would also pay me while i attend the class so i can afford accommodations as well. does anyone know about this thanks
-
thats the color that i used. thats why i am so confused on how to get the color like in your avitar
-
was wondering if someone has ever put clearlac on a project after it was stitched already......i didn't think it would mess it up but i wanted to get a few opinions from anyone that does this or anyone that has had good or bad experiences thanks
-
How Do You Mix Beeswax And Paraffin ?
ouchmyfinger replied to ouchmyfinger's topic in How Do I Do That?
when your using the saucepan do you use a super low temp, or how hot does it need to be. i don't know what to expect and i don't wanna burn the wax. how quickly should it be melting and what is a good way to mix them. do i have to stir constantly or just once..im not sure how the 2 waxes are going to react and i wanna do it right the first time if possible thanks everyone im gonna run to the grocery store or walgreens and pick up some paraffin now so hopefully ill have the answer n get it done tonight -
How Do You Mix Beeswax And Paraffin ?
ouchmyfinger replied to ouchmyfinger's topic in How Do I Do That?
how are you guys melting it though, i just don't want to ruin my kitchenware or burn the wax and create a mess and waste my materials thanks -
i have read where people are mixing beeswax and paraffin....how is this done. what are you guys pouring it into also to let cool and is it difficult to remove from the mold..any tricks thanks
-
Totally New To Sheridan/floral Style
ouchmyfinger replied to Wolfsax's topic in Floral and Sheridan Carving
yeah by any means go for it lol...im sure just building a nice quality replacement for him will make him happy enough. as long as that goes well the word of mouth will spread, at least thats what happened to me for holsters (not so much for other things) maybe try looking for some sheridan people in your area to maybe meet up with after you have your leather cut and they could probably help you or lend you a few tools. you can knock out the lifters, thumbprints, and flower centers first. that only leaves you with some beveling and backgrounding pretty much(if you even are backgrounding) I'm sure you have other tools in that kit also...double check to see if he wants "sheridan" or "floral" you can knock out some awesome maple leaves and acorns with a little practice and your tandy tools should be good enough for a good job if you shy away from the sheridan style flowers and leaves pm me if u have any questions, i think tandy has a few western rigs on sale this month that you could get a pattern from if needed good luck ps i had to edit my post because i didn't realize u were a female lol....but yeah check out the instructional pdf for edge finishing with glycerin soap and dying after. definitely gave me a professial look and ill never do anything else, also if your hand stitching i read a good article in a leatherworker magazine i think about wiping the excess wax off before stitching and i drilled my holes with a dremel and a small bit, ran a glass slicker when i was done and then ran the overstitch wheel and it came out great, it the little things like that, most people won't notice but they won't know why it is so nice but as long they know its nice thats all that matters lol -
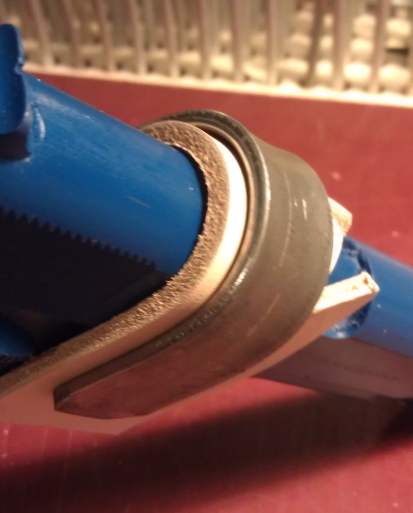
this is as far as i got and now i don't know the best method to stitch it in should i stitch it and then bend it, i didn't know how to do that without marking the leather thanks
-
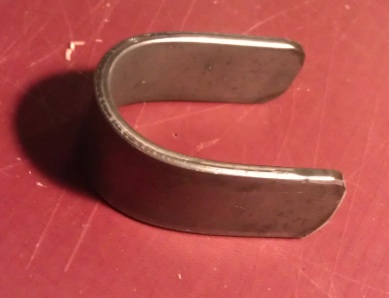
what did you use to reinforce the throat? i took some flat metal bar from home depot and hacksawed a piece off and bent it around a pipe and took it to the bench grinder and rounded and smoothed the edges and can't figure out how i could ever stitch it in thanks


-
i have seen a few videos of people using a vacuum and bags to suck the air out and mold the holster that way, but i also heard of some people using a press to do it. how is a press made for this? can someone chime in and possibly post pics. i just received some horse from springfield leather also so let me know what you used for leather on your pics thanks
-
Is there anywhere that shows how it is built or a video of one in action. Thanks.
-
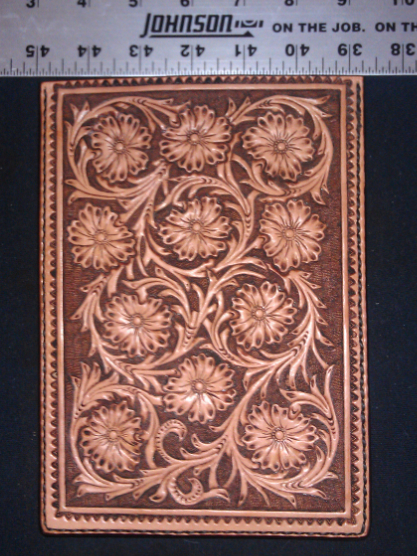
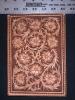
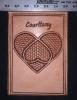
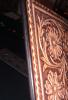
hey to anyone thats been online in the past few days...i have been working on this case for a kindle. this is the first time i used the burnishing technique with bob park that was posted here....this is my first project with the barry king tools i ordered and the chan geer patterns that i downloaded from sheridanstylecarving.com. it is also the first with neatlac, antique paste, the nyltex (or whatever it is called) thread from springfield leather. i did a stitch groove, ran my spacing wheel, and drilled my holes with a dremel. i sanded the edges on a bench grinder with a smooth sand wheel instead of the sandpaper used in the bob park tutorial. first time with herman oak leather as well. to anyone who gets a beader blade, or to barry king.....if someone orders a beader blade, do not let them complete their order without including a large beveler lol. that would have saved some time, the beader blade was fantastic and i wish i would have bought one a long time ago, definitely looking foreword to getting another one for thinner lines in the future. the chan geer patterns worked out well because when i printed the ebook off the pages were slightly smaller than if i would have ordered the book i assume, i got the book for notebook patterns and they were perfect for the kindle so i did not need to resize anything. feel free to critique also, I'm open to any pointers. the only thing i know i did not do correct was- i used cheap packing tape to reduce stretch on the sheridan side and i went to home depot and got better tape for the other side. the sheridan side stretched more and the borders did not line up for the stitching at the end so i had to make due and be creative to make it look decent. thanks for the help everyone who answered my questions i had about all the new materials i used this time. i recommend all of these things i used in this project and will be sticking with these as main supplies in the future, very satisfied with barry, chan and all the materials i bought from springfield leather.
-
Totally New To Sheridan/floral Style
ouchmyfinger replied to Wolfsax's topic in Floral and Sheridan Carving
im familiar with both books, the sheridan book will go over the specialty tools needed and will give you a basic overview of how the patterns flow and how to draw them. i am not an artist and have seen the other book and that is more geared to showing you how the patterns flow and has some example pics of different leaf and flowers. if you have the ability to shrink and enlarge things then i would definitely get the one for the artistically impaired. the big problem is that based on what you have carved before you may be lacking to tools to do a good job, tandy doesn't make most of them like the thumbprints, flower centers (they have one decent one i think) the bar grounder that they make is garbage so don't even bother with that one. plus it takes a lot of practice to do that particular type of tooling. thats why you see it everywhere. IMHO its the best format for "showing off" other than pictorial. and as you know pictorial requires different tools as well so same thing going backwards. you may want to send it out and have someone do that part for you unless your friend is paying you enough to acquire the tools needed for that project and enough for the hassle. theres nothing worse than taking on a project for a friend and not being happy with it. as long as he knows this up front then go for it and welcome to the world of sheridan lol post pics too people on here can help, i would recommend going to barry kings website and checking out his tools and if you have any questions post them and theres enough sheridan guys here to help u quickly good luck -
has anyone used thicker thread on this machine, i am number 40something lol and can't wait to get my machine, i like the look of a big thread and i think it just makes things look well built. not too big though because i know that you want to use the proper equipment for the project your working on. i just want to make sure that i order the right size thread and needles the first time so i don't waste money. what size thread should i be using on lined western rigs, also which needles. does everyone use the same size top and bottom? I've always looked into the details of what makes a top notch product and I'm looking for the opinions of people like me. I know this place is full of em lol. so if you have that attention to detail and think you have it nailed and will share your secrets i would appreciate it thanks
-
Boss Tension Adjust Ment Question.
ouchmyfinger replied to mlapaglia's topic in Leather Sewing Machines
that exact thing happened to me and i didn't notice until it really caught, the thread coming off the spool going up through the metal guide on your thread stand thing wasn't helping the cause either, i had to bend it to keep this from happening. once i noticed it i payed attention to it and it was doing it more and less depending on what part of the spool of thread i was at, more of a problem at the bottom obviously. someone told me to use a little spray of silicon on my roll of thread and that would keep it smooth throughout the whole machine. hope this helped -
Show Me Your Backside Of Holsters Sewn With Boss
ouchmyfinger replied to particle's topic in Sewing Leather
i know that they have a bolt on the inside of the machine you can reach when u pop the back panel off. this bolt will be what stops the pull handle and if the nut is too far up on the bolt inside then your handle pull is not going down far enough and that is directly related to how far the bobbin is going to turn back and forth and will cause missed stitches, this will cause missed stitches. that being said your handle pull controls the bobbin rotation so if your pulls start lacking then you are going to affect the bobbins rotation and this will affect the loop so you need to have that nut and bolt adjusted and have all your tensions adjusted and don't forget, you are part of the machine. if you change that handle pull at all you'll be the one that causes the missed stitches. if your pull doesn't go up enough it won't provide enough slack for the loop to free in the bobbin case and if u don't pull down enough then you won't catch that loop, thats the best way i can describe it. hope this helps