SooperJake
-
Posts
657 -
Joined
-
Last visited
Content Type
Profiles
Forums
Events
Blogs
Gallery
Store
Everything posted by SooperJake
-
My Latest Holster
SooperJake replied to SooperJake's topic in Gun Holsters, Rifle Slings and Knife Sheathes
LOl Thanks Kayak! Too late though..I just order a Canon S100. I want my damn Nikon back, along with the rest of my stuff some mofo stole from me back in 2010!~ Jake -
My Latest Holster
SooperJake replied to SooperJake's topic in Gun Holsters, Rifle Slings and Knife Sheathes
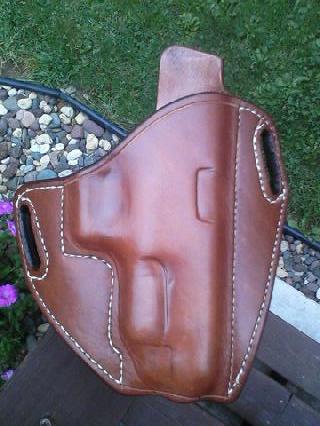
The left hand picture is more true to color BTW...It is a nice fawn brown color. Jake -
My Latest Holster
SooperJake replied to SooperJake's topic in Gun Holsters, Rifle Slings and Knife Sheathes
Yes, I agree...I altered the pattern to add leather to the outside of the loops. I punched an end hole and then it dawned on me I was too close to the edge, so I made it look balanced anyway. Thanks TO! Thanks Mike! Jake -
I made this one for an XDM 4.5BBL .45ACP I've ordered an oblong punch because I'm not happy with punch/knife cutting. I just can't seem to get a clean look. Hand stitched Hermann Oak with neetsfoot oil/ tan kote finish. I finished the inside with Resolene . Crummy cell phone camera...I need to shop for a good camera. Jake
-
I Went And Done It Now...pink!
SooperJake replied to renegadelizard's topic in Gun Holsters, Rifle Slings and Knife Sheathes
What did you end up using for the dye? Jake -
Looking through the vast holster world I haven't seen common sense or pull- it- up type fasteners used, and they seem like a very secure way to close a loop. Has anyone ever used these or can someone shed some light as to why they wouldn't be a useful way to attach a holster? Both of these are commonly used in the boating world and are secure against forces applied from most any direction, as apposed to snaps. I'm thinking as applied to a pancake / snapcake style holster. http://dotfasteners.thomasnet.com/viewitems/miscellaneous/miscellaneous-pull-it-up?&forward=1 http://www.dotfasteners.com/common_sense.html Any thoughts? Jake
-
Wild Bunch Rig
SooperJake replied to Boothill Bob's topic in Gun Holsters, Rifle Slings and Knife Sheathes
Awesome rig, Bob! What weight leather are you using? -
I don't know either, Mike. That's why I thought maybe my needles were defective. I broke one the other day, and two yesterday on the same holster. One of the breaks was while using pliers. Jake
-
I've broken 3 #1 harness needles this week. I bought needles from two well known vendors and unfortunately mixed them, so I have no idea if it is all from one vendor or not. What I haven't figured out yet is, where the heck the top loop of the needle ends up. It isn't in the hole, as far as I can tell. I also note that some needles have slightly different hole sizes even though they are listed as the same size. I now eyeball them and get the right size, depending on if I use 6 or 5 linen thread. It must be a brand difference. Jake
-
Problems With The Avenger From Hell
SooperJake replied to George B's topic in Gun Holsters, Rifle Slings and Knife Sheathes
Looks great George! Jake -
Stirrup Purse
SooperJake replied to rscow's topic in Purses, Wallets, Belts and Miscellaneous Pocket Items
and with lacing (bought decent lace from Springfield). Roger Nice job! Which lace is it, Roger? Jake -
Wingman Iwbs With Ostrich Leg Trim
SooperJake replied to DHopper's topic in Gun Holsters, Rifle Slings and Knife Sheathes
They look pretty good, Dave. Very distinct shape. Stitch spacing could be tighter.....loops a a tad thin.... molding and workmanship look nice! Jake -
Problems With The Avenger From Hell
SooperJake replied to George B's topic in Gun Holsters, Rifle Slings and Knife Sheathes
Hell, George..just send me the gun and the holster and move on.... problem solved... Jake -
Looking To Buy A Stitching Chisel To Pre-Punch The Holes
SooperJake replied to particle's topic in Leather Tools
Eric, I have used the diamond stitching punches but I spent a couple hours in total sharpening and polishing them, which also made a much smaller hole ( and a weaker prong). They came in a Tandy bag but I ordered them from Springfield. 2mm will mimic 6spi . I bought two 4-prong punches from Springfield, and ground off the two outside prongs on one to make a two punch. Reason being, I have another set from Tandy, earlier, and the thickness of the two are way off, so the holes look like hell. (That was a 4mm set I started with). You want a two prong and a four prong at least, so you can always index off an existing hole accurately. I would add a single also, for fudging in between holes as you come to an end, for instance. If I buy anymore of these, I'd look for Seiwa brand, which are sold by Goods Japan online as told above, and Ebay. I have not seen the smaller sizes on Ebay, though. That's one of the few tools Seiwa makes that looks different than what you get from Tandy and the like. And, at least it isn't made in China. I've purchased a number of tools from Springfield that came in a Tandy bag, which really irritated me. They were cheaper at Tandy with my discount. Jake -
Airbrushing is the most uniform coverage method I've used yet for applying dye . Fiebing's alcohol based dye is practically dry on contact. On areas where the dye absorbs a little more ( or less) the airbrush can be set to barely fog on additional dye. Well worth the investment. It can be used to even out a blotchy dauber job too. And the airbrush can be used for tons of other projects around the house. Ever have to paint close around a window? Run Chapstick on the glass perimeter and paint the muttons or window frame with the airbrush, for example. Scrape the Chapstick and paint off with a flat razor. You'll never tape off a window again. Jake
-
I would dye before stitching. And get an airbrush if you haven't already. The results are spectacular over dauber dying. Jake
-
I guess the second half of my question was redundant.
-
Has anyone tried using their vacuum press to mold a metal reinforcement already sewn inside the holster or is the slide area pre-bent by hand prior to sewing? Jake
-
My First Holsters
SooperJake replied to mojoewrkn's topic in Gun Holsters, Rifle Slings and Knife Sheathes
Is there brown dye on the holster then a top coat? Brown is a mixture of red and green. That could be the source of the green hue. I've had undyed Tandy leather leather leave a brown smudge on my dampening sponge. Here is a link to an instruction on color mixing, with a blip on brown http://home.comcast....IO/COLORSYS.htm Keep making them, you're doing great! Jake -
Define a "tight budget" in dollars, Jdbfish... Jake
-
By the way, if you get in on your hands, wait 30 seconds and it will peel right off. http://www.tearmende...erialSafety.pdf THOSE ALLERGIC TO LATEX TAKE HEED..IT IS LIQUID LATEX Jake
-
I couldn't find a related thread so I thought I'd share a new find. I picked up a 16oz bottle of Bish's original Tear Mender at the local hardware store( not cheap, about $19 with tax). It is listed as "Instant Fabric and Leather Adhesive" and claims a 3 minute drying time. Other claims include waterproof, permanent, quick drying, flexible, UV resistant, and acid free.Machine washable in 15 minutes. It is milky white and has a mild smell of urea or maybe ammonia. Not quite water thin, but is clear in a minute or so when applied. I applied it with a dauber on a couple 6 sq in pieces of scrap leather and it was tacky before I finished painting each piece. I waited a couple minutes with one set , and with another set, put them right together. Wow. it tacks fast. The smell is gone in about a minute, and the stuff sticks pretty much right away. I was hoping it actually would give 3 minutes for extra positioning time but it really doesn't. The dauber will clean if you wash it in water right away. The bonded leather can be pulled apart with considerable effort, but then, so can Weldbond contact cement. The big difference I can see it the Bish's is a real rubbery like residue once separated, and you could, with some time, clean your leather pieces off by pulling up the glue residue. So,, your pieces wouldn't necessarily be lost if they stick together wrong. It does NOT appear to pull flesh leather up in the glue in my preliminary pull-apart tests. I've got a piece soaking in water now for waterproof testing. I may shelve my smelly old Weldbond. http://www.tearmender.com/ Jake
-
"use Wax Instead Of Acrylic Sealer"
SooperJake replied to particle's topic in Gun Holsters, Rifle Slings and Knife Sheathes
I found a quick way to make / melt wax finishes is to use one of those pitchers with the internal heat plate. You can get one at any X-mart of your choice. They are around 15 -20 bucks, and boil water about 60% faster than a microwave. I've used this method for hide glue and wood finishes for years and it works fantastic for any oil/wax combination. Just save and clean a soup can or whatever size can will fit in the pitcher to melt your potion in, and pull it out of the hot water with pliers. Jake -
Where Can I Get Duncan's Blue Guns?
SooperJake replied to mojoewrkn's topic in Gun Holsters, Rifle Slings and Knife Sheathes
I think you mean these folks, Dwight Streicher's Police Equipment | 10911 W. Hwy 55 Minneapolis, MN 55441 http://www.policehq.com/ -
Bruce, do you run the stitching groover more than once to deepen the groove? Thanks, Jake