


SooperJake
-
Posts
657 -
Joined
-
Last visited
Content Type
Profiles
Forums
Events
Blogs
Gallery
Store
Everything posted by SooperJake
-
 Free pattern with pouch purchase.
 -
Something like this? http://www.kirkpatrickleather.com/conceal-acc./compact-double-holder-99 Jake
-
Kydex Holster Clip Alternative?
SooperJake replied to Rayban's topic in Gun Holsters, Rifle Slings and Knife Sheathes
I'm trying to get a sample of this product http://www.alimed.com/carboplast-sheets.html to replace kydex. It is a heat-moldable carbon fiber/ fiber glass composite used in podiatry. My ski boats are made of a similar material ( if not the same thing). It is pricey stuff. Jake -
-
One suggestion I would make is to take a look at the pinned post in the "How do I do that" section on edge finishing. It is amazing how much difference a smooth edge enhances the overall finished item. It is a little extra work that pays huge dividends. Yours aren't terrible but they can be improved. It helped me out a ton once I did same. Jake
-
I think it is more a visual aesthetic than anything. If you are want to making things with a more primitive look, I think it helps for that. But I prefer Barbour's size 6 linen thread aesthetically, so far, for hand sewing. Jake
-
Laser Cut Stingray Inlay
SooperJake replied to stitchwizzard's topic in Gun Holsters, Rifle Slings and Knife Sheathes
Cool sheath! What thickness of leather will 100 watts cut, Stitch? Thanks, Jake -
First thing I'd say is Welcome to the forum! Second thing is the pics are a tiny bit too small to get specific on comments but from what I can see you are doing fine work. I'd like to see an enlarged picture of the revolver holster, if you have one. Jake
-
Hello From Tundra Leather, Hamilton, Ontario
SooperJake replied to Tundra Leather's topic in Member Gallery
Welcome to the forum! Jake -
Utah..the best skiing ever! Welcome! Jake
-
Did somebody say cheese? :D Welcome to the forum! Jake
-
Welcome from Wisconsin. Jake
-
Nice work. Welcome! Jake
-
Welcome home. Jake
-
Hello from Wi. Jake
-
Welcome Mike. Jake
-
Welcome Eric. You'll find this place a boon on information and friendly folks. Jake
-
Second Knife Sheath With Skirt
SooperJake replied to PutnamLeather's topic in Gun Holsters, Rifle Slings and Knife Sheathes
I just saw found this thread ( because I want to try lacing). WOW...Putnam that is awesome work. Is that store bought lace or did you cut your own? Thanks, Jake -
My Latest Holster
SooperJake replied to SooperJake's topic in Gun Holsters, Rifle Slings and Knife Sheathes
TO, how much leather do you typically leave outside the belt slots? Jake -
Vinegroon
SooperJake replied to robertmeco's topic in Dyes, Antiques, Stains, Glues, Waxes, Finishes and Conditioners.
Mike, which step in the holster making process do you use vinegaroon? Are you pre-dying the leather at the start? Also, please define "a mild solution" if you would. Is that a box of baking soda to a 5 gallon bucket or? I just tested my batch and the color is awesome. A deep rich black . I was pleased to see a deliberate line I made on my test piece go away after total submersion. ( dipped half the test piece only, then the whole thing) Thanks! Jake -
New Owb Prototype
SooperJake replied to DHopper's topic in Gun Holsters, Rifle Slings and Knife Sheathes
Even if the wings had no actual benefit, I'd recognize your holster in a second. Nothing quite like, it shape-wise, I've ever seen. Great workmanship, too! Jake -
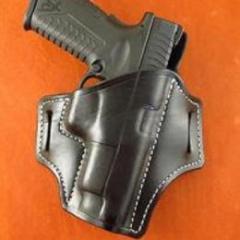
My Latest Holster
SooperJake replied to SooperJake's topic in Gun Holsters, Rifle Slings and Knife Sheathes
D fingers and Kats...I think both of you mistakenly got in the wrong thread, maybe? Has the forum gone wacky on us? Jake -
Looked for a similar thread but didn't find one... I see on some websites the maker stitches all the way around the belt slots and some folks don't do that. Any opinions for or against and why? Obviously saving time would be one reason not to. Jake
-
Alternative Loop Fasteners
SooperJake replied to SooperJake's topic in Gun Holsters, Rifle Slings and Knife Sheathes
I ordered some Pull-it-up fasteners from Sailrite just to try the idea. Wouldn't you know it they are back ordered! -
My Latest Holster
SooperJake replied to SooperJake's topic in Gun Holsters, Rifle Slings and Knife Sheathes
Thanks,Lizard. On some of my earlier holsters I did just that...stitch all the way around. And I agree. Without that little bit of stitching it looks "unfinished". But there is a reason why this time I didn't do it. I've been trying to come up with a way to get a more accurate stitch line on the first try, and I think I may be on to something. Normally I would make the pattern in the usual fashion, just like you would see in Eric's AWL videos, for instance. But every time I made a pattern I seemed to lose the crispness of form in the stitch line along the trigger guard. In particular, the area at the front corner of the guard where it transitions back to vertical. It always ended up with too much space left over. Which got me to thinking " How can I make this mimic the gun lines better, and make the pattern a little easier than guesswork?". So what I did this time was to trace the trigger guard area with a .5mm mechanical pencil lead extended out far enough for the pencil body to clear the gun. Just the pencil lead touched the gun. Very carefully trace around the lower area without breaking the lead. Then, I marked the upper slide line in the same way. Next I added the full gun width plus 2 leather thicknesses to the upper slide line, shifting over that distance. Pretty darn near perfect fit. Almost too good, as Mike points out on the unrounded corner at the trigger guard in that stitch line. I even fudged out a lot of the detail I had traced to get the current line. Like the rail mount area, which all showed up on the pattern. It may not be revolutionary, but it worked for me. So I didn't stitch those areas at the mouth and toe, because I was anxious to see if my idea would work. Now, there is no need to adjust the curved stitch line which mimics the gun's line well. You just tweak the straight line on the other side for fit, except I need to round that one corner. Jake