


SooperJake
-
Posts
657 -
Joined
-
Last visited
Content Type
Profiles
Forums
Events
Blogs
Gallery
Store
Everything posted by SooperJake
-
 It has been my experience that gum tragacanth comes right off in a slimy mess when it gets wet. Not even remotely waterproof. Take a look at this product line. It may fit the bill for you. http://www.aquaseal.com/ Jake
 -
finally some wisdom hath spewed forth.. thank you all. Jake
-
I just received my stamps from Grey Ghost this week and I'll give you a few tips. If you have any sort of design, like an outline or silhouette of something, say a penguin, you'll be better off if it is only the outline of a penguin, not a penguin in silhouette. My stamps offer much more resistance than I expected because there is possibly too much flat surface area in the design. I'll have to experiment with casing to see if I can improve the impression depth, and I'm going to make a very sturdy table for all punching/hammering to be done on. Also, be mindful of your font style and size. I have two words on the stamp of different font sizes ,and the smaller word on the 1 1/4" stamp, if struck too shallow, is hard to read. I approved the design on Saturday morning and the stamps arrived on Monday. How's that for fast service!? They are made of Delrin, by the way. Jake
-
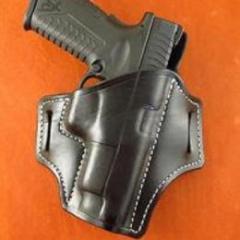
I'm curious as to how many of you get your holster stitch lines right on the first try, especially along the trigger guard? How many tries does your typical holster pattern require before it is "perfect"? Also, do you establish a base pattern style and then modify for the specific gun, or start each pattern from scratch? Thanks, Jake
-
I assumed it was like shining shoes, the brush appearing to be some sort of similar horse hair type brush .I'm just shocked no one else on the forum had an idea. Jake
-
Another New Plain Jane
SooperJake replied to Dwight's topic in Gun Holsters, Rifle Slings and Knife Sheathes
I don't think USMC black ever stops rubbing off. My first ( and probably last sing USMC dye) black dyed holster was done with it and it rubbed off readily two weeks later. Not until I applied a top coat did it stop. Thanks for the reply, Dwight. Jake -
Dan Wesson Holster
SooperJake replied to glockanator's topic in Gun Holsters, Rifle Slings and Knife Sheathes
interesting..iwb /owb combo? Jake -
Looking For 1 1/2" Brass Belt Tips
SooperJake replied to katsass's topic in Hardware and Accessories
http://www.sdtradingco.com/buckles/PaulsTips.htm These guys claim to have them, Mike. I've never order from them though. Jake -
Note the hide being brushed in this video. Note the appearance of the hide before he starts, and after the brushing. What's the secret? Is it most likely horse hair, like a big shoe brush? The mottled appearance is gone. How he do that? Any ideas are welcome. http://vimeo.com/27862521 Jake
-
I'm pretty green, too, and have been struggling with this same problem, but here are the things I have learned in the last couple of days that helped me out a lot. My awl is the collet style, where the blade is removable, and the handle has two flats on it. I positioned the blade so that I can reference the flat on the handle for horizontal. This solved two things. First, it ensures that my blade is angled to the groove properly. Second, the flat gives me a horizontal reference, so that I am piercing straight through the leather. If yours is fixed blade type, put a reference line on the handle for visual blade positioning. Are you using a pony to hold the leather? Next, I cut the stitching grooves a little deeper by pressing harder on the handle. This was huge. I practiced on scrap, paying close attention to how much pressure I was placing on the cutter, and cut parallel grooves over and over until they got more consistent. I also did this with the cutter set at different widths from the edge. And, I cut some with my straight cutter too. Initially I wasn't making them deep enough. Now the thread can be made flush. Also, at the suggestion of several good folks on here, who's names escape me this late at night, I shortened my awl blade using a few small pieces of leather. The awl is shortened to pierce through plus about 1/8". Now the holes on each side are much closer to being the same size, even though the front side is a smidge bigger .If the slot cut from the awl is too big, your thread can run high in one side of the cut, and low on the other side. Then, maybe low low high high low high low low, and so on. This makes the stitch line appear to squiggle all over the place. It is even worse if you have one of those wide awls. Mine is maybe 1/8" wide or so. I now back up my awl punctures with a wine cork, and I slowed down and try to be really conscious of making the hole. I had stabbed myself a few times with the awl and I think I was a little timid. The cork works awesome, and was also a suggestion from this forum. Get smaller thread, and if your needles are from Tandy, in the words of katsass on this forum, "They're too damn big". Use nothing larger than a 0, size 1 is even better. You may be wandering with your needle on account of the eye being big enough for a camel to skip through, and you are forcing it too much. Springfield's has 0 needles and thinner thread. PM me for part numbers if you want, I just received some this week. Campbell Randall has 1's and even smaller. Now, I cannot pull the needle through bare handed, but I can with nitrile surgical gloves on, which add a kind of stickiness. My opinion is the pliers are a bit over the top. I am a greenhorn. You can also practice on any heavy material, like old blue jeans or canvas, if you are parched for leather. For the stitching groove, mark a line with a pencil or pen. Be sure to glue the material together (5-6 layers) with white glue, real good so it is stiff. An old belt or old leather boots can be salvaged for practice leather, which is ideal. Then you don't feel bad about wasting good leather. This does another thing: I taught woodworking for years, and what held back the student most was that they were not trying to learn a technique, they were try to MAKE A THING. And so, the fear of screwing up the project kept them from experimenting. Kept them from learning. I just caught my very self guilty in the act, and had to laugh because I figured I shoulda known better. So, in woodworking, especially woodturning, which was my specialty, I had the student turn cheap wood literally into chips and dust. Stacks of 12" long 2x4 pieces ripped into 2x2's. They had nothing to show for the efforts but experience, and piles of sawdust to sweep up. It is really a special gift to the instructor when all of the sudden the lights go on, and that AHA! moment shows across the students face. I hope some of this helps. Try breaking the individual steps down and you might find where your weakness is. Mine was mostly the awl. I have to be careful because I let the end of the handle dip, and the hole ends up angled upward on the backside, and I miss the groove or end up too high. Jake
-
What I find interesting on this $3200 dollar document case, is not only the rough edge work and inking, but the use of the stitching punch ( huge holes which angle the stitch). I'm also wondering if the hide was cased prior to the brushing, which magically evened out the color or something else? The hide in the beginning is pretty mottled, then darker and more even, tonally, when he is brushing it. it also seems to have less sheen on it. Maybe these are ordinary things, or maybe they are tricks. But, since I am quite new to leather work, I am curious to learn them. Jake
-
Crickets chirping.....
-
It also looks like he is using a stitching punch and some kind of edge coating? Jake
-
Gun Rig For A Friend
SooperJake replied to cgleather's topic in Gun Holsters, Rifle Slings and Knife Sheathes
It's a beauty! Jake -
I'm not sure what you did while using the Eco Flo Professional edge dressing, but I bought some just out of curiosity, and it arrived today. On a dry, dyed, burnished edge, that I did maybe a week ago, and after coating and waiting 30 min. of drying, I can't scrape it off with a finger nail. I could not peel it off either. To clearify, I am in an air conditioned home, so the humidity is low. The leather pieces are dry. I also put it on a raw, fresh cut edge at the same time. In both cases the edge dressing sticks very firmly. It dries to a very low sheen. It doesn't look near as "fake" or awful as some of the reports I have read about edge dressing or edge ink as I have heard it called. It is tricky to get a smooth line along the edge. It looks like a second coat would benefit. I can see why this type of product is used in a production setting. Jake
-
Can someone explain the brushing of the hide he does? Thanks, Jake
-
Python Inlay Owb
SooperJake replied to Spidey2011's topic in Gun Holsters, Rifle Slings and Knife Sheathes
I forgot to compliment you on this holster, Spidey..coOL! Jake -
Python Inlay Owb
SooperJake replied to Spidey2011's topic in Gun Holsters, Rifle Slings and Knife Sheathes
What determines the need for a welt? Sorry for all the questions. Jake -
Python Inlay Owb
SooperJake replied to Spidey2011's topic in Gun Holsters, Rifle Slings and Knife Sheathes
Awesome, thanks! Do you welt all holsters ? Pancake / IWB styles? Jake -
Python Inlay Owb
SooperJake replied to Spidey2011's topic in Gun Holsters, Rifle Slings and Knife Sheathes
Mike, would you be kinda grumpy enough to explain how you made this holster, or at least how the inlay front is constructed? I really like this one. Does the yellow leather extend all he way to the front edges? Is it a pattern like a cowboy single action-type holster? Things like that... Thanks, Jake -
Another New Plain Jane
SooperJake replied to Dwight's topic in Gun Holsters, Rifle Slings and Knife Sheathes
Clear as mud. Hot here, too. Vinegaroon you think, Mike ? Looks to be....that finish always seems a little flatter than commercial dye to me. Probably because it is actually black. To my understanding, black aniline dye is really a kind of super dark blue, as it is made, chemically. At least that is what a dye manufacturer told me once. In the woodworking field we call it "ebonizing", and it works best on woods with high tannin content. A tip to anyone making it with steel wool. wash the oil off the wool with some mineral spirits first, and let that dry. Then proceed with water rusting. Or, buy steel wool listed as "oil free". You get better rust that way. Jake -
This thread went southward to vacuum forming, and originally was asking about using a press... Is anyone adept at using a press forming method? Thanks, Jake
-
Another New Plain Jane
SooperJake replied to Dwight's topic in Gun Holsters, Rifle Slings and Knife Sheathes
Dwight, is that vinegaroon for the dye? Also, I thought Mike made his out of 2 layers flesh to flesh? How are you gluing up 4 layers? Or is it two and two to make the two layers for the pancake, resulting in a smooth inside...? Thanks, Jake -
Did that already a couple weeks back ...MSDS for Mop & Glo states it is primarily acrylic polymer emulsion: http://www.kandelandson.com/msds/Mop%20and%20Glo.pdf Jake ps: in the above comment I said acrylic and I meant to say lacquer. I don't believe Krylons Matte lacquer to be acrylic based. J.
-
Contact Cement Alternative
SooperJake replied to steelhawk's topic in Gun Holsters, Rifle Slings and Knife Sheathes
North~ what sort of wait time is there before you can assemble? I used to sell Titebond's GreenChoice neoprene (water based) contact cement which dried reasonably fast for a water based product. Never used it on leather though. No VOC's to off-gas. I've used Weldwood's original (nice and stinky bad for you) for years..it has never failed me. Would like to get away from the chemicals though. Jake