Rawhide
-
Posts
1,311 -
Joined
-
Last visited
Content Type
Profiles
Forums
Events
Blogs
Gallery
Store
Everything posted by Rawhide
-
Tim, The only problem with the stirrup bolts would be that I would have to offset the lamp mounting hole and it would look asymmetrical. Thanks for the compliments Tim. CollinsMS, Thanks for the compliments. BW takes patience and straight lines. Most try to rush it. It took me an hour to tool one side of that stirrup. Marlon
-
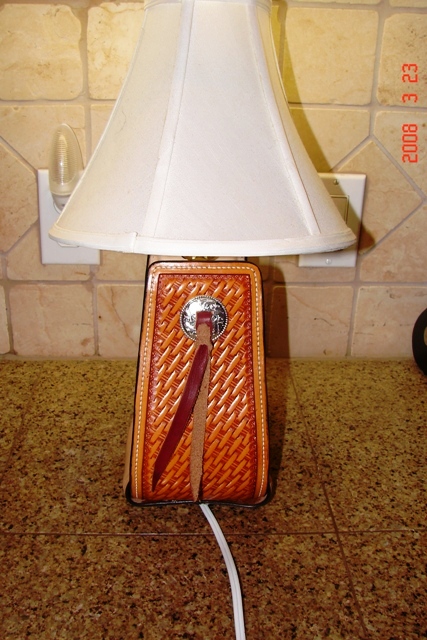
Ian, The cord is ran through a hole in the bottom of the stirrup, and up the inside of one of the sides, then it goes in a groove under the block that holds the lamp assembly and out of a hole in the center of the block. Spider, Aw Shucks! thanks for the compliments. I hope to help as much as I've been helped. Marlon
-
Thanks Tina. It was fun to make. Marlon
-
Funny you said that. I've already got "orders" for my mom and uncle. My wife tried to steal this one, so I imagine she's attached it to her list without saying so. Marlon
-
That's great Anne. I'm sure glad it worked out well for you in Ca. You're blessed to have instructors like Wayne close by, he sounds like a gem. Hope it continues to go well for ya. Take care. I will mention to everybody a HC you said hi. Marlon
-
Hi Ann, how are you? Miss you at HC. I did get the idea from the George Hurst Video. Very good instructions on creating this piece. I didn't know they sold the lamp kits as well though. I'll look for that next time I'm in there. I think i got mine from home depot. Thanks for the compliments Kathy. I did think about tooling on the interior as well, but decided against it. I did however use a camoflauge tool around the border of the tread cover. The next one will be for my uncle. I may embellish it a bit. Marlon
-
Not my idea, but a great one indeed. The only wood that's used is the block that goes across the top. There will also be a base made of wood that the stirrup will sit on (It's still drying with stain which is why it's not pictured. The stirrup is made of hard plastic. I'm sure you can find wooden stirrups though, but I'm sure more expensive. Thanks for the compliments. Marlon
-
I use Barbour's unwaxed flax sinew (#5 cord), and wax it myself with beeswax. Marlon
-
Here's a project I've been working on lately. I've got almost finished. All I have to add is the base for it to sit on. Enjoy, and as always, feel free to critique. Marlon


-

cleaning glue brushes: white glue and contact cement
Rawhide replied to esantoro's topic in Hardware and Accessories
You may try cement thinner. Barge makes one and I'm sure other manufacturers have it as well. You may also try naphtha, but if denatured alcohol doesn't work, chances are naphtha won't either. Marlon -
Glue for leather
Rawhide replied to MarkS's topic in Dyes, Antiques, Stains, Glues, Waxes, Finishes and Conditioners.
Hey Beav, what's the name of it? -
I don't use tandys anymore I use a red jewelers rouge that I bought at woodcraft. Pete is absolutely right about Henley. You have to be careful not to cut completely through the leather. Marlon
-
Actually Pete, it's not the tip that gets rounded with a leather strop, it's the corners of the blade. Since the leather gives way to the pressure from your finger, you actually make the leather cup around the blade and it begins to form a "U" shape around the blade and rounds the corners off. EMSNUT, I would strop the ceramic on card as well just to keep myself in the habit. I use Cresent illustration board, kind of like a buisness card, but I can cut longer strips. I don't know if leather has the same effect on the ceramic or not, but better safe than sorry. I had to regrind all my steel blades because they had been rounded, Until Peter Main hipped me to this, I was clueless as to why my blades wouldn't remain sharp and cut with ease. (Now I know). Marlon
-
Welcome back Beav . We missed you! Hope all is well, and thanks for the tutorial!
-
Hilly, You should bevel your lace, this will yield a cleaner look for a laced project. The object is not to round the lace however. Tim, you can make your own lace beveler with a block of wood and a razor blade. Drive a razor blade into a block of wood at a 45 degree angle and leave about 3/8 of an inch of blade sticking above the wood. Screw down a piece of leather on both sides of the blade at the width of your lace. now you can pull your lace between the two leathers screwed down and against the blade to bevel it. If you get the book "Leathercraft Tools" by Al Stohlman, there are instructions on building one of these. Or you could just buy a ready-made beveler from Jim Downey @ about $75. Marlon
-
There are two spots left in Peter's class. Hurry and sign up if you're interested. Marlon
-
I'm not looking for the stamps in particular. Just some things that are hard to find or expensive, like the oxalic acid crystals, shoe tacks, etc... Marlon
-
I think I'm going to order by e-mail, or snail mail. That way it's written down with part numbers and everything. Marlon
-
I guarantee you'll like the Henley blade. I have the Peter Main designed blade and love it. I also ordered a knife and two blades through Cathy Schlim when she offered to collect and do a bulk order from them. I can't wait until they arrive. That may be why they are behind a bit. They are making a bunch of blades for that bulk order. Marlon
-
Yup, exactly what Art said.
-
Thanks for the comments crafts & Billy. I'll probably place an order next week or so. Marlon
-
it's not really as hard as people think.
-
Tanget = opp over adjacent? Therefore, tan 20 = quarter stack/ x , then x = quarter stack / tan 20. (I'm an NGNEER, too!) Marlon
-
That's a weird looking knife. Let us know how it holds up. For 9 bucks you can't beat that. I will look for it next time I go down to HF. It may be an order only item though. Marlon
-
Thanks for the replies folks. M