Rawhide
-
Posts
1,311 -
Joined
-
Last visited
Content Type
Profiles
Forums
Events
Blogs
Gallery
Store
Everything posted by Rawhide
-
I've been a bit busy lately so sorry for the late replies, but here goes. Johann, if you apply the rubber cement to the board only, it will be enough to stick well, yet easy to peel off. I try to peel the board from the leather, not the leather from the board. Mike, it's usually a one shot deal, I have had success using a board multiple times, but I usually don't try to save it. TT custom, it is hot press board #201 from Crescent. I don't know the difference in the numbers, I only know which one I use. Rickey, It's not an offensive question at all. Peter post to multiple forums, but they are all through email and he can post once to all at the same time. A couple of years ago I asked if I could post some of his work here for LW.net to see. It kind of took root there. I do it because I love his work and don't mind posting for him. He does lurk here every so often and has posted before. It's just a different forum type than he's used to. Hope this answers everyone. If I missed something, let me know and I'll get you an answer. Marlon
-
None from what I know...they both serve the same purpose, to prevent stretching.
-
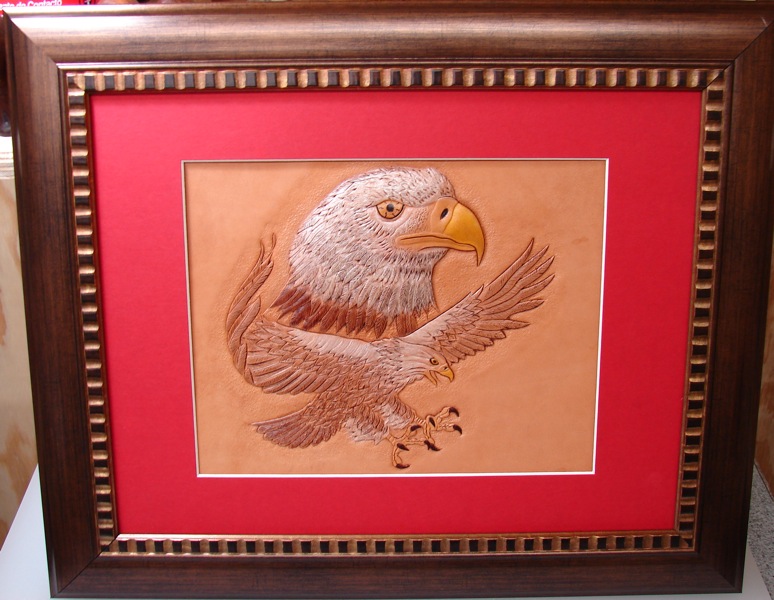
The tooling didn't take very long, maybe 3 to 4 hours. The embossing took about an hour and the dying/painting another couple of hours. The red border actually matched the walls of the house it was to be displayed in, so hence the reason for it. I sort of liked it, but it really brought it home when put next to the wall. Well Bob, I can't seem to get the western floral like yours, so I figure I'd better quit while I'm ahead and try something I actually have a shot at! Thanks for the complements everyone, it means a lot to me.
-
Here's an eagle portrait completed a couple of weeks ago. Please enjoy and critiques are always welcome. Thanks, Marlon
-
Hi everyone, Our Guild president Dave Smith has offered to help set up and sponsor a class in Fort Worth if Alan or RawhideLady are still willing to teach. I'm not sure about all the details which can all still be ironed out, but he did put the offer out there. Let me know if you're still interested and I'll either be the go between or put you in touch with the Dave, whichever you prefer. Marlon
-
Not at all, I'm glad to share. Here's the basic step by step. 1. cover the handle with a thin piece of leather tightly, by wrapping it onto itself and glue it to itself. This will give you a base to glue to because the glue won't stick very well to the bare metal. 2. Then skive out the pieces to glue on from however different leathers you care to have. 3. Next glue them randomly onto the already leather wrapped handle. Don't worry about the residual glue, because it will give you some contrast when dying. 4. Let it dry for a week. (Yes a week). 5. Sand it with some progressively finer sandpaper I think I used 400/600/800 or so. 6. clean off the leather dust created by sanding and then dye with a brush. (I used Saddle Tan dye) 7. Seal with Neat lac, or Saddle Lac and let dry. Marlon
-
I did not use a blender, I used a safety skiver to slice very thin slivers from the grain side of some scraps. I used different leathers to give me slightly different colors when dyed. I used Leather cement as well to glue them down. Marlon
-
Hi Damon, He'll be at the offices.
-
I can only repeat it the way it was told to me...But no matter how you look at it, layoff - fired - terminated - contract extention, what ever... the fact remains that employment is no longer.
-
Ken, I do believe he had been working on more videos. I think he has his own production business, so he's still able to do them. I wouldn't imagine that he'd stop. Ben, I'm pretty sure there are plenty of mixed emotions running wild, but he seems to be in stride and doing well.
-
Amazingly ironic.
-
Yes George did start HC in 1996. In and around 2007-08 timeframe, he sold it to a group of investors that were already in the leather game. They kept George on as Creative Director, until recently. It will be a great loss for HC and a great gain for Tandy and the rest of the leather world. Just to keep George in and around leather is a blessing itself.
-
Just FYI for the leatherheads out there... About a week ago, George was fired from Hidecrafters. The official word is that they couldn't afford him anymore. However, George is now employed at Tandy and is their Digital Product Manager. He's doing well and is very happy. I resisted posting this last week when it happened, but didn't want a lot of folks bombarding George with calls. (probably still not a good idea). Anyway, George is doing great and we hope to see more of his creativity in the future. Marlon
-
Don't know if this is correct, but here's how I do it and gives me great results... Step 1. I use a diamond hone (course), but an arkansas stone will work as well. An awl blade has four flat sides (diamond shaped). place one of the flat sides against the stone on a flat surface. Push and pull the blade back and forth on the stone (like a stabbing motion). Do this on all four sides. (this will take a while depending on the blade, it takes a little practice to know when enough is enough.) You should be able to feel a burr develop on the edge. the burr will be on the opposite side of the flat that's against the stone. It might be a good idea to put a black marker on the side you'll start with and work it until all the black is gone. Step 2. Stropping on a stone. Grab a finer stone/hone (I use extra fine) and place awl flat against stone at one end and drag that side across the stone (away from the cutting edge) several times. Do this to all four sides. Step 3. Some people do this, some don't. I do. Strop again using wet/dry paper. 1200 grit and 2000 grit (just repeating step 2 on the wet/dry). You'll only need several passes with this. Do this on all four sides. Step 4. Most important strop on a rouge card. I use green rouge, but white/red rouge is just as good. Rub the rouge on a long strip of manilla folder or illustration board. then strop several times on each side as in steps 2 and 3.
-
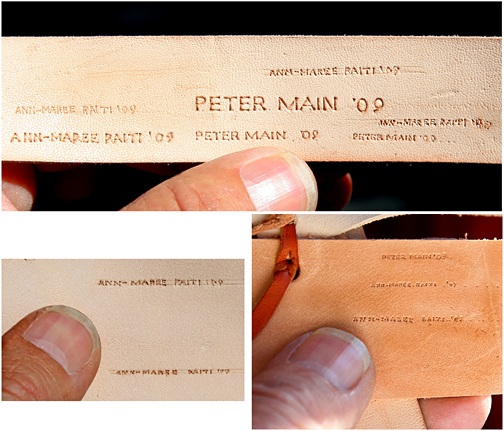
...thought I would share a little fun. At the recent Leather Conference in Brisbane, Australia, a young lady asked how I sign my name (she has never done lettering before). I showed her at a large size, so she could understand the strokes, then did it a little smaller beneath...then smaller again. (Ann-Maree has been only doing leatherwork for one year....three hour classes on Saturday mornings in Sydney). She went away with swivel knife in hand and returned showing me what she did. This amazed me...I have never seen (in all years past) anyone do this before. I then cut my name smaller again (bottom right)...and, she did it again! Peter

-
John, You can take the same needle and put it in a sewing machine. This will punch all your holes consistently and spaced perfectly without the tiring out your arm. just my .02.
-
If anyone is looking to get rid of a Beard polyurethane maul, please let me know and let me know the asking price. Thanks, Marlon
-

Airbrush
Rawhide replied to HarleyChef's topic in Dyes, Antiques, Stains, Glues, Waxes, Finishes and Conditioners.
I prefer the double action as well for control. I have a Badger 150 and is middle of the road and works well for just about anything I would do. I also suggest getting a compressor with a small tank and not the diaphram type. I got one for airbrushes from Northern Tool for about 100 bucks and it has the regulator and water separator with a mini tank. It's extremely quiet. Also, I purchased my Badger from Michaels using a 50% off coupon for one item. Marlon -
12ft African Python snakeskin
Rawhide replied to badLoveLeather's topic in Exotics, Reptiles, Furs and others
Dyo -Reptile Shoe conditioner. There was a post here a long time ago, that had a very similar situation 30 yr old snake skin and they cleaned it up nicely with Dyo -Reptile. See here. -
I haven't used the Crown tools, but if you want a better quality tool, for no much price difference, I would try Hidecrafter's Craft Japan line... they yield much better impressions than the Craftool line.
-
Honing oil is what you put on a stone to sharpen tools with...you can find it at a wood supply store like woodcraft, maybe even home depot or lowes.
-
I always do this...i spread rubber cement on the illustration board (Cresent #201 found at Hobby Lobby), let dry and then stick my leather down to it. remove excess rubber cement with a crepe rubber. Case the leather and use a glass slicker to slick the grain of the leather. this will make sure it's adhered properly. Cover with glass until ready to carve. To remove it, just peel the board away from the leather (not the leather from the board.)
-
Spence I agree with you here, however, the fact is one side isn't happy that there is no website.."When will the website be up? why don't you update your website? Can't you get your website up quicker?. Then once it's rushed to satisfy that group and it isn't perfect, then you'll get "Why can't I order from your website? I can't see any pictures. By the way when is the catalog coming? I mean sheesh, they're getting it from all sides. I understand the frustration, but you can't please everybody everytime...I know it sounds like I work for them or have a vested interest, but I don't, I just think they have a place in the leather business and hope to see them survive.
-
this will depend on the rouge quality...If the rouge is really hard like chalk it will flake for a short period of time, if the rouge is waxy, it shouldn't flake at all. The honing oil will sort of make the rouge act as a waxy type. The more you strop on it, the less it will flake.
-
Absolutley. I think the econo line at Hidecrafters is much better than the Tandy line. The impressions are much crisper. They're still an economy line, but much better quality.