Rawhide
-
Posts
1,311 -
Joined
-
Last visited
Content Type
Profiles
Forums
Events
Blogs
Gallery
Store
Everything posted by Rawhide
-
Russ, Just wondering how your Rose knife came out...I just picked up a small one myself on the old ebay and I found it so far really easy to sharpen and I can put a fantastic edge on it. This will be in the short reach range for a long time. Mine has a little discoloration in spots, not really sure if it's pitting or not but I know it's not rust, but I plan to sand blast it lightly to see if I can strip that off and shine it up a bit...If not, it still cuts faboulously.
-
Frank, I'm not sure how you're sharpening, but if you have a delicate edge, you may try using the needle files in one direction only and that being away from the cutting edge. Then once you get a burr, do the opposite side until the burr just disappears. then load up a string with rouge and drag it through the tool away from the edge as well... do that a few times and you should be golden.
-
Johanna, do you (or anyone else for that matter) still have the pattern for this purse (tandy jean purse) they wouldn't mind sharing? This is a perfect fit for a purse I need to make. Thanks, (sorry for the hijack)
-
...here are some boot-top inlays just completed. The design was sent to me...unfortunately only for a 'right' side. This meant re-drawing it so the guitar player did not appear left-handed on the left panel. This was a good exercise in cutting very fine parallel lines (no, not with a beader blade) and keeping the coloring 'within the lines'. The darker areas are 'backgrounded' and the lighter areas have beveled edges (beveled with 'that' modeling tool). These inlays will be set into a light olive green leather with outer stitching lines following the scrolls. I will post completed boots in August. Peter
-
 Bruce, Do you warm you NF before you mix it? I have problems even with the pro dye mixing. What's you starting ratio, favorite ratio, and maximum ratio of dye to oil?
 -
If you're diluting to lighten the color intensity, you need to use dye reducer. If you want to mix the dye with neatsfoot oil, I haven't perfected that one yet...I know there are people who do it well on the site... "hidepounder". What I do in the latter case is drop several drops of dye in a small amount of oil in a plastic cup... I then swirl it around really good to mix it up well, I try to apply it quick enough so that the dye doesn't have a chance to re-suspend itself. Good luck.
-
Everything's good up here. Except the heat....whew! I'm sure it hot down there too though!
-
Woodcraft carries them as well...they call them mallets though.
-
...perhaps a few of our overseas members may wish to know that I will be conducting weekend workshops in Norway and Germany. Dates are, Norway, September 12, 13 (box-making) and Germany (filigree belt)September 26, 27. Apart from the six days of classes in Australia next month, I will also be conducting a box making class in Seattle August 29, 30. Email me direct and I will give you contact information regarding these workshops. Peter
-
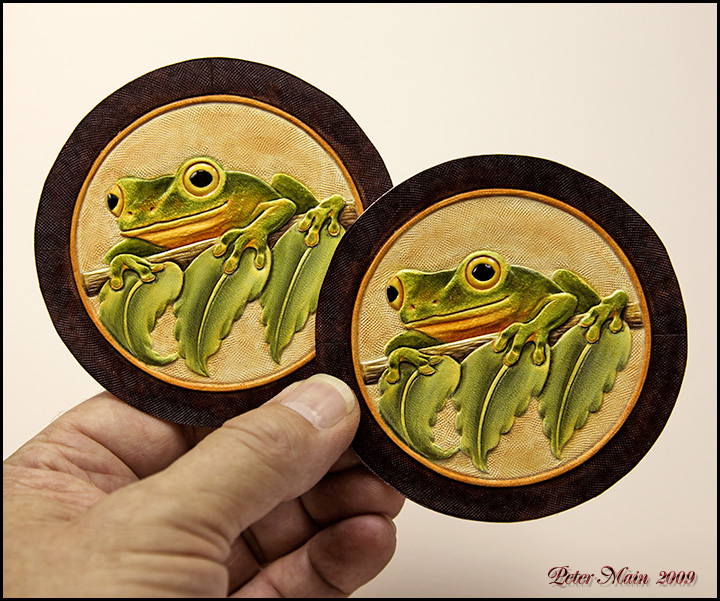
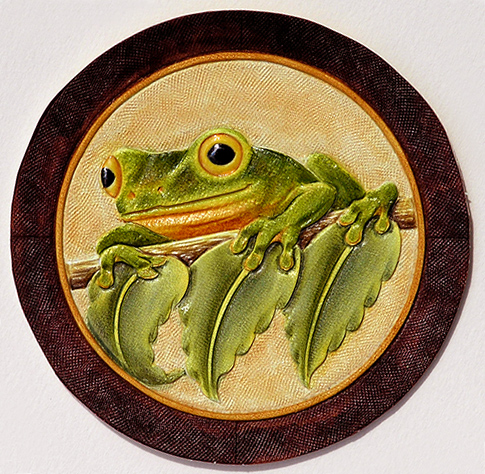
Peter's text in red, mine in blue... ...here are a couple of three inch diameter inlays for boot tops. They are carved on 2-3oz leather and are colored with spirit dyes. Peter Peter, Beautiful inlays. What did you finish the eyes with? And what did you finish the overall piece with? Did you spray the finish on? Thanks. Marlon ...the eyes (now) [see new photo] have three coats of 'clear glaze' on them (had the little jar for years, but the label has dropped off). The acrylic finish has been sprayed...then another coat given to the frog only by brush, to give a slightly 'wet look'. Peter

-
Hi and welcome to the addiction 'er craft... You should stop by the Lone Star Leathercrafter's guild meeting sometime...It's on the 2nd Tuesdays of every month at Hidecrafters, 7 pm. Hopefully you'll enjoy it as much as we do. Marlon
-
Here's a photo of the set from Hidecrafter's. I think this one replaced the one they have in the catalog... I think it's a decent set, not the best, but certainly not the worst...I don't recall the price, but I do remember it being fairly inexpensive. Marlon
-
Peter usually waits until the next day to carve on leather... He wets it, let's it return to original color (visually), then covers it with glass. The next day when you uncover it, it's ready to carve...
-
As said mafia style.... Happy Boitday Bruce...
-
These were some responses to questions posed to Peter... ....the first I heard of using lemon juice was from Bob Beard back in the 80's...I tried it (with a real lemon)...and, it worked well. For those who wonder about this... At times, black metal marks can appear on veg tan leather from a number of sources...tools, or fine loose metal particles that may be in the workspace. It is the citric acid in lemons that will make these marks magically go away. I only use oxalic acid (it does the same job as a lemon will do),...a teaspoon dissolved in a pint of water is all that is needed. I have had the same (glass) bottle for over three years, and there is still plenty left. Your leather must be completely dry before adding oxalic acid or lemon juice. It is best to (quickly) apply it 'very lightly' overall with a dampened (not wet) sponge...then concentrate more where there are darker marks. Allow this to dry, which won't take long, and then again quickly wipe the leather overall with a dampened sponge (not wet) of plain water. The only time I use oxalic acid is when I see marks on leather. I do not use tape on the back of my leather. All of my work is mounted on 'illustration board'...this is available from art/craft stores...the most commonly available is 'crescent brand'. Make sure it is 'super-smooth, No.202'. Mounting leather on this board will prevent stretch which will come from using large face tools such as the shader and basketweave etc. Apply a thick, but 'even' coat of rubber cement (not contact adhesive) to the board (use a credit card as a spreader...I have many of the plastic 'gift-cards' that seem to be everywhere)...allow to dry a little, then lay your 'dry' leather down (wet leather will not stick at this point)....rub hard with your hand for good adhesion. Apply water with a 'loaded' sponge...apply in 'even' strokes in several directions to ensure 'even' coverage of moisture. Do this several times and you will find the water is not going into the leather as quickly as it did at first...this means it can take no more. Lay the leather aside....allow it to lose its wet look, and when you think it is ready to carve....don't!. Instead, cover it with a piece of plate glass (I use a large glass cutting board...from the kitchen...I think Bed/Bath&beyond carry these). Allow to sit covered overnight...this is proper 'casing' (just adding water to leather is 'not casing')....the evening out of moisture throughout the leather. The reason I do not use a plastic bag is that the illustration board becomes damp. With glass, the air can come in from the sides...in saying that, you should always add extra moisture around the edges....leather will always dry from the edges inwards. When working, and you need a break....cover your work with the glass....it will hold moisture for days if required. Again, always add moisture to edges only when having a break...this will hold the moisture in the center, which is where you want it. When using illustration board, you will find you are able to get extra depth in your work....especially if you are using lighter-weights. Peter
-
If you don't need the best, Hidecrafters has one with interchangeable wheels, It has a 5, 6, 7, & 8 and is better quality than the tandy ones... I could post a picture of one if you care to see it.
-
Gomphs are the best...but you'll have to get them on ebay or from someone who has 'em like Bob Douglas. The old Osbornes are good as well. What spacings are you looking for?
-
I use Gomph overstitch wheels... but for me, each mark represents a hole, so i'm either using an awl in the mark, or lacing nippers in the mark, when I'm done, there are no marks left. I'm not quite sure how to picture what you describe...Do you have any visual examples?
-
Jack, For me it was, because I had a problem with high speed grinders, taking too much off, and overheating the metal. I can do manual sharpening, but it does take a while... I sharpened a spindle gouge just yesterday with it..., took me all of 30 seconds. I didn't even turn the lathe off, I just walked to it, hit the edge, honed it on the strop and was back to cutting. Worth every penny to me. Now If I can get a jig for a head knife... I'll be set. (Although I did sharpen my head knife on it without a jig.)
-
I have the small one (T3) and I think it's fantastic. I use it for everything... I haven't bought any of the jigs yet, cause they are expensive too, but man I can get a quick sharpen with no chance of overheating the temper. I love mine.
-
I could only wish... that's a J Cook knife and I borrowed the pic from his website, disclaimer "FOR DEMONSTRATION PURPOSES ONLY". Not affiliated, just the first to come up in google.
-
There is a fundamental difference when using a diamond awl. When you pierce the leather with the diamond awl, it uses two of the cutting edges to cut the leather and the other two to spread the leather apart. Then with the diamond hole that's left, one side of the thread will go up into one of the corners of the diamond and the other thread will go into the other corner. If this is done consistently the same way, you will yield perfect stitches. Some people like round holes, but I've had them fail on me with a dog's harness I made. As far as the knife, I would suggest a head knife with highly tapered "wings"...i.e. a pattern knife, see below.. this will cut well and get into the corners well. It's probably not the best for skiving though.

-
Answers in Red ...it has been remiss of me to neglect my website for so long....there is much to add. I intend to add 'boots', 'belts' and 'miscellaneous' when time permits. ...and, the toaster is in front of my drawing board (out of sight in the photo). The bread-bin, plate, butter-dish with butter-knife and vegemite are to the right. PGM
-
Looking for the ideal sewing machine to stitch thin/soft leather
Rawhide replied to UKRay's topic in Leather Sewing Machines
Yeah....And it could cost a lot of money too!!!