


Rawhide
-
Posts
1,311 -
Joined
-
Last visited
Content Type
Profiles
Forums
Events
Blogs
Gallery
Store
Everything posted by Rawhide
-
Sylvia, I didn't use stones, I used Automotive sand paper. I bought them at O'reilly auto parts I think. I use a 4-sided strop, if you will. I rubber cement to it a strip of 800, 1200, 2000 grit paper, then the last side is a strip of manilla folder with rouge rubbed in. when either side gets roughed up beyond use, I remove that strip and rubber cement another strip on. for serious work on a blade, you could just use the paper glued to a hard backing so that you have a larger surface to work with. But the strips seem to work great for me.
-
Nice to be missed Pete! I would start with 800 to cut the serrations off, then 1000, 1200, up to 2000 to polish it up. It seems that the big companies are all the same now, they don't really take the time to churn out a quality product anymore. those old ceramics are probably 10 times better than what you can get now.
-
While ceramic blades are great for long lasting edges, they require A LOT OF WORK before you can expect longevity with your carvings. I had to to work on my ceramic blades about a half an hour on each side. If you look very closely at the bevel of those blades as they come from the store, there are a multitude of serrations. (use a magnifying glass). When you work all these out and make it smooth, they will cut a thousand times better. That being said, the blades from Leatherwranglers seem to me to be the longest lasting for carving without stropping. They have a great metal blade that they researched extensively and I use it regularly. It's always the first one I grab. (I've tried almost all blades too, Henley, ceramic, Chuck Smith, Al Stohlman brand, Barry King, etc...) Marlon
-

Wicket And Craig Leather
Rawhide replied to Abram's topic in Gun Holsters, Rifle Slings and Knife Sheathes
you can also use it as filler material. Say you want a belt with a raised center, or a little bit stiffer sidewall to a purse. Probably many more uses that we haven't thought of. -
i used to get marks from slicking the back of the piece. When I flipped it over, I didn't realize that the little gribblies from tooling were all over the granite. Now I have a habit of using denatured alcohol to clean my block, before I flip my piece over for anything. I also don't lay tools on the leather as I'm working. I lay them to the side or in front. you might try some rubber or latex gloves to tool with, and see if that helps. Marlon
-
King's is not much more expensive than the tandy one and is MUCH BETTER made. I have 3 tandy ones and one Barry King stylus and will reach over all the Tandy's to get the BK one. You wouldn't think that it makes much difference but it does.
-
I second the Barry King one. Although, I sharpened mine to a finer point.
-
I use neither. Why? Because the leather will give and eventually round the corners of your blade. Use something hard and flat. I use the wood board, and glue a strip of manilla folder to it and rub in my polishing compound to that. Keeps corners nice and sharp! Marlon
-
you should probably make a wooden mold the shape of your camera body and fit the body of the case around it, then cut your bottom to fit, and sew it with the wooden mold still in place. just my $.02
-
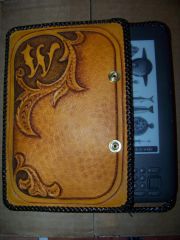 Comments: This is really good to say you haven't been tooling a while. You are getting great burnishing in your bevels which says that you understand the moisture control for cased leather. (quite hard to get the hang of in the beginning). Good use of the pear shader and matting tools as well. I still have my days with the pear shaders! Critiques: The backgrouning surrounding the "W" sort of has a pattern identifying the directions you tooled it, try to get more consistent with the amount of force used to strike the tool, and rotate it as you work. on your border that is also your leaf stem, use a pair of dividers to make your curves parallell. And lastly (more of a personal choice than a critique), but I would not use snaps on a case for an electronic device like this, because of the pressure required to snap it closed, it make break the screen.... Great Job...Keep up the good work.. Marlon
 -
Ray, Not sure how it will handle slush and ice. Maybe a 2 stage is what you need. I know ice gets compacted and is hard to break up. Might want to ask a manufacturer how well it copes with your climate. you might need to install heaters under your driveway!
-
I like the ones that take gasoline! I used to live in Delaware and hated shoveling. I bought a blower and this was the best move I ever made. sold it when I left for texas. If I ever went back, I'd buy another snow blower, before I buy groceries!
-
It's been a while since I've done one, but you have to put in some work to get them right. If you look at them closely, with a maginfying glass, you'll see small serrations from when it was made. You'll have to polish all of these out. I would start by stropping it on about 600-800 grit sandpaper, then move to 1200, then move to 2000. The first and second level of stropping will take a while, but be sure you do both sides evenly (count your strokes). Marlon
-
Western Tooled Purse
Rawhide replied to hidepounder's topic in Purses, Wallets, Belts and Miscellaneous Pocket Items
My goodness Bob! Very classy and just outstanding work! I do have some questions. Along the scalloped border on the back, there is stitching following the scallops. is that just decorative, or does it actually secure the liner into the purse? Also, did you develop the overall shape of the purse, or is it a basic pattern? Thanks, Marlon. -
JoAnn Fabric sells a little quilter's thimble that you can fit on your fingers and they work great. http://www.joann.com/joann/catalog/productdetail.jsp?pageName=search&flag=true&PRODID=xprd1002396
-
rayban, Glad something I posted could help. I get so much help and so many ideas from here it's nice that I can recipricate. For perfect stitches, it takes perfect practice. Oh and as for the Bob Douglas awl, wickedly sharp! Sharp enough to slide through a fingernail down to the nail bed! Ask me how I know!
-
Rob, This is how I stretch mine. Fast forward to 9:13 in the video
-
Brown Angelus Dyes
Rawhide replied to Eugene's topic in Gun Holsters, Rifle Slings and Knife Sheathes
I use the Angelus Jet Black. and I like it. I think the color lasts a little longer than Fiebings. I do like the penetration depth of Fiebings oil dye for edges, but I like the angelus dyes better for overall use. -
Thomas, I use Leathercraft Cement. It's a white glue, that dries clear and is left flexible and strong. I'm not sure why you use epoxy, as I would think this would make all your articles very stiff. In any case I probably wouldn't use epoxy. Leathercraft Cement can be found at any Tandy Leather, or several online retailers. Next, to punch the holes, I use a diamond shaped awl also available at Tandy and the like, however, be sure NOT to get the 4-in-1 set, get the osborne and sharpen it before you use it. There are several discussions about it on LW, so you should be able to find more info with a quick search. Marlon
-
I've seen people use the minwax wood stains.You might try that....
-
I'll see if I can catch him. I'm not sure if he's in the country or not. He travels internationally quite often. Marlon
-
You should be fine with that. I tool on a cutoff of about 18 x 22 and it's about the same thickness as yours. I would probably place a poundo board underneath to minimize noise, but you should not have any problems tooling with it. As a matter of fact, I think that the Tandy block is only 1 1/2" thick.
-
Business Card Holder
Rawhide replied to Rawhide's topic in Purses, Wallets, Belts and Miscellaneous Pocket Items
Hi Aaron, I don't use a punch, I use nippers and and overstitch wheel. The only thing I use a punch for is the angle. I mark my guideline, then use a #7 overstitch wheel with 1/8" lace, and a #8 with 3/32" lace. I then take an angled punch (doesn't matter which size) and lean it so that only one finger of the punch is on the leather and use it to set the angle of the holes. I mark each location by pressing the punch with hand pressure just to get a mark. then I punch each slit with nippers. It takes a little longer, but I like the look. I also bevel my lace on the flesh side so that the edges lie flat against the surface when I tap the laces down. I hope this kind of makes sense. Marlon
