thekid77
-
Posts
435 -
Joined
-
Last visited
Content Type
Profiles
Forums
Events
Blogs
Gallery
Store
Everything posted by thekid77
-
That's what I was thinking, thank you for settling this in my mind....now I can have a nice uninterrupted line of stitches and peace of mind LOL
-
Thanks for sharing, I really appreciate it!
-
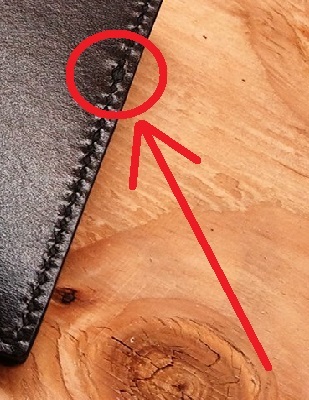
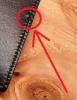
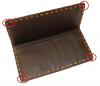
Hey friends, I need your advice/experience with securing card slots with the stitching straddling over them... My question is this... Is it absolutely necessary to double the thread over where the thread straddles the stress areas of the card slots, ie, at the top of the pockets as shown in the pictures below?? I am using braided polyester thread (Ritza 25 Tiger thread), and even at .6mm, this stuff is incredibly strong....my gut tells me that the weak link if anything were to go wrong would be the leather and not the thread....but I'm not sure... I don't like doubling the thread over because it ruins the look of the stitch line but I also don't want my stuff falling apart.....I just can't see the braided poly thread breaking even if there is some force against it..... what does everyone think?
-
thank you, I will be leaving some excess to cut away Yea, I was thinking about the rolled edge before, but I don't have the skiving technique down quite yet...more practice!!! thank you!! great ideas, yea i could see how there isn't much room for error but i am going to have to give that a try!! You do great work by the way!! Thank you
-
hey everyone, i was wondering....I want to make a lined bifold and have been told that when lining wallets, you can extend the liner out to the perimeter edges of the wallet.... i haven't done this yet, but I was wondering, how do you give the edges a finished look? I understand you can use edge paint or edge kote but I don't like those products......I was thinking make clean cut edges with a fresh razor, then dye, resolene to harden, beeswax, then burnish?? what do you all think? any advice or experience you could share would be great!! thank you in advance
-
Hey David, welcome to the trade!! You're going to find many kind and helpful people on this forum A suggestion....two yrs ago I was in the same position as you, just getting started.....for tools, I suggest you contact Bruce Johnson....he is a great guy who is also on this forum and specialized in saddlery and selling vintage tools......he can set you up with a basic set of tools that you will need if you tell him what you intend to do...... Also, do yourself a favor and invest in quality tools.....many of the tools that Bruce sells are antiques 50-100+ yrs old that still work like the day they were made.....here's his contact info: http://brucejohnsonleather.com/ Telephone: (844) 584-7866 Give him a call he's a real stand up guy who will help you!! Enjoy!!
-
Hey Austyn, I don't know much about leatherwork but I can definitely help you with this.... I know that Tandy doesn't have the best rep out there for dyes, but I recently discovered the Tandy Waterstain dye.....PLEASE do yourself a favor and try it...you will not be disappointed.... Here's what impressed me so much....I took some scrap leather and dyed it with the Tandy black waterstain......the people at the store told me let it dry 24 hrs then buff it....I waited about 8 hrs....buffed it, and noticed there was almost nothing coming off.....then get this.... I took the leather (before applying resolene finish) and held it under running tap water and tried to rub out the black......there was absolutely no dye coming off at all..........I have not found a better product for black than this.....and it just gets better when you apply the topcoat of your choice Again, I hope you try it out.....before, I was using the Tandy black eco flo stuff which was not good.....ran everywhere.....the Tandy black waterstain is an entirely different animal..
-
How To Even Out The Distance Between Stitch Marks?
thekid77 replied to thekid77's topic in How Do I Do That?
that's what I was thinking, especially since the eyes tend to flow toward the corners...thank you great idea! thank you, i use the dividers all the time but I haven't used them like that just yet...I'll have to try it!! yeah that's what I was thinking as well, just make the pattern custom to fit the SPI....thank you for the imput!! Thank you for sharing Jim!!! Thanks for posting this!!! great idea...I'm going to give it a go the next time I have the awl in my hand!!! thank you!! -
so, say you're making your stitch marks along a stitch line (with overstitch/pricking wheel/pricking iron, etc), and you get to near the end of your stitch line and realize that there is either slightly too much space or not enough space to end with that last stich on the corner... does anybody know of a way to precisely even out the distance between all the stitch marks when this problem comes up? for example, say you get to the end of the stitch line and there's going to be either slightly too much or too little space between that last stitch mark and the corner........if there was a way to distribute that little bit of space off between all the stitches, it would not be noticeable to the naked eye.... but i cant figure out how to do this...please share!!! Thanks
-
WOW!!! looks awesome....I like the clip on the back too....my first project was a sheath as well and yours is light years ahead of mine LOL....keep learning and keep up the great work!!
-
JJ, you do beautiful work....unfortunately, this is a case of cheap leather, or sometimes you'll buy a good hide but like the others said if you cut the piece out from near the belly area, it tends to be softer and wrinkle easily......just try a different piece of leather from up near the shoulder and you'll be alright
-
Hey Ray!!! Thank you so much for sharing....gives me lots of ideas....I love the control you have with a dye dampened cloth....I've used that technique with lighter dyes where I want to cover a large area, but where a dauber would just put too much dye on.....this would also probably alleviate the bleed factor greatly....I'm gunna try maybe a stencil + the dye dampened cloth......thanks again for sharing your experience and have a great day!!!
-
+1 to the gum trag for stringy flesh sides...you can use the smooth barrel of an ink pen to roll over the leather and lay those fibers down...glass works nice too....also, some people like to line the back of the belt with pigskin but just experiemnt....theres no right or wrong
-
Has anyone here done this? I was thinking about trying it but not sure if the dye would tend to bleed as the leather absorbs....probably other challenges with doing this as well.... id love to hear your experience!! thanks guys
-
Camouflage?
thekid77 replied to Aulus's topic in Dyes, Antiques, Stains, Glues, Waxes, Finishes and Conditioners.
bump....I'm interested in doing this as well! anyone ever done it?? -
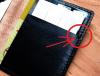
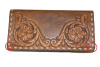
Thanks for the advice Tom, I'm just wondering how whoever made the wallet pictured below seems to have gotten around my dilemma using relatively normal looking lace...
-
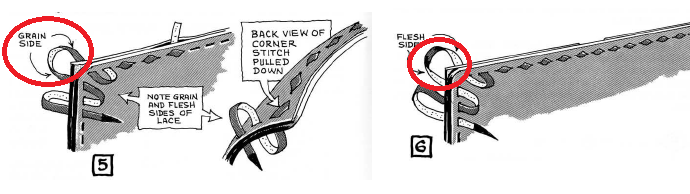
Hi friends, I am wanting to buckstitch the perimeter of a small card wallet...with the grain side of the lace showing on both sides on every stitch (including around the corners)... In Stohlman's book on buckstitching, he describes the process of buckstitching around a corner, and in the attached photo, says that when turning a corner, the grain side of the lace will show on one corner, then the flesh side will show on the next corner, and it will alternate.... Is there a way to keep the grain side of the lace showing on all of the stitches, front and back?? Thank you in advance for sharing

-
Using A Creaser...does The Leather Have To Be Dampened?
thekid77 replied to thekid77's topic in How Do I Do That?
I don't have a groover anymore...I have ruined too many projects with an errant cut while trying to turn a rounded corner with the groover that I had, unfortunately....maybe I should try a different groover in the future....the one I had was extremely difficult to control, even with lots of practice... I understand, thanks for the advice...the only thing I don't like about the groover is that once you take leather off, ie, one slip/mistake, you can't put it back on Thank you, I will do some research into that -
Using A Creaser...does The Leather Have To Be Dampened?
thekid77 replied to thekid77's topic in How Do I Do That?
Thank you!! Thanks Chief, I think I might try using heat.....the reason I ask, is because I make card wallets and usually I cut the leather and dye/buff/finish it before cutting the shapes and assembling... I'm looking to crease the leather along the curved border of a card wallet instead of grooving it...since I have ruined projects with that groover I wanna try a crease to lay the thread down in. Some people have told me that it wouldn't work and that the creased leather would push back up over time but I'm going to give it a try. -
Using A Creaser...does The Leather Have To Be Dampened?
thekid77 posted a topic in How Do I Do That?
hey friends, just wondering if leather has to be dampened before creasing? Is it possible to crease leather after applying the top coat finish? thank you!! -
Gotcha, thanks Chief!! Much appreciated Wow that's a really interesting idea....never would have thought of that! Thank you for sharing your insight!
-
Hey friends, I just wanted to let everybody know that I had been looking for a way to dye leather black and not have it lift up when applying the acrylic resolene, or bleed/run... I have found the solution and BELIEVE me, this stuff works... Tandy Professional Waterstain From what I have read, Tandy dye products have gotten a pretty bad reputation for not penetrating, lifting, and bleeding... Let me tell you my experience with this stuff... I took a scrap piece of leather and dyed it black with the Tandy Black Waterstain... I was told to wait 24 hours before buffing it and applying the resolene......I waited about 8 hours instead because I'm impatient lol... I took the piece I dyed and buffed it....I noticed hardly any black came off at all. Even better, when I applied the resolene with an old white T-shirt, you could barely see the slightest hint of grey color on it. Here's what impressed me the most though...I took another scrap bit of leather and dyed it. Waited 8 hours, then without applying any finish, i took it to the sink and ran water over the leather that I dyed black and rubbed it vigorously in the dyed area. NOTHING came off at all. I hope that everyone looking for a solution to the dying thngs black problem reads this post and gives it a chance. This stuff is unbelievable!!
-
hey friends, when you're lacing a basic roper style wallet, (three pieces of leather----one back piece attached to two inside panels), how do you get the lacing to look continuous when going across the middle section of the wallet (top and bottom) where you're just lacing the back piece? in other words, doesn't going from lacing through two pieces of leather, then suddenly lacing through one piece break the visual continuity of the lacing, ie, the lacing would look thicker when lacing the two pieces of leather than it would when lacing thru one layer? sorry for the bad wording....i'm not sure of any other way to ask the question....thank you in advance for sharing
-
Two Tone Wallet
thekid77 replied to rawr66's topic in Purses, Wallets, Belts and Miscellaneous Pocket Items
Man I love everything about this wallet...and it's uniqueness....you really don't see a lot of two-toned handmade stuff out there....stitching and design are great!!! I can tell you're a perfectionist Please keep posting more of your work...it's a great inspiration to the rest of us who are trying to do the same thing!!! -
Hey there, welcome!! I don't have answers to your questions, but if you haven't already, familiarize yourself with the advanced search feature of this forum...you can easily search keywords related to the questions you have either in just the title of the posts or in all forum posts...i believe there is also a wanted/for sale section on this forum...sorry I don't have answers but I hope this helps!!