thekid77
-
Posts
435 -
Joined
-
Last visited
Content Type
Profiles
Forums
Events
Blogs
Gallery
Store
Everything posted by thekid77
-
Wallet Strap....stitching Is Deforming The Edge Of The Strap..
thekid77 replied to thekid77's topic in How Do I Do That?
Thanks for the advice Twin, it's really odd...I stitch through the same thickness of leather all the time for wallets, and this never happens.....when I stitch something like a strap, it's getting deformed....I will try everything you've suggested -
Nexus 7 Case
thekid77 replied to Redochre's topic in Purses, Wallets, Belts and Miscellaneous Pocket Items
nice stitching....how many stitches per inch and are you using a pricking iron? -
hey friends, I tried making a wallet strap for the first time today out of some 8-9oz vegtan i had lying around....everything was going well until i started stitching.... i noticed that the leather along the stitched edge was starting to deform.....is my leather too soft? sure, smaller harness needles and thread would help, but i hand stitch wallets all the time and never have this problem.... any advice is appreciated!! thank you
-
Yes, like electrathon said!! it's really all personal preference, just experiment and see what appeals more to your eye....less stitches per inch will make the thread more visible, while more stitches per inch makes the thread more subtle....
-
If you are willing to take 40 minutes and watch this video, I think it will help you make a decision regarding the commonly used finished out on the market today....after watching it, I have used acrylic resolene diluted 50% with water and haven't looked back....I used it whether I am dyeing my projects or just leaving them natural....hope it helps https://www.youtube.com/watch?v=zyTg_hfpNUM
-
Hi there! Welcome to the trade I would be happy to share my experience with you....as you will see, in leather work, there are lots of different ways to go about doing things....just experiment!!! :D First, about dyeing the leather....I do have experience using the Tandy Black Waterstain....it's great stuff....unlike the eco flo line of dyes, the waterstain, after allowing it to dry for about a day, really sticks to the leather well.....also, after applying the dye, while the leather is damp, it's a good time to apply a light coat of neatsfoot oil to the surface to the leather....this will help keep the leather supple and help to prevent cracking and wrinkling if the leather is to be folded later... after the dye is dry, just take a wool cloth and buff the surface of the leather to remove any residual dye particles left on the surface.... At first, I used the eco flo finishes, but now I use acrylic resolene....it provides, in my opinion a much better finish in terms of look, durability, and water resistance. Fiebings makes it... To use the acrylic resolene, I mix it 1 part resolene to 1 part water...if you don't dilute the resolene, it's very easy to apply too thick a coat, which will lead to the finish looking like plastic and cracking easily....to get better results, the resolene needs to be built up in very light coats (being allowed to dry completely in between each coat).....so, after diluting it 1:1 water/resolene, just take an old cotton t shirt, fold it up into a 3" square, and put it up to the mouth of the bottle with the resolene and tip the bottle onto the shirt a couple times, then blot the shirt on a paper towel lightly....then apply the resolene with smooth swirls onto your leather piece. Allow the first coat to dry for an hour or two. Additional coats can be applied depending on whether you want a matte finish, or a more glossy finish)...after applying your coat(s) of resolene, and allowing to dry, just buff the surface of the leather with a cotton cloth and the resolene will take a polish... About setting the snaps... -first, make sure that your snap is properly sized for the thickness of leather you are trying to set it to. If there is too much post sticking up above the leather, it is easy for it to bend off kilter when you're trying to set it..... -second, make sure the hole you are punching is properly sized for the post of the snap (there should be no wiggle room) -third, I find that the inside edge of the tandy snaps tend to be rolled inward slightly, which can make setting them more difficult.....you can take a scratch awl and rotate the awl against the inner edge of the snaps and it will flare the metal outward a little (kinda starting the roll of the metal)....doing this makes life much easier.... -fourth, don't try to set the snap in two or three hits, make sure you are tapping lightly with the hammer and rotating the setter tool as you are tapping....being in a hurry in leather work is a recipe for disaster... hope this helps!!!
-
Thanks for the idea David!!
-
hey Red, thank you for sharing I have tried landing the stitches in between the slots instead of bridging them, but when I did that the edges of the slots pulled away from each other (think I pulled the threads too tight)... I'm going to have another go at it.....it will b awesome if I can get this method to work because then there will be a full 1/8" of leather instead of 1/16" left until the edge of each slot, making a tear much less likely....thank you!!
-
Yeah, definitely need a finer awl blade.....maybe finer thread.....currently using .6mm tiger thread....but going to get some lin cable when i get a bit more money..... i haven't done a wallet with rolled edges yet, but yes, the thought has crossed my mind....not sure if im good enough at skiving yet....u have to get it awfully thin to roll eges...
-
Hi I'm using 2/3oz vegtan cowhide for the card slots...wondering if there are leathers available that are very strong and wont tear that are in the 2/3 weight??
-
hey friends, I'm trying to figure out the best way to straddle card slots with the stitches and 1. still keep the stitches looking even at 8 SPI, and 2. keep the leather near edges of the slots (1/16" away from the edge) from tearing... the solutions i've thought of so far, are: 1. finer awl blade, smaller needles 2. reinforce the leather somehow?? i'm at a loss for ideas......anyone have any suggestions? see attached photo for clarity....thanks in advance for sharing

-
Need To Fold Leather And Get It To Hold But...
thekid77 replied to thekid77's topic in How Do I Do That?
Thank you byggyns, a little experimenting ahead of me lol!!! So true!!! can't b in a hurry lol -
Need To Fold Leather And Get It To Hold But...
thekid77 replied to thekid77's topic in How Do I Do That?
LOL Tramps....I'll try that too if it doesn't behave after the 1,000 lb concrete block I'm going to set on it hahaha -
Need To Fold Leather And Get It To Hold But...
thekid77 replied to thekid77's topic in How Do I Do That?
Thank you Mr. Dwight, and God bless you!! -
hey friends, I finished a card wallet (outside coated with resolene) and inside lined.....I used weldwood contact cement for the liner.... I usually make my wallets unlined and so when it comes time to wet the crease in the middle to get it to fold, there is no issue... I forgot to crease before I put the contact cement on....not its finished and both sides are resisting water.... any suggestions? Thank you!! :D
-
New Member - First Projects
thekid77 replied to Mark Peters's topic in Purses, Wallets, Belts and Miscellaneous Pocket Items
hey Mark, welcome to the community, and congrats on your first few projects----they are beautiful!!! I love the oxblood...is it fiebings dye? what is your process for finishing with resolene? maybe i can be of help....i use the stuff all the time -
First Post/show Off/question
thekid77 replied to Tokarsky's topic in Purses, Wallets, Belts and Miscellaneous Pocket Items
Hey there!! First of all, great work!!! Resolene is really all I use for a top coat....in the video below, Ian tests the most commonly available leather finishes on the market....after watching, I was convinced that resolene was the best finish for my purposes....you can be the judge yourself...it's definitely worth a watch: https://www.youtube.com/watch?v=zyTg_hfpNUM Secondly, I don't know if there is such a thing as a "light coat of 100% resolene" unless you are misting it on with an airbrush.......something you might try that works for me... 1. cut the resolene by mixing it with 1 part water: 1 part resolene 2. fold up a paper towel into a small square and wrap that with a cotton cloth (old t shirt works well) 3. cover the mouth of the jar holding the resolene with the cotton square and tip the bottle to get the resolene onto the cotton 4. blot the cotton lightly onto a paper towel (this helps to ensure that your first coat is light) 5. gently wipe the cotton with resolene over your work and let the first coat dry 6. apply additional coats as needed you will find you have a ton of control of how much resolene you are putting on hope this helps!!! -
Stitch Straddling Card Slots Is Ruining Line Of Stitches...
thekid77 replied to thekid77's topic in How Do I Do That?
Thanks for taking the time to share your experience Jim!! I never thought of doing it that way!! -
Stitch Straddling Card Slots Is Ruining Line Of Stitches...
thekid77 replied to thekid77's topic in How Do I Do That?
Hey Jim, thanks for the reply Sorry I was not clear about this, but I am not using a sewing machine....I am hand stitching....... I was experimenting last nite and discovered that when you are passing the needle/thread through the hole just above the top of the card pocket, I just have to be extra careful with which direction I'm pulling the thread to get it to seat properly and lay like the rest of them..... In other words, I normally pull the left thread up and the right thread down......I've found that if I exaggerate this, the thread seats normally.... Thanks again!!! This is definitely a learning process haha -
Passport Wallet
thekid77 replied to lightningad's topic in Purses, Wallets, Belts and Miscellaneous Pocket Items
beautiful work!!! did you extend the lining out to the edges? if so, do you find it difficult to get a finished edge if the lining is sandwiched between the layers of leather? or do u just finish normally? -
Whats A Good Sandpaper Grit For Sanding Wallet Edges?
thekid77 replied to TheHoneyBadger's topic in Getting Started
hey there! I'd like to share my process (definitely more than one way to skin a cat with this)..... first off, start by getting a fresh razor blade loaded into your utility knife (a dull blade will pull those soft leather fibers up making it more difficult to get a smooth edge... 1. bevel/dye the edge whatever color you are going to dye it...allow it to dry... 2. get a Q-tip and dip in in resolene+water mixed 1:1 and use the Q-tip to "roll" the resolene onto the dyed edges.....let it dry....when the resolene cures it freezes up the fibers of the leather along the edges and hardens them making it easier to bevel/burnish the edges later... 3. all dry... 4. run a cake of paraffin wax or beeswax back and forth over the edges of the leather... 5. get the wood slicker, the smooth barrel of an ink pen, or a piece of denim/canvas and vigorously rub the edge back and forth....this will cause the wax to heat up a bit, and the wax will help to fill any open pores along the surface of the leather.... 6. get a piece of 1000 grit sandpaper and rub the edge back and forth vigorusly... 7. the edge will be much more smooth than what you started with, but if it is not to your liking, sand with 600, rub the wax, burnish, and hit it with the sandpaper until all smooth.... I hope this helps you...as I said earlier, this is just what works for me but I'm very happy with the edges I get doing this......the resolene really is a key since it helps freeze those little fuzzies and also takes a high polish itself....just be careful when applying it....you have a lot of control with a blotted out Q-tip -
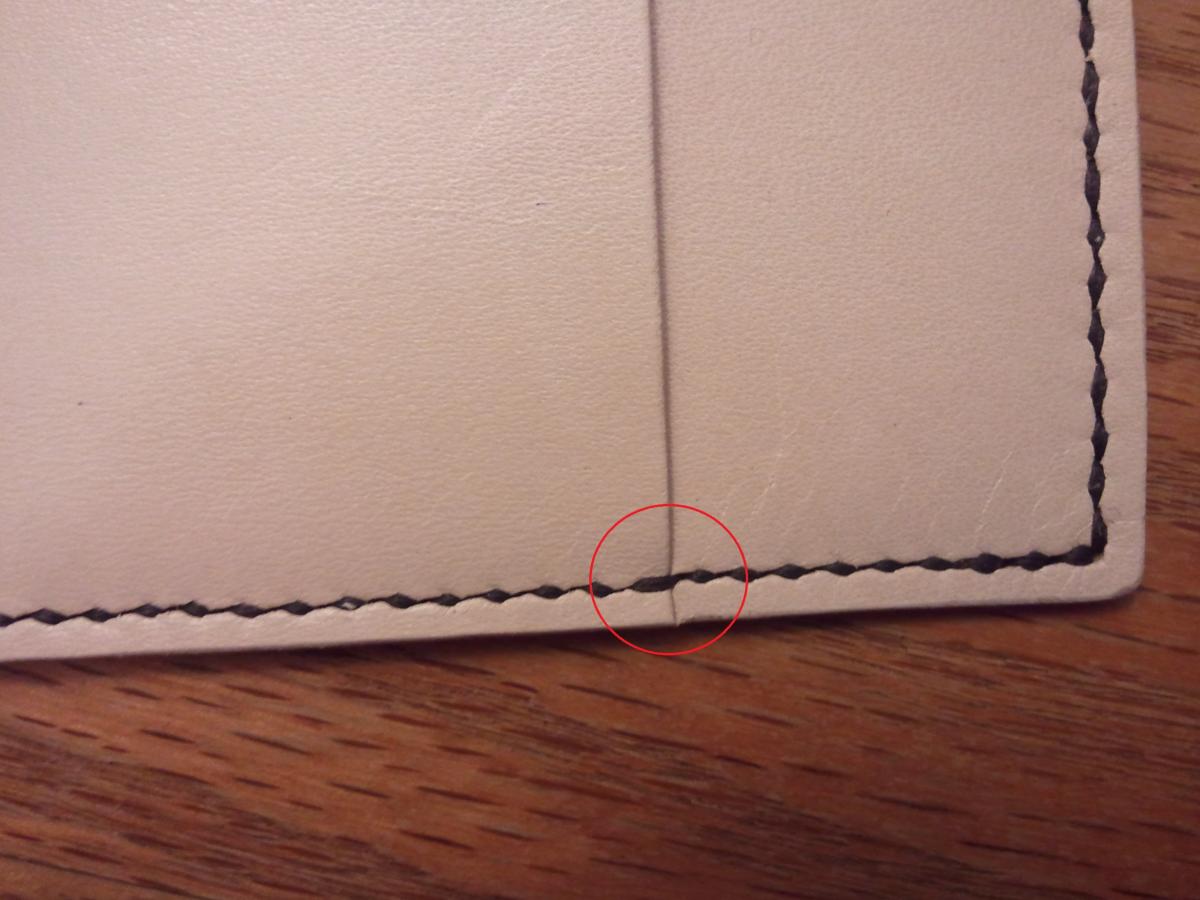
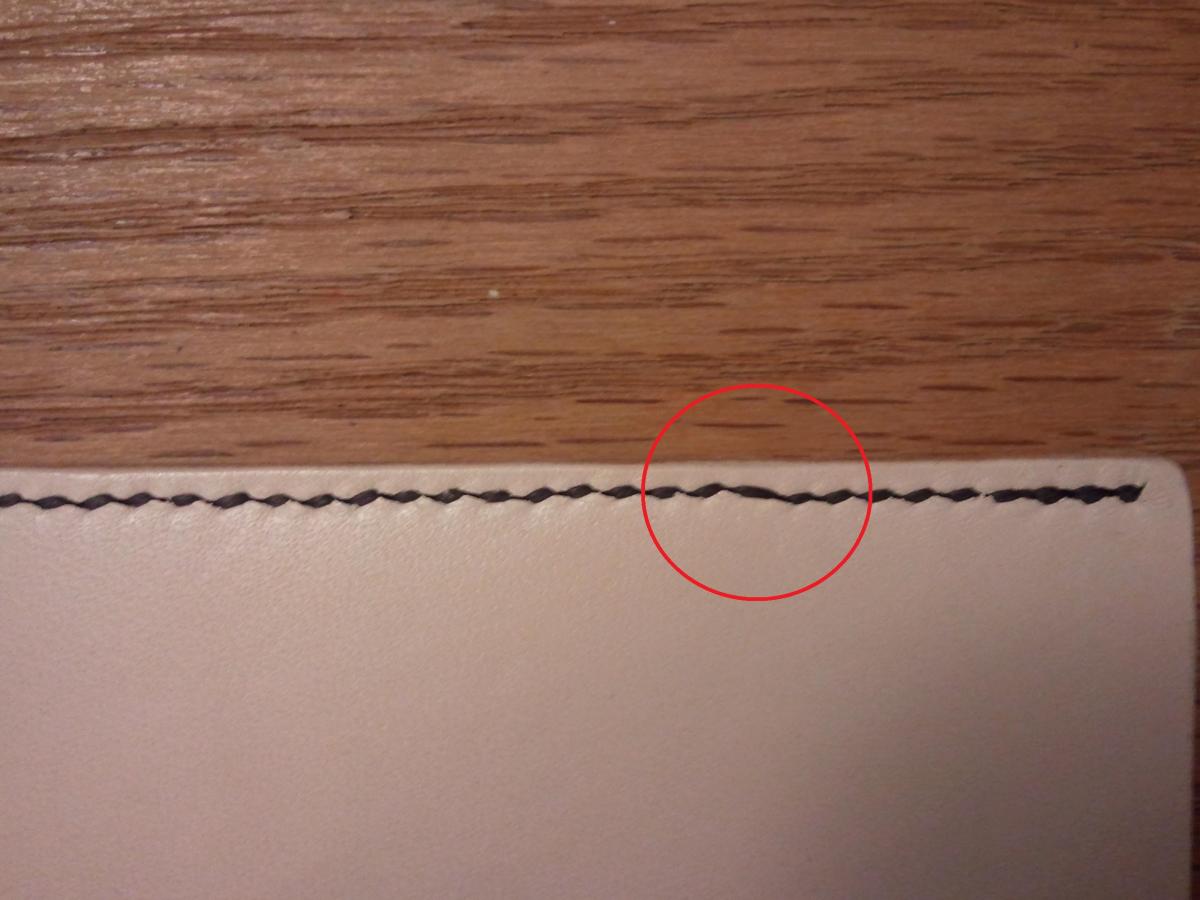
Hey friends, I was wondering if anybody has any suggestions to correct this......please refer to the photos....I made a stitch straddle a card slot and it completely ruined the line of stitching....I didn't change anything about the thread/needle priority or tension, I kept everything the same.... I wonder if this has anything to do with it.......instead of spacing the stitch where the top edge of the card slot would be in the middle of the stitch that is straddling it, I put the hole at the top edge....
-
Hey I don't know too much about this area of leatherwork, but you may find the video helpful.... https://www.facebook.com/video.php?v=10150131553076948&set=vb.182186731147&type=3&theater Peter uses a tool called a fileteuse.......he says u can buy it here: http://www.mando.fr/
-
Hey Austyn, You don't need to let the leather dry before applying a second coat but.... The advantage to letting the dye dry is that if you are trying to achieve a certain shade (light/dark), it's easier to see what you need to do (either apply another coat or not) if you just let the leather dry... When the leather is still wet after being dyed, the color tends to look different (often darker) than it will after it has dried....
-
Thanks for the confirmation Wind, much appreciated!!! Yeah, I never though about it that way, you're absolutely right!! Thank you!! Hey Bill!! Thank you for taking the time to share your thoughts, and for the encouraging words!! You are too kind :D