-
Posts
45 -
Joined
-
Last visited
About zfcjr67
- Birthday June 28
Profile Information
-
Gender
Male
-
Location
Atlanta
-
Interests
Learning more about the art and construction of leather equipment, improving my tooling and making useful items.
LW Info
-
Leatherwork Specialty
making "prototypes"
-
Interested in learning about
everything
Recent Profile Visitors
2,956 profile views
zfcjr67's Achievements

Member (2/4)
-

Homemade tools and ways you have saved money on tools
zfcjr67 replied to JenGranger's topic in Leatherwork Conversation
I built a stitching pony out of scrap wood and a few pieces of hardware I got at the store. It was under 10 bucks US and I think better than the deluxe tandy version. -
One item I noticed - on the first picture you didn't have your beveler in the swivel knife cut. Look around the ears, you can see the knife cut and the beveler marks outside of the cut. The second image you showed had the bevel marks in the cut, which is where they should be. Whenever you have a knife cut, make sure to use the beveler in the cut. Think of it as a line you make to show you where to make a smooth bevel. It takes practice to get the beveling right. Also, you can clean and smooth the beveled edges with a modeling spoon.
-
I re-read this thread while looking for my next inspiration and have some questions - How has the bag held up since you made it? Over the years, did you find anything you would do differently with it or some improved construction ideas from your use of the bag?
-
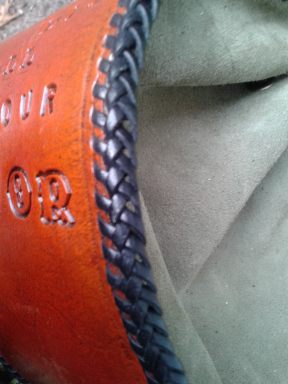
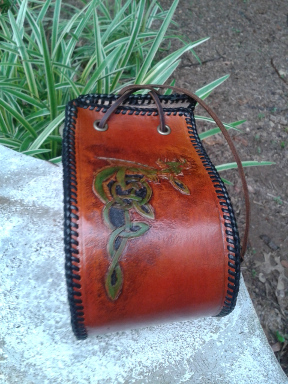
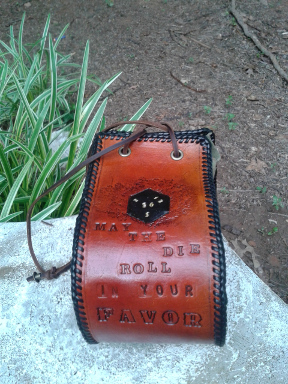
This is a small stirrup bag I made for my daughter, who needed a bag to hold her ever growing dice collection. The sides are sage green suede and the body is 4/5 oz vegtan. The dragon and die are painted with acrylic paints with gel antique rubbed across the entire piece to give it the rustic medieval look. I used eyelets for the cinch lace instead of grommets; the only grommets I found were shiny which I thought distracted from the overall appearance. There is a close up of the double loop lacing - I think it looks great but if you see anything I can improve please let me know. This is also the first piece that gives me hope I can possibly start this hobby job - I do this for fun and therapy (banging things is fun!) from my daily corporate job. Typically it is stuff for the family, friends and coworkers - but now I might start a stockpile and look at local craft fairs and gaming conventions.
-

Tanner's Bond Contact Cement - why isn't it working?
zfcjr67 replied to teresamwong's topic in Sewing Leather
In addition to Barge's, I've had luck with Tandy's Leather Weld. I use it for attaching linings to the insides of bags. Never had a problem with it coming up or separating, even in wet weather conditions. -
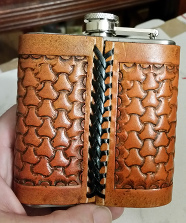
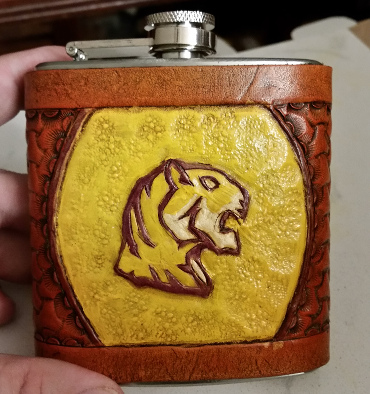
It has been a while, and I need to get back into leather to keep my sanity I just completed this flask cover for my wife (she graduated from Sewanee). My applique lacing on the back didn't straighten out as I wanted, but I can still wiggle it around to get it flat. I did glue it to the flask, so the lacing is more decorative than holding it together.
-
That is an excellent bag, and I hope you have many years of adventures past law school with it.
-

Celtic Knot 5X8 Notebook
zfcjr67 replied to Bob Blea's topic in Purses, Wallets, Belts and Miscellaneous Pocket Items
I like the knot and the background changes. It was stated before it really brings out the knot and the design.- 23 replies
-
- carved leather notebook
- celtic refillable journal
- (and 2 more)
-

Lined Wallet Prototype
zfcjr67 replied to Hi Im Joe's topic in Purses, Wallets, Belts and Miscellaneous Pocket Items
that is a nice wallet, Joe. you make it look so easy. -

Hip Bag And Cuffs
zfcjr67 replied to mtroyalguy's topic in Purses, Wallets, Belts and Miscellaneous Pocket Items
I never saw a hip bag before, but it is a cool idea. How did you line the bag, with fabric or leather? -

Being Doing A Bit Of Leathercraft On My Motorcycle
zfcjr67 replied to holmesmarsh's topic in Motorcycles and Biker Gear
I was thinking the same thing. Excellent pieces. -
Thank you for the wonderful pattern and instructions. I plan to make one this month and will post pictures.
-

First Run Of Tooled Leather Bags
zfcjr67 replied to LHissong's topic in Purses, Wallets, Belts and Miscellaneous Pocket Items
I like the bags. The rough-hewn tooling look goes well with the limited use of natural coloring on the bag and I can see a Good Sir Knight carrying some important dispatch in this bag. In my opinion, additional colors (greens, blues, reds) would detract from the simplistic beauty of the bag. I am jealous - free-hand leather skills are not in my genetic code. All of my designs are in CAD or drawings, printed on plastic tracing film to get it out of my head onto the leather.


