


prc77ro
-
Posts
195 -
Joined
-
Last visited
Content Type
Profiles
Forums
Events
Blogs
Gallery
Store
Everything posted by prc77ro
-
Which Edge Finishing Method For Shoulder Strap?
prc77ro replied to zeroflight's topic in How Do I Do That?
For the shoulder straps, in my opinion, I wouldn't lace them for comfort reasons, I would guess that once you finish lacing them they would be sorta stiff and would have the potential to rub in the armpit area. It also depends on the look your going for, do you want a refined high end look or are you going for the rugged, used, unfinished look( like a Banana Republic look). I use two different types of finishes on my edges if I want something more than just the burnishing. I'll use Fiebing's burnishing ink in black or medium brown, for this you really just need to have a decent edge, paint it on then either use a burnishing cloth by hand or a cotton buffing wheel to bring it to a mirror finish. The other edge finish I just started using is Fiebing's Edge Kote, Dura Edge. This stuff is awsome, you can paint it on burnished edges if you want or if your cut edges are pretty much perfect when you cut them you can just brush it on. It states on the bottle its flexible, won't crack or peel or rub off once it's dry. It does give a really good finish even if you only sand the edges. As far as the sinew, I have never used it, I have used Nyltex and am not really crazy about it. It's thick doesn't seem to lay as nice as waxed linen. The waxed linen is what I prefer, if I need it thinner i can pull a strand or two out, can't do that with the Nyltex. I know you can do the same with the sinew's so you dont have large stitches on an otherwise small project, keep that in mind. If you really want to be sure and have some scrap around try making an example so you can get an idea of what it will look like. Hope that may help some. -

From the album: Western Loop Holster
A leftover Holster from the gun belt I made, made two right hand holsters by accident, so I figured for some practice I'd carve it up and put it together. It's the first time using the 101-3, 101, 101-7 backgrounders. -
Thanks to everyone who left suggestions for me for a new maul, going to try the AS brand got a decent deal on a 16oz brand new one. After having my K-BAR for so long I'm a little partial to leather handles.
-
Thanks to everyone who left suggestions for me for a new maul, going to try the AS brand got a decent deal on a 16oz brand new one. After haveing my
-
My First Full Rig
prc77ro replied to Leatherman42z's topic in Gun Holsters, Rifle Slings and Knife Sheathes
Looks awsome, did one myself so I know how much work you put into it. The color is terrific, I love the old rustic look, and you stiched the cartridge loops too, I chose to weave mine. If I can make an observation for future thought, the ends of the cartridge loops have a row of stitching and then the ends are cut? Why not taper them to match say the stitched ends of the billets and sew them down, may give them a little more finished look but that is just my opnion. You did a terrific job on the entire thing. Can I ask did you line the holsters and/or the belt? and are the Uberti's .45Colt or .45Schofield? -
I agree with all the advice given, the only thing i havent seen mentioned here is are you securing your holster in a stitching pony/horse? I also started drilling holes using a harness needle though, and held my sheaths in my had while pushing the needle through. Very, very time consuming. If you have not already purchased AS's The Art of Sewing Leather buy it and read it cover to cover. In the back are plans to build a stitching horse. for about $50-$60 in materials you can make your own and it makes a BIG difference. It's easier to see your overstitcher marks, how straight your awl is and if you practice, practice, practice the instructions in Al's book you'll be able to stitch a saddle stitch without setting down either needle or awl. I am now stitching about a foot every 30-45 min at 6 stitches an inch. I use an awl haft not a saddlers awl, that way I can change blades and its still comfortable in my hands. Also, one more thing to note: when I sharpen and strop my blade I push it along the length of the blade just as the begining of the video shows, so I don't change the angle's on the blade and don't drag it across a stone or even a strop because both will change the angles. I'm not 100% sure but reason tells me that even stroping or polishing the blade still leaves micro abrasions(lines) in the blade and that the awl blade would perform better and with less resistance(drag) if they were in the same direction as the point, if that makes any sense.
-
Thanks, took me two days to make. If you can make it on your own its cheaper for one, plus then you can customize it as far as the sizes of the holes and how you want to lay it out. It would have been alot easier if I had access to a band saw, then I could have glued everything together and then cut the angles.
-
From the album: Home made tool rack
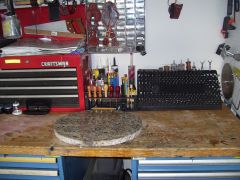
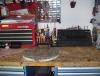
My work area for stamping, carving, dyeing, burnishing, etc. -
From the album: Home made tool rack
-
From the album: Home made tool rack
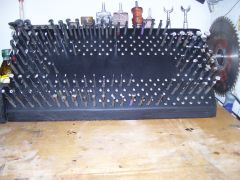
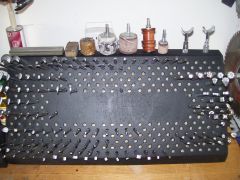
19 7/8" X 10" tall with 8" width on the slope. Made from 9 pieces of 3/4" Birch all glued with Gorilla Glue and clamped. It was ALOT of drilling. -
I filled two Craftool tool racks, and a home made tool rack that was equal to two of the Craftool racks and decided to make a larger one this past weekend. I had a 4'X6' sheet of 3/4 Birch laying around so I drew up a plan and started cutting. Basically the racked is stacked layers of the 3/4" with the angled sides cut on my table saw. This I had to do in several stages as the rack is about 10" high and my table saw is only a10"(wich only gives about 4 1/2" cut at 90deg roughly) the finished product has a useable space of 19 7/8"L X 8" H which comes out to 9 rows of 23 holes and 8 rows of 24 for a total of (if completly drilled) 399. I left out the center section which leaves me with 323 give or take a hole to fill. now the only problem is it looks half empty! The third photo is my work bench to give a better scale of the rack.

-
Finished making a larger tool rack for my stamps, only problem now is its half empty. I guess I'll have to fill it up.
-
 I think this one is my favorite, hmmmmm that rose and leaves looks familiar. Al Stohlman's holster book? think i have the same thing carved in my gallery. This looks really good!
 -
I agree with behind the wire, Craft Japan is seperate from Craftool. There are stamps out there that are goldish in color with either a stamped Craftool or an ink printed Craftool and these are made in Taiwan from what Jim Villwock (Customer Service Manager at Tandy) has told me.
-
Customers boots with the straps I made for her.
prc77ro commented on prc77ro's gallery image in Gallery- Our Leatherwork
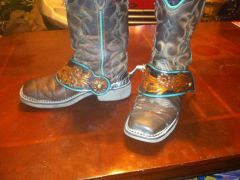 I am very pleased with how they turned out and it is very satisfying to see a product made by me "in use". She has agreed to be my gunia pig for any tack and anything horse or western riding. this friday I'm going to be showing her some chap leather samples and getting her measurements for her chaps.
 -
 Thanks for the tip Dwight. It wasn't so much the prongs going through the back side, they wouldnt even penatrate the leather, they were bending to the side and I couldn't figure out if I wasn't holding the setter straight or the sleeve wasn't all the way down. Maybe it was because the leather was 9-10oz? I am going to try using 5-6 or 6-7 oz then line the back with 2-3oz and see if that makes a difference.
 -
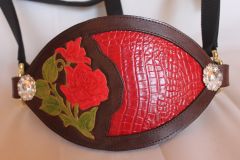
Crocodile Dog Collar And Leash Set
prc77ro replied to The Dawg Club's topic in Collars, Cuffs, Leashes and Leads
Those are incredible. On the double prong buckle collar how did you attach it, I dont see any stitching? -
Customers boots with the straps I made for her.
prc77ro posted a gallery image in Gallery- Our Leatherwork
From the album: Spur Straps
Customer sent me a photo of her boots with the gull wing spur straps I made for her. -
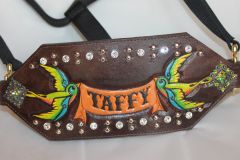
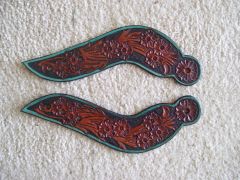 I had to mix Angelus blue and green acrylic to get the teal. I already had it mixed from the first pair I had done with the initials. then the entire strap was antiqued with medium brown. I havent been able to find a teal paint or dye, the closest would be turquoise.
 -
From the album: Spur Straps
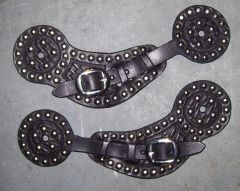
A different style, very large and hefty, dyed black with a dura coat edge. It was my first time using the spots and they are a little tricky to install. I ended up having to mark the holes with the spot where it would go then use my awl to poke them through so that I could put the spot on and set it with the tool. bent quite a few or the prongs before I figured that out. -
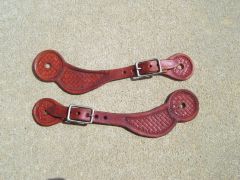
From the album: Spur Straps
Dyed russet and basketweave stamped with Craftool X506, you dont see this stamp too often. -
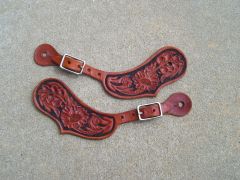
From the album: Spur Straps
Hand carved and dyed russet with black background -
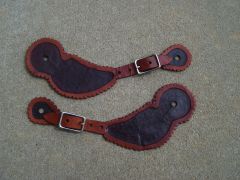
From the album: Spur Straps
My first time doing a scalloped edge, the inside is just matted and dyed, I started with dark brown then went to black and it gives it a unique color. -
 I'd really love to be able to make custom tack, not saddles or anything but breast collars and such. If people want their horses name, designs, flowers or even riding school names to keep track of their tack I'd really love to do that. Only thing is it would take some time to sew, as I do all mine by hand. The gunbelt in my gallery took me about 6 hrs to do just the belt. I havent been to a Saddlery in Fayetteville yet just Tractor Supply, and if I owned a horse I wouldnt be crazy about buying anything in there, you can tell everything is embossed and you can see the foot prints left by the machine. I have received some sample chap leather from Springfield Leather and it makes me a little nervous because even though the samples are about 4-5oz they seem stiff. I'm sure that if i had about 20sqf id would be different but I am concerened about a custom fit and the thickness as far as movement. Also I have new photos of the new spur leathers i have finished.
 -
I think that is going to be my next book, I am building quite the library between patterns and Stohlman books. I'm going to be doing a pair of shotgun chaps, fitted, then im thinking of tackling a breast collar. I see the Tack in the stores and I think I can do better.


