


Reegesc
-
Posts
444 -
Joined
-
Last visited
Content Type
Profiles
Forums
Events
Blogs
Gallery
Store
Everything posted by Reegesc
-
 Here's a pic of what I'm talking about:
 -
From the album: Untitled Album
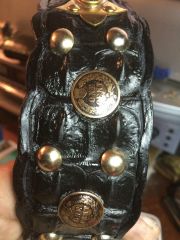
Coin Concho Example -
I use coin conchos a lot my myself and one thing you can do to add a little pizzaz is to dome the coins. Harbor Freight sells a really nice doming block set for $49. Professional looking conchos are a breeze with this set. I saw that you punched the coins and I thought ewwww....but it looks cool with the copper rivet I must admit. I solder rivets and Chicago screws to the back of my domed coins, then antique, polish, and varnish them (looks terrific on the Indian Heads). Very easy to do. PM me if you're interested in how do that.
-
Por Favor...Gracious
-
 Nice.
Nice. -
This book helped me out a lot when I first started: "Leathercraft Tools: How to Use Them, How To Sharpen Them" by Al Stohlman (leatherworker Saint and possible Diety). As the title suggests, Al describes the proper usage and the intended function of practically every leather working tool there is plus shows you how to make a few of them yourself. In addition to bering a terrific reference (I still turn to it regularly for sharpening tips) it's also a good primer on leather working and will give you a leg up on the learning curve of trial and error.
-
Gorgeous!
-
-
I'm posting this to make it easier for those searching on the following terms as well as share my own recipe and experience using it on tooled veg tan leather: oxalic acid alternatives cleaning substitutes Barkeeper's mixing recipe Barkeeper mixing recipe Bar Keeper mixing recipe Mix: ==== 1 Tablespoon of Barkeeper's Friend to 1 pint of water. Result ===== I used this mix on a heavily soiled veg tan piece (hand oils, sweat, grime) that I had just tooled. I dipped a clean rag in the solution and briskly rubbed the piece with plenty of saturation. It couldn't tell if it was working when it was wet so I just gave it a good scrub. To be honest, I wasn't expecting much, but once dry it was clean as a whistle. In fact, it came out cleaner than it was on the roll when I first cut it. There's a comment on another thread stating that Barkeeper's Friend is an inferior substitute because it only contains 5% per volume of oxalic acid (MSDS sheet says 5-10%) and you would have to use an entire can in a paste form for it do anything. That's about as absurd a statement as I've read in these forums, and there are some doozies. All I can say is it worked great for me. Barkeepers is cheap and easy to find in the cleaning section of your grocery store. I use it mainly to clean copper and brass on my metal projects. Works great on that too.
-

From the album: test
more detail on this one -

From the album: test
Slave collar -
![20130323 105857[1]](https://leatherworker.net/forum/uploads/gallery/album_1694/sml_gallery_39643_1694_1211246.jpg)
From the album: WIP Wallet/Tobacco Pouch
-
From the album: WIP Wallet/Tobacco Pouch
-
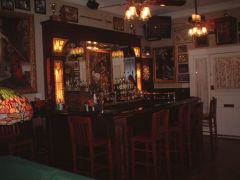 I actually want to delete this. It's a crappy picture that I thought was going to temporary. I was chatting with another member and we got talking about swords which led to uploading this. Anyway, I hope to delete this and replace with a se of Show-Off photos of a pub that design and created for my home -- a home no longer own -- but still worthy of bragging rights. It's pretty off topic but I think there are many people hjere who will appreciate the design work and and who know, might be a point of inspiration for a leather project. Inspiration can and should come from a lot of places, I think. I'd like to see galleries opened up a bit to allow for other avenues of inspiration. Don't get me wrong, I love looking at everyone's work. But can't we have room for a little bit more, just for inspiration? Yeah, I know, where do you draw the line and what's inspiring? PUBS are inspiring.
 -
 ~^~ HOME MADE CONHCOS ~^~ Polishing--> Doming --> Soldering --> Finish I'm thinking of putting a tutorial together on how you can make your own coin conchos. It's pretty easy, It's fairly cheap, It's mo' better. ________________________________________________________________________________________ Adorments should be the one area where creativity and imaginative designs flourish. And yet Conchos have always been an underserved segment in my opinion (ditto buckles -excep: Ohio Bag) Selection - narrow breadth New Designs - few and slow Quality - low-to-poor (some exceptions) Price - high-to-ridiculous (some exceptions) _______________________________________________________________________________________ ~^~ DIY ~^~ ~^~ DIY ~^~ ~^~ DIY ~^~ ~^~ DIY ~^~ ~^~ DIY ~^~ ~^~ DIY ~^~ ~^~ DIY ~^~ ~^~ DIY ~^~ If you already own soldering iron and soldering suppllies, your setup cost would just be the doming block set (Harbor Freight $50). If you're starting from scratch $100- $150 depending how much you spend on the solderinig iron $25 - $75, ~^~ DIY ~^~ ~^~ DIY ~^~ ~^~ DIY ~^~ ~^~ DIY ~^~ ~^~ DIY ~^~ ~^~ DIY ~^~ ~^~ DIY ~^~ ~^~ DIY ~^~ ♦ PM ♦ Chastise Me ♦ Comment ♦ Iritate Me ♦ PM ♦ Trick Me ♦ Comment ♦ Surprise Me ♦ PM WHAT'S THE FREAKING HOLD UP? PUT UP OR SHUT UP!! GET OF YOUR BUTT AND DO THIS! - CHOP CHOP !! HURRY UP LARD ASS! - JUST DO IT!! HELLO?!? MCFLY?!? ♦ PM ♦ Chastise Me ♦ Comment ♦ Iritate Me ♦ PM ♦ Trick Me ♦ Comment ♦ Surprise Me ♦ PM I'm not to going to say what the magic number is, but I will say - 'It ain't much, but it ain't zero.'
 -
Example of Spar Varnish on Polished Copper
Reegesc commented on Reegesc's gallery image in Gallery- Our Leatherwork
 * One HEAVY COAT (to the point of dripping), provides a dipped look, adding depth to the finish, and created an impossible look of fossilized clear liquid Amber * Seals the copper completely, preventing oxiditation. * Spar varnish's natural amber cast nicely compliments copper's polished color, providing an amber glaze look.. * The color deepens over time as the varnish cures for a year (possibly longer). At one year the color is a lovely combination of bronze/orange/copper These results are for indoor objects away from sunlight. Spar varnish does deteriorate under UV rays. It's also a soft finish and more easily scratched than Poly for example (which is inferior, don't bother).
 -
Example of Spar Varnish on Polished Copper
Reegesc posted a gallery image in Gallery- Our Leatherwork
From the album: WIP Wallet/Tobacco Pouch
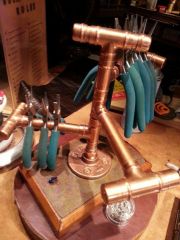
Here's and example of the the color you can expect applying Spar Varnish to polished copper. The finish has cured for about six months on this tool stand. You can see how deep the finish looks but using my ONE HEAVY COAT METHOD. :-) You could apply multiple and get a similar look. I've the one coat to be easier and less likely to develop bubbles and other finish blemishes. I also removed the tools on the second rack to give you and idea of how the spare varnish hold up. You can see a little wear on the arm were the tools normally rest, it's not quit as shiney, but stilll looks for regularly use. -

From the album: WIP Wallet/Tobacco Pouch
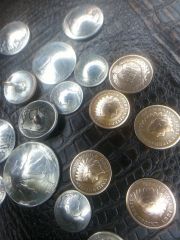
Detail of domed Indian Head Pennies ready to have back soldered to them. These are my favorite concho coin right now. The details really show up by creating a contrast between the relief (the raised or three-dimensional image) and the field (the background), Here I have polished the relief taking care not to exert too much pressure, thereby polishing just the verfy top of the relief. After that, I lightly polish the background until the desired effect is achieved. In other words, polish both to whatever pleases you the most. Of course, once removed it talkes a long time to achieve a similar patina. In this case over 100 years. I'm sure there are plenty of way to achieve a patina quickly, I've not looked into it though. After I solder these, I'll then apply a heavy coat (like dripping heavy) of Spar Varnish. I use Rust-Oleum brand "Ultimate Spar Varnish" Semi-Gloss Exterior. I get it at Home Depot and Lowes. I imagine any spar varnish would work, but this has worked great and I've just stuck with it. I use this finish on copper-tubing projects - it's terrific on highly polished copper offering these benefits. * One HEAVY COAT (to the point of dripping), provides a dipped look, adding depth to the finish, and created an impossible look of fossilized clear liquid Amber * Seals the copper completely, preventing oxiditation. * Spar varnish's natural amber cast nicely compliments copper's polished color, providing an amber glaze look.. * The color deepens over time as the varnish cures for a year (possibly longer). At one year the color is a lovely combination of bronze/orange/copper These results are for indoor objects away from sunlight. Spar varnish does deteriorate under UV rays. It's also a soft finish and more easily scratched than Poly for example (which is inferior, don't bother). I expect it will be as nice a finish on Indian Head Pennies, but what I'm most concerned about is preserving that cool contrast look look I've got and the spar should do that. -
From the album: WIP Wallet/Tobacco Pouch
Here's a mix of coins I've domed and they're now ready to have backs soldered to them, either a button loop back, chicago screw back, or rived post back. -
Tobacco Pouch Liner?
Reegesc replied to Shorts's topic in Purses, Wallets, Belts and Miscellaneous Pocket Items
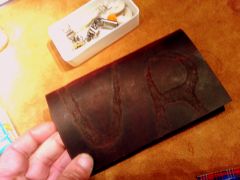
Hey Shorts, I'm a little last to the party with this, but maybe somebody else. Or, perhaps somebody will explain my little DIY discovery is not so wonderful after all. Its all good... I'm making a combination wallet/tobacco pouch and had the same question on the pouch lining. I ended up making my own liner after buying a cheap fabric pouch from a tobacco shop for reverse engineering ideas and to use as a liner. Once home and dissected, it was nothing more than some really ugly fabric with a thin sheet of plastic on one side -- the kind of material that you might find used on a kid's raincoat. Looked easy enough to DIY, so I did. I took some 6 mil visqueen and sandwiched it between two layers of faux tooled upholstery fabric (~ 1oz) and I think it turned out great. http://leatherworker.net/forum/index.php?app=galleryℑ=19280 First of all it looks cool. But does it perform? Indeed it does. It's flexible, returns to shape, and is stiff enough to be manageable in a one-handed rolling situation (an unexpected benefit). No crinkling sound from the visqueen nor any odors. Did I mention it's reversible? You betcha it is. Now that I think about it, I could see an occasion where you might have a need to store something other than tobacco and didn't want to taint the taste of either -- two pouches in one. All that, and it's still thin enough to be used as a liner if you want. Why it's a dang modern marvel is what its! Durability, not a problem. Last as long as the skin does. Ok, it's not leather. You got me on that one. -
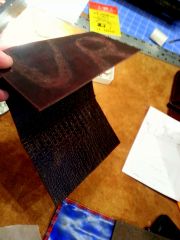
 This is crappy tobacco pouch I purchased from a tobacco store. I bought it mainly for reverse engineering ideas but also figured I would use it as the pouch liner. There's nothing much to it, just a thin sheet of plastic bonded to the ugliest fabric ever designed. So, I made my own.
 -
From the album: WIP Wallet/Tobacco Pouch
-
From the album: WIP Wallet/Tobacco Pouch
How cool would it be if you name just happened to be Viceroy Rothschild III, owner of half of Belize and all of the Cayman Islands. That would be great, but you wouldn't need a wallet. But what you would need is a Bodyguard (Valentino "Tony" Scaro) and a Valet (Vincent "Vince" Raines). -

From the album: WIP Wallet/Tobacco Pouch
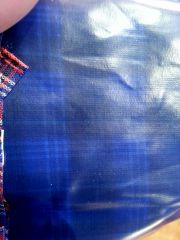
Plain ol' sheet plastic -
From the album: WIP Wallet/Tobacco Pouch
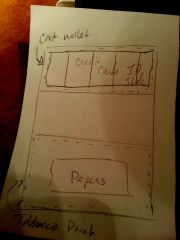
It always looks good on paper. Or does it...? Papers slot is on the wrong side.