


Reegesc
-
Posts
444 -
Joined
-
Last visited
Content Type
Profiles
Forums
Events
Blogs
Gallery
Store
Everything posted by Reegesc
-
From the album: Untitled Album
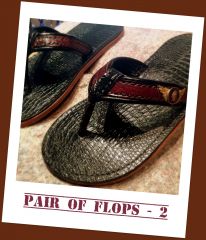
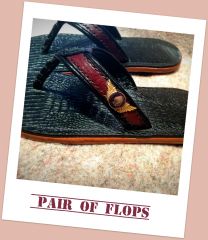
Flops -
Breifcase Hardware Question / Source
Reegesc replied to rmr's topic in Satchels, Luggage and Briefcases
@ Tinker -- Ha....now that's funny. You might be assuming too much. That rock star pic of me is from the late 70s. Been to college, got me some learning. But what I don't know is how are things VBC? -
Breifcase Hardware Question / Source
Reegesc replied to rmr's topic in Satchels, Luggage and Briefcases
Yep, just fire up the lathe....soon as I get one. @ Tinker -- uh, you don't have any hair. -
Breifcase Hardware Question / Source
Reegesc replied to rmr's topic in Satchels, Luggage and Briefcases
Hmmm...I gotta a ton of those just sitting a box. Never thought to cut them up and do anything with them. I will now... Thx -
Breifcase Hardware Question / Source
Reegesc replied to rmr's topic in Satchels, Luggage and Briefcases
Perfect! I like the knurled idea. (hell you didn't say you had a lathe hahahaha) Thx for turning me on to these unique feet. Very cool.. Definitely post pic. -
Breifcase Hardware Question / Source
Reegesc replied to rmr's topic in Satchels, Luggage and Briefcases
Just had an aha moment thanks to Tinker's idea, Here's a drop dead easy solution. These are pre soldered copper fittings, plumbing fittings. "Pre Soldered" means they already have solder in them -- that's what the ridges are for. They're packed with solder. You could just grind or cut off the ends (or use as is), then cut a slot and shape as Tinker suggests. Then glue your leather in the middle strip. Done. Well, along with the some holes for stitching or rivets. Granted, it's copper and not brass, but polished copper is gorgeous IMHO. To prevent it from tarnishing, just spray it with some spar varnish (don't use poly though -- the spar varnish looks terrific with copper). You would need to do the same with brass as well although laquer looks pretty good on brass. I did a search for pre soldered brass, couldn't find any (wasn't expecting to). These never really took off, so don't expect to find them at Home Depot or Lowe's. But here's a place I buy from -- cheapest source I've found yet. I do a fair amount of metal work using copper tubing and these pre soldered fittings (lamps and stuff). http://presolderedfittings.com/presoldered~prices.htm What you want is the 1/2" Slip Coupling -- Item 4 on that page. $5.90 for a pack of ten. That's dirt cheap. -
Breifcase Hardware Question / Source
Reegesc replied to rmr's topic in Satchels, Luggage and Briefcases
I like the way you think... ;-) -
Hey YinTx -- on the off chance you haven't looked at the Chinese irons, you ought to give them a look. There's a number of eBay sellers. Here's the one I went with. http://www.ebay.com/...=item5d540a5045 I bought the 4, 5, and 6 mm sets (that's 12 irons all together) for $40. Yeah, forty bucks. They arrived just a couple days ago (took a month), so I only have a little bit experience using them, but so far I'm VERY pleased with them. And at that price? THRILLED with them. Check out Nigel Armstrong's review on these irons -- he gives a thumbs up and that's saying a lot. Left off the video link. Here ya go... And make that "Armitage" not Armstrong :-)
-
Breifcase Hardware Question / Source
Reegesc replied to rmr's topic in Satchels, Luggage and Briefcases
@ TinkerTailor -- Yeah, great idea. And you could even use rivets instead of stitches. Clever... -
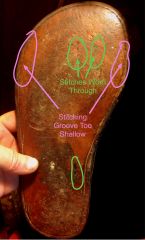
@Troy Burch Re: Pic of the Bottom Soles I didn't take a pic of the ones posted, but here's a pic from my very first pair which I have been wearing continuously for nine months. I'm glad you asked because I wouldn't have looked at them otherwise and there's a couple newbie errors worth pointing out. In this case, I stitched the uppers all the way through the soles. I no longer do this and instead just stitch to the upper layer. It just isn't necessary, but certainly no harm in doing so if you do it right, which I didn't. Notice there are no stitching grooves and you can see in the photo why that is a bad idea -- you wear right through the stitches. Surprisingly, mine are holding up just fine -- a testament to just how strong the saddle stitch is I suppose. I also didn't make my perimeter stitch groove nearly deep enough. For the pair featured in this post, once I wetted the "DEEP" stitching groove and let sit overnight, it closed up so much you could barely see the stitches below the surface. The crappy perimeter stitching groove speaks for itself. My latter pairs have perfect stitching grooves (ya know, like how my other car is a Mercedes). ;-)
-
From the album: Untitled Album
-
Breifcase Hardware Question / Source
Reegesc replied to rmr's topic in Satchels, Luggage and Briefcases
PM me if you're not set up for metal work. I'll make you a set for a nominal charge. -
 Nice stitch line
 -
A few days ago I was admiring (lusting over) Nigel Armstrong’s vintage dividers he uses in his sewing videos and I resolved to upgrade my crappy pair, but not for vintage or Osborne prices — $20 bucks was my budget. Right off I found the pair on the left (Shinwa 6” Dividers - $15) — high quality, Japanese Company, low cost. Perfect! EXCEPT where’s the adjusting/setting assembly? How do you keep them stable? Long research story short, the deciding factor was “It’s-Just-$15-Bucks-Ya-Idiot!” Glad I did. Adjusting/setting is not a problem with these guys — they do not move AT ALL after you spread them. I’m also glad I opted for the smaller 6” model — fits and feels just right in the hand. I scribed a few practice lines and circles — very stable. Extremely sharp points ( I might dull these a bit). The ones on the right? $7 Springfield specials. Not picking on Springfield per se but man those are some crappy dividers. Thin gauge, wobbly project killers is what they really are (now safely stored in the garbage bin and trash day is tomorrow! ). So, there ya go. A real bargain at $15 (free ship to boot). I won’t bother with a link ( it’ll be broken in a month). Just search Shinwa dividers. Amazon and eBay both have them for about the same price.
-
Damn....that's nice.
-
Breifcase Hardware Question / Source
Reegesc replied to rmr's topic in Satchels, Luggage and Briefcases
Just thought of something else that is probably easier and maybe even cooler. Instead of sheet brass for the sides, use brass wire instead. Easier to lay down three pieces of wire than cut, file, and exactly set a small strip. Plus you get an interesting "serrated" visual effect with the wire. Like I said, so many ideas, so little time... -
Breifcase Hardware Question / Source
Reegesc replied to rmr's topic in Satchels, Luggage and Briefcases
Howdy neighbor (just noticed you're in Allen). Right. My pic accentuates/distorts the thickness of the leather in relation to the brass, plus it's thicker leather than I would use if I were to make a set. But yes, the leather on my prototype does not lay even with the brass. That said, you should be able to use a thin enough layer of leather to where it is indiscernible. But pondering this a bit more, you could get it to even pretty easily by soldering side strips of brass with a thinner gauge. In my prototype is used 12 ga brass. So adding say 18 or 20 ga would do the trick. Now that I think about even more, what would be really cool is to also add a middle strip of brass or perhaps bronze or copper. That would really would really make it stand out as a unique treatment. In any case, you're right, haven't seen anything quite like this. Very cool indeed. So many ideas, so little time.... Oh, one other thing, be sure to use E6000 glue to attach the leather. Works great. Post a pic of what you come up with. -
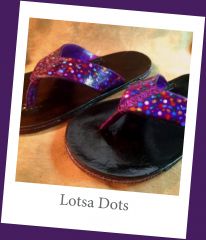
Thanks everyone for the kind comments. I ended up putting together a fairly comprehensive tutorial on this and am happy to share. Just send me an email -- clyde.seeger@gmail.com. Just mentioning it again, a little clearer this time, as some weren't sure if it was just a one off for the person who originally asked. i also have a request on DIY coin conchos and will be posting a short video on that soon. It's really easy and inexpensive to make your own cool conchos like the one on these flops and more. If you would like to have a heads up on that as well, pm me and I'll let you know when it's available. Stay tuned and thanks for the interest.
-
Sure, not prob. Email me - clyde.seeger@gmail.com - and I'll send you a general template and instructions PDF.
-
A pair of flops for a friend
-
From the album: Untitled Album
Alligator embossed top sole, veg tan bottom soles. Latigo inlays on uppers. -
From the album: Untitled Album
Alligator embossed top sole, veg tan bottom soles. Latigo inlays on uppers. -
Breifcase Hardware Question / Source
Reegesc replied to rmr's topic in Satchels, Luggage and Briefcases
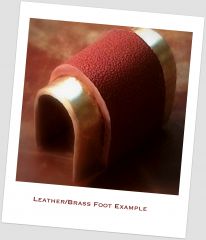
Like this -
From the album: Untitled Album
Protective case foot -- leather glued to polish brass using E6000. Crimp to finish. -
Breifcase Hardware Question / Source
Reegesc replied to rmr's topic in Satchels, Luggage and Briefcases
Those are cool looking. Seems like it would be easy enough to make your own though. Cut a strip from sheet brass, curl it, glue leather to it, crimp it.
