Cletus2014
-
Posts
34 -
Joined
-
Last visited
Content Type
Profiles
Forums
Events
Blogs
Gallery
Store
Everything posted by Cletus2014
-
So if I used the antique tan, for instance, as the base coat, would I let it dry completely before applying the black? When you say "alcohol" dye, is that just leather dye that isn't oil dye? Does the base coat actually resist the black from penetrating completely into the leather? I basically understand what you're describing here, just not quite clear on how to go about it. Any other suggestions for achieving this finish?
-
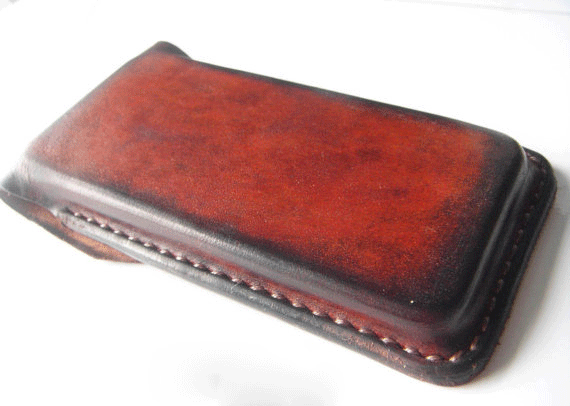
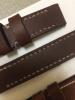
I'm trying to figure out how to do a finish like this and I can't seem to find anything on antiquing that described this process. I borrowed this image (if you are the maker, I hope you don't mind my using your excellent work as an example) of an iPhone case to show how this maker has done the finish. I love how the dark brown transitions to black near the edges and can't figure out how to get this affect. Is this just a black antique gel around the edges, with brown in the middle? Anyone know how to get this effect?
-
PM sent on one of your 5/6 sides...
-
Leather Tray For My Friend
Cletus2014 replied to hunio's topic in Purses, Wallets, Belts and Miscellaneous Pocket Items
Hunio - Your work is truly exceptional and to me looks just like something straight out of Hermes or Louis Vuitton. Very close attention to detail must certainly be among the keys to this look, but I'd sure like to know more about how you do these trays. I'll bet a lot of folks here would be interested in a detailed tutorial, or breakdown of just how you make these. I know I've seen several questions about your covered snaps, edges, etc., would you care to tell more? Either way, thank you for posting! -
Billybopp - Thanks for the input on the creasers, it's quite possible I just need more practice, but so far I've been completely unable to get these new CSO creasers to work AT ALL without wandering off the edge of the leather. I'm about ready to take a file to them and try to do something, as they are completely useless as is, unfortunately. I might should have gone ahead and got the VB screw crease in the first place and been done with it. I'm beginning to learn to go ahead and buy the better, more expensive tools first, rather than wasting money and time (and leather) trying to save money re-buying cheap tools again and again. My experience with awls has been varied, but I think I'm finally getting the hang of it at last! I started out with the Tandy "wing blades" too. I didn't realize that's what they were called, but I do see, in hindsight now, how completely useless these things really are. What a struggle! And this was when I was barely first learning to stitch and also didn't know any better. Tandy should be ashamed, selling such junk and for the prices they ask too! (of course, you could spend several hundred dollars to get their "club discount" for a year, what a deal!) My next awl was an Osborne 143? or 144, I forget, but once sharp worked quite well. I recently bought a Barry King small haft and #1 awl blade and also a VB 38mm awl with blade. The BK came fully polished and sharp and works beautifully, though I've since reground and polished the tip to suit my style. The VB had a very sharp point, but was roughly finished, not polished at all and was basically unusable too. Now I have also reground it and polished the entire blade and now it effortlessly pushes through the leather, every bit as good as my other two awls. The point of the long story here (pardon the pun) is, as long as the blade is basically the correct type, size and length for your style, it's important to spend some time getting it dialed in before it becomes the tool it's meant to be. I'm not sure the brand makes much difference (please note, I did say not "much" difference). I've spent probably several hours on each of my three stitching awls and they all work beautifully for me and they are all nearly identical in tip grind and polish, with the length and width of the blade being the only difference, for different stitch sizes. If you look at it this way, you can then more or less choose and awl for the design of the haft/handle and use whatever suits you best, without worrying too much whether you're getting the "best" awl blade. You can make most blades the best, by the work you put into them.
-
Pro-Line Pricking Irons Full Set (10, 5, 2 Teeth) 3.38Mm
Cletus2014 replied to JanC's topic in Old/Sold
PM Sent - not clear on whether these have been sold or not? -
Not to reopen an old thread, but I have a question about the Osborne irons that I've seen some here - Joe? - comment on. I bought one of these, the 609-7, from the CSO Tools site for around $55 and I found that the length of the dents (don't know how else to put it) was far too long to get an accurate stitching line. The marks appear to be slanted properly, but when stitching I've had to try to "aim" the awl for the top of the dent/mark, which lead to much inconsistency in the stitch line. I spent several hours with a file, on each of the two side of the iron, if you can picture that, and was able to get the length of the dents down to a somewhat more usable "width". Still not perfect though and stitch lines are still inconsistent. With even more file work I might be able to approximate the fine, narrow stitch track, or line, or whatever you want to call it, of the Blanchard irons, but I'm not as optimistic as I once was. I'm about to give up and spring for a set of #6 VBs at this point. Does this sound like your experience with the CSO chisels?
-
It's funny (well, not really funny) but since I've really discovered leather working and saddle stitching in general, I've been on something of a quest for a better, cheaper pricking iron. I originally had a couple old Tandy junk irons and didn't know the difference. I finally sprung for a set of #8 V. Blanchard irons in a set from a guy on Ebay and have since spent pretty close to what those cost trying to find a less expensive alternative - so far, without success. To date, I've purchased two different sets of Chinese "White Metal" diamond irons, which are barely passable but work, total with shipping, about $75. I've bought a CS Osborne 609-7 direct from their site, which after several hours of file work, is just BARELY passable, ~$65. I've seriously contemplated spending the money (and time) it would take to get a set of Dixon's shipped from the UK, which would end up around $225 all told. If I would just bite the bullet on a set of #6 Blanchard irons ($219 free shipping), instead of spending dollar after dollar trying to find something "cheaper", I could finally get on with life and quit worrying about it. I never learn, it seems, when it comes to stuff like this: If you want quality tools, sometimes the only way to do it is to spend the big money once and be done. Clearly, this is just my opinion and my own experience, I'm not telling anyone they should run out and spend a couple hundred bucks on anything, whatever you're doing probably works fine for you, this is just me.
-
Hi Joe - The problem I've been having isn't because of whether I get the tools hot or not, it's these CSO creasers I got that will not stay on the leather and do their thing - well, the #2 will, to a point, if I'm VERY careful and slow - but the #1 is unusable and slips off the leather edge every time instead of following the edge and making the line. I was looking for some opinions on possibly some way to use, or hold these tools that I'm not figuring out here. I can't imagine too many ways to use it that I haven't tried yet, but who knows?
-
Thanks mrtreat32, I'd be interested to hear how the VB screw crease works out for you. I came very close to getting one of these, there's an Ebay seller who usually carries quite a bit of Blanchard stuff and had this tool for right at $70. I should have just got that in the first place, rather than screwing around with these other ones. The Barry King awl - I actually bought the small haft and the #1 blade and I'm really happy with it. I'd been using a CSO #143 (I think) and it served me well once I had it all polished up and sharp enough to slip through the leather. The BK awl (blade) was already polished when I got it and works beautifully. I've heard the Douglas blades are very good, but I'm happy with the BK for now. I also have a small Blanchard awl, but I've not had a chance to polish it up yet, so haven't used it. Last thing - If you're looking for a round knife, or any kind of leather knife, don't forget to check out Knipschield Custom Knives. I just got my new French style head knife and Wharncliff trim knife yesterday and I am so blown away with how bleeding edge, FRIKKEN SHARP these knives are, I've never seen anything like it in my life. I always thought I was getting my shoe knife pretty sharp and stropping it up to straight razor edge - NOTHING compared to these Knip knives, which slice right through a tough old 14oz latigo like it's butter. I've never seen anything like it. Terry Knipschield's prices are great too and the knives are beautifully and perfectly done. Do yourself a big favor and check it out, if you don't already know about Knipschield.
-
I'm kinda going through the same trials and tribulations with properly creasing leather myself. Like you, I've been using my dividers, which work okay, but I recently picked up two (a #1 and #2) CS Osborne Creasers from Ebay. I'm starting to wonder though, whether these CSOs are seconds or rejects or something, as I can not, no matter how slow I go, or how carefully it try, keep the tool indexed off the edge of the piece. It doesn't even seem to "slip" off, but rather seems to actually pull off the leather, which obviously screws up the edge. The #1 is worse than the #2 and I've so far found it impossible to use the #1 at all and this is on a piece of 4oz veg tan with a very clean, square edge. I can't even imagine trying one of these things on a work piece with an edge that's been beveled or isn't completely perfectly sharp and square to guide the tool. Anyone have an comments on this? I know the vintage CSO tools tend to be a little (or even a lot) better than new ones, but these creasers seem unusable to me. Could it really be I just haven't figured out how to use it properly? I'm thinking about dropping half a buck on a Barry King (Their awls are a work of art) and be done with it.
-
Rick - Funny, I just noticed this post, I got my Knipschield knives today in the mail and it sounds like I'm about as amazed as you are! Terry does absolutely beautiful knives at beyond reasonable prices, I'm so glad I found this maker. And SHARP??? I'm the same as you - I thought I was getting my little Dexter shoe knife pretty dang sharp Yeah, no comparison at all! I've never seen anything even come close to the way these Knipshield knives seem to just magically part the leather. I bought a French style head knife and the Wharncliff trimmer and I spent the morning practicing on a heavy, tough old sole of latigo, figuring this was probably the toughest leather I'd ever cut. These knives go through it with almost no effort at all, what an eye opener! I'd keep right on going, bragging about how good these knives are, but I'm running out of superlatives to describe them. All I can say - for all you leather guys out there who've not tried or heard of Knipschield Custom Knives - this is the big plug. Terry is a great guy to talk to, as knowledgeable about knives as anyone I've ever come across and can make you a one-off head or trim knife in something like a week. For about half what you'd expect to pay, just to top it off! Thanks again Terry! I was blind but now I see.
-
rawcustom - The sheath in your photo looks to me exactly like Horween Brown Chromexcel. Even if it's not Horween, chrome tanned aniline leather tends to have that waxy smooth, even look to the finish which distinguishes it from veg tanned leather. I'm still pretty new to the trade though, so you would be well advised to get a more experienced opinion if it's an important question about leather.
-
I ran into a little snafoo trying to stitch gussets into a small bag and I hope somebody can tell me what I'm missing here - I'm making a small tool case with gussets, which is basically a scaled down version of Neil Armitage's iPad Messenger bag. This is my first attempt working with gussets and it is indeed a tricky business getting these right. I have a small stitching pony that I built and I'm having a lot of trouble figuring out how to hold the work for stitching the back side gusset. The front side, or the first half of the gusset was difficult to get positioned and stitched, even though held in place with contact cement. I managed okay though and could clamp it in my pony for stitching because I could just fold the gusset down out of the way to get the bag in the clamp. It's the second half that I'm really hung up on. I can't just fold the gusset down now, like I did on the front panel stitching. So how do you clamp the work for stitching in the second part of a gusset? If this bag were any larger I'd really be in trouble, as my stitching clamp is rather small, but I can't even see how a larger clamp would help with this problem. I just can't seem to figure out a way to clamp this bag to hold it in position for stitching once the first half of the gusset is done. I've watched Neil's Messanger Bag video several times, but he doesn't seem show the stitching of the second half of the gusset, only the first half. I hope this is just some simple trick I don't know about and someone can enlighten me, 'cause I'm stumped! Thanks for your help!
-
Brand New To This Leatherworking Thing With Lots Of Questions!
Cletus2014 replied to Seaphoenix's topic in Getting Started
Seaphoenix - From one beginner to another, I want to second (or third or fourth) the recommendation for learning to hand stitch leather. Nigel Armitage's videos are invaluable, the guy is a terrific teacher! I believe that proficiency in the basic saddle stitch is one of the core skills any leatherworker should have and I can tell you from personal experience, every minute you spend practicing, and every dollar you spend on quality stitching tools will pay off handsomely. There's a moderate learning curve here, by no means insurmountable - properly using the awl, what size stitch or thread, types of thread, etc. - along with a healthy dose of practice before you really start to see some results. I think you'll find that the first time you do a perfect line of fine saddle stitching on a wallet, case, or whatever, you'll be thrilled with what you've accomplished and feel ready to take on the world. -
Charlie and Union Craft...and David L...and everyone else too - I can't tell you how much I appreciate your guidance and considered answers to my many questions about the finer points of stitching and its various tools and materials. You've posted excellent examples and made suggestions that can actually be acted on, which is invaluable to me as well as, I'm sure, the other newbies reading this post with great interest. The more I practice and read and learn and the more time I spend here, soaking up the knowledge, the more I begin to truly understand the sheer breadth and scope of this noble craft. Of the many disciplines one needs to be proficient in fine leatherwork, proper stitching technique alone is enough to keep me engaged for some time to come. It seems I'm still at that stage where I 'don't know what I don't know' to some degree, but I'm beginning to get a handle on things and realizing some direction - at least on the parts where I most need the practice. At this point, right as I'm beginning to feel comfortable controlling my awl (and about where it might poke through the backside of the leather) I think I need to stop what I'm doing and go back to square one on my actual saddle stitch technique. Just when I thought I was getting the hang of it, it appears what I'm actually doing is getting a few bad habits down to rote and I would be better off starting over again doing some things the right way from the outset. I can see I'm rambling now - I'm at the end of a 12 hour nightshift and sleepy - and best get to bed before putting everyone else here to sleep too! Thanks again for your thoughtful remarks and instruction - be seeing you all again soon.
-
That is gorgeous work Charlie! Definitely a great example of what can be done with some practice and proper technique - it's a lot easier to understand what folks are saying about using the finer threads and higher stitch counts when you can demonstrate something like this. Wow. If you don't mind my asking another question or two - I see some others already have - I see that you're stitching very close to the edge of the piece, which is appropriate for such fine work. Are you using a groover, or otherwise creating a recessed path for the stitching to lay into? What do you use to emboss the edge outside of your stitch line? Is that an impression made with a tool of some kind, or does it just...occur..as a result of your stitching technique? You mentioned using Blanchard 10spi pricking irons. I've been seriously considering buying a set of these irons, but I have a hard time picturing how fine, or small, the stitch marks are that these are capable of. Evidently, you can get very close to the edge with these tools without wrecking the edges. Your strap and belt example pretty much has me convinced that I need to just bite the bullet and spend the money for these. My last question (I hope I'm not going too far here) How do you lock the thread at the end of a stitch line with the Chinois thread? With the heavily waxed linen I've been using, I just do a couple back-stitches, with the ends coming out on the back of the piece and just clip them flush. I read that no knots or anything are necessary to keep the thread locked and in place this way. The Chinois, however, which isn't quite as "sticky" as the waxed thread, doesn't seem to me it would stay put without some kind of knot, or other method of locking. Any comments on the locking technique you used on these two pieces? Regardless, I have to say it again - Your outstanding work is really something to aspire to, thanks for posting!
-
Hi mrtreat32 - No, in this case I did not make a groove and I've generally found that I don't need one, as I continue to get better at stitching. I still have a ways to go yet! I do use a couple cheap pricking irons, but only to make an impression on the front side to mark where my awl should go through. I'm getting a little better at stabbing the holes and getting them straight on the backside too, but it's only after some practice - muscle memory I guess. I'm contemplating shelling out a couple hundred on a set of Blanchard irons, but I'm not quite ready to take that plunge yet.
-
David - Yes, I agree with your comments about the different styles of stitch, but really there's no variation in the way I do it - I'm nowhere near that skilled yet! I did use a pricking iron in both cases, but no groove and I stitch with the work clamped in a pony and stitch toward myself. I push the awl through, then the backside needle, then the front side needle under and ahead of the other and pull tight. I watched the Hermes saddle stitch video a couple time and trying to emulate that technique. IOW, mark the stitch lines lightly with an iron, then push a sharp awl through each mark as I go, stitching toward myself. I keep the awl at about a 45deg angle to the edge of the work. In both cases, the front side stitching line comes out straight, or end to end and I get the angled pattern on the backside. Here are two watch straps made last night and tonight. Last night's was using the Chinois thread and 9spi punch marks, tonight's was using the waxed thread and 7spi. No groove, lightly hammered flat after stitching. I like the strap I made tonight much better than the one with the Chinois threads and not only because the stitching is neater. The larger thread and stitch count just looks better proportioned to me for the size of the project. This is pretty much the crux of the issues I'm having with this Chinois thread. Even the 432 looks very small and fine to me, yet others are saying even finer thread should be used for a project like this. I just don't understand. Let me know what you think....
-
Here's a photo comparing stitching I've done. The smaller, crookedy line is the Chinois 432 thread at ~9spi, the better straighter line is with 3 or 4 ply waxed linen at ~7spi. To me there's a dramatic difference both in the size and "fineness" of the stitching and the larger thread - which really isn't all that large - look far better for the spi size than the Chinois to me. I can't imagine using an even smaller thread than the 432 and if this sample is any indication, I would only try the larger 332 if I even try Chinois again at all. What do you think?
-
I will post a few photos later, when I can get to some samples of my stitching with this thread. Everyone keeps saying the 432 at 9spi is too large, but it sure doesn't look that way to me, it looks too small, by a lot! I wonder if my pricking irons aren't what I think they are? Basically, I just did a stitch line and measured the stitches per inch with a ruler - it was 9, hence 9spi. I can't imagine there's another way to look at that? Anyway, later on I'll post a couple pics of what I have so far and maybe that will shed some light on this. I'm sure it's just me not knowing what I'm doing, it's frustrating because I'm not getting anything like what I was expecting. Thanks for your comments.
-
Yep, I'll certainly defer to Bruce Johnson, as well as the OP's experience, with regard to the strap punches. Evidently I've been under the impression that my low quality, oversize punches were supposed to be that way. I suppose I just bought the explanation I had received, as an excuse for poor quality control, and then repeated it here as factual. I learn something new every day, please forgive my misleading remarks above. I'll just quiet down now and listen instead!
-
Strap end punches are always slightly oversize from their specified, or marked size, which is by design. At least for the English Point strap end punches I have, it's possible there are other types where this isn't necessary, but I don't know what that would be. My 1" punch measures about 1.25" and my 3/4" punch is closer to 7/8" at the widest part. This not only gives you some wiggle room for slightly different width straps, but also if you think about it, if your leather strap was exactly 1" and you were using a punch that was 1" with zero oversize, you'd probably be unable to get a clean tapering off at the rear edges of the strap. In other words, if the distance between the cutting edge at the widest part (the rear) of the punch is even a tiny bit narrower than the strap you're cutting, you wouldn't get a clean end without a step that would be very difficult to remove. So it's necessary for the strap end punch to be a bit wider than the strap your cutting and they are intentionally made that way. I agree with you on the relative low quality (and high price) of Tandy tools and materials, but the strap end punches I've bought from them were actually pretty high quality (and also pretty expensive at ~$45 each). I only mention that, as it's one of the few items I've got from Tandy that were pretty good.
-
I'm learning a little more every day and with practice, my stitching is improving nicely. So far I've mostly been doing very simple projects to get stitching practice, with the goal of working my way up to making high quality leather watch straps with fine, detailed stitching. In anticipation of this, I bought an expensive spool of Chinois Lin Cable 432 from Fine Leatherworking because I understand this is the "best" thread available. So far I absolutely hate it and can't manage anything even close to a decent stitch with this thread! Until I got the fancy French thread, I've been using heavily waxed linen (or maybe polyester?) which is probably 3-ply or 4-ply and stitching around 6-7 spi. I've been happy with the results I've been getting, but I thought this to be a bit heavy for a watch strap. I was hoping the Chinois thread in 432 size, which is only one size away from their largest of 332, would be only very slightly smaller than I've been using and perfect for 9spi. I have a set of 9spi Chinese diamond pricking irons, (which are no Vergaz Blanchard), but don't seem too bad either, that I also bought in anticipation of using for watch straps. Now that I've started working with the Chinois thread, I cannot for the life of me manage to get a straight, even stitch line. At 9 spi, which didn't seem all that fine to me, the teeniest tiniest little error in stitch alignment becomes a glaring flaw on the piece. Also, the Chinois thread seems almost brittle compared to the waxed linen I'm used to and doesn't seem to have the friction to "bite" and stay tight when the stitch is pulled. Not as bad as slippery nylon, but even after running through some beeswax it still takes some effort to keep it tight for the next stitch. I'm also stumped as to how I'm supposed to lock the backstitching when I come to the end of the stitch line. The waxed thread stays tight where you cut it, but this stuff looks like it will start to unravel if I just cut it without gluing it or something. How do you lock your backstitches with this thread? Is this one of these things that are just difficult to do at first, but will reward my patience and practice to learn properly? I really thought I was getting the hang of saddle stitching until I tried this thread. Now I feel like I'm starting all over again. Anyone have any comments, or comparison between the Chinois thread and ordinary waxed linen for saddle stitching? Maybe I would have better luck with the larger 332 at 9 spi? It appeared from the stitch size mock-up photo on Fine Leatherworking that 432 would be perfect for what I'm doing, but after trying it I'm not so sure.
-
Thanks for the tip on Waterhouse camino. I've looked at quite a few different suppliers and Waterhouse looks to have a pretty wide selection - as long as your buying larger lots, or sides. More than that though, their Leather Guide and descriptions has a lot of good info on leather types and characteristics, which was a big help for me. Most leather suppliers that carry different leathers don't go into enough detail about their individual products, IMO. It's a lot to learn when you're starting out as there's so many different leather types and tannates (hence this post in the first place) and it seems like the info on Waterhouse's site has some pretty good basic descriptions (and typical uses) for the various leather types. Great info!