TwinOaks
-
Posts
4,513 -
Joined
-
Last visited
Content Type
Profiles
Forums
Events
Blogs
Gallery
Store
Everything posted by TwinOaks
-
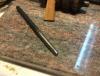
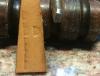
Distractions aside, once I had the parts and pieces together, this took about 10 minutes. It's a mild steel rod (not stainless) which I turned into a small spot checkered matting tool. There's really no bevel to it (anymore), but I did it as a proof of concept. This one was made by flattening the "face" which used to be my sharp angle beveler and then hammering it against an old dull file. The cross hatching is done by simply turning the tool. ---for all the tool heads out there, yes, I know it ruins the file to do it...the file's already pretty well useless as a file, it's becoming a blade soon-- I know, not terribly impressive metal work, but like I said- it was a 10 minute project, not tool making day.
-
At the risk of sounding 'put off' by the quality of what's being produced these days I have another suggestion. It isn't necessarily less expensive at first, but in the long run it's worth it. My suggestion is to get some stainless steel rods and bolts, some files or a belt sander and Dremel tool, then learn to make some tools - you can practice on brass rod, and mild steel, but the SS will have a longer service life. Somewhere along the way, pick up some checkering files in various 'lines per inch' (or LPI). The long term result is that you'll be able to make most of the tools you'll need to do anything you want. There are some tools like intricate basket weave stamps that require more tool making knowledge and tools....or lots of time and detail with a dremel. Making your own tools will also give you unique stampings. I'll see if I can throw some things together to provide an example.
-
Thinking Of Purchasing A Used Adler 205-64...thoughts?
TwinOaks replied to fitabull's topic in Sewing Leather
You **might** be able to get a little better price on the machine, but then you'd have to pay shipping (which wouldn't be cheap), and possibly duties on it. Getting personal instruction from the previous owner, as well as some mentoring on that specific machine...you're coming out waaaaaaay ahead on this deal. Happy for you....now if I could just find something like that around here. -
The 211 will likely do what you need it to, but there's been some comments that the 211 isn't quite the machine that the 111 is. If you need to get into production, grab the 211. If you just prefer the 111, then you could use the 211 until you're able to find the 111.
-
send a PM to "Admin" and request access to the adult area. Those patterns are posted in the area mentioned. The majority of this site is open for anyone to read, so it is kept "PG" in case any youngsters start looking around.
-
Heavens to Murgatroyd, we've got folks from 'Bama popping up left and right in here! Welcome to the best site on the internet! I'm up in Huntsville (used to be in Mobile), Ray's in Opelika, we've got another new member from Anniston, a couple from Guntersville area, and a group down around Birmingham....we're all over the place. Nice work on the pony, it's always good to see people's innovations.
-
The key to the suggestion of a 3/8" barrel is your mention of carving on key fobs. The same is true with the 1/4" angle blade. A smaller barrel will turn a little more than a larger barrel in the same amount of finger movement. Likewise, the angled blade will make the tighter radius cuts, and at only 1/4", there's less chance of blade drag anywhere along the arc. And, it will cut a straight line as well. A larger barrel with a 1/2" straight blade will track better on a long straight cut or on larger radius curves, but will require more tilting back of knife to handle smaller radius turns. The maker you contacted simply suggested a knife with the widest range of compatibility. As you learn more about the tools, you'll find a plethora of modifications that people do- One that came up recently is a blade that Peter Main calls his 'low angle blade'. It has a shallower angle bevel, and a slight angle to the blade. Oddly enough, I modified one of MY blades like this several years ago before really knowing who Peter is. The shallow bevel gives a wider cut, and the slight angle prevents blade drag. I've also got some 1/4", 3/8", 1/2" straight and angled blades, and even a 1/4" filagree blade all set in different knives. Being clever, I put the 1/2" straight blades in the knives that have the larger barrels and the LEAST smooth rotation - I use them for.....yep, straight cuts and long curves. Leather Wranglers even offers a 1/8th" angled blade, that was designed to handle micro carving....and I believe Ed "The Bearman" also recently introduced a similar sized blade and with an itty bitty barrel for really tiny work. This is why most of us have multiple knives - instead of swapping out blades, we just grab the one best suited. My piece of advice on this, is to get what you feel will be the most comfortable knife in your hands, and don't worry about it - you will likely end up with several varieties of knife anyway.
-
Gun Belt Edges
TwinOaks replied to BigMatt's topic in Purses, Wallets, Belts and Miscellaneous Pocket Items
When you slick an edge, what you're doing is compressing the leather fibers and getting them warm enough to activate the collagen in the cells. As long as you have a pretty smooth edge before trying to finish it, it will look good and last a long time. As far as beeswax, that is one of the finishing steps, NOT what should be used to get the edge smooth to begin with. A good sanding will help smooth the edge, but a really sharp knife and careful trimming will leave an even smoother edge. And here's the crux - leave your edges WIDE, dye, glue, stitch, and whatever else you need to do to the belt...and once you've done all that, THEN trim the edges. This will give you the smoothest edge you can get, and also hopefully ensure that your leather is glued all the way to the edge (which eliminates that pesky separated edge that sometimes happens). Once you've trimmed to size, run the edger on the corners, moisten and start slicking but without the beeswax. If you use a hand held burnishing tool, you should hear a light clicking noise when you change direction. Once you have everything slick and burnished down, dye the edge, and hit it again with the slicker. Repeat as needed in case you have spots that didn't take the dye well. Once that is done, get a heavy cloth like canvas and burnish the edges with that. THEN apply the beeswax (although a beeswax/paraffin blend works better IMO) and finally buff with the cloth. -
There's a group called the Alabama Leather Guild that meets up just outside B'ham about once a month. I don't think they're officially a Guild (as in IFoLG), but they're a nice group of folks. I missed the Jan meeting (the 25th), but I'm hoping to make it next month. They've got a group page on facebook - here
-
Thinking Of Purchasing A Used Adler 205-64...thoughts?
TwinOaks replied to fitabull's topic in Sewing Leather
As long as the machine is in working order, RUN to go get it. You've found a great deal on a fantastic machine. -
Welcome to the best site on the internet! I'm up in Huntsville, and we've got a few other folks from Alabama, too.
-
Bookbinding And Hot-Foil Stamping Questions
TwinOaks replied to Wilshire's topic in Leatherwork Conversation
This makes me think of felling a tree because you only need 1 toothpick. -
Thanks for looking into this Tom!
-
Water Tanned Leather For Punch Bag Buy Or Leave It
TwinOaks replied to stropping's topic in Leatherwork Conversation
If the seller can't give any better information than that.....or even say "I don't know" (which would at least indicate honesty), *I* would pass on it. -
Welcome to the best site on the internet! I think the shape of the maul will primarily be personal preference, but it may also depend on the type of tooling you need to do. I find that lighter repetitive work like walking a beveler is easier with a round headed maul as I can shift myself around and don't have to worry about the tool face being square. However if there's work that requires more force, like 1" letters, then a flat face might have less chance of deflection from what would be a harder swing. Since you've got a rawhide mallet with a nice hole already started in the center, why not move the handle to there to give you a round tapper? That would give you the option of test driving before buying.
-
Water Tanned Leather For Punch Bag Buy Or Leave It
TwinOaks replied to stropping's topic in Leatherwork Conversation
I've never, NEVER, heard of "water tanned" leather.... -
Check Book Cover
TwinOaks replied to YinTx's topic in Purses, Wallets, Belts and Miscellaneous Pocket Items
There may be some minor little errors somewhere on it, but nothing that stands out. Excellent work! -
Welcome to the best site on the internet! I can't help much with the shoe last questions, but for the pics.........Select "choose files" at the bottom left of the reply window. Once you choose the pics to upload, the file will appear in a gray line right above the 'attach files" option and you have to click "attach to post" on the right side of the screen to get them to show up. You can also store your pics on a 3rd party site and insert a link to that pic. The 'button' to do that is the little green square (below and just left of the smiley face) in the option panel for your replies. If you don't see the option panel in the 'quick reply' section, choose "more reply options".

-
I thought that might be the case with Fitabull, as she only has 3 posts. I don't know why yours would quit working. I guess it's time to flag down some of the IT folks...
-
This topic is over two years old and the OP hasn't been active since 11-20-12, so this one is closed.
-
Really top shelf work there, great job!
-
Bonded Nylon Thread Changing Color Once Sewn?
TwinOaks replied to MuddyClearWaters's topic in Sewing Leather
I would have thought that it's more of an issue with either the translucence of the thread to begin with - looks dark when wrapped against more thread, but lighter when not backed up by more of the same color. But, if it doesn't change until after the needle, it sounds like the coloring is in the bonding (presuming you're using bonded nylon) Going through the needle and leather, it's exposed to heat (from friction), and that little bit of heat is causing the color to wash out. If you have the next larger size needle, try sewing the thread with a larger needle. It won't necessarily 'fix' the problem, but it may help narrow down the possibilities. -
The function seems to be working..... It may be a forum setting for newer users. On some forums I've been on a minimum # of posts is required to 'unlock' certain features. This is done as a precaution against spammers and bots; that may be the case here.
-
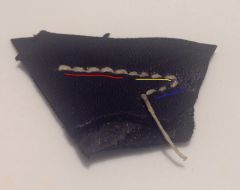
From the album: D.M.DeLoach Custom Leather
Stitch sample, deer tanned -
I've got a Champion (narrow throat) down in Mobile that I never finished restoring. Everything turns freely, but I never invested in the needle/awl sets. It's on what I believe to be the original stand. As you may expect, it is VERY heavy, so a road trip would likely be required as I have no idea what shipping (freight) would be. Feel free to PM me for details if interested.