


TwinOaks
-
Posts
4,513 -
Joined
-
Last visited
Content Type
Profiles
Forums
Events
Blogs
Gallery
Store
Everything posted by TwinOaks
-
Thread Types And Uses? Leather Types And Uses?
TwinOaks replied to Nessmuk1's topic in Sewing Leather
Look at the advertisers at the top of the page - those that are sewing machine dealers often include some of that basic information. General info: We typically use 3 types of common thread, cotton/linen, polyester, and nylon. There is also 'Artificial Sinew' (which is nylon), and it is used in some applications that are to appear 'period correct'. You can use any thread in any leather, but sometimes it's preferred to use one over another. Linen has the longest historical use for just about all applications and can still be found in things that use chain stitching. Linen is used because it's easy to wax the thread with a liquid acrylic wax which locks the stitches in place once it dries. Redwing shoes/boots use this method for sewing the upppers. Nylon is often found where strength and durability are a concern, specifically Bonded Nylon - saddles, holsters, sheaths, hard use items....long list! Polyester (aka Poly) is also used in those things but may also be found in purses, bags, wallets, et al., because it can have a softer feel to it - referred to as 'the hand' of the thread. I.e. a soft thread to the touch is said to have a soft hand. The size of the thread is dictated by the size of the thing being sewn. You wouldn't use really thick thread for something like a wallet liner, nor really thin thread for a saddle. This is partly for aesthetic reasons, partly for the physics of sewing. Just about all machines use a lock stitch (some use a chain stitch). A lock stitch is two threads entering and exiting a stitch hole and crossing each other once, just like hooking your fingers together. That place where they cross each other is often referred to as the knot. For the stitch to look good and actually be 'locked', the knot needs to be between the pieces that are being sewn together. If you have very thin material, it becomes difficult or impossible to keep the knot between the layers, which results in the thread not being locked in place, and possibly slipping. For example: Using thread that was thicker than either of the two pieces being sewn would result in the knot resting on either the top or the bottom of the sewn piece, as it can not physically fit between the two smaller pieces. On the opposite side of the spectrum is sewing thick material with thin thread. To have any significant strength, there would need to be MORE stitches because the thin thread isn't as strong as thick thread. This creates a problem with sewing leather because if the stitch holes are too close together, you end up perforating the leather just like a paper towel. So, you end up with thick material requires thick thread, thin material gets thin thread. There are exceptions, but I did preface this with "general information". -
Making Straight Holes In Something Round And Curved
TwinOaks replied to MorningStarL's topic in How Do I Do That?
I'm also going to offer a counter argument to Jim's preference of not glueing. I try to always glue my edges because I think it adds to the appearance and longevity of the finished product. That said, I also like nice solid looking edges (reference Hidepounder/Bob Park's tutorial on edges). A glued edge is less likely to separate over time. Use and abuse certainly will show on it, but I don't want any of my products having a edge that looks like well worn book pages. With a quality glue/cement you'll have a stronger edge as well. IF your stitches do get worn and break, a glued edge will still try to stay together. It *might* still separate, but it's not a forgone conclusion. An edge that's ONLY stitched has nothing else holding it together, so if a stitch breaks, it will separate. Here's an important note about gluing edges - Don't use so much glue that it's sloppy and glue is running all over everything. If you take time to read the instructions, most products work better. The first couple of times I used a contact cement, I had 'glue boogers' on the edge from the glue being squeezed out because I used a lot of glue (more is better, right?) and stuck the pieces together while it was wet. Those glue boogers are a PITA to remove, make a bump/gap in the finished edge, and are harder to dye. So, following the old adage "When all else fails.....read the instructions", I did. Hmm...it said "apply a thin layer to both pieces and allow to dry until tacky"......sonuvagun! I followed the directions and when I put the pieces together they stuck right there, with no squeezed out glue, no sliding around, no problems at all.....and the glue was all the way to the edge with no bumps. Now when I glue edges together before sewing, the result is uniform and I end up with two (or more) pieces of leather acting like a single piece which means that I have ZERO movement of the leather. -
Making Straight Holes In Something Round And Curved
TwinOaks replied to MorningStarL's topic in How Do I Do That?
The misaligned stitch line is the result of a tilted awl, nothing more. The solution is to keep the awl in the same position by 1. Practice, or 2. use a jig or machine. You didn't mention how you did your sewing - i.e. Did you place it on a table and pushed awl through, or did you hold it up so you could see both sides? As you have a standard awl, you need to do something to mark it. This can be a flat spot where your thumb/finger goes, it can be a spot made with a marker...anything. Do this so that you can have the awl in the same position in your hand for every stitch. That addresses consistency of stitch angle. Next, try Dwight's method. If you're worried about stabbing the awl too far through the leather, just add some 'washers' made out of leather- just stack them up on the awl blade until you have 'the right amount' of blade sticking out. (For consistency's sake, I use the little 'hole centers' that are left over from punching holes in leather). Another option is to use something like a stitching horse/saddler's clam. It has a pair of jaws that hold the work in front of you so that can see both sides of the work. Start the awl on one side and look to see where the tip of the awl starts to penetrate the leather. If it's not where you want, pull back and adjust. The often overlooked utility of the clam type holder is that if you place the stitch line at the edge of the jaws, the jaws themselves can act as a sewing guide. It's next to impossible to get the stitch too low because there's a jaw in the way. Insert awl, and if it feels like you're hitting something solid...you are! Just adjust up a little bit, and you'll be on the line. It still requires practice, though. As far as using a jig or machine, there have been several types posted on this forum. The simplest way is to just insert the awl blade into a (**unplugged**) drill press and use that to punch your holes. Just make sure that the blade doesn't change orientation. Other tpes of jig/machine do the same thing - it's just a method of keeping the awl blade perpendicular to the leather, and giving a little leverage to the operator. -
The only way I know to make it 100% waterproof is to dip it in a hot mix of oil and wax. This has the downside to making the leather rigid, so for tack applications, it's probably not what you want. This method is often seen in period recreations like mugs, tankards, and flasks that you might find at a ren-faire. It's also popular for certain types of sheaths.
-
$600???!!!??? GAAAHHHHHH Yer Killin' me!
-
You should inspect the punches before use to ensure that they are not nicked or have a rolled edge, and that they are sharp. If they aren't, you need to first stone the edge flat, then sharpen them. Chucking it up in a drill is the easiest method to ensure roundness. Be sure to de-burr the inside of the punch as well.
-
this might be useful -
-
Leatherwork And Crypto Currencies
TwinOaks replied to Beaverslayer's topic in Marketing and Advertising
Just an interesting note on the first piece quoted- One of the tornadoes damaged the high tension power lines from Browns Ferry NPP....it safely SCRAMed, but that also left the whole area with no power. After 24-36 hrs, the batttery backups for all the cell towers started failing, which meant that any comms that weren't 'peer to peer', were useless. The phones themselves were working, but the towers to which they connected weren't....so, no calls. Even land lines are run through electronic multiplexers these days, not hard wired back to the central office. That left only two comm types for this area - satellite, and (HAM) radio. The sat comms might be a viable transaction method, provided the other end of the transaction still has power. For part two of the quote- Thank you for bringing this topic up. There are members here from just about every nation, and places where BC is accepted/used, it's certainly worth having every option of serving our customer base. Perhaps for some folks who deal internationally, this could open new avenues of revenue. My vote? Keep it up. -
Also look up how to set the timing. You're machine is acting up, so you might as well learn how to 'fix' one of the most common things. On some machines, there's a little shim plate that adjusts how far the hook is from the needle. As was mentioned in a thread somewhere, the needle should NOT be bottomed out- it should be raised a small amount above 'bottom-dead-center', as the thread loop forms when the needle is on the rise.
-
It sounds like either the thicker material is causing a little needle deflection, the thicker leather is keeping the needle too high (needle bar adjustment **I think**) or there's an issue with the needle/thread size. To test if it's the latter, see if a thinner thread will work when using the same needle and leather thickness. It could be that the thicker leather is 'grabbing' the thread and not allowing the hook to grab the loop. Or, if it's the former, the slight deflection is moving the needle too far away from the hook's path. It'd probably be easiest to see with the bobbin out of the way so you can see where the hook is in relation to the needle. Some of the better sewing machine gurus will have more useful input than this, but it's something to get you started.
-
Leatherwork And Crypto Currencies
TwinOaks replied to Beaverslayer's topic in Marketing and Advertising
Bitcoin is dead article That is not the only one; there have been multiple 'obituaries' for Bitcoin, and all of them have been proven false as Bitcoin is still operating. If anyone wants to try it, well I'm all for innovation. This is the second time I've seen someone touting the wonders of Bitcoin, yet I'm still not moved to consider it. I can see some of the appeal of the system, but personally it feels like 'magical thinking'. There are several articles which just plainly say that 'bitcoin mining' has a negative return. It uses more value in electricity than it produces. I'll leave the speculation of it's legitimacy, speculation of it's monetary value, and acceptance of it's use to others more inclined and qualified. I see several large risks to it, some of which are cited in the article above. So, for me, it doesn't appear to be worth the risk. Ken, thank you for bringing the topic to the table; I'm just too grounded in the physical world to believe in 'magical internet money'. I do see the comparison between bitcoin and other electronic transactions- i.e. I go to work, get paid with direct deposit, and purchase something with a debit card. The difference is that I've been in situations - post Hurricane Ivan, and post Hurricane Katrina (I lived on the Alabama coast at the time and worked several post-storm reconstruction efforts) - where there was NO electricity. A similar thing happened here in North Alabama several years ago - a line of tornadoes damaged some power grid infrastructure. In both cases, there were NO electronic transfers AT ALL......and since bitcoin is completely digital, it's really hard to hand someone a bitcoin to buy a sandwich or a bottle of water. Plus, with multiple law enforcement agencies scrutinizing it because it's very popular for black market or other illegal transactions, I prefer to just stay away from it. -
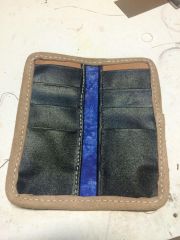
From the album: D.M.DeLoach Custom Leather
Changed sewing machine in the middle of this wallet. You can see the difference in stitching for the pockets on the left side. -
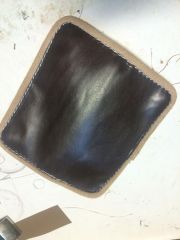
From the album: D.M.DeLoach Custom Leather
-
2015 Keep Making Stuff Monthly Challenge
TwinOaks replied to thefanninator's topic in Leatherwork Conversation
I'm still in - technically, I've still got tomorrow to finish,right?...and the %@@#$%^@$%&@%@$% wallet is fighting me every step of the way. It occurs to me that having a motorized sewing machine would be very very handy when doing french edges. Combination of TBoyce's pattern and KK assembly. Things 'right' with this - pattern pieces work well, I had some decent leather to use to start with. Things 'wrong' with it- my small sewing machine crapped out after assembly of the right side pocket panel. It's got french edge binding the card pockets and forming the cash pocket. The left side.....crap-tastic. The Boss was used to complete the sewing, and having the wrong machine definitely shows. The thread used in this is 207 top and bottom, and is just too large for the application. Likewise, when I sewed on the edge binding, the binding material itself is too thick. That said, the edges alone should stand up to years of hard use, so I may remake this one when I get a more suitable machine for this type of work. http://leatherworker.net/forum/index.php?app=galleryℑ=27598 http://leatherworker.net/forum/index.php?app=galleryℑ=27597 In short, this wallet fought me from the very start...but since I said I would...I did. -
Should I Glue Messenger Bag Gusset
TwinOaks replied to Danielvetpath's topic in Satchels, Luggage and Briefcases
I almost always glue gussets. I've had one or two that tried to twist a little from the weight, and having the edges stuck together really helped with keeping things aligned. The practice on scrap is a great idea, but it misses the effect of having the rest of the bag resist your efforts (not always the case, but some of them will fight you to the end.) There's also edge finishing to consider. If you have the leather glued all the way to the edge, it will act more like one piece of leather when slicking/burnishing and give better results. Non-glued edges could see puckering and separating after a little bit of use. -
Bookbinding And Hot-Foil Stamping Questions
TwinOaks replied to Wilshire's topic in Leatherwork Conversation
... I'm blaming the spell checker for that one -
Leatherwork And Crypto Currencies
TwinOaks replied to Beaverslayer's topic in Marketing and Advertising
One FIAT currency is NOT a viable alternative to another FIAT currency. Before arguing that it is, be prepared to say what commodity is backing up the bitcoin. -
Blue Guns For Sale
TwinOaks replied to Haystacker's topic in Gun Holsters, Rifle Slings and Knife Sheathes
Sorry to hear you're closing it down -
Bookbinding And Hot-Foil Stamping Questions
TwinOaks replied to Wilshire's topic in Leatherwork Conversation
The larger the area, the more pressure you'll need. Take a look at Harbor Freight and you'll find an arbor press that will do 1 ton, and it has about a 1 sq inch ram. That's enough to hot stamp a maker's mark on dry leather. Compare your proposed stamp size and extrapolate. there is a video by Ian Atchison showing him heat stamping leather with an arbor press....you might check it out. -
20something years I saw this "Warning: This bag contains Silicate dust, a product known to the State of California to cause Cancer, birth defects or other reproductive harm." . . . On a bag of SAND. I just quit caring after learning that Dirt causes cancer
-
For easy re-useable carving practice, melt some paraffin wax (in a double boiler set up to be safe) and pour it into a cheap aluminum pie round. Try for at least 3/8" thick. Once it dries, you have a semi-hard surface to practice the knife strokes. When you've carved up all the available surface, just remelt it and start again.
-
The flat yoke works well if you control where your finger is. If you kind of just drape your finger over the top of the yoke, you'll like the saddle yoke better- there's no edges. If you already have a flat yoke, you could just pad it with something.
-
Welcome back to the fold! I'm sure you'll notice that a lot of tools have changed, but the spirit stayed the same. Looking forward to seeing you around the forums
-
Bookbinding And Hot-Foil Stamping Questions
TwinOaks replied to Wilshire's topic in Leatherwork Conversation
The reason for the comment about the toothpick is that when looking at the material and equipment cost of doing this, I doubt you'll even break even when compared to having someone with experience do it. You intoned in your first post that you wanted this done as inexpensively as possible.....and get good results. The two are not mutually exclusive, but it's rare to have Good and Cheap together. If this is a '3 book only' project, I think you'll find the non-recoverable expenses growing rapidly. And why tell you this? Because I've seen many people get into this craft /trade and make the comment "I wish somebody had told me how much all this was gonna cost", then sell their barely used tools at a loss. Hot stamping is going to require a way apply controlled heat to a plate, then evenly apply several hundred pounds of force spread over that plate. For small stamp designs you could use a heat gun and arbor press...for larger things you might need something like a clicker. Can you 'chop' the design into smaller segments? Maybe use negative space to create the break in the pattern? -
If you're on Facebook, look up 'Alabama Leather Guild' - there's a monthly meeting in Trussville. ....and a Tandy right up the road.