TwinOaks
-
Posts
4,513 -
Joined
-
Last visited
Content Type
Profiles
Forums
Events
Blogs
Gallery
Store
Everything posted by TwinOaks
-
Red Cent, since you have a similar machine, can you take a pic of yours from the same angle as above for comparison?
-
Thank you for the reply - extending past the barrel makes a ton of sense, I just wasn't thinking in that direction.... OUCH......learned something new.
-
Just a question here, but why were the front sights "ground down for a sight channel"? You need to have something on the top to make the channel, and grinding off the thing that indicates height and center line doesn't make sense to me.
-
Yes Ray, I was able to meet up with the ALG for the last meeting. They're a really nice group of folks. We also just got a new member from Guntersville here on the forums. Thank you for the lead on them.
-
I really wish there was a 'tagging' feature here..... I just looked and in the Al Bane instructional video, it looks like the discs ARE split by the bracket, but the techsew 5100 video shows them together.... I'm gonna PM some folks to see if they'll chime in on this one. This is where experience outweighs knowledge... please standby. Bob Kovar threading that type machine:
-
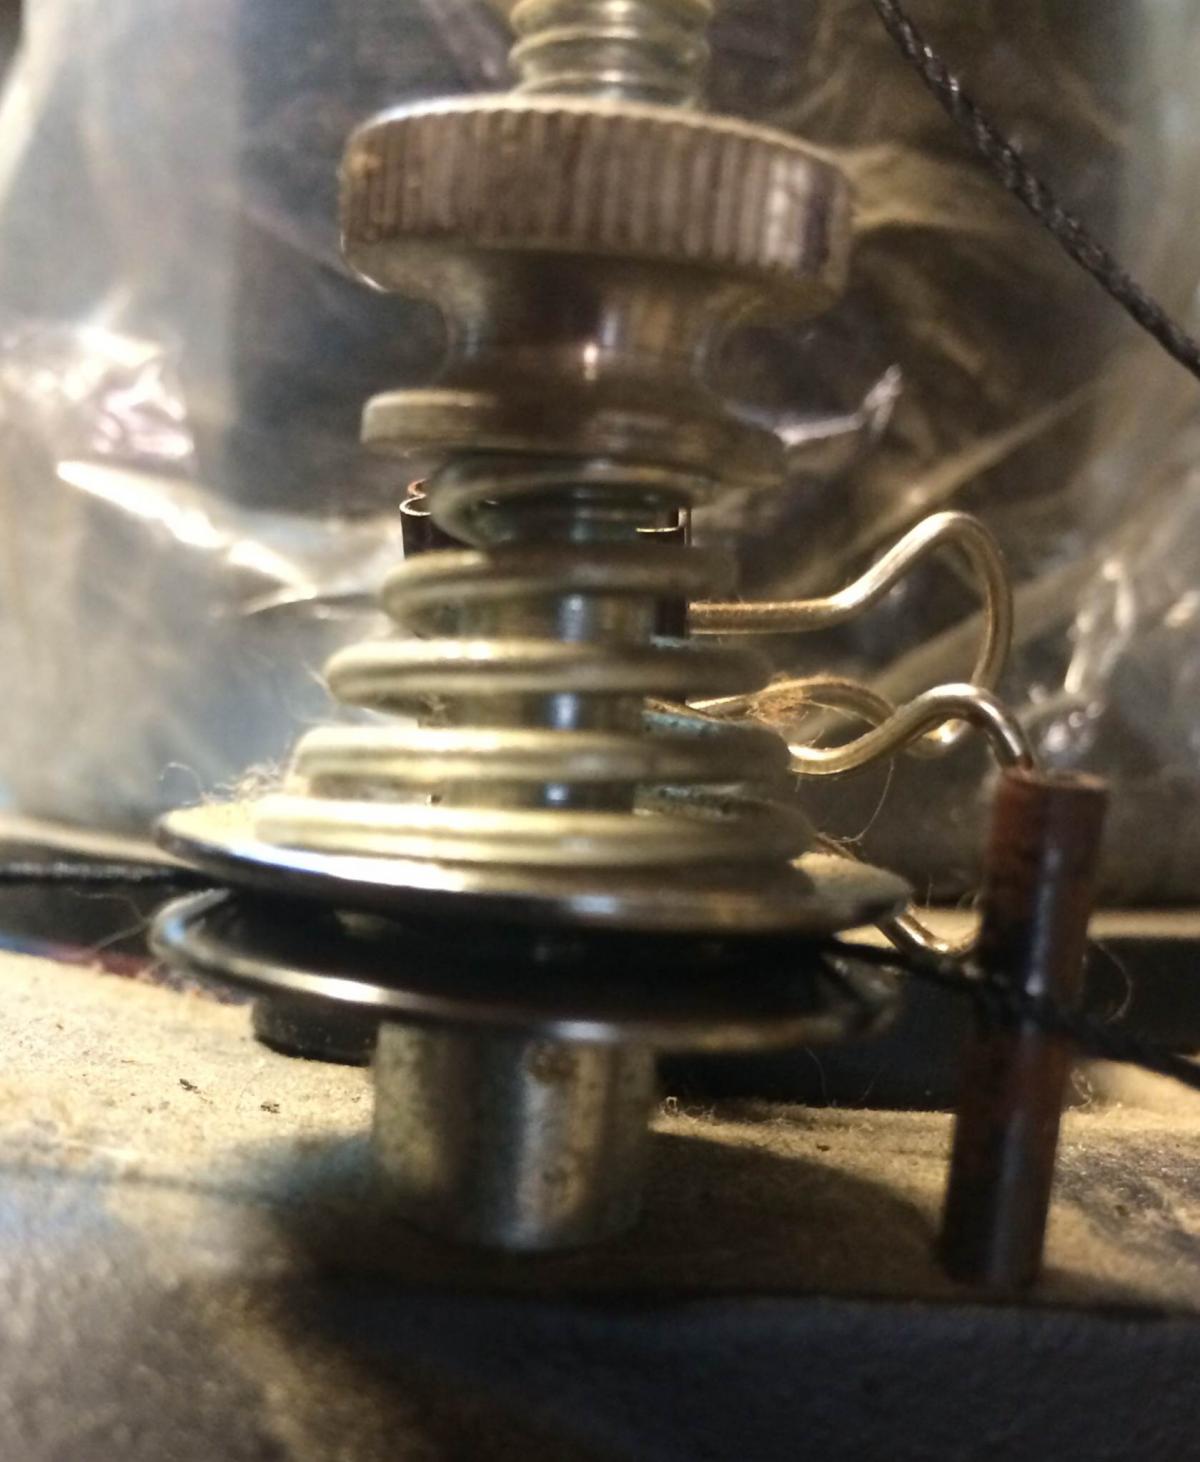
That tensioner is put together incorrectly. The two discs should be touching, as that's where the tension comes from. I'm not sure why they're separated like that, but they shouldn't be. You'll need to remove either the post that holds the tensioner discs, or that bracket that's separating them, to correct the problem. Based on the apparent height in the picture, I think that both should be under the bracket. Please TEST FIT things before tightening things back down. I'll add a pic of how the discs should look in just a few minutes. This is just how the discs should be. Refer to threading instructions from other users of the 441 type machines for whether you should just go between the discs (like it's shown), or use a full wrap around it. Youtube, and more than a few posts here on LW discuss that.
-
Ray, thank you for such an incredibly generous offer.
-
Interesting read: http://www.cnn.com/interactive/2014/04/opinion/sutter-change-the-list-pangolin-trafficking/ Curious little critters....and being Endangered takes them off of MY 'will use it' list.
-
You're most welcome; I'm glad to be able to help
-
Are you using "artist's acrylic paints" or the "craft" grade? The "artist's acrylics" typically have more pigment and a somewhat better form of acrylic medium in them. I've used the 'craft' grade on a few things....which resulted in me ordering the Angelus paints to re-color the pieces inside of 3 months. There just wasn't much adhesion from the low grade stuff.
-
very nice!
-
Alcohol to clean the leather and help strip the finish, white vinegar to kill the mold, then Lexol to recondition it, and finally some sort of topcoat to seal it.
-
Since it's just for punching holes, I think a dead blow hammer would do nicely.
-
Versatile Machine For Motorcycle Bags
TwinOaks replied to MuddyClearWaters's topic in Leather Sewing Machines
an old 153 should do quite well....it doesn't have a reverse, but it sounds like you're used to the older machines that don't have one. -
Or a few cheap flat head screwdrivers, a few minutes on a belt sander, and a little more time polishing them. If you go the screwdriver route, you should be able to find one that fits your hands pretty easily.
-
Welcome to Leatherworker.net! I'm just up the road from you in Huntsville, and in case you weren't aware of it there is an Alabama Leather Guild, too. I only just joined but the meetings are in Trussville, just outside Birmingham.
-
Bone Folders Vs. Teflon Vs. Cocobolo, Vs Etc.
TwinOaks replied to CustomDoug's topic in Leather Tools
I made one out of cocobolo, sealed the wood, and carved a variable burnishing groove in the end. I burnish after dyeing because the burnish itself will effect how the leather absorbs the dye....but I've never had a problem with the wood picking any colors from the dye. -
While I haven't done much experimenting with multiple thread sizes (I'm only using two sizes) there are several members that have said that they can change thread size and NOT adjust the tensions at all. This is because despite the difference in thread size and the actual tension on the threads....the RATIO between the top and bottom tensions has stayed the same. On my Boss, I can run 277/277 or 277/207 with only change being 1/8th turn on the primary tensioner (closest to the needle) Or swap from 277/277 to 207/207 with no adjustments at all.....unless I change the thickness of leather. example: for 277 thread, top and bottom, the bobbin is set at 1lb. the top tension is set at 1.3lbs, which lets the top thread pull the bobbin thread up. If you drop down to size 96 thread, the tensions may be .6lb on the bottom and .9 on the top...but as long as the ratio remains the same, the stitch still looks good and functions as it should. ****I just plugged in arbitrary numbers, I don't know what the actual #s are**** Consider the thread without leather - it's simply getting the top tension to pull slightly more than the bottom tension in a set amount of space. The stronger the top tension is in comparison to the bottom tension, the more it will lift the knot in that set space. Now, when you add the leather, you are determining what that space is.
-
1 AND 2 AND 3 control the tension....which controls where the knot is. I'll explain.... The tension on the bobbin should be pretty close to 'right' if the machine was set up by a dealer. It just controls how tightly the bobbin tries to hold onto the thread. The hook grabs the loop of your top thread (when the needle is rising) and wraps it around the bobbin. Then, the take up arm - the silver arm in the long slot facing the camera - pulls UP on the thread. When it does that, it's pulling on BOTH the thread that's in the leather and from the thread that's on the spool. So, 1 controls the thread from the spool, 2 controls the thread in the stitch. They should be fairly close to the same so that while the knot (formed when the top thread is wrapped around the bobbin) is being pulled up and into the leather, enough thread for the next knot is being pulled from the spool. If 1 is less than 2, you'll simply pull thread from the spool and never pull the knot into the leather. If 1 is more than 2, you'll pull the knot through the leather....unless you increase 3. Having 3 too tight might be what's causing the cuts in the leather. So....adjust 3 so that it has about a pound of smooth tension when you pull thread directly from it.(remember it should be close to 'right' from the factory) then adjust 1 and 2 at the same time so that the bottom thread and knot are pulled into the leather, but not so far that it pulls through to the top.
-
You'll likely want to stay in the 2-3oz range for most types of vests or heavy jackets. Light jackets would be even thinner. Chaps...yeah, you'll want heavier leather for that. Look for "deer tanned" or some other chrome tanned leather for garments, and call (not online order) the distributor you're purchasing from and tell them what you're wanting to do. A person you talk to *should* know enough about the leather to give you a suggestion.
-
ABC3, If you are going to use your customer's logo, be sure to get LEGAL permission....essentially, REQUIRE the customer to sign a contract that allows you to use their logo. I know, it sounds silly to have to do so, but it's a lot better than getting sued down the road somewhere. Also, if the logo is for ONLY that one customer, you should absolutely pass the cost of the logo on to that customer.
-
New To Leatherworking And Need Some Guidance
TwinOaks replied to Keeper of Tradition's topic in Leatherwork Conversation
First of all, welcome to Leatherworker.net! Your experience of leathers having varying thicknesses/ firmness is called the 'hand' or the 'temper' of the leather, and is a result of the tanning process. It's something you either pick, or ask for when ordering. Ounces of leather directly equates to 64th's of an inch of leather, i.e. 4oz = 4/64ths". From there, it's just a English to metric conversion. Most projects can be made with veg-tanned leather, but sometimes you'll want "bag" or "chap" leather, which is chrome tanned and much softer. Please note that any type of case or sheath for metal items should use veg-tan, as the chromium salts used in chrome tanned leather can cause corrosion. As for locals near you....put up a post with your location in the title....such as "anyone near ________" , then give it a little while for people to see it. We've got members on every continent (maybe not Antarctica). When you order your leather, try to call and talk to a person and tell them what your project will be. That way that person can make some recommendations for what they have available. -
When you get a machine, be sure to get the adjustable speed motor and speed reducer. That allows the machine to have plenty of torque to punch through the leather but still sew at just a crawl. Start off slow, maybe 1 stitch per second, using scraps as mentioned. Within a short period of time, you'll be waiting on the machine to hurry up and make the next stitch. Then you can increase the speed a little bit, and pretty soon you'll be sewing at a reasonable rate. When I first got my Boss (hand powered stitcher) I was methodically checking the placement of each stitch. Then I learned to trust the machine to do the stitching while I did the guiding, and now I just get in position and start sewing. The same thing applies to the motorized machines....go slow until you're comfortable, then start speeding up. To specifically answer your question....you should be able to be at a reasonable sewing speed in 1-3 days. Mostly, you'll be learning to let the machine do the work.
-
 awesome job on the shading, esp. the skin tones
 -
Rats.