TwinOaks
-
Posts
4,513 -
Joined
-
Last visited
Content Type
Profiles
Forums
Events
Blogs
Gallery
Store
Everything posted by TwinOaks
-
Reading the problems listed, and having a little bit of knowlege about phone services, my thought is that Telus' PBX is severely outdated. Or, basically, the place where all the calls go is so old and technologically old that it's doing the best it can. I'd almost bet money that collectively, local bandwidth has greatly increased. Your area isn't alone, as a guy named Jerry(friend of a friend of a family member) is going all over the country and tearing out the old systems and installing new ones for the various phone companies. In some places, the removed equipment was a few decades old and still the vital comm link for entire communities. Sounds like your area, yes? Have you seen the commercial for a computer server system where there's a great big room and just one little computer, and a guy says "hey, where'd all the servers go!?!?" , the next guy says, "They're all right here." (pointing to a new and itty bitty box on the floor) It's kinda like that. Of course, there is another option that noone has mentioned- Check and see if there's a competitor to Telus that is looking to expand. You'd probably need your political contacts to actually make those calls, but it's worth a shot. Good luck in your endeavors.
-
First left holster
TwinOaks replied to Shorts's topic in Gun Holsters, Rifle Slings and Knife Sheathes
Yeah, only lefthanders are in their right mind... What about those of us who are ambidextrous?....ah! Matched pair! -
First left holster
TwinOaks replied to Shorts's topic in Gun Holsters, Rifle Slings and Knife Sheathes
Now all the guy needs is a Randall to go in it! Nice looking holster, and as usual...very clean. -
first pancake sheath
TwinOaks replied to KendallAA's topic in Gun Holsters, Rifle Slings and Knife Sheathes
Kendall, Welcome to LW! Not bad at all for your first! The stitching reminds me of my first holster- which I still use to CC my 1911. Here you will find an incredible amount of information, and an even more incredible community that will help you any way we can. Remember the old adage: 'The only dumb question is the one un-asked'. Which tools or tool set are you planning on getting? I and others will gladly help with suggestions on what to get, what to avoid, and what you can accumulate piece by piece. If you're pretty interested in keeping up the leather working, I highly recommend joining the Tandy wholesale club. You'll pay slightly lower prices on many things, and monthly you get two stamps for the price of one (buy one, get one). Plus, it is a good place to find hard copy books and patterns. Personally, I put in an order back in tax season and the membership paid for itself in that one order. So, good value as far as I'm concerned. Here's a few things you should look for on your first purchase- the Basic 7 is a good starter set, you'll outgrow it fairly quickly, but you'll learn to use each tool in several ways- like dragging a camoflauge tool to get even rows of fine lines. Purchase an awl- worth their weight in gold. An overstitch wheel is nice, but you can get by without it(-budget decision-)by using anything that will provide a consistant spacing. Still it is a nice thing to have. If you'll be doing a lot of stitching, a stitching groover makes things nice and neat. A few punches, or a punch set keeps holes nice and round. For your knife sheath, overlay a punch at the end of the belt slot to make a rounded end slot which resists tearing better. Don't forget to check other places for tools too. I bought a second stitching/sewing awl at Harbor Freight for about $4. Hobby Lobby sells the same thing ( with a LOT LESS string) for 4 times that. Same tool. Well, I better leave a few things for others to mention... Glad to have you here with us, Mike -
Jo, I vote to 'pin' this so it will be easier for people to locate if they have to come back to it. Mike
-
Trouble with dry-dying
TwinOaks replied to Schno's topic in Dyes, Antiques, Stains, Glues, Waxes, Finishes and Conditioners.
Eco- dyes, being water based, will lift or run off the leather when exposed to enough moisture. I'd suggest you try some spirit dyes (alchohol based) or oil dyes. You'll be MUCH happier with them. -
Trouble with dry-dying
TwinOaks replied to Schno's topic in Dyes, Antiques, Stains, Glues, Waxes, Finishes and Conditioners.
For your problem at step 4, are you by chance using Eco-flow water based colors? -
These make great gifts
TwinOaks replied to Hammerhead's topic in Purses, Wallets, Belts and Miscellaneous Pocket Items
I've been wondering how people managed to bend over enough to light their smokes from a belt mounted lighter.. -
swivel knife holster
TwinOaks replied to carr52's topic in Gun Holsters, Rifle Slings and Knife Sheathes
Hmmm. I had the same idea, too. Maybe we're all sorta becoming one large collective intelligence..... Just wondering 'bout something else too....I wonder what kind of reaction you'd get walking around a trade show with your swivel knife holstered on your belt and ready for action.....oooo headache thinking of sewing in the cartridge loops to match the holster size.. Mike -
When do you expand your gun list?
TwinOaks replied to Shorts's topic in Gun Holsters, Rifle Slings and Knife Sheathes
Google "Bluegun" and you'll find a variety of sources. Shorts, don't worry a bit about it; I never presumed to give you an assignment. -
Darryl, very nice work! One thing I'd like to critique, which I did on my first Mex. basketweave braid. The holes for the lacing need to be the same spacing as the lacing width. That will help eliminate the gaps between the laces on the sides. I knew mine looked funny, all spaced out the way it was, and someone was kind enough to explain it to me. Interestingly enough, I had to learn how to splice into that braid twice also!! Keep up the excellent progress. Mike
-
When do you expand your gun list?
TwinOaks replied to Shorts's topic in Gun Holsters, Rifle Slings and Knife Sheathes
Check on a bulk rate shipping cost from the company. Then, IF you can afford it, build capital and make a multi-model purchase. That would let you moderately reduce the overall cost per gun. I don't think you should price the first run of a model any higher than you would any other holster--UNLESS it's an unusual model, or a very uncommon one. Something like HK, Ruger, S&W, Glock, Sig, 1911's (and clones), Taurus/Barretta, and the increasingly popular Bersa 'Thunder' models should be just a part of your tools and materials list for your business. Now, if someone asked for a holster for an antique, or something really off the wall (perhaps someone wants a lefthanded tacticool holster for a rail mounted flashlight-mounted when holstered) and you could convince the bluegun mfg to make you a mock up then yes, you should include the cost under special materials. Another way to look at it- Would you charge more for the first holster out of a hide just because you had to buy some new leather? Of course not. The cost of materials is (or at least should be amoritized over several holsters. Any specialty items are recovered at cost + X% (as economy allows) on an individual basis. Oh, by the way, I found a translation to Kanji for the project I'm working on. Thanks for checking on it for me. Mike P.S. I don't know the cost, and I wouldn't recommend pounding on them, but check out AirSoft pistols- and if you're even able to get them over there. From what I've seen, they're dimensionally correct, and include safeties and controls. The plain models (Crossman Soft Air- and obvious knockoff) are pretty inexpensive. They might be a viable alternative to blueguns. -
Quick update: This method also works well using round satin cord instead of leather lace. I made a simple leather bracelet then wrapped with black and did the herringbone pattern in bright red. I'd love to post a pic for you but when I took it to show my wife at the convenience store where she works part time, it sold right out of my hand. Dang, now I've got to make more.
-
Grab some scrap leather and an old shirt. I say an 'old' shirt, just in case you pick up any coloration from the leather. You never know with some leathers. Stretch the fabric over a finger, trying to keep out any little folds or creases. Then just rub the area you want shaded. You'll find the results vary according to how much pressure you use, the area of the finger used ( i.e. the finger tip, vs. the edge of the finger, vs. the finger nail, etc.) The leather has a lot to do with it as well. If it's cased well, even a little pressure will produce some burnishing. Also, the brand of leather will matter. I've had some pretty nice leather ($$$) take the shading with extreme ease, allowing subtle shifts in the color. I've also used some pretty inexpensive leather that took ONE shade, no matter what I tried. If you take a look at my avatar photo, I used this technique to shade the background around the hummingbird. Please experiment with fabric colored tools to work into small areas, but practice your pressure control first. I prefer using a finger to do this because it better follows contours- and you can feel the leather better. By this, I don't just mean the contours of the leather, but also the texture which helps (with lots of practice) let you know when the leather is drying out a bit too much. It's a little hard to describe accurately, but just like with edge burnishing, you can feel the leather 'stick' a little. Too dry, and it's almost slick feeling. In a nutshell, you're giving the leather a friction burn. Hope that didn't confuse you too much, and pardon the intended sarcasm when I said it was " VERY comlicated". Feel free to ask any more questions. Oh, one other thing- SuperSheen and Resolene dry to slightly different shades. I used this tidbit of info to lightly shade the background on a portrait of a white dog. There's no burnishing, but because of the finish difference, the dog's body is lighter than the background.
-
Nice Tutorial, Roo! Seeing the video was actually better to me than a series of pics.
-
Another very nice one. To me, the stand out feature of this piece is the detail on the eye. That's one of the problem areas for me, despite all the tutorials.
-
Cindy, that is some great work! You've got a lot of talent, and I'm glad it's we're able to see it. Keep it up!
-
This one is sealed with eco-supersheen, though I've used neat-lac and resolene as well. The shading holds up to a little darkening, but I haven't put one out in the sun to see what it will take- maybe I need to? And Yes, I've done a few others like this. The technique is VERY complicated and involves an old t-shirt, and one or more very sore fingers. You can cheat and use a t-shirt wrapped modeling spoon in tight areas.
-
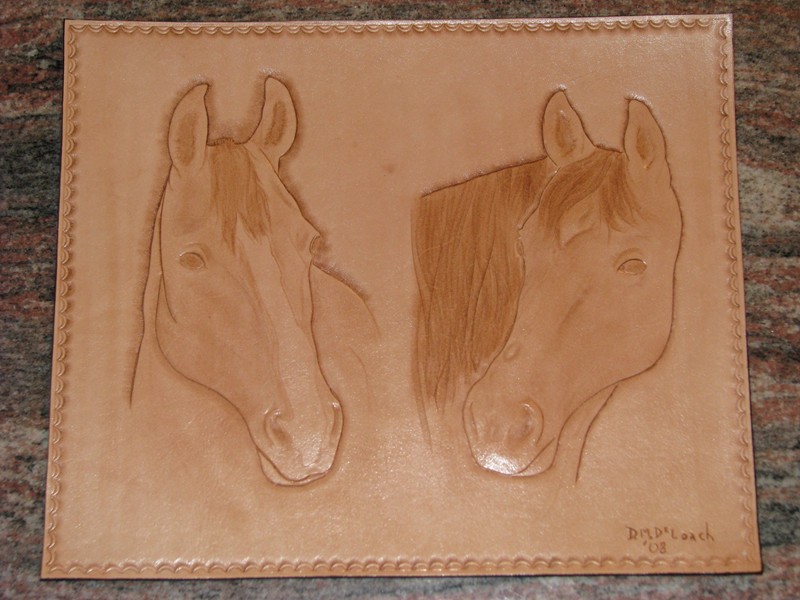
Here's the latest work I've carved. It's for a friend who'd retiring out of the horse business. The two pictured are her 'babies', and are now residing at the stable my wife works at. Cindy, in another thread, you asked about burnishing. The shading here is done by burnishing. Y'all let me know what you think. Mike
-
The surface of the leather can also be burnished to create shaded (not pear shaded) areas to help contrast elements of a project. The method I use to darken an area is to use an old t-shirt, single thickness, and briskly yet firmly rub the area. It kinda has the same effect as giving the leather a sun tan.
-
First thing: Stop demeaning yourself. Not a single person on this forum, or any other for that matter, picked up a strip of leather or a coil of line and said "Today, I will make _______, and be the master of it." It takes a bit of learning, and lots of practice. Drop a PM to Horsehair Braider and ask how long she's been working at her art, or ask Myriam (who posted the excellent 4 strand round braid tutorial). The first roundbraid I did, I was checking the photos, correcting the problem, recheck, etc. Now, I do it while I'm watching TV ( and still backing up and correcting some errors from time to time). This forum exists for people to share and learn;...those that know how helping others learn. And to make friends on the internet who share a love for leather and related crafts. I do happen to be a little good at this computer thing, and share some common interests such as knot tying. However, I am NOT an expert on braiding/weaving/tying..I'm still learning, too. I just happen to know where to look for some things. Here's a link to a very nice knot tying website click me . There's lots of useful things on there, so check out the whole site. Now, you have been reprimanded for being overly appologetic (even if it isn't my place to do so), and given sources to achieve your goals. Go tie some knots and post pics so we can see them. Ask questions when you have them, use the answers, then ask more. When you get pretty good at something, pass the knowledge along.
-
While using the dremel can speed things up, I've found a downside to them. If you don't keep it moving, or reverse direction without lifting the tool, you can get a 'spotty' look. It's just where certain places are more burnished than others.
-
"Knowing how is NOT the same as doing" - I grasped the concept in all of about 30 seconds. Applying that concept took more than an hour to work out the details. ClayB, I think you're right; this is something that folks need to figure out. And here's another quote, from a well liked book: "Knowledge without understanding only increases the frustration of the impatient."- L.E.Moddesitt
-
Yep, I got it. Those who got the cone, you were on the right track. I'll let ClayB reveal the exact method, 'cause I know I skipped or reversed a few steps! This is great. Inspiring us to think outside the box....umm.. ring. And yes, I know mine isn't as pretty as Peter's work, but I'm happy that I figured it out.

-
hee hee hee I'm pretty sure I got it. Will post a pic in the morning when it's done. Nice riddle.