TwinOaks
-
Posts
4,513 -
Joined
-
Last visited
Content Type
Profiles
Forums
Events
Blogs
Gallery
Store
Everything posted by TwinOaks
-
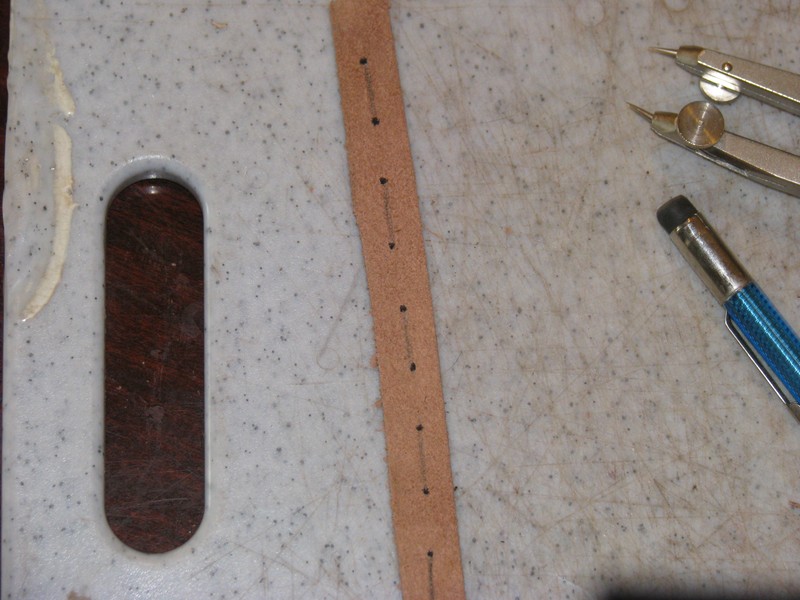
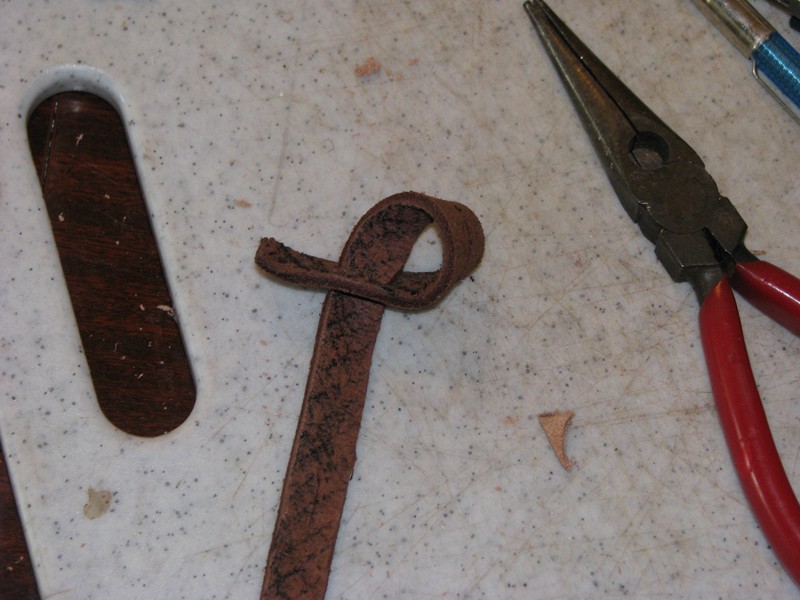
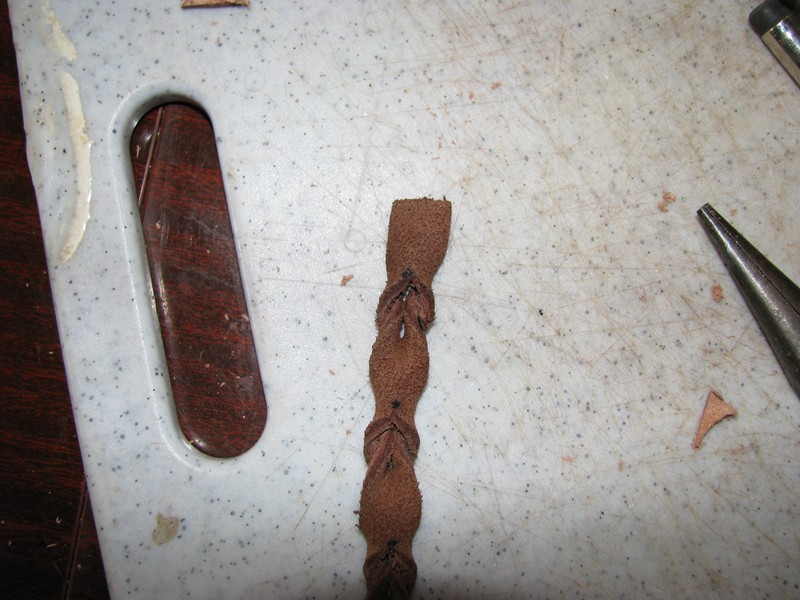
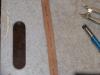
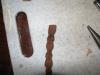
To be clear, this is only one design, which is easy to make, and looks pretty good- you could always take the 8 strand flat braid approach.... [attachment 11644:lwpics6.JPG] As stated in the prev. post, if you wanted the 'braid' closer together, you might try the spacing between slits at 1/2 X. On good leather, rather than a split, the side roll will show the color of the back of the leather, so you can color the back and have , light on dark or color the front and dark on light. Mike Thanks to the OP on this type of strap, for introducing it. I couldn't find the thread or the pics, so I had to improvise.

-
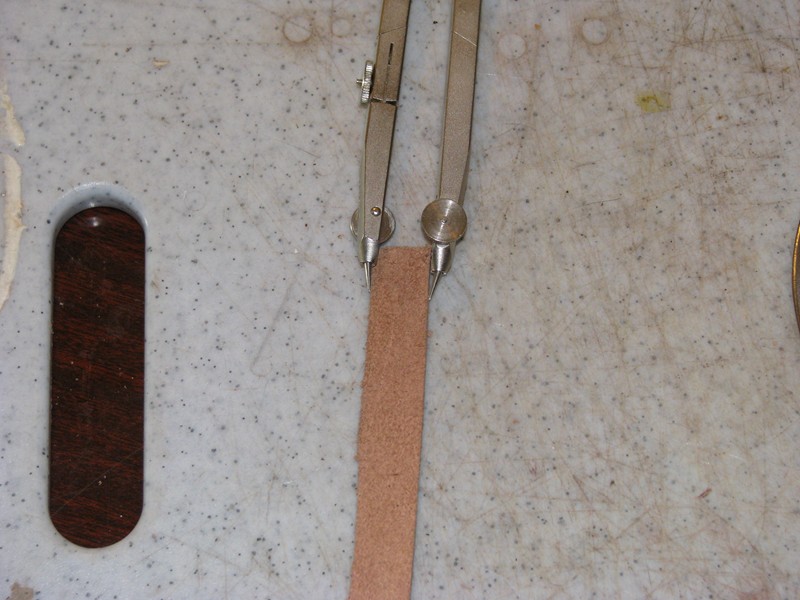
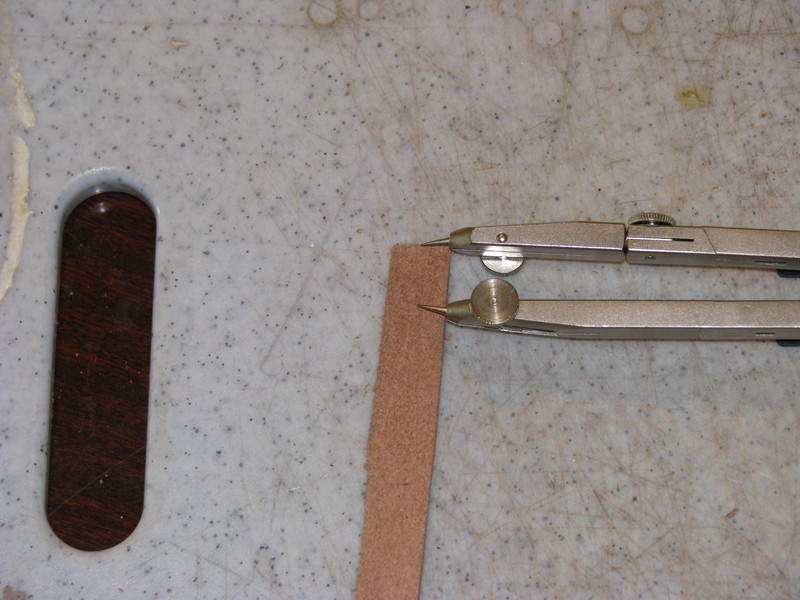
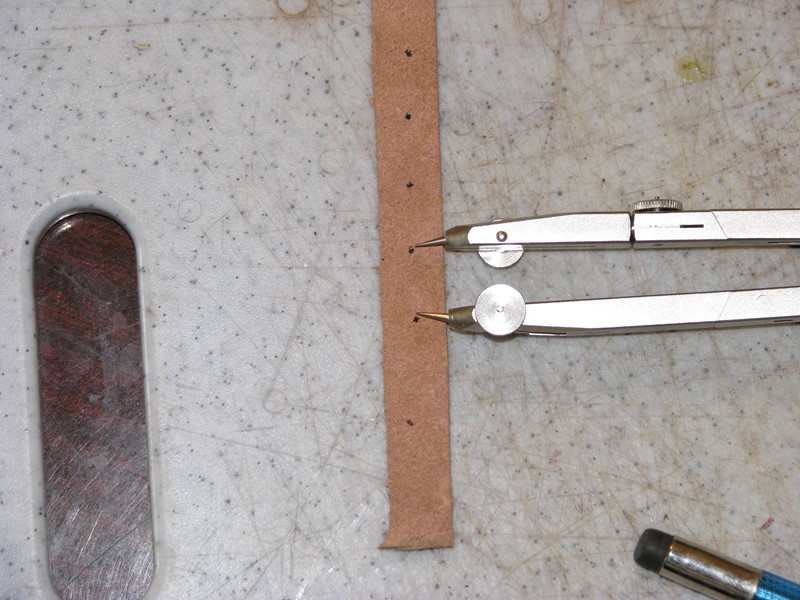
Maybe Luke or Bruce will correct me on this, but here goes: I think the original idea of the "night-latch" wasn't so much as a 'grap-in-case-of-emergency' strap. It was for the cowboy who had overnight sentry duty on the herd. The original idea was kinda like a retaining strap incase the cowhand fell asleep at the reins. For a nice pretty little design, here's an idea: take a strap of whatever width you like, and dye one side of it. Now, measure the width of the strap and write it down; We'll call this X. A set of dividers is great for this next part, but I have used a ruler. Measure X from the end of the strap (maybe a little more depending on the way you mean to attach it), and mark a spot. Staying centered on the strap, mark X's for the length you want the night latch. Connect every other set of dots with a knife, so that the slit looks like a perforated line down the center of the strap. ( - - - - - -) I'd like to point out here, that you can play with the 'tightness' of the pseudobraid by varying the spacing between the slits. Width of the slit can be played with a little, but needs to stay close to the strap width until you get the technique down. Leave a pretty good running end on it, and cut a point at the tip. Now, (hoping you haven't used Eco- dyes) wet the whole strap. You'll want it pretty wet for this, as you'll really be stressing the leather. Now, take the running end (point) and pass it through the first slit, being careful not to twist it. Just keep pulling until the strap rolls in on itself. Repeat down the strap through each consecutive slit. Let dry and apply finish, then attach with aforementioned break away. I'll post a pic when I can find it. Mike
-
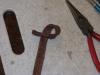
Yes, and yes. The device is simply a handle for the drill bit. I've seen it used by model makers and electronic techs, among others. You place the drill bit tip where you want the hole, and twist while applying pressure. That's why it has the name 'precision' in it- it'll only drill as fast as you make it. I think you'll find it more useful to clean out a hole through several layers of leather than to actually make holes in leather. P.S. The battery life on these things is just fantastic. Mike
-
Spam, spam, spam, spam....lovely spam, wonderful spam (filters). - Monty Python I'll recheck to see if any of the filters caught mine. Thanks for the heads up on this- I couldn't see the screen for all the windows!
-
Lord of the Anvil: The Journey for The Precious
TwinOaks replied to esantoro's topic in Hardware and Accessories
To quote the song "Sunscreen", artist unremembered: "Live in Northern California, but leave before it makes you soft. Live in New York, but leave before it makes you hard." -
Do the customer a favor and make it out of single strand 3/32 sueded lace. That should convey the message that they need to learn to hold on with their legs, and stick to the saddle with their bottom. In lieu of that, if you make one for the customer, consider making a break away for it. If the rider is holding on to that strap and leaves the horse, there's a good chance he/she can twist up in it and be unable to let go. Now you've got a bucked rider semi permanently attached to a horse that's freaking out 'cause there's this big thing attached to it's side hollaring and screaming. In some cases it could also act like a lower sitting launch tab...er, saddle horn. Even PBR guys get hung up in thier bull straps from time to time, and those are designed to let go when the rider looses grip. Thanks for reading my $.02 worth.
-
Molded Gun Holster Questions
TwinOaks replied to Leather Bum's topic in Gun Holsters, Rifle Slings and Knife Sheathes
Hey Bum, 8-9 oz leather will make a pretty heavy grade holster that will last a very long time. If you have a chance to check out a gun store's selection, most of what you'll see ( in leather) is pretty heavy stuff and is labeled 'duty holster'. For a holster that will be worn on the belt heavier leather like that is fine. Thinner leathers come into play when planning a Inside (the) Waist Band hosters for concealed carry. That's because thicker leather is less comfortable to carry IWB than thinner leather. As you know, thinner leather molds more readily and easily than thick leather. So, for 8-9 oz. you shouldn't expect to get quite as much detail as if you were using 5-6 oz. But, on the other hand, it should be stiffer and not require reinforcement bands around the mouth... For molding, I case and press. I find it easier to strretch the leather into a general shape, then work on details. If you have some forming material, such as pretty firm foam, or rubber, you can stretch the general shape, then stack some weight on top of the forming material and just press the details in. For added rigidity of the leather, and to help it keep the detail molding, I heat the leather. NO GUN IN THE HOLSTER FOR THIS! There's no "one set way", but I let the leather dry about half way on it's own, then pop it in the toaster (convection) oven (150 F) for about 10 min. to heat it well. Then, use a hair dryer to blow out all the steam, and dry the interior. Another 20 min in the oven at 100 deg F, and it's done. Oh, I almost forgot...THIS IS THE LAST THING I DO....ALL STITCHING, COLORING, LACING, ETC IS ALREADY DONE. P.S. you might want to put a twist of paper towels in the holster to help absorb moisture. Mike -
What tools should I get to start off with?
TwinOaks replied to AndersHeintz's topic in Getting Started
There's a variety of dyes available, and my opinion is that the Fiebing's spirit (alchohol based), and oil dyes are the best. For any dye, you'll need to seal the leather after staining. Fiebing's Aussie Leather Conditioner is good, and contains no animal fats (which according to some can promote mold), and there's a whole shelf full of oils (neatsfoot, mink, etc.) that work well too. For some stirrup straps I did on a repair job, I saturated and rubbed in thouroughly plain old carnuba wax. That has yet to bleed out any color. For the colors, you might like to check out 'British Tan', 'med. brown', and I think 'chestnut'. -
Not long ago, we had a floral, and a figure carving "challenge". I know that with the PIF adventures a lot of people got tied up in those, but I was wondering if we'll get back to our monthly posting. I really enjoyed seeing all the interpretations of a piece, as well as having a common 'source' for comparison of my own work. Thoughts?
-
Feibings Aussie
TwinOaks replied to bruce johnson's topic in Dyes, Antiques, Stains, Glues, Waxes, Finishes and Conditioners.
Bruce, I forgot to mention it in the last post....I hand rub the Aussie in very well. On the reins, I rubbed it in hard enough to effectively burnish the flesh side. Maybe that was a part of the difference. -
Okay...I've only used brass pins on my scales, but since I didn't see any on your's I was curious. Some folks who do 'period work' use pewter or "animal byproduct" based glues. Don't I know it!!!! WAAAAAAAY back when I was taking martial arts, we'd occasionally break things. Turning the board is a great way to get even with a person that's been picking at you. Incidentally, board breaking is mostly (one can of worms officially opened) about confidence and technique rather than strength- as in "Do you have the confidence to hit this with your hand/foot and know you did it correctly and won't get hurt?" Cinder blocks are a step or three up from that and um....they don't have a grain. Back to the knife handle....That was more or less what I was hinting at when I made the observation. However, for a knife that is as much art as tool, I see nothing wrong with it at all. Especially if it is a 'for sale' piece that's likely to fetch a higher price for being purty. Also, a gorgeous knife like that will be kept well, and not used for mundane things like prying or punching holes in stew cans. The user may be a little cautious in it's use, and only use it as a knife- instead of a prybar, chisel, hammer, throwing knife, etc...Moon, this is in no way intended as a slight against the knife. Let's face it: If you built the knife to be a jungle cutter, it'd be in a flat black sheath with plain scales. As it is, it's spectacular, and far better than what I do ( and no, you can't have a picture, 'cause the last time I took a pic of my 'smithing efforts, I broke the camera).
-
Feibings Aussie
TwinOaks replied to bruce johnson's topic in Dyes, Antiques, Stains, Glues, Waxes, Finishes and Conditioners.
I'm sure others will chime in, but here's my $.02: I picked some up to use on the stirrup straps of a repair job. Can label say's smooth leather, but when I made a set of reins for the same customer, I used it grain and flesh- really saturated them. The sticky was there for just a little while, and after the leather aborbed what it would, well, I just buffed off the rest. Now the leather feels....like leather. No sticky left to it. Smells like Mink oil to me. -
Yeah, Moon, I know there's more to than that!!!LOL I was referring to having the growth rings in that pattern. Everything else I've seen is along the grain, instead of across it - at least not SO across it. Did you use epoxy or go with the more traditional pewter?
-
I believe the word we're all looking for here is: TROLL IMO, the OP should be given opportunity to address Art's questions. If the OP declines that opportunity, or makes further inflamatory remarks, then corrective action should be taken by the Mods.
-
Bob, Welcome to Leatherworker.net. This forum is a wonderful place, as you'll find, and we're very happy you found us. Now...as to the bottle sheath. Shrink wrapping as you call it is usually called 'molding'. There's a few ways to do it, but I think that wet molding is perhaps the easiest. I make a few holsters here and there, and that's where my experience comes from. Trace the outline of the bottle onto a piece of paper. This is your pattern. You didn't indicate whether this will be one piece of leather, joined on one side and folded on the other, or two pieces, with the bottle sandwiched between. I'll presume the latter, but if it's a folded piece, simply trace the leather, then flip the bottle on the paper so you have both faces and the width of the bottle accounted for. Now, add 3/8"-1/2" for stitching/lacing/riveting, but only to the edge(s) you'll be joining. If you're sandwiching the bottle between two pieces, remember to allow for the neck of the bottle. If it's an irregluar shape (not symmetrical) remember to flip your pattern on the leather. Cut out the leather, using scissors, razor blades, etc. On any cuts, remember to position the leather so that a slip of the knife won't glide across the pattern, or you. It's better to clean up a rough edge than scrap the whole piece because there's a slice running through it. Use a contact cement on the edges to hold them together, then punch holes for lacing or stitching. The pattern should be slightly larger than the bottle's width. Wet the leather. This is most easily done by soaking it, or by running it under a faucet. You'll want to wet both sides. When you see little bubbles coming out of the leather, it means that the water is penetrating deep into the core of the leather. When the leather is saturated, lay it out to dry a bit (seems contrary, I know). This to allow the leather to fully absorb the water. From whatever opening you choose, insert the bottle and stretch the leather around it. You can let it dry this way, and it will be a semi snug fit, or, let it dry partially, then remove the bottle, letting the leather shrink a bit as it dries. This will result in a tighter fit. I'm sure I left out a few things, but don't worry, others will chime in and add them. Good luck on your project, and don't forget to post pics of it. Mike
-
Very nice work!!! I like the way you dyed the leather to match the handle (or vice versa). Beautiful work on both, especially the way you mounted the handle to the tang. I don't think I've ever seen it done that way before.
-
Regis, I tried it yesterday, and just checked again-allowing for slow server-and got nothing. I emailed to myself, using my contact address for this forum.
-
One thing I thought about for coloring flowers without obscuring the carving is to 'under color' them- basically dilute your color to be more like a wash. Then apply minimally, sorta fading into the flowers at the stem, developing the intensity of the color up to the flower. That's my take on it anyway. Ought to be pretty easy to do with an airbrush...
-
bunches of nuthin'. Fear not, I've have lots that needs to get done...but to answer you question....nuthin'.
-
Umm....measure it? If you haven't inserted the liner you can fold it to find the center. If you've already inserted the liner, you'll have to use the ol' measuring stick. As far as cutting the slit, why not just use scissors? Mark one end (as measured from the edge of the notebook), mark the other end (same), scribe a line and cut it. Or am I missing the point?
-
How about a trip to the local tanning salon? You get the really high UV which kills without all the heat. Or just a really good UV lamp for that matter. In fact, I bet you could spot treat with any work light that uses a quartz lamp. Remove the glass cover and there you go. It puts off enough UV to cause minor 'sun burn' in just a few minutes. When I have to work on them, I always have gloves and UV blocking sunglasses, even when working inside (some deli heat lamps are quartz lamps).
-
Blue Gun Fitment list
TwinOaks replied to Shorts's topic in Gun Holsters, Rifle Slings and Knife Sheathes
And a small forklift for the ammo cases...which could be cured by installing an underground range in your backyard...Oh dear, I see this going in a bad direction.... -
Normal? I guess so, but I kinda swap back and forth on IE and firefox, so I don't really remember all the details. I believe it's a security measure, and a good one if you're in a multiuser environment with shared terminals. It does slow things down a bit for single users though. I'll play around with my version and see if I can find anything out for you. <Several minutes, and a reboot of a frozen system later> OOOOkay....I am NOT the right person to go messing with firefox settings. However, I did determine that closing my browser does eliminate any history (from the address bar) and password. I'll presume that you don't want the program to remember your password for the bookmark. [tools tab, options, security] Personally, I don't allow password rememberance, form fill, or anything that would grant access to someone using my computer- but then I've been accused of being paranoid too.
-
Also check to see if you have anything set to automatically clear all cookies, temp files, etc. when you close. Moz. Firefox has such an option, and sure enough, when you close the browser, it deletes everything you've looked at in that session. Not sure if IE has that feature or not. Mike
-
Blue Gun Fitment list
TwinOaks replied to Shorts's topic in Gun Holsters, Rifle Slings and Knife Sheathes
I wasn't talking about blue guns....like I said- a little more expensive LOL