TwinOaks
-
Posts
4,513 -
Joined
-
Last visited
Content Type
Profiles
Forums
Events
Blogs
Gallery
Store
Everything posted by TwinOaks
-
Using fingernail polish.....well there's your problem right there!!! I used a paint marker and don't have any problems at all! Joking aside, I do the 'clock face' thing as well, but I don't touch the bobbin tension. Think of it like this (because this is what's happening): Your bobbin tension is providing a consistent tension. That stays the same regardless of what sizes you're stitching. Once you have it set for a particular thread size, leave it alone. You're top tension is what determines how high you're pulling the two threads inside the leather. If you have the top tension set at zero, then the needle will move and the tension of the bobbin thread will pull the top thread off the spool with no problems. Increase the top tension and your countering the tension from the bobbin. The result is that you 'lift' the lock stitch by pulling the two tensions against each other. This is also precisely what creates the stitch tension that holds the leather together (yes, I know we glue the leather, too.). Decreasing the tension on the top thread will lower the lock because it doesn't pull as hard against the bobbin thread. Now, here's the key - the 'lift' I mentioned is measured from the bottom of the leather...which is always at the same height...it's (should be) against the needle plate. So all you're doing is increasing or decreasing tension to alter the lift from 'zero' height to anywhere from 1/16th (top of 4oz leather..center of two 4oz pieces) to 1/8th (top of 8oz...center of two pieces of 8oz), etc., etc. ETA: I'm also sewing on a boss. I suggest trying the following- turn your primary tensioner 1/8th turn counter clockwise and test sew a piece. Alternately.....a quick tension trick I've learned: Some diagrams show a full wrap on both the primary and secondary tensioners for the Boss, some diagrams show a full wrap on the primary and a half wrap on the secondary....this was covered in your thread about the back side of stitches. If you normally have both with a full wrap, try taking the secondary tensioner to a half wrap and leaving the primary tension adjustment alone. You are decreasing the top thread tension when you do this, and I find it's a very easy way to shift between two tension settings without having to make any adjustments on the knobs.
-
Retention On Holster
TwinOaks replied to mrfixit's topic in Gun Holsters, Rifle Slings and Knife Sheathes
Look up Jim Simmon's tutorial on making a holster. In it he shows how to measure and build the holster so that it will have retention without the need for ANY molding. Once you get that part down, you just tool the outer piece and assemble as he instructs. IIRC, the holster he built was a cowboy style rig....but the concept of measuring the holster remains the same for both types of revolvers. -
I just realized that I forgot to add the following: Stay away from the 28 watt high efficiency lamps/ballasts. The lamp uses "warm start" technology to increase lamp life, and well......it works in THEORY.
-
Get him a Uncle Mike's nylon IWB holster with a velcro strap and paint the spring clip silver. There's a few things that could go wrong with his "ideal holster", and I think you did the right thing. However if the guy wanting the holster is insistent that his design is what he wants......require payment up front and make the holster like he wants.
-
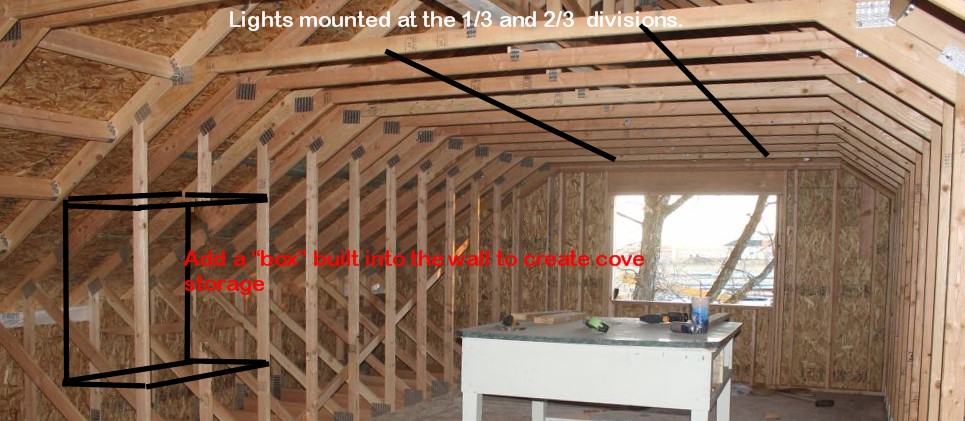
This certainly is right up my alley.........I'm a lighting technician / electrician for Sylvania. Some of what's above is right, some is wrong, some can go either way. First, forget recessed can lights. I don't think you have the room for them except right in the center of the room, especially if you plan to insulate the ceiling. The regular incandescent cans are at least 6 inches deep and require a minimum clearance around them. Based on what I see in the picture, I'd suggest running your power above ceiling and surface mounting everything you install. That's actually good news because "shop lights" are pretty well self contained and often less expensive than the fixtures that are recess mounted.....as well as easier to install. On to fluorescent lights.....it's come a long way from what it once was. Older fixtures typically didn't show colors well because of the types of lamps (bulb) used in them. The most common was the F34CW.....34 watt, 'cool white' color, that used a magnetic ballast and if one lamp went out, the other went with it. With the new T8 lamps, which are 32 watt and run off electronic ballasts, that's a thing of the past. What you need to look for is a higher "CRI", for 'Color Rendering Index". That's one part of it, the other part is the base color of the lamp which is rated in the color of temperatures....in Kelvin (unit of measurement). The most common colors are 3000K, 3500K, 4100K, and 5000K. Lower numbers have more red in them and are commonly called "warm" colors. The higher the number, the 'whiter' the light, with the exception of the 5000K....it has a blue-ish tint. The 5000K and up are called "daylight" and are usually only used inside signs and displays over water. Sylvania's high CRI lamps are the 800 series, for 'CRI 82'....as in 830, 835, 841, and 850. Here's how a fluorescent lamp would be listed: FO32/841 xxxxxxxx ----for FluorescentOctron (means T8) 32 watt800 series4100 Kelvin color , the xxxx is for nomenclature such as 'Eco' for 'economy', or 'xp' for 'extended performance'. The color and CRI of the lamp makes all the difference in the world. In a grocery store, we use the 3500 color lamps for most of the store, but the meat dept. and shelves get the 3000 color- it's redder and makes the meat look better. If I was to put in very white light (4100) or even the slightly blue (5000 and up) lamps, I could easily shut down the meat sales ...it makes the meat look like it's gone bad. The color is that important. The best way for you to see the difference is to go to the local box hardware store and look at the lighting displays in the paint dept. They typically have one set up to show the effects the lighting has on the colors so you can see what it will look like in your house. Alternately...Dress Barn uses the 3000 lamps, Steinmart uses 3500 lamps, Ross stores use 4100, and Tractor supply uses the 5000 color. Incandescent- There's a pretty wide range of options, including low voltage. The down side to these is lamp life and HEAT. I have several stores that use a 50watt 12v track lighting system, and the real world life is somewhat shorter than we'd like. They are pretty expensive for what you get at ~$8 retail. They also get too hot to even consider touching. Regular halogen lamps don't get quite as hot. Either of them produce a pretty stark light, which could cast sharp shadows. There is the option to use 'soft' lighting, which is little more than a frosting on the inside of the lamp to diffuse the light. If you decide to use a low voltage track system, be sure to allow for the power supply, which is a step down transformer that turns your 120V house current to 12V. LEDs really are the future, but as stated before, there's a limit to what they can do. We're working on that (in the industry), but regardless, they all produce some pretty stark lighting. If they're a little ways off, 5-8 feet, it's not any worse than a regular halogen flood light. The downside to LEDs is the cost. At ~$25 apiece, using them gets expensive....but that last a very long time. And despite the energy sipping nature of LEDs, they still produce heat because all the LED "replacement" lamps have a regular medium screw base (light a regular bulb) and a transformer built into the base of the unit. You'll probably also notice a bunch of fins or vanes....that's for heat dissipation. If you have the coin, you could go with a LED power pack and LED strips, which is how we back light channel letters on signs. They are UBER-bright and since they're available as flexible ribbon or 6 inch 'sticks', you can use one power supply and stretch a string to pretty much any configuration you want. Now that you're more confused than ever...............I'll offer my suggestion. Run 4 lamp fixtures and use BOTH 3500 and 4100 color lamps (2 each) to get the most uniform color. Get fixtures that include a diffuser lens, and paint the ceiling and angled part of the ceiling in high gloss, which will help reflect the light around the room. I'd suggest dividing the ceiling into thirds (lengthwise) and center the fixtures at the 1/3 and 2/3 marks. That will give you lighting that is NOT directly overhead so that you have some light shining on your work at an angle. Wire the room so that you can turn on banks of light as you need them. Another thing I would recommend is to remove every other stud along the wall, add a jack stud to either side, and in the new open space where the stud used to be, add in cove storage. Don't forget to add venting under the roof.
-
Sorry to hear that the machine is a lemon, but it's always good to hear about superb customer service. I'm sure you've already seen it, but if you haven't, the thread by Particle asking about the back side of the stitching is worth a bit of time.....It should help you with your tension settings/adjustments.
-
Conservative (Not Politician!) Where To For?
TwinOaks replied to cowboy bill's topic in General Saddlery Discussion
click the ad banner for Springfield leather and look for the wholesale link on the left side. -
Even Bob Kovar needs a vacation once in a while, but I'm sure he'll be back soon, and either of them may at some point be at the trade shows. You don't have your location listed, so you'll need to decide which is closer to you, but it sounds like you're in the market for a Cobra class 3, Cowboy 3500, or an Artisan Toro 3000 (emphasis on the first two, due to their pretty frequent activity here....it means they're available most of the time)....unless you just need 16" under the arm. The machines will sew up to 3/4 or even 7/8 inch, are motorized, and will usually ship 'pre-set' to what you tell them you'll be doing. The machine heads are all very similar, with the package differences in the motors and accessories that come with it. Bob Kovar's shop is in Ohio, Cobra Steve (Tayrien) is in California; You could pick whichever is closest to you and be very well off based on that alone. If I recall, Cobras come with a few more goodies, Cowboy's save a few bucks. Both Steve and Bob offer tremendous customer support. Really, the best suggestion I can offer is to give them time to get back from the Christmas and New Year holidays and talk to both to see what they can do. I know that Bob does have some used equipment, and I believe I read on here that a member picked up a used Toro 3k from Steve. Either way you go, you won't likely go wrong.
-
Holster Pattern Help
TwinOaks replied to glockanator's topic in Gun Holsters, Rifle Slings and Knife Sheathes
OH! Well, that certainly makes a difference! Ok, for the section that's at the top of the gun, you've closely followed the details of the profile. Because of the difference in height of the front sight and the rest of the body, you'll need to basically draw a line from the highest point at the toggle to the front sight.....working with the current tracing lines, not the physical gun. That line is going to be your new stitch line and you won't worry about following the lines of the top of the gun. Your strap will probably need to be "fitted" once everything else is done, so leave it a bit long - you can always cut it down to size. For the belt loops, the one on the left side is too close to the grip. You can either move it down, or back. Moving it back means building the holster so that the side closest to the body is flat (mostly), and all the molding is on the outer piece. That makes the molding more difficult and the stitch lines more critical, so you might want to just move the loops down. If you aren't too far along, you might consider an Avenger style holster (clamshell) as it would allow for a bit more room around the grip. -
Iwb Holster - Looking For Feedback
TwinOaks replied to particle's topic in Gun Holsters, Rifle Slings and Knife Sheathes
You can use 6/32 just fine and the heads recess nicely in a line 24 snap with no modification. I have used 8/32, but had to reduce the head by chucking the threads up in a drill and applying a mill file as it spun. I've never had any issues with the size/strength. As far as the little prongs on the t-nuts......Grasshopper, you have forgotten the most important rule of this craft: If it doesn't work...MODIFY IT!!!! I routinely use a pair of side cutters/ wire nips to chop the points off those little prongs. It changes it from a small sharp triangle to a smaller sharp trapezoid....and it stays put just fine. -
(the other) Mike speaks about the exact reason holsters are molded in the first place - that 'snap' or 'thunk'. Molding a holster can look good, but it's more important that the holster properly holds the weapon. This means that the holster keeps the weapon in the same place..period. There's no shifting around, no settling, no twisting...and it's not loose or apt to fall out. People that choose to (or have to) carry a weapon, most likely train with it. Having the pistol in exactly the same place every time leads to repeatability when practicing draws, re-holstering, etc. To accomplish the goal of "same place, all the time", I mold my holsters (like Katsass) by hand with the sole intents of proper retention, support, and presentation. A few years ago, some top notch holster makers took the time to get me straightened out on the design principles (big thank you to K-man, and BOOMstick). All the pretty lines on the outside of the holster do absolutely nothing for the important properties. Proper molding eliminates excess space (or 'wiggle room') in critical areas, and increases the surface area of the leather that is in contact with the weapon. The more leather you have against the leather, the more stable and secure the weapon is. This does NOT mean that it will be difficult to draw, because when properly done, a leather holster will lock in or release just as well as wonder plastic (kydex)....without the finish marring results of hard plastic on steel. It DOES mean that if you do it correctly, then there will be only one direction that the weapon will clear the holster...as opposed to the nylon/neoprene 'socks' with a clip on it. With those, you can pull the weapon free from any angle. However, molding is not the only way to get a good fitting holster. Though it takes a bit more layout, you can build the holster to exactly fit the dimensions of the weapon...right from the start. Take a look at the holster tutorial by Jim Simmons and you'll see how to measure and build to the specific dimensions. His tutorial is for a revolver, but the principles are the same. Once those aspects are covered, THEN I worry about the aesthetics. ETA: It is possible to OVER mold a holster, and defeat the purpose of the molding. mlapaglia made a holster and boned it nearly tight enough to read the serial numbers () which caused the weapon to be 'locked' into the holster. The over molding was at the 'tactical rail' under the muzzle, and by molding so closely to the shape of it, he got little bits of leather pressed between the slots on the rail. As it dried, it acted like the teeth on gears, preventing removal.
-
A lot of molding is done on a press, using 40 durometer rubber pads. They're soft enough to allow good forming around a gun, but firm enough to pick up most of the lines. They're an excellent idea if you're turning out a LOT of holsters, or just happen to like the look. I market my holsters and sheaths as "Custom", so having all the little details that mark something as "hand made" is more important than being able to rapidly press-form a holster.
-
Holster Pattern Help
TwinOaks replied to glockanator's topic in Gun Holsters, Rifle Slings and Knife Sheathes
What's it supposed to fit, and is that long tab at the top going to be a retention strap? -
Sewing An Avenger Style Holster
TwinOaks replied to Abram's topic in Gun Holsters, Rifle Slings and Knife Sheathes
Just clamp below where you're going to sew. When you get to the clamp, adjust/move the piece,or flip it. If you flip it, be sure to reverse your stitching so the sewing remains constant in relation to the leather. -
The most commonly used modeler I have is my spade(kind of a spoon) and stylus combo. After that, it's the med and small spoon combo. When I (very occasionally) do any floral tooling, the deerfoot sees a good bit of use to lift the petal edges. If you'll be doing a lot of embossing, then the ball end styli would be a good investment.
-
Welcome to Leatherworker,net, and thanks for a great intro.
-
Welcome to Leatherworker.net! As far as advice goes....well, you're in the right place. You can read the holster/sheath forum to get some ideas of what you want to make and how to do so. We have some awesome tutorials in there. If you're looking for tooling instructions, check out the stamping forum, and if you're trying to figure out what you might need for tools, look at the "getting started" forum under "The Business". There are some specialty tools you'll need, but many "regular" tools can be used 'as-is' for leather working. One of the most spectacular figure carvings I've seen on here was done by a lady somewhere in the Nordic countries....and she did it with a manicure set. Let us know what we can do to help, and feel free to ask specific questions as you encounter them.
-
I use a piece of waxed paper under the holster, or just rub out the marks. Really, they're shallower than even scribe lines. The little channels need to be present for the vacuum to get the air out, otherwise you can get pockets that are pinched off, so a block or sheet is needed instead of turning it inside out. A food sealer works pretty well. You won't be able to read the serial #s through the leather, but you're talking about an appliance, not a commercial vacuum table.
-
Check out our 'market place', specifically the 'used' section. We had one there with the flatbed attachment as late as yesterday.
-
Lining Question
TwinOaks replied to glockanator's topic in Gun Holsters, Rifle Slings and Knife Sheathes
I use 4/5 against 7/8 for grain out on both sides. Whatever sizes you choose to use, be sure that you are NOT using chrome tanned leather. The CT could possibly damage the finish. -
Handedness doesn't matter, consistency with the awl, and more importantly, consistency with the stitching is more important. On small cases like tool pouches, I'll occasionally run \\\\\ on the left side and //// on the right side.
-
Excellent!!! Now.....get to stitching!!!! P.S. You'll find your scrap bin invaluable for matching thicknesses when you need to adjust the tensions.
-
It should sound pretty much the same. Have you tried sewing with it without thread? Just using the needle to punch holes...that would let you diagnose if it was specifically related to the thread or if it was another issue. And yes, a lack of thread will make a difference. That last little push, right at the end of the 'up' stroke is what pulls the thread up into the leather. If your machine is pulling thread directly from the spool, it's fighting the bobbin tension, the tension of the thread on the spool, and both tensioners. If you pull that little loop between the double hole thread guide and the secondary tensioner, then you'll eliminate everything but the primary and secondary tensioners. And there's something tickling my memory....I think it was a post by Particle. There's a screw that holds the thread take up arm in place that was causing him problems.....Denster, Dwight? I'm pretty sure it was one of you that identified and sorted out that issue. And, you ARE holding the thread snugly behind the machine for several stitches, right? You've got to provide the tension for the first couple of stitches. If you aren't, then that would explain the several 'easy' stitches...the machine is pulling the tag end back through everything, and when there's enough lock stitches to actually hold the thread in place is when you start feeling the difference in the stitch.
-
From the description, it sounds like you need a splitter not a skiver. Skivers typically only thin down the edge, where a splitter can handle (almost) the full width of the blade.
-
You can also get thread from Bob Kovar....click the ad banner for Toledo Sewing at the top of the page. I think I saw the posted price of $15/pound (spool).