TwinOaks
-
Posts
4,513 -
Joined
-
Last visited
Content Type
Profiles
Forums
Events
Blogs
Gallery
Store
Everything posted by TwinOaks
-
3 year old thread. Please remember to check the dates in a topic.
-
I slick down the flesh side with gum trag, water, and elbow grease. Then I seal it with Resolene or the homemade version of it.
-
For your first holster, I'd recommend making a clamshell style. For an IWB, the simplest way to do it is trace your gun on a folded sheet of paper, add spacing for the stitches, cut out and unfold. There's your pattern. The assembly is pretty easy, especially if you do something inspired by a Summer Special. That can be made with a total of 2 pieces of leather, and two snaps....plus stitching, of course. Good style for a first, as the design of the holster will help with retention without relying only on molding. Read (if you haven't) our pinned tutorials on holster making, and feel free to ask any questions.
-
Welcome to Leatherworker.net, best site on the world wide web. To answer your question......no, not really. You might get some fading, but that would probably indicate that the leather is dried out. Also, being sandles, the leather is probably chrome tanned. The dying process was done at the factory and the leather is most likely that color through and through.
-
1911 Cover Trigger Or No ?
TwinOaks replied to MADMAX22's topic in Gun Holsters, Rifle Slings and Knife Sheathes
We are in agreement, then. Even though the 1911 is safe to carry in condition 1, it's still a good idea to cover the trigger because you can't always account for other people's actions. -
Want To Make My Own Holster And Belt
TwinOaks replied to Kcinnick's topic in Gun Holsters, Rifle Slings and Knife Sheathes
That workshop sounds suited to a Boss. For one of the big machines, you pretty much need the floor space of a standard pallet....maybe a skosh more. -
1911 Cover Trigger Or No ?
TwinOaks replied to MADMAX22's topic in Gun Holsters, Rifle Slings and Knife Sheathes
A Tom Threepersons style holster would also have an exposed trigger. See examples by Lobo. -
Welcome to Leatherworker.net, we're glad you stopped in. It sounds like you have found a treasure trove of knowledge in your friends.
-
1911 Cover Trigger Or No ?
TwinOaks replied to MADMAX22's topic in Gun Holsters, Rifle Slings and Knife Sheathes
Actually, many people that choose to carry a 1911 don't carry it ready to 'rock and roll', they carry it 'cocked and locked', otherwise known as condition 1. The platform is safe to carry in this condition because there are a minimum of two safeties engaged at that point. The grip safety blocks the trigger bow from moving the disconnector. Being blocked, the disconnector can not move the sear to release the hammer. The frame safety physically blocks the sear from moving. And if it doesn't move, the hammer doesn't fall. On more recent models there is also a firing pin block using the Colt design or the Swartz design that prevents the firing pin from moving unless the other safeties are 'off'. All this presuming an intact and not damaged firearm. All that aside, I personally prefer to build holsters with the trigger covered. I think it lends to a stronger and better looking holster. If you're building one for someone else, I recommend covering the trigger as liability issue (unless specifically asked to leave it open). -
Want To Make My Own Holster And Belt
TwinOaks replied to Kcinnick's topic in Gun Holsters, Rifle Slings and Knife Sheathes
The Boss has a couple of things going for it - it's VERY portable. I mounted mine to a 12x18x1.5" base, and it still weighs less than 40lbs. That means it can be set up to use, then put away later. It's also powered by YOU. The combination of the two means there's no requirement to have a spot near a wall socket. The big machines are BIG....the head alone on the ones like the Cowboy/Cobra/Artisan machines is in excess of 150lbs....then add the stand.....most are sitting at about 300lbs total, and are shipped as freight...on a pallet. Since the Boss is one stitch per pull of the handle, the learning curve is easy. You just wait until everything is in place and put the stitch exactly where you want it - no running off the piece of leather unless you're completely ignoring it. You can sew as slowly as you want.....and fairly quickly if you want, but not as fast as a motor. Now, for a belt......and yes I've done belts on mine.....a motorized machine is better. It's a LOT of pulls of the handle on one side of the belt. If you were ONLY doing belts, let's presume max thickness at 1/4 inch, then a flatbed with 3/8ths capability is 'good enough'. However, it's best (as I suspect you know) to get more tool than you think you'll need. The same applies to sewing machines. The Boss will sew up to 3/4ths of an inch, which seems like a lot until you decide to make a sheath or a holster with a welt in it. Then all that extra capacity comes in VERY HANDY. For example: 8oz front, welt, and back piece = 24 oz ...or 24/64ths, which equals 3/8ths of an inch. If that was a lined with 4 oz, you have another 1/16th per side making the total thickness right at half an inch. The layers build up pretty quickly. Another thing about the Boss is that it is a needle feed with a jump foot. The needle goes down and pulls the leather while the foot is up, then the foot comes down to hold the leather while the needle goes up and resets its position. That's not quite as good as a walking foot, or (even better) a Unison Feed which uses walking feet AND needle feed. But, it IS a lot better than feed dogs if you're going to have the grain on top and bottom of the piece (which you would in most holsters). Feed dogs can mark the leather if you're not careful, or using special 'smooth' feed dogs. The powered machines that have the capability are certainly a match for the Boss, but they do cost more. That said, you can occasionally find one on here where someone is going out of business and selling their machine for a bit less than what they bought it for, but unless they're local to you, you'll still have to arrange shipping. I got my Boss from this forum, and have been very happy with it. It has limitations, but then, so does my wallet! -
Head Knife Handle Replacement? What Would You Do?
TwinOaks replied to tostrap's topic in Leather Tools
Slather a bit of epoxy in the tang, reinsert, and let cure. If it has a pinned handle, you can use an appropriate sized piece of brazing rod to re-pin it. -
You might also find the lacing calculator handy- http://leatherworker.net/forum/index.php?showtopic=1938&hl=lacing+calculator+program
-
uhhhh yeah....Nasa called. They want their launch pad back.
-
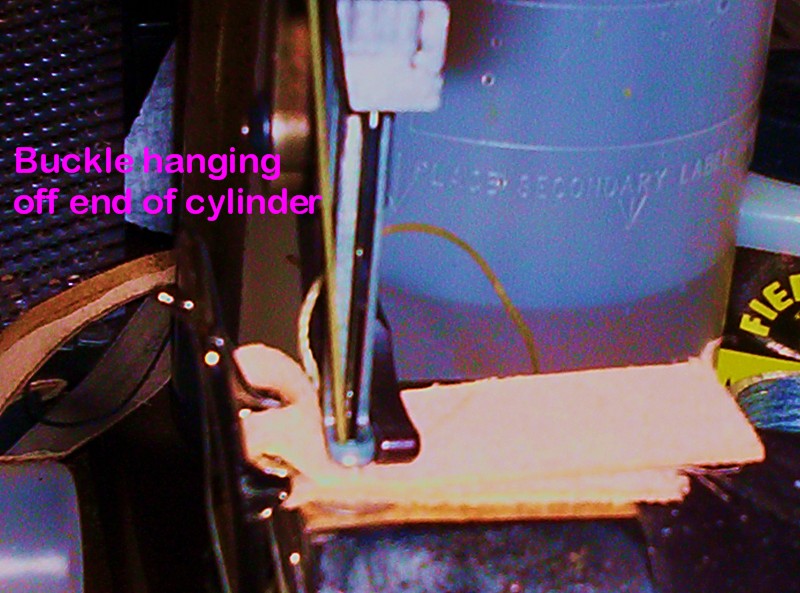
Ah, now I think I see what you were asking... Turn the work sideways, and use either the left or right toe foot. You can guide the needle about 1/8th inch away from the buckle...like this- Is that what you were talking about?
-
Beads n leather does have a (limited) selection of leather and they're willing to cut some of it. I think the biggest they had last time I dropped by was a single shoulder, but of course that will vary. Their phone number is [tw0 5 one six 6 zero ten o five] . If you don't find what you're looking for there, give me a shout in the PMs and I'll cut some of mine for you. And pardon my forgetting in the first post......WELCOME TO LEATHERWORKER.NET!
-
You could probably do well with pre-cut bands available at Springfield Leather and or Tandy. If you happen to be near Birmingham, there's a Tandy on Atlanta highway down in Hoover. If that isn't an option, I suggest checking at Hobby Lobby (they have a leather craft section) and looking at the Leather Factory wristbands. I think it's a five pack. Most of the pre-cut wristbands already include the snaps, or have holes punched for them. If you happen to be in or near Mobile, there's a store called "Beads-n-leather" on the loop (they sell both, and have a gorgeous selection of turquiose as well) - or - if you don't need to much to start with I can cut some straps from what I have.
-
Anyone Know What Tools Needed To Make Clicker Dies
TwinOaks replied to RMB Custom Leather's topic in Leather Tools
Besides a bender and a welder, I'd think you'll need to sharpen the die, and maybe even heat treat it. For this I think a good torch would do .....differential hardening on the cutting edge, and maybe a good sized bucket for quenching. I can't make a recommendation on brands, but wanted to toss that in so you could perhaps look for 'bundles'. -
You can sew flat items on a cylinder bed very easily. However, it is NOT as easy to sew tight radius round items (tool roll?) on a flatbed. If your work will include needing to sew inside curves, you'd be ahead of the curve with a cylinder bed. As far as making a flatbed attachment.....I think I'll let someone who's done it answer that. I've got some ideas on doing it, but haven't actually tried it.
-
Want To Make My Own Holster And Belt
TwinOaks replied to Kcinnick's topic in Gun Holsters, Rifle Slings and Knife Sheathes
You're exactly right. Hand stitching, using a saddle stitch where one thread alternates sides of the leather and crisscrosses with another thread doing the same thing is the 'best' stitch. This is because if one thread breaks, the other is still holding, and you wouldn't see mass unraveling....at least not on the level of a lock stitch where one thread is on one side of the leather and only wraps around (locks) the other thread inside the hole. If a lock stitch breaks, it could unravel a long way.....I had it happen not long ago where I got careless and put the backstitch (end of the stitching that 'locks' everything in place) at a stress point. A little force and the thread slipped...............restitch!!!!!! Now there's nothing wrong with machine sewing items, not at all. But I and others feel that the saddle stitch is the most durable, and just looks better. That said, I have a machine for most of my stitching, and am always on the lookout to upgrade. Some of the machines can produce a quality lockstitch that looks as good any saddle stitch....but it's what's between the leather that's the key. For your awl, yes, you want a 'diamond' awl. That refers to the cross section of the blade. it pushes the leather out of the way to make a hole instead of removing leather like a drill press would. Tandy sells an Osborne awl that is sufficient for most needs. The holes might be a little large for waxed linen (hobby lobby), but they're pretty close. The awl from Craftool is way too big for the thread. As Katsass has said, if the needle can be pulled through by hand, the hole's too big. I don't go quite that far....I can get the first needle through, but need the pliers to get the second needle through. You'll get the feel of it .....with practice. The key to hand stitching is consistency. Once the holes placements are marked, you need to push the awl through at the same angle (45 degrees to the stitch line), you need to keep the penetrations perfectly perpendicular through the leather (otherwise the back side stitches wander all over the place), and you need to follow the same overlap pattern for the needles....................on every stitch. An overlap example: Awl punches the hole, right hand needle goes through and crosses over and back, left needle goes in the top of the hole. Repeat. You could also have the r.h. needle go through and under. Or start with the left hand needle....as long as it's the same on every stitch it'll look good. To keep the blade angle consistent, you can sand/carve a flat spot for your thumb to rest. That will help keep the blade in the same position....it also helps keep the thing from rolling off a table/work bench. Expect to have some sore fingers for a while. You'll be pulling on the thread -not the needle- ( the needle's only job is to get the thread through the hole) and the thread will usually take more than your fingers are willing to give. When you stitch, don't use more than about 3 feet of line at a time. The thread in the needles goes through every hole, so if you've got a long run, the needle end of the thread will get raggedy looking while the start will look nice. If you get raggedy looking thread, complete a stitch and cut it off. Get new thread, back up 3-4 stitches and start the new thread, overlapping the ends of the previous thread. Practice is the key. Oh, and if you insist on absolutely the "best" awl, look to get one from Bob Douglas. -
What Is "pop-Stitching" And How Does It Work?
TwinOaks replied to Aurelie's topic in How Do I Do That?
Keep in mind that I'm not a saddle maker, I'm just interested in the 'pop-stitching', and offering some thoughts. -
Use right toe presser foot. Or the left toe presser foot. If you don't have either, contact one of the sewing machine distributors from this forum and they can get one to you. The l/r toe foot is basically half the presser foot, and allows you to run the center foot (where the needle is) right to the edge of something like a buckle. You'll still have to allow for the width of the center foot, but you should be able to get VERY CLOSE. Here's a (somewhat blurry) picture showing what I'm talking about. Forgive the picture quality, it's a 'rush job' from a old camera (whopping 3 mega pixel and no macro): The feet for YOUR sewing machine will be smaller than this one (Tippmann Boss), but this is just to show a 'one sided foot'.
-
What Is "pop-Stitching" And How Does It Work?
TwinOaks replied to Aurelie's topic in How Do I Do That?
It almost sounds like pressing the thread down into the holes with no penetration to the back side. I suppose if there was a little barb or some epoxy to hold it, it'd be about as strong as any stitch. I'm thinking the term is like "pop rivet" where the fastener is installed from only one side. -
Black dye is somewhat notorious for what we call "rub off". It is probably the worst of the dyes, and is caused by the solids not being absorbed fully into the leather. Before you dye the leather, you should clean it. There's no telling how many hands have been on it during the manufacturing and shipping process, or how many of them were dirty/sweaty/oily. Any of those three factors can cause inadequate absorption. To clean, wipe down with deglazer or alcohol and let fully dry. You're just cleaning the surface, so try not to soak it. After you've cleaned and dyed the piece, you need to buff off the non absorbed particles. You can use cloth rags or paper towels, and just keep going until you don't have any more color transfer. This may develop a light glaze on the leather caused by surface burnishing, but it shouldn't be noticeable under your finish. If you need to reapply the dye, for better color, repeat the process of applying and buffing until you're satisfied. Once you've removed all the unabsorbed particles, condition (oil) and seal/finish the piece. If you are interested in a permanent black leather, go to the search box and type in "vinegaroon". It's a home brew concoction (safe, but do it outside because of the smell and you don't want to drip any) that makes ferric acetate.....which reacts to the tannins in the leather to produce a deeeeeeeeeep rich black that ages wonderfully. It's permanent because it's a chemical reaction inside the leather. Once it's dry, it's black, and there is no rub-off. As far as a "homemade" deglazer......no. Deglazer is a chemical, with pretty high VOCs, and is not suitable for making at home. However, you can pick up gallons (if you like) of Acetone and Denatured Alcohol at a hardware store and use it the same way. Adequate ventilation strongly recommended.
-
Want To Make My Own Holster And Belt
TwinOaks replied to Kcinnick's topic in Gun Holsters, Rifle Slings and Knife Sheathes
Well, you don't HAVE to have a sewing machine, but after sewing one belt, you'll probably want one if you decide to continue leather work. You can spend a fortune on the tools before you ever make your first project. Start small and develop some skills before you drop a lot of money into this.........unless you just happen to have a lot of money to spend on a hobby. If that's the case, feel free to buy whatever we suggest!!!! If you're near Kenner, you could stop by the Tandy store on Airline Hwy. They won't have EVERYTHING, but they should have a good selection of basic tools that you can get started with. Books, an Osborne awl (smaller blade than the standard Craftool), over stitch wheel (marks where holes go), edger, groover, etc. When I first started, I used a fork (don't tell my wife) like a pricking iron to mark the stitches. A child's compass (school section at wallyworld) makes a suitable substitute for wing dividers until you get the real thing. Unless you're buying a machine from the get-go, you'll likely start with saddle stitching. I avoid the large eye "harness needles" from Tandy. I use the smallest pair of a pack from wallyworld's fabric dept. I also use waxed linen from the jewelry dept. at Hobby Lobby. As far as other sources go.....well, you ARE on the largest and best forum for leather working on the planet. Look through the "how do I do that" section, the "holster, sheath,...." forum, and the "purses, wallets, belts" forum. At the beginning of each, there are topics that are "pinned", and often include tutorials on how to do something. You also have us, the collective membership, as a source and we are for the most part a pretty helpful group. -
oops! I guess in trying to relate that I swapped the metals around. Thanks for the reminder. And I've heard nothing but good things about the cast iron models, but sadly, they aren't as available as they once were. So, I'm using an aluminum one, and I got to tell you......sewing through thick leather with it is certainly easier than using an awl and needles for hand stitching.