


Joon1911
-
Posts
127 -
Joined
-
Last visited
Content Type
Profiles
Forums
Events
Blogs
Gallery
Store
Everything posted by Joon1911
-

Tell me about your "Hot Box"
Joon1911 replied to Dwight's topic in Gun Holsters, Rifle Slings and Knife Sheathes
Been following this thread with interest. Now I've gotta build one. Didn't see the particular PWMs listed in your parts list. Do you have a link for the particular one you use? Also can you tell me what advantage adding the PWM in the mix does? Thanks. -
PM sent.
-
I haven't tried them out personally but Nigel Armitage did a review of these on his Youtube channel and he thought they were a great value and worked well
-
I use Barry King and Ron's Tools bevellers. Both make excellent tools and work well for different situations. I use the Barry King grooved edgers for most edging duties, anything with curvy edges. I also have a couple sharp curve edger that are used inside slots and punched holes. The Ron's edger is one of the Round Edge edgers and it gives me the best edge cut bar none along very straight and slightly curved edges, primarily because the Ron's edger has a really long base, it doesn't really like to go around tight turns to well. As for the issue with beveling around a tight radius, in my experience that is more an issue of technique as opposed to the tool. When I first started out, I used the Tandy bevellers and found they were sufficient to do the job just as well as the more expensive tools. Don't be afraid to modify the tools to your liking, especially if they are inexpensive like the basic Tandy ones. Definitely wet your edges prior to edging, it goes a long way. I used a small sponge to wet the edge as opposed to a spray bottle. I find I can control the application pretty well to limit the water to the edge being cut. I strop the same way as bikermutt... my strop has several different cuts from the various edgers and I use the stropping compound on those edges to strop the bottoms of the edgers. Hope this is helpful. Here's a couple pics of the edgers: Top one is the Ron's round edge edger, middle is Barry King grooved, and bottom is the BK sharp curve edger. Next pic shows the bottoms in the same order.
-
-
stiching problem with Cobra class 4
Joon1911 replied to collarobo's topic in Leather Sewing Machines
Collarobo, Is the top thread getting caught up at the beginning of the stitching or only at the end? If it's at the beginning, definitely call Steve and try to troubleshoot with them. If the top thread is getting hung up at the end of the stitch, where in the path of travel of the needle are you trying to remove the work piece? The take up lever on the side of the head needs to be just past top dead center and on its way down for the top thread to release from the hook. If you are getting a line of stitches and your top and bottom threads are knotting it suggests that it is more of a technique issue as opposed to timing. If you haven't watched Al Banes's YouTube videos for the C4 I'd highly recommend to start there. They are very helpful when starting out. Here's a few links: Hope this helps. Joon -
New guy trying new things
Joon1911 replied to Christopher's topic in Gun Holsters, Rifle Slings and Knife Sheathes
Greetings Christopher, Where to start... first off, welcome! If I can make a few suggestions from someone who was in your shoes not too long ago? I think that you would benefit from separating the two things you are trying to accomplish here. On the one hand you have a lot of technical and purely physical skills that you need to develop that will be critical further on. Let's drill in on this first, ok? I would suggest doing a google search and find some free or fairly inexpensive patterns that you can download and use to build those skill sets before tackling what appears to be a fairly complex prototype. JLS and Adams Leatherworks come to mind but I'm sure there are other options as well. Doing this will allow you to build your skill set without having to worry about the "design" aspects such as stitch line placement and aesthetic and functionality issues. Here's one quick link I found: http://www.jlsleather.com/tag/free-holster-pattern/ I think you really need to shelf that prototype until you have some more fundamental skills in your toolbox. Otherwise the lack of these skills will make it really difficult for you to recognize whether it's purely techne that is holding you back or if it's a design issue. As far as stitch placement goes, your formula sound right but in application it looks like your calculations are off. For a 1911 pattern which is fairly flat I'd guess that my stitch placement is about 3/8"- 1/2" all the way around the perimeter of the gun. You have to consider the varying thickness of things such as the trigger guard which will dictate where the stitch line will need to come closer to the outline. I stitch most things while flat. This does require a well developed pattern. Martyn's suggestion of wetmoulding then stitching could work as well but I haven't found this to be very reliable personally. There are a couple fundamental issues that should be resolved in your prototype. What is the reasoning for your stitch path on the thumb strap not being a complete path? This is a high stress area and sure to fail as it stands right now. The triangle of removed leather behind the trigger guard is also an area that significantly weakens the construction of your prototype. I would question what advantage it offers other than perhaps aesthetic? Spend some significant time building a few holsters and getting these right and then move on to your own ideas. I think you'll find this a better path in the long run. Good luck and have fun! -
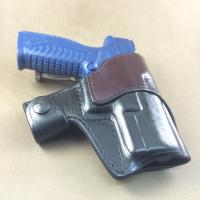
Another Blue Gun Question 1911
Joon1911 replied to Boriqua's topic in Gun Holsters, Rifle Slings and Knife Sheathes
The dust cover on the frame of the SA should be squarer. The actual gun is. I use the Duncan's molds for 1911s so I can't speak for the Ring's blue gun molds. Hopefully someone here can confirm for you. -
deleted duplicate post. Damned "smart" phone making me dumb.
-
Can't confirm the similarities/differences between the EMP vs. micro... But Duncan's currently has mold guns for the EMP.
-
Fundamentals Of Accurate Stitches...tips Needed
Joon1911 replied to Landcruzer94's topic in Leather Sewing Machines
That's the standard Cobra center presser foot. http://www.leathermachineco.com/product/center-toe-presser-foot/ I'd guess it would fit the 3200 which if I'm not mistaken is still based on the Juki 441. You could ask Cobra Steve who is on this forum. He would be able to confirm. As an alternative, why not just modify your existing foot? Pretty straight forward for someone moderately handy. -
Techsew 5100 Thread Tension Issues- Stiff Veg Retan
Joon1911 replied to TinkerTailor's topic in Leather Sewing Machines
Just reread the first post and now it makes more sense. Thanks. -
Techsew 5100 Thread Tension Issues- Stiff Veg Retan
Joon1911 replied to TinkerTailor's topic in Leather Sewing Machines
Why would you suggest going to a smaller needle not larger? Trying to logic it out, it would seem that you would want a larger hole to let the knot seat in the middle of the leather, but I demur to your greater knowledge. Just curious. -
Andy, Can you share with me what sort of stamps/ tooling are you using to get the background effect on the flap of the bag? Thanks. -Joon
-
I Would Love To Try Some Diamond Point Needles (Dyx3)
Joon1911 replied to deloid's topic in Leather Sewing Machines
Deloid, I emailed Diamond Needle which I believe is the main importer for Organ Needles in the U.S. Here's their response: Thanks for your inquiry. We only sizes of 794Di Diamond Point needles we stock are the following: #24/180, #25/200, #26/230, and #27/250 The price is $92.50 / hundred, FOB, Carlstadt, NJ (The needles are sold in lots of 100 pcs per size). Unfortunately we do not have enough demand to produce thinner sizes of the Diamond Point needles. We do have round point needles in thinner sizes. Kindest regards and thanks, Abe Silberstein DIAMOND NEEDLE CORP 60 Commerce Road Carlstadt NJ 07072 -
Id be interested in adding my name to the list. Beautiful work!
-
I Would Love To Try Some Diamond Point Needles (Dyx3)
Joon1911 replied to deloid's topic in Leather Sewing Machines
Deloid, My bad, brain isn't working the greatest. For some reason I was thinking you were looking for chisel point leather needles in your original post. I didn't catch that you were looking specifically for DI point needles. I always think of the LR and LL needles as being "diamond" point as the shape is vaguely diamond like... I have found that most dealers seam to send you a random point selection even when you try to specify. I haven't found any vendor who specifically carries the DI points. Good luck, let us know if you find anyone. -
I Would Love To Try Some Diamond Point Needles (Dyx3)
Joon1911 replied to deloid's topic in Leather Sewing Machines
If you meant to say DYX3 as opposed to DXY3, try Campbell-Randall. This is also known as 794H if I'm not mistaken. Here's a link http://www.campbell-randall.com/shop/index.php?route=product/category&path=49_82_109 -
Cobra Class 4 Servo Motor Adjustments
Joon1911 replied to Bluesman's topic in Leather Sewing Machines
My how feeble my memory is these days. Finally remembered to scan the page from the Cobra C4 manual with instructions for the servo motor. Hope this helps. servo motor.pdf -
Cobra Class 4 Servo Motor Adjustments
Joon1911 replied to Bluesman's topic in Leather Sewing Machines
Umm. Mine came with a manual in the box with sewing head. If yours didn't then call Steve and I'm sure he'll send you one. It has directions in the back. If I have a chance I'll scan the page withe those directions. -
Just talked to Jeff the other day. He is still making knives. He just moved and decided to let the website go. He said he is going to be selling thru Amazon shortly. He is going to be at the Sheridan show next week if you are going. Otherwise just give him a call at (971)202-3471
-
Welcome Suzanne. This site has been phenomenal for my personal learning about leatherwork. I'll leave the specific advice about suitable machines to the many experts here. What I would suggest you consider is not only the suitability of the machine but maybe more important than that is the issue of later service. Time after time you hear about how important the after sale service is to keep you running. If Nick-o-Sew is local to you, I would suggest that any machine you can buy thru them will likely result in the best service when your machine needs service later. That can easily even the score if the price difference is oy a couple hundred bucks. I say buy local, or you might not have someplace to buy local from down the road.
-
Out of curiosity, what does 80 hours a week as a professional equal out to as far as output? Meaning about how many holsters does that 80 hours translate to per week if you don't mind sharing. I've always been curious how many holster you can make doing this as a profession.
-
Spring Steel Holster Clip Scuffing Belt
Joon1911 replied to Tallbald's topic in Gun Holsters, Rifle Slings and Knife Sheathes
Bigpaws, Would you mind sharing your basic process for covering your clips? -
Closing Small Shop
Joon1911 replied to woolfe's topic in Gun Holsters, Rifle Slings and Knife Sheathes
Payment sent.