


terrypen
-
Posts
161 -
Joined
-
Last visited
Content Type
Profiles
Forums
Events
Blogs
Gallery
Store
Everything posted by terrypen
-
-
I know someone who tried to quick dry a coaster... dang that sucker got hot and hard in a hurry!... err or so I was told!
-
Thor, is that guest ranch yours? OMG LOL I want to live there! I got ..... about $10! That looks pretty nice! BTW... Nothing concerning computers is EVER Dummy Proof, not necessarily because of New and Improved Dummies! Microsoft in their infinite wisdom thinks that we need to have a 100 different ways to view the same thing, you just get to them differently... OK it's not all Microsoft but they started it. haha I keep telling my mom that no matter how you get to something on a computer there might be several other ways to get to the same thing, do whatever works.
-
Yes, OS = Operating System or Windows 7 as you said! On that first screenshot, ignore that little gear in the top right corner and actually left click on the photo and it will open a larger view and have that Direct link on the page. Then you should be able to paste the copied URL in the little box on your second screenshot. You are actually viewing someone else's photos and it appears to be a little different than when you are viewing your own photos. Terry P.S. lrb, your screenshots did it for me! It is always a good idea to post screenshots if you seem to be rehashing the same "help" and not seeing what people are telling you. You will get different "context menus" (that menu when you right-click or click on the gear) depending on what page or application page you are on... hopefully that makes sense! It made perfect sense in my mind!
-
Edit... Maybe you need to click on the picture you want to share first then you should see the Direct box.. end Edit... OK, maybe something to do with your OS and/or browser. What OS and browser are you using, maybe I can reproduce what you are seeing.. I'm using Windows 7 and Google Chrome and this is what I see. I hope this helps. Sorry for them being so big! also read the stuff next to the arrows in the images.. Then Then go back to your thread When you click on that image icon this should appear Then this one. At the end it should have posted your image in your thread like this... Terry
-
Go to photobucket and click on your image that you want to share. Click in the Direct box on the right side of image. Come back to the forum and select image icon. right click in empty box and select paste. That worked for me...
-
 I'm glad you got paid for it already! I am really new to this hobby but from a business viewpoint, I would not rework the bag unless there is no chance that it might cause premature failure. A couple years down the road he could start badmouthing you and your work if it starts falling apart.If he "insists" then have him sign a statement saying that you warned him of possible issues. Lean towards creating new "similar" bag with new features and let him sell or give it to a family member or friend. Just my newbie thoughts! Terry
 -
Helicopter clarification.. haha Chinook of some type The other one is an AH-1 Cobra helicopter Former Huey crewchief, Terry
-
I've been thinking about doing this exact thing without the extension as I want the work as close to me as I can. Maybe I should just break down and get new glasses! Karina, I think I would use PVC too, even WRLC might have if he didn't already have something laying around. I would really like the drawing for this also!
-
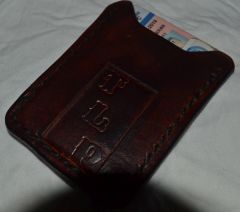
From the album: Card Holder - first project
Card holder front -
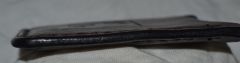
From the album: Card Holder - first project
Card holder edge -

From the album: Card Holder - first project
Card holder back -
bump?
-
OK, some new pics. Outer part of money clip with 1 1/2 to 2 oz liner Liner cut long to trim later Inner piece of money clip that will be sewn on to the inside of the outside piece. I'm thinking that the cards might get hung up on the inside portion of the magnet holder when you slide cards into the slot. Am I going to have to cover it with a liner? How else to do that? I have skived the inner half of the veg tanned, but I still think cards might hang up on it. I am still wanting to put a one piece in between the two outer pieces in a U shape or V shape made out of the 1.5 to 2 oz liner. This might end up getting too thick. What do you think?
-

From the album: Money Clip
The magnet portion of the money clip. magnets not in picture. -
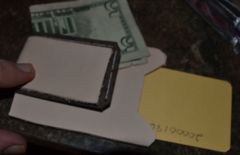
From the album: Money Clip
Outside of money clip. -
From the album: Money Clip
Inside of money clip. -
Money Clip magnet money clip inside with card
terrypen posted a gallery image in Gallery- Our Leatherwork
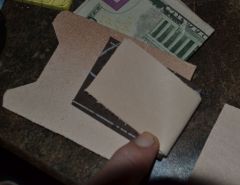
From the album: Money Clip
Card near internal money clip. -
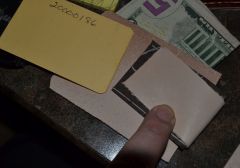
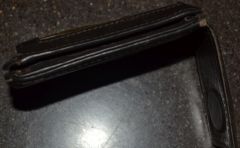
OK, I got my other stuff from SLC (sewing items, wing divider, 1-2oz lining leather, stitching awl, groover, overstitcher, etc) so I am ready to get this project started. Here are the pics of my current money clip/card holder (don't like the plastic see-thru cover) I am also including my first try at stitching, wonder if it will be too thick for my money clip.
-
From the album: Money Clip
It has 3 separate pockets plus the money clip. -
From the album: Money Clip
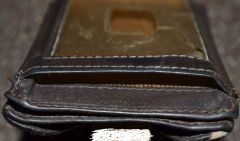
Face of money clip with plastic sewn in for ID. It is very brittle now, so I don't want this "feature." -

From the album: Money Clip
The magnet style money clip. -
From the album: First
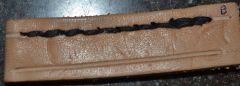
This is my first time stitching. Back side. -
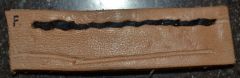
From the album: First
This is my first time stitching. Front side. -
Blue Guns For Sale
terrypen replied to Haystacker's topic in Gun Holsters, Rifle Slings and Knife Sheathes
Dang! email sent... then read the last message...