TroyS
-
Posts
599 -
Joined
-
Last visited
Content Type
Profiles
Forums
Events
Blogs
Gallery
Store
Everything posted by TroyS
-
Personally, I'm not into dragons, but I have to give credit where it's due! The Seats are great looking. The techniques are wonderfully executed and the braiding is great!
-
Thanks! I'm like you, the thought of screwing it up made me very nervous. But I just took my time, didn't rush it.... Thanks for the nice comment! The leather is 5/6 oz and you're correct, the tool is Craft Tool E294-003
-
Looks awesome!
-
Joker, That's awesome! I need to make myself one of those! Now I just need the pistons! Your customer must be riding around smilin' like a cheshire cat! I know I would be!
-
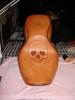
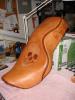
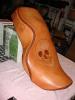
Thanks Billy! It took me longer than I expected. It was my first Road King seat... Thanks Bobby! I had to soak, stretch, mold, & dry several times to get the curves to lay right. It wasn't easy! The multiple opposing contours really made it a P.I.T.A. (Pain In The $#@) to get right, but it worked out after several sessions. I sealed it with Tan-Kote to protect it from the weather... The weight was about 5/6 oz and the skulls were fun to do! If I can help you with your project, just let me know....
-
WOOT WOOT!!! CONGRATULATIONS!
-
Hell yeah! That's cool!!
-
I like it! Very cool project!
-
I like skulls, but they are a bit tedious when you want REAL looking results. But, the end results are pretty rewarding! Thanks for the kudos Dave!
-
Thank ya Sir!
-
Thanks everyone! I appreciate all of the kind words! The braid is simply an APPLIQUE braid. The hardest part of the project was getting the leather to conform around all of the curves of the seat. I'll post more pics of it on the bike once the customer gets it. He's in New York...
-
Try using a stiching groover. They help keep your stitches straight and also recess them for a tighter stitch. I'd also finish stitching the back of the sheath. It looks like you have the holes, but no thread. That will add the finishing touch and also keep the leather from stretching out of shape. Other than that, it's a very cool sheath. I really like the way it comes up high to on lt expose a small portion of the handle! Very cool!
-
Sorry I haven't been as active lately. We've been moving and getting settled in to our new place. But, that's a topic for a whole other conversation. Here's my latest project... Whatcha think?? More pics....
-
The Rubber mallet is your biggest problem. Every time you strike the hefty handle, the mallet absorbs a portion of your energy or force from the swing. Not to mention the bounce of your tool from the impact. With nothing solid to keep it from moving, both tools move. Hitting the hefty handle with a steel headed mallet will cause the Hefty Handle to fail. Tandy is know for NOT putting much quality in their tools. A few strikes will cause your hefty handle to mushroom out. You can try a "DEAD-BLOW" mallet. They are filled with beads of lead to give you the weight for a good striking force, but they don't bounce on impact. The real secret is a firm grip on your stamp. You can hit your Hefty Handle several times for a better impression AS LONG AS your stamp doesn't move between strikes. Try striking the tool, make sure tool is seated in original impression, then strike again. Repeat as necessary....
-
I've done a project like this and in my opinion, the way to achieve what you're wanting to do is: 1. Dye the leather the color you want the logo part to be... Let dry completely! 2. After your leather is dry, DAMPEN and press design into coaster with plastic die... let dry for about 2 hours to get nice impression... Your leather should be cool to the touch but not dry. This is explained in step 4... 3. Once you remove the die, you'll have a solid colored coaster with your nice clean logo impression in the color you want. 4. Now, with the project cool to the touch but not dry, you'll need to put something fairly heavy on it to make it layout flat. This is VERY important for the next step to work... 5. Now, take a foam roller from your local hardware store. You want the kind with NO TEXTURE! If it has texture, the wool will push down into your impressions and you'll ruin your project. Lowe's has one in their paint department for about $6 - $8 bucks. 6. Roll your roller into your complimenting dye, and roll off any extra onto a a blotter of some sort (newspaper, paper towels, etc.) then simply roll the roller over the face of your project and the dye will coat the raised parts while the depressed areas remain the other color. 7. Let dry then seal with your favorite sealer! I like Satin Sheen because you see the design before the shine... Here's a sample of what I'm talking about. The Red & White areas are done using this technique, the the Black area was sewn on.

-
Congrats Dave! Well deserved!
-
Hell, there ain't nuthin' wrong with that! I like it! And just think, you're ready for next year's show...
-
Sweet Seat! I love it!
-
Knife Scabbard Restoration
TroyS replied to desib's topic in Gun Holsters, Rifle Slings and Knife Sheathes
You impressed me too! Very nice! -
After you dyed it, did you seal it with something? Satin Sheen? Resolene? Aussie Wax?? It looks to me like you used water based dye. No matter how hard you try, water based dyes will ALWAYS FADE!
-
Click HERE for more information about the Vinegroon Technique....
-
Welcome Back Leatherworker.net! It's good to see you my old friend! Thanks ladies for all your hard work!
-
-
I think it looks great Billio! I love Black & Tan!
-
Colors are a personal choice of yourself or your customer. However, I agree with Rick, stay away from all thing ECO-FLO when dealing with motorcycle seats/saddles! ECO-FLO colors are water based and they WILL rub off on your clothes no matter how hard you try to stop it! I prefer Fiebing's alcohol/spirit dyes also. They don't wear off, don't stain your clothes, doesn't get lighter over time and gives a nice even coverage when applying. If you plan on making your project BLACK, there is always the "Vinegroon" technique.