particle
-
Posts
1,352 -
Joined
Content Type
Profiles
Forums
Events
Blogs
Gallery
Everything posted by particle
-
Kevin King posted a distressed wrist cuff here a while back. I wasn't able to get much information out of him for how he did it, but check it out. His end product looks fantastic, but the leather looks severely weakened, so you'd probably want to make sure it was lined with a sufficient strength liner to do the heavy lifting of the guitar, or put one of the heavy-duty fabrics that doesn't stretch between the front/back pieces of leather - I forget what that particular fabric is called. http://www.kevinkingleather.com/#!__distressed
-
Looks great dickf! I like your CT cutout. And that's a great idea about the super glue on the knot and pulling it into the leather. I tried the same thing, but didn't pull the knot into the stitch hole. I might have to give your method a try.
-
Very nice!
-
 Over the last couple weeks, I've been working on my second bag. My first one came out better than I'd ever hoped. Unfortunately, I think that gave me too much confidence when I dove into my second bag... It has 7 pockets, a 2-pen pocket and a flashlight pocket (enough pockets to carry my current daily gear). Unfortunately, I got the assembly order wrong and wasn't able to incorporate a couple features I was hoping to include since I can't sew them on now (the pockets are in the way). Anyway, with this second bag my goal was to sew it entirely on my Tippmann Boss. I think I'm almost there, though I think I need a different presser foot (just have the one that came with it). I'm looking for inspiration - have you sewn a bag (satchel, messenger, purse, etc.) entirely with a machine? If so, let's see some pics! Also, please include what machine you used when sewing it.
 -
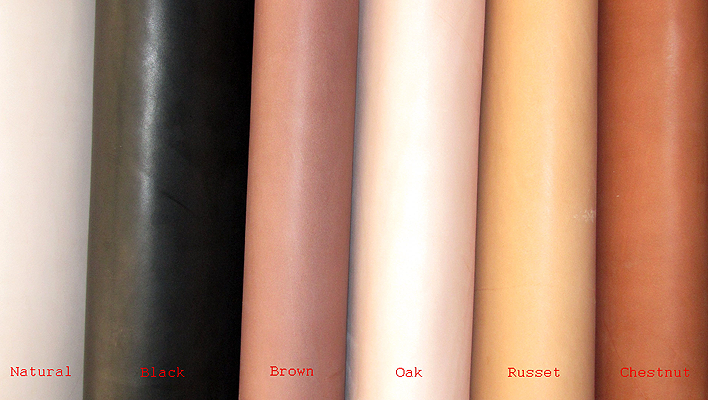
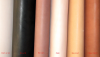
I ended up buying 277 thread from Weaver. I ordered Henna to try instead of brown - haven't gotten to use it yet, but the color looks nice. The Brown I have (from Tippmann) is so dark, it might as well be Black!! For Natural (that I bought from Tippmann), I ended up ordering Sand (Tan isn't available in 277 from Weaver). I think it's a little darker than the Natural I was using from Tippmann, but I actually like the Sand better. The Natural was so light, I couldn't really tell a difference between it and White once it was stitched on a holster and the holster had been oiled. One of these days I'd like to order Orange, but of course it's not offered in 277!! So, the next best thing is Red.
-
Gun Fits Loose In Holster
particle replied to hotwing's topic in Gun Holsters, Rifle Slings and Knife Sheathes
Just a thought, but if your initial goal was to use it as a reference to build your first holster, why not cut the stitching out so you can open it up and lay it flat. Then, trace the pattern onto card stock. You could inset the stitch line a little if you wanted to, but for your first holster, I wouldn't recommend it. Since you've opened up your Bianchi, you could stitch in a sight channel with thin leather which would put additional friction on the top of the slide. Then, hand sew it closed and add it to your holster collection. -
Sig P238 Bb&wb New Design
particle replied to Denster's topic in Gun Holsters, Rifle Slings and Knife Sheathes
Hey, looks great to me! I might have to try one of those myself for my personal Sig P238. Out of curiosity, how well does it carry left-hand OWB with just that single belt tunnel? You made the tunnel wide enough, I'd think it'd offer pretty good stability, though it might not pull the grip inward enough... Nice work as always. -
Denster - Can I ask what kind of pricing you've been seeing on them? I don't get out to many gun shows - Buds has it listed at $590.
-
I agree with the others that said it's just a natural piece of Veg Tan leather. Note that you'll get slightly different results, depending on the brand of leather you're using. This is Herman Oak with neetsfoot oil and clear finish. This is Wickett & Craig with neetsoot and a clear finish. Herman Oak has a warmer tint straight from the tannery, so it will get you that color you're after. Wickett & Craig will need additional work to get that color, like the sun tan, etc. Also, Wickett & Craig sells a pre-dyed "Russet" skirting leather. It looks very close to what you're after IMHO.
-
With most of my coloring, I apply my dyes with an airbrush, to include the base color and airbrushed accents around the edges. I've been happy with the smooth appearance of the coloring, but worry the penetration may not be enough. I recently cut and dyed multiple pieces for a messenger / laptop bag. I didn't want to airbrush it, but have very little experience with any other method. So, I used a piece of the yellow shearling cut in about a 2" square, dipped it in the dye and applied it by hand. BIG mistake... The coloring is extremely inconsistent and way too heavy in places. To salvage it, I dyed it again so everything is the same darkness. Not the color of final look I was after... This all got me to thinking about the Eco-Flo Professional Waterstains. I just watched the video on Tandy's website again showing its use, and it looks super easy to apply. Plus, I like the fact that it's safer to use than the Fiebing's Pro Oil dyes I've been spraying in my garage (I do wear a respirator). I may buy a bottle of the stuff to try, but wanted to confirm something first... I need to maintain the ability to airbrush accent colors around the edges of my holsters. Can I still airbrush the Fiebing's Pro Oil dyes over this Eco-Flo stain? Since the Eco-Flo product is a "blend of natural and synthetic waxes", I'm not sure how well the airbrushed Pro Oil dyes will take to the leather once the Eco-Flo Waterstain is applied.
-
Like the title says - anyone out there building holsters for the Sig P290 yet? I have a customer requesting one and is willing to wait for me to find a dummy if/when they become available. If so, did you buy the real thing?
-
Carved Ipad Cover
particle replied to boma's topic in Purses, Wallets, Belts and Miscellaneous Pocket Items
Your work never fails to inspire - very nice!! What king of metal is in your tooling weight? That's a neat idea! -
First Avenger Style
particle replied to redhat4201's topic in Gun Holsters, Rifle Slings and Knife Sheathes
Great job! -
A Couple Of Owb's For The Walther Pps
particle replied to Sixer's topic in Gun Holsters, Rifle Slings and Knife Sheathes
Where did you get that thread, and what color is it? I bought some Henna from Weaver a couple weeks ago, but haven't had a chance to use it yet. Wanted something a little more red/rusty, but this is all I can find in 277 to run through my Boss. How hard is it to cut that thin strip around the edge? I've been thinking of ways to line a leather bag with fabric, and cutting a narrow trim piece like you've done is one thing I've been thinking of doing. -
A Couple Of New Holsters Kimber Solo
particle replied to Denster's topic in Gun Holsters, Rifle Slings and Knife Sheathes
Or perhaps curve it back along the bottom of the belt slot towards the edge of the holster - that might still leave enough room for your stamp...? Denster - what ammo were you running through it? Standard pressure? Or +P defensive rounds? -
I Goofed, Finger Nail Prints In My Holster
particle replied to Abram's topic in Gun Holsters, Rifle Slings and Knife Sheathes
Definitely don't take sandpaper to it... Like Denster said - rub a damp sponge over the leather and liberally dampen the grain (don't get it soaking wet, but use more than just a little). Then, immediately rub over the area with a smooth tool, like your bone folder. If you wait too long, or if you don't use enough water, you're likely to burnish the surface, causing it to slightly darken in the areas you're rubbing. Also, if you haven't actually formed your holster yet (so it's still relatively flat), you can hammer along the seam with a smooth faced hammer to help flatten it out. I usually do this on the back of my holsters to close up the stitches and flatten out the puckering I get with machine sewing. -
I'm not exactly certain what you're talking about, but if you're talking about smoothing the flesh side (back side) of the leather similar to my attached photo below, you can try sanding the back with an orbital sander. If you don't have an orbital sander, you can achieve the same thing manually, but it takes a whole lot of sanding... The final result depends on the tightness of the flesh fibers too. The tighter, the better - otherwise, it'll just look really furry...
-
A Couple Of New Holsters Kimber Solo
particle replied to Denster's topic in Gun Holsters, Rifle Slings and Knife Sheathes
Looks great! Very clean looking. I'm not familiar with the SOLO models, but is that an ambi-mag release? Do you think there would be any reason not to slightly modify the cut line to barely clear the mag release (on the front and back)? -
Thanks Bruce - I'll pull the blade and sharpen it again and adjust it as you've mentioned. Thanks for the help!
-
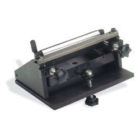
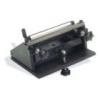
Hello all. A while back, a forum member was kind enough to offer me a great price on a bench-mounted skiver. It works pretty well, but I feel like it could work a whole lot better if I knew how the heck to properly adjust it. One of the things that frustrates me the most is when I'm thinning down a belt blank, I'll get about half way through the blank and the skiver will slice the wrong direction and cut through to the grain side. Is this because the roller drum is too far forward in relation to the cutting edge of the blade? What about if the hide slides to the right or left - does that mean the roller drum is slightly angled forward on one end or the other? If anyone has any tips or an instruction manual, I'd greatly appreciate it. I don't have any photos with me, and don't know what brand it is. But I think it was one of the inexpensive Tandy models that was sold a while back (without the wooden handle). It looks very much like the attached model.
-
If you're only going to have one source for your backup, I'd suggest putting a delay in your backup schedule - like 7 days. If you get a virus on your system that destroys your computer, but don't notice it immediately, it's possible the virus could get backed up to your backup drive too, possibly destroying both sets of data. If you use a 7 day delay, at least you're only missing about 1 week's worth of work/data. Ideally you want 2 backup sources (or even more). Your primary data is stored on your hard drive (HD#1). Then, your HD#1 gets backed up to Backup #1 nightly. 7 days later, bring Backup #2 home (store it off-site, or in your car) and swap it with Backup #1. You should strive to keep one copy offsite in case your house gets robbed or burned down in a fire, etc. This method should also help protect you from a virus, provided your antivirus software catches it before you swap drives. I you wannna go nuts, get two hard drives so HD#1 is instantly backed up to HD#2 - that way you're protected if your hard drive in your computer crashes. Depending on how much data you have, this could be accomplished with nothing more than a pair of USB drives, like the Western Digital Passport - I've used them for years, and never had a problem with them. You can get each one for well under $100. Easy to transport, and you don't need a bulky power cord to tote around to power it. http://www.bestbuy.com/site/External-Hard-Drives/Portable-External-Hard+Drives/pcmcat186100050006.c?id=pcmcat186100050006 This is a great page that goes into a lot more detail if you're interested in learning more. There are probably other/better sources for more detailed information, but this guy pretty much sums it up. http://blog.chasejarvis.com/blog/2010/06/workflow-and-backup-for-photo-video/
-
Wood Burnishers
particle replied to triage1998's topic in Gun Holsters, Rifle Slings and Knife Sheathes
In a pinch, you can simply use the largest dowel your drill press can hold. Turn it on, then cut your own grooves with a round wood rasp. Angle the rasp up/down to create various sizes of grooves. If you want to do even better, drill a hole in the bottom of the dowel and epoxy a threaded rod (long screw) into the dowel. I've done about 250 orders with this method, simply using the wooden handle from a sponge-brush I bought from Lowes - it still has a lot of life left in it. I'll probably make my next one out of an oak dowel, instead of the soft wood that brush handle was made from. Here's one from Tandy, but you'll have to mount your own shank for the drill press. http://www.tandyleatherfactory.com/en-usd/home/department/Tools/8121-00.aspx Here is one from Weaver, though I personally question the strength of the short shaft and its ability to resist breaking under pressure when mounted in a drill press. http://www.leathersupply.com/downloads/catalog/LeatherworkingTools/Edgers.pdf -
Holster Stitch Lines
particle replied to malabar's topic in Gun Holsters, Rifle Slings and Knife Sheathes
I've found it easiest to divide the thickness of the gun in half, then add the thickness of your hide (usually about 1/8"). That will be the offset of your stitch line when you initially create your pattern. Then, using a scrap piece of leather, I build a mock-up of the holster to test the fit. Usually the stitch line will need a little adjustment around the trigger guard area. Since you now have a mock-up, it's easy to visually adjust the stitch line on your pattern by looking at what could have been adjusted on the mock-up - "tighter here, looser there", etc. If your pattern is slipping, try inserting two thumb tacks in places that will later be removed, such as the two belt slots on a Pancake, or the front/back faces of the belt slot on an Avenger (when it's laid out flat). -
Lining For First Holster
particle replied to glockanator's topic in Gun Holsters, Rifle Slings and Knife Sheathes
I agree - if you've never made a holster before, stick to the basics to make sure your pattern works. No sense wasting leather if your stitch line's off. However, if you're going for a loose-fit Western style holster, and you're using someone else's pattern for a specific gun, you can probably feel pretty comfortable with the pattern and go ahead and tackle lining it since the workflow is pretty much spelled out in Stohlman's holster book. -
Hot Off The Bench
particle replied to Treed's topic in Gun Holsters, Rifle Slings and Knife Sheathes
Very nice!