


Dwight
-
Posts
5,261 -
Joined
-
Last visited
Content Type
Profiles
Forums
Events
Blogs
Gallery
Store
Everything posted by Dwight
-
I've never tried it with leather, . . . but I've had some wonderful success with the iron on transfers one uses for tee shirts, sweat shirts, etc. Call Mcg Paper LLC, . . . 215-679-8163 or check their website www.mcgpaper.com . Ask for Mark Labate, he helped me out with my last couple of orders. Before I sent in my last big order, I asked him for some "samples" and he sent them to me for the price of the shipping, I think it was like $7.00 May God bless, Dwight
-
FYI, . . . Tippmann has a $300 off sale going on right now (I think ??? ) Unless someone just doesn't want the hassle, . . . they usually sell on Ebay for almost $1000, . . . sometimes more. As close as you are, it might be worth your while to drive over and get one, . . . ask for Ben, . . . he'll help you get started. I looked on Google, . . . seems to be just about 320 miles one way for you. If I have a problem I cannot solve, . . . I load my machine up, . . . grab a cup of coffee, . . . and while I am just under half the distance you are, . . . it is still well, well worth my time for the information and help I get. The really are a stand up company, and Ben is one really good guy. May God bless, Dwight
-
That's beautiful work. And a beatutful knife. May God bless, Dwight
-
 I had a young lady all of 4'1" tall tell me that she wanted her spur straps pink, . . . she didn't care what color they came out as just so long as it was pink. I used some Eco Flo Dusty Rose Pink, . . . and I watered it down just a bit, . . . wish I had taken pictures of them, . . . they were absolutely beautiful, even if I did do them. She was super pleased. Play with it, . . . do some practice pieces, . . . don't forget to put your finish on it too, . . . it'll work out. May God bless, Dwight PS: I didn't turn in my man card, . . . heck, . . . I even got a hug out of that deal.
 -
The kids use a word to describe things they really like, . . . "awesome", . . . and it certainly is that. My makers mark is three crosses on a hill, . . . so you got my attention right away And as a pastor also, . . . I can see someone in many years to come, . . . lovingly looking at a piece of his physical history, . . . and his spiritual history, . . . and counting himself blessed. Now, . . . you've also given me a gift idea for a son and daughter in law, . . . thank you. May God bless, Dwight
-
Just a little anecdote, . . . you will also have to be wary of some Springfield Armory items. I owned one once that would not fit any other 1911 holster I had except a paddle I bought from Galco, . . . I don't know exactly the model other than it was a stainless, beavertail, single/left side safety, white dot sights. I should have measured the slide on that rascal, for I am sure that is where the extra steel was, . . . but it was really a hog in size. I also had a cheap little plastic holster, . . . it fit ANY other 1911 I ever tried in it, . . . the Springfield would not go into it at all. I would have busted the holster if I had forced it in it. Other than that, . . . I have never had any other problems fitting them. May God bless, Dwight
-
Flat Back Pancake
Dwight replied to chiefjason's topic in Gun Holsters, Rifle Slings and Knife Sheathes
When I make a pancake, . . . they are almost always flat backed, . . . I personally find the others uncomfortable on my bony frame. I use a vacuum forming technique, . . . the back piece of leather is dry, . . . I wet the front. The holster has the back completely cut out and formed other than the slots. The front is intentionally left a little long and wide, The leading edge of the holster having the front sight, etc. is all sewn, edged, beveled, etc. at this point. Again, . . . I only wet that front piece, . . . lay the weapon in it's place, . . . put it in my vacuum machine, . . . and watch the magic. Once it is vacuum formed, . . . I gently pull out the molding firearm, . . . and hang the leather up to dry. When dry, . . . put the two pieces together with the weapon inside, . . . mark, cut, glue, edge, bevel, sew and finish. I could probably save some time by developing an exact pattern for each weapon I do, . . . but honestly, . . . so few of them are the exact same weapon, . . . it is easier for me to do my process. May God bless, Dwight -
Might I suggest that you use your sewing machine to make the holes, . . . and then add the thread by hand sewing? I have to do this occasionally, . . . and it really does not take all that long when you get the hang of it. I use an old sail needle (that's what we called them on my Navy ship) which is a wooden handle, a small bobbin spool, and the needle all in one package. Tandy leather stores sell them. As large as that quiver is, . . . I would use the sail needle inside, . . . and loop my thread outside to make the stitch. I would think something in the neighborhood of a half hour for that one long stitch in the picture you show above. Another choice would be to simply contact cement it to a very thin piece of plastic tubing, . . . which in all honesty, . . . is very much most likely my choice. I know a fellow that does fly rod cases, . . . and I believe that is his process. May God bless, Dwight
-
Hello From Afghanistan (Oregon National Guard Soldier)
Dwight replied to Robert Justice's topic in Member Gallery
As said above, . . . thank you for your service, . . . good looking work, . . . far better than I did early on in my leather "career". Welcome to the forum, . . . and again, echoing what has been already said, . . . this is one fun place, . . . lots to learn, . . . lots to do. Give me a holler if there is anything we can do to help. May God bless, Dwight -
My first purchased holster was a Galco paddle, . . . I traded it off not too awful long later. Personally, . . . I really did like the holster itself, . . . and I liked the idea, . . . but they're in the family of Edsel, Desoto, Imperial, and Oldsmobile. All of them I have ever had on, . . . or used, . . . hung out in space, . . . had a tendency to flop up and down at least somewhat, . . . and either took a winter coat or an Indian blanket to cover it up for CCW. I still have one, . . . but I far prefer a pancake to a paddle, . . . but that's just one opinion. The other thing I really don't like about it, . . . if someone determines you are carrying, wearing a paddle, . . . they are just one "grab and snatch" from having your weapon and a 10 foot head start on you in the foot race of your life for your weapon. There's a youtube out there showing that very scenario. May God bless, Dwight
-
If that is the first one you ever made, . . . well, . . . "Good Job" should be said. Not meaning to sound too awful critical though, . . . if you have an extra bit of leather laying around, . . . try one more. If you do, . . . make two changed: 1) tape a 3/16" dowel rod to the top of your revolver during the molding process, . . . it makes a sight channel so your front sight doesen't dig up the inside of your hoslter, . . . and 2) starting at the back side of your trigger guard, . . . take the line of the front of the holster up to the center of the hammer. When you have the holster all molded, . . . draw the gun out, . . . take your thumb, . . . and roll ever so slightly the outside edge of the holster outward. Don't make it look like a funnel, . . . just a very slight outward turn of the whole top rim, . . . you will be amazed at the rigidity and strength it will add to the front of your holster. But it for sure is a good job, . . . I don't show folks my first one, . . . even though I still have it, . . . May God bless, Dwight
-
Stef, . . . I used to work in a refinish paint factory, . . . and what you are asking is what we used to call "tinting", . . . changing the color. First, . . . go slow, . . . anything you do will have FAR reaching effects on whatever your finished product is. Secondly, . . . I use Feibings saddle tan, oil dye, . . . and have found that the finishing process usually tones down the "orange" you are talking about. Fact is, I have a gun belt, holster, and mag carrier awaiting finishing even right now. Third, . . . one of the real problems in "tinting" dye, . . . is being consistent. If you happen to hit on a beautiful shade today, . . . will you be able to duplicate it some day in the future. The probable answer is "NO", . . . unless you are fastidious about your amounts and documentation. You may be better off to put it aside and go buy another color of dye. At least then you will be able to duplicate it some day in the future. Last, . . . leather is a funny medium in which to work. Most of what I said above can be thrown out the window by a certain piece of leather. I have made different items out of the exact same hide, . . . dyed them in the same pan, . . . dried them on the same drying line, . . . and they come out a shade or two darker or lighter, . . . just depending on how the old cow wanted to take the dye that day. But, . . . welcome, . . . experiment, . . . have fun. Leatherworking has it's ups and downs, . . . but it is still a fun experience. May God bless, Dwight
-
Converting A Lockstich Machine To An Awl Punching Machine
Dwight replied to raWorkshope's topic in Leather Sewing Machines
Personally, I would opt to take a half dozen of your old needles, . . . take them to a local machine shop, . . . and have them sanded or ground down to similar specs as the awl you want to use. You then should only have to remove the bobbin, . . . and you would be in the money. I often have to punch holes with my Tippmann Boss and hand stitch the area because my throat clearance is very limited. It works well for that. The Boss is of course hand operated, also, which makes it really nice when I want to space those stitches a certain way. May God bless, Dwight -
How To Put A 45 Degree Bevel On A Circular Piece?
Dwight replied to thekid77's topic in How Do I Do That?
I don't trust myself and my abilities on something that technical. I try to devise some kind of a helper. If I was even doing only one of these, . . . but knew it was for a special purpose, . . . I'd make a sanding jig like in the drawing. It will make the bevel completely the same all the way around. The key to it, though, is the round disk you must make and put on the dowel rod. Put the plate on the rod, . . . clamp the jig up close to the sanding disc so you sand the edge of the disc at a 90 degree angle, . . . use the sander to make your disc perfectly round, and as near the diameter of the leather as you can get it. Then rubber cement your leather to the sanding disc, . . . turn the jig so it is at a 45 degree angle, . . . clamp it firmly but not rigid in the lower left corner, . . . turn on your sander, . . . swivel the disc over to touching the sandpaper, . . . rotate your disc, . . . voioa, . . . perfectly sanded bottom. May God bless, Dwight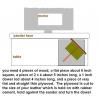
-
For a "no bigger than that" project, . . . I'd just paint the letters. I would find a better way if I were making 10 of them a day, . . . but for one, . . . painting is the only way for me. May God bless, Dwight
-
For knife sheaths and other small projects, . . . an easy way is to first cut your pattern about 1/8 inch too big. Glue the edges together, . . . then very carefully cut off the excess, . . . it results in a beautiful edge. The other way, . . . and the most done, . . . is to sand it like the bluesman mentioned. I use both a 12 inch round flat plate sander, . . . and a 1 inch wide belt sander. The belt sander is about $50 at Harbor Freight, . . . and is totally well worth the money. You will use it for so many more things than just sheath edges, . . . and it WILL do you a great job there. Just one word of caution, . . . play with it with some scraps before you put a project on it. Sanders are aggressive on leather. Second word, . . . one contributor on here, Lobo, always wets his edges before he sands them. It keeps the dust down, and that IS a good idea. May God bless, Dwight
-
I don't have the reference, . . . but there was a piece about leather armor being used by the Romans, and I think the emphasis was more on a "dress armor" that would provide a level of protection well above none at all, . . . it was very well decorated, . . . kinda like the old "Sunday go to meetin' suit" idea. Supposedly the person who would wear it was the model, . . . they would put on a long sleeve, tight fitting shirt type garment, . . . then the leather would be litterally boiled in wax, . . . pulled out, . . . and form fitted to the person, . . . as they lay on a table. Once it cooled, . . . it would be trimmed, decorated, and worn. Again, . . . hearsay, . . . but it makes sense to me. I tested a piece once, . . . some 14/15 oz veg tan, . . . immersed in liquid parrafin, . . . I didn't have a knife I could have stuck through it if it were armor on someone I wanted to hurt. I also have a set I made for a Centurion costume, . . . it's about 10oz, . . . only hot water hardened, . . . but it is very rigid. May God bless, Dwight
-
I use the common, garden variety of steel staples, used in the construction trade. I put three in each keeper, . . . from the outside, . . . and using a pair of needlenosed pliers, . . . turn them down into the leather. I've never had a problem, . . . and once they are encapsulated within the leather finish, . . . they won't rust, . . . and I can do a keeper with staples in less time than I can find a needle and get it threaded. Also, . . . it is one of those things that I do when I find myself out of other "things to do". Make keepers for belts, . . . make suicide straps for holsters, . . . make belt straps for holsters, . . . etc. Doing those things keeps me from the television and re-runs of Gunsmoke, The Rifleman, and Bonanza, . . . not that they are bad, . . . but I don't want to watch all the re-runs at one time. May God bless, Dwight belt keeper.bmp
-
Most of my work is sewn by a Tippmann Boss, . . . or I would probably be doing concrete work, or roofing, . . . That said, . . . every now and then, . . . a project comes up that "needs" to be hand sewn. I have two options: 1) take the thread out of the Boss, . . . make the holes, . . . and stitch the rascal, . . . OR, . . . like Mike said above, . . . use a drill press. When I use a press (in the states we get Chinese cheapies for $50 or so), . . . it is never even plugged in. I mount my regular sewing needle in the chuck, . . . punch the hole. I also make sure my needle is oriented correctly at all times. If I can see the eye, . . . it's wrong, . . . and I re-orient it so I cannot. The drill press is not as fast as the Boss, . . . but it is really good for small stuff, . . . and you can have as much control over where everything is done as you could possibly want. You can creatively also use the drill press as a sewing machine if you punch through, . . . pull up a little bit to produce a loop in the thread under the leather, . . . use a second needle, . . . throw it through the loop (thread attached of course), . . . and pull it all tight. May God bless, Dwight
-
I guess I just did not take the question as subtle verses obtuse, . . . but rather to mark or not to mark, visibly. My mark is three crosses on a hill, . . . it speaks volumes about me, about my life, about how I try to do my work, and hopefully, . . . my name with it, allows folks to associate me with the crosses and the work with me. The only time I don't mark a piece is when I am asked not to (very rare) or if I forget, . . . which is all too often. I think it has something to do with being 68 or so. Anyway, . . . that is my line of reasoning, . . . FWIW, . . . and I don't mean to begrudge anyone else their line, . . . after all, . . . it is their product. May God less, Dwight
-
I have two sets of jeans, . . . good and patched. Patched are leather working jeans, . . . flannel shirts are in the same categories. Insulated bibs are absolutely necessary, sometimes I have to do some leatherwork in the cold, . . . and they ARE great. Piece of advice: don't get full body coveralls, . . . get bibs. They allow you to dress lighter on your upper body, . . . or heavier than the bibs, . . . which in my case I have to do for my feet and legs. Sometimes I'm in bibs keeping the lower body warm, . . . and a long sleeved tee on the upper half, . . . even sometimes the sleevs pulled up. Bibs offer better versatility, . . . and one of the best pairs I have, . . . they are ski bibs, . . . $10 at a yard sale, . . . keep this old coot toasty. May God bless, Dwight
-
Ford puts their logo dead center of the front of the grill, . . . so does GM, Chrysler, and Desoto used to. As a product maker, I see no reason to do anything less. If a customer asks me not to, . . . that is one thing, . . . but I am proud of my work, . . . and I believe I have earned the right to "mark" my products. Someone who has a problem with that, . . . wants a bland product, . . . they can tell me or shop elsewhere, . . . either way is not a real problem to me, . . . but to be critical of my personal work because I signed my work with my mark, . . . I would take that as an insult, . . . and would very likely keep the product and send them to someone else. May God bless, Dwight
-
There is also a basic pattern in Stohlman's "How to make holsters" book, . . . page 31. You make that shoulder rig part, . . . add a clamshell or straight draw holster to it, . . . voila, . . . shoulder rig. I made one from the pattern, . . . not particularly my cup of tea, . . . but it did work well. For a Beretta 92, . . . I think it would work well. Mine was for a 1911, . . . I used a clamshell, . . . brought a snap around in front on two tabs, . . . pulling the weapon from the holster would break the snap. May God bless, Dwight
-
Stitch Groover--Is It Always Necessary To Use?
Dwight replied to thekid77's topic in How Do I Do That?
Besides esthetics, . . . stitch grooving serves two other purposes: 1) it protects you from the stitches where your skin could rub against the raised stitches and chafe your skin, . . . and 2) it protects the stitches against undue wear from you. Long and short, . . . grooving is sort of like a muffler on a car, . . . don't really need it, it'll work without it, . . . but it is so much better with it. May God bless, Dwight -
First Double Ring Belt
Dwight replied to PAMuzzle's topic in Purses, Wallets, Belts and Miscellaneous Pocket Items
From what I could see, . . . ya done good ! I don't use gum trag because I got sloppy with it once, . . . ruined a project, . . . what it does is it permanently and totally seals the leather. Dye WILL NOT penetrate where the gum trag is. I use a 50/50 mix of resolene, . . . put on with a cheap pig hair brush, . . . love the final product. Most all of my belts are double layer for CCW. If you do a meticulous job of burnishing the edges before you dye, . . . then touch it up after you dye, . . . you'll love the edges once you put on the resolene, . . . or at least I do. Oh, . . . and thanks for the memories of the double ring belt, . . . brought back a bunch of 70's memories May God bless, Dwight
