


Dwight
-
Posts
5,244 -
Joined
-
Last visited
Content Type
Profiles
Forums
Events
Blogs
Gallery
Store
Everything posted by Dwight
-
Nothing but beautiful . . . May God bless, Dwight
-
AIZilla, Tony V, Oddball, ClaimedVacancy . . . thanks to you all . . . Lots of ideas there to digest . . . see if I can get anything out of the process that will work for me. May God bless, Dwight
-
For the last couple of years . . . been telling myself I'm gonna make me a set of saddle bags . . . horse and rider type saddlebags . . . not the Harley kind. Every place I look . . . patterns and all . . . they are almost the size of a woman's small purse . . . On the western's on TV . . . they seem to be a lot bigger. The question I'm asking . . . what are the largest set you've seen or made . . . height / width / depth. I'm looking to replace my AWOL bag from the Navy . . . and I thought that might work . . . Thanks for whatever help you can toss my way. May God bless, Dwight
-
 Stitching is good . . . better than I do by hand . . . I'm a machine guy. BUT . . . do yourself a favor . . . scratch around on the internet and grab up a Harbor Freight sale flyer or coupon . . . usually good fo 5 to 15 bucks. THEN . . .go to harbor freight and buy a 30 inch bench top belt sander . . . the one with the little 1 inch wide belt. Buy some 80 grit belts to go with it. Trying to cut leather so that all the edges match will cause you to pull your hair out. Cut both of the a "tad" big . . . glue em up . . . and sand the edges. I don't know anyone who can cut his pieces for as good a fit as I can make them with my litle hand dandy sander . . . I actually have 2 of em . . . Glue seom scrap pieces together . . . put a line on it with an awl . . . and sand it to the center of the line you struck with the awl . . . practice with it a bit . . you'll learn . . . and you'll be just plumb tickled that you bought that little rascal. May God bless, Dwight
 -
That's a good looking rig. Reminds me of the new briefcase(s) I gotta do for myself. I need one for church (Bible and song books) and one for my laptop / keyboard / mouse / charger. Would like to do one . . . make it good for both . . . doubt that I'm that ingenuity minded though . . . make one do for both jobs. But thanks for showing yours . . . got a couple Ideas out of it . . . I may put into play. May God bless, Dwight
-
What Machine Do I Need to Sew 12 mm Leather
Dwight replied to OscarRush's topic in Leather Sewing Machines
And if you are hard up for cash . . . a Tippmann Boss is a manual machine . . . one pull and one push of the lever . . . makes one stitch. I've sewn some pretty heavy stuff with one of them until I got my Cowboy 4500 . . . It'll do what you need . . . brand new for something in the neighborhood of 1000 bucks US. A cowboy 4500 is over 3000 just for comparison May God bless, Dwight -
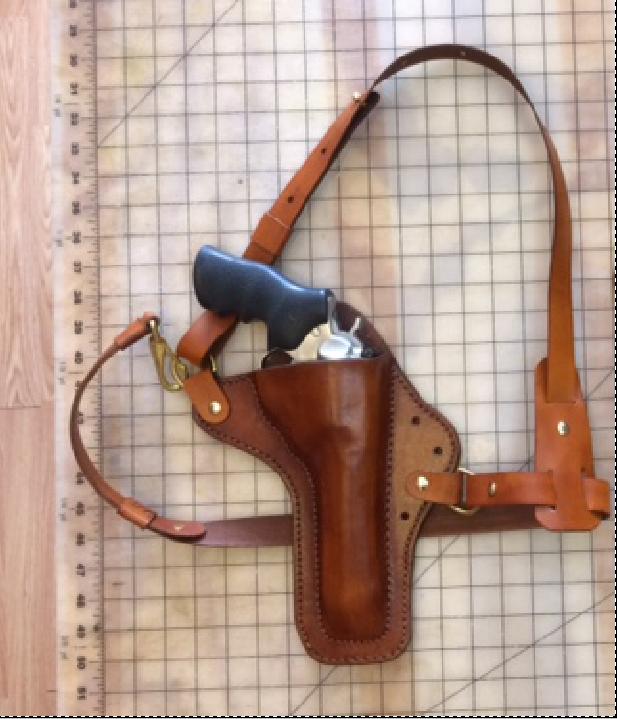
There is no real "calculation" you can make . . . what you have to do is take the holster . . . that has been wet formed . . . and then fully dried . . . give it a light coat of neatsfoot oil and let that dry . . . then add your contact cement to both sides of the inside of the holster . . . wait for it to dry . . . place the weapon in the holster and squeeze the sides together. I have a pair of tin bending pliers I use to squeeze the sides together. The holster stitch line has to be as close to the weapon as you can get . . . and again there is no "formula" for it. You use your sewing machine . . . mine is a Cowboy 4500 with only a half foot on it . . . allowing the needle to get up close to the intersection where the two pieces of leather are bound together with the contact cement. As you can see on this holster . . . I got up real close. I have a hand held stitch maker (from Tandy) which makes those lines next to the weapon. All outside stitch lines are made with a typical gouge set for a determined distance . . . then you simply connect the two . . . and you have your holster finished. There is no (A x C) / 3 = stitch line formula . . . or calculation . . . you simply sew it where the leather comes together. Most of the time this will produce a tight holster . . . the customer can loosen it with the freezer bag trick if he wants it more loose. May God bless, Dwight
-
If you don't know how to make them . . . you probably shouldn't be taking orders . . . May God bless, Dwight
-
That's some good looking work . . . Most of us would like to see them being "modeled" . . . I for sure would May God bless, Dwight
-
Got a picture of one??? May God bless, Dwight
-
To sand the edges or not to sand
Dwight replied to ThisIsMyFirstRodeo's topic in Leatherwork Conversation
I've used 120 for 20+ years . . . never had one complaint May God bless, Dwight -
Call it a laptop tote bag . . . one of my next projects. Got a keyboard giving me fits . . . have to get that settled before I do anything else though. It's not exactly the design I will use . . . but thanks AndrewWR for the pictures . . . I'm getting closer to my project with your example. Good job by the way . . . May God bless, Dwight
-
When u design a new holster pattern
Dwight replied to rccolt45's topic in Gun Holsters, Rifle Slings and Knife Sheathes
I use either marine grade vinyl ( about 25 bucks for a piece that is 36 x 48 . . . OR . . . I use yellow manila folder stock. The vinyl gives me a really good shot at what I need . . . and is best for some unique do dad . . . but in the end I use the cut piece of leather to mark out and cut the pattern on manila folder stock for future reference. I always make the first cut 1/2 inch wide in all directions . . . and trim as needed. It is very seldom that 1/2 inch margin doesn't do the trick. May God bless, Dwight -
putting a belt in the fridge?
Dwight replied to LakeOtter's topic in Purses, Wallets, Belts and Miscellaneous Pocket Items
I've never done that . . . and it would take a bunch of convincing to get me to do that. Stuff dries out in the fridge almost as fast as laying on the counter. For what stamping I do . . . if I have to shagnasty for a while . . . I leave it and hit it with the sponge when I get back. Works fine for me May God bless, Dwight -
mountain man moccasins pattern #3 By Gene Noland
Dwight replied to chuck123wapati's topic in Patterns and Templates
Good looking . . . wonder how long the soles will last . . . I'm gonna make myself a pair some day . . . using the 3 layer approach the Romans used on their sandals. Bottom layer is sole . . . thick . . . and they had kinda likd hob nails that gave them traction whenever they were worn. Middle layer actually is all one piece . . . toes and tongue would sew in like yours . . . sides and ends are all one piece Top piece is the inner layer that touches the wearer's foot. All three layers were sewn together . . . and if I recall correctly . . . may have been some rivets. That is what I'll do Plan on making mine to stop just below the knee . . . will put zippers in the inside for quick on and off May God bless, Dwight -
Thanks pal . . . beautiful wallet . . . I won't even think about doing something like that . . . never been that steady at cutting & stamping. May God bless, Dwight
-
I think it looks fine . . . you definitely put a lot of time into it for sure Sometimes it is the time spent that helps the maker say to himself "Good Job" when he can look at it knowing it is done. What is the bag for? May God bless, Dwight
-
How do I paint or draw on leather (waterproofed leather)
Dwight replied to c.c.1315's topic in How Do I Do That?
If you have someone who has a laser burner . . . the mittens could have a flat board pressed into them (to create a flat surface) . . . and if you could get it flat enough . . . and IF the person using the burner is good enough . . . he could just burn off enough of the waterproofing that you would have a rough surface for the paint to adhere to. The acrylic paint itself is waterproof . . . so you should work out good there. But the whole thing hinges on how good your laser burner buddy is . . . May God bless, Dwight -
A couple of months back . . . had a fellow need a new belt . . . his older one had seen better days. Simple project . . . grabbed a Script font from MSWord . . . wrote his name out . . . on the computer . . . did a screen shot . . . turned it into a *.jpg . . . picked it up with Laser GRBL . . . plotted in on my little 50 dollar laser engraver . . . did a "guesstament" as to the settings . . . darned if it didn't turn out just hunky dory. Laid his belt onto my engraver's table . . . did a couple of test runs for position . . . turned my little laser loose . . . and about 6 or 8 minutes later . . . took the finished project off the table . . . wiped it down with a paper towel . . . dyed and finished the belt. He was happier than a broke out jailbird . . . May God bless, Dwight
-
Tape Measure Carrier
Dwight replied to Hildebrand's topic in Gun Holsters, Rifle Slings and Knife Sheathes
If you saw the right front pocket of most of my work britches . . . you would not wonder why I don't have one. May God bless, Dwight -
Interesting Holster Project
Dwight replied to MarlinDave's topic in Gun Holsters, Rifle Slings and Knife Sheathes
I like the patch idea . . . but I'd rather just make the holster out of two pieces of 6/7 leather and be done with it. It'll make a really good sturdy holster . . . it'll outlive your friend unless he is come kind of hard on holsters . . . I've made some ungodly number like that . . . only ever had one that would not pass my quality control . . . I did some experimentation on it for rigidity . . . and you could probably get arrested for hitting someone in the head with this one . . . it would knock him out . . . leave a concussion . . . and he might bleed to death from it. May God bless, Dwight -
It ain't HO . . . but I've never had much more than a small quibble about the sides I've purchased thru Tandy. Granted . . . I don't order them on line . . . I go in . . . start pulling and inspecting sides with my dial caliper and my two good eyes. It has taken a good half hour in the past . . . but that side of leather I walk out with tucked under my arm . . . it does the job and then some. May God bless, Dwight
-
1: don't use glue . . . use contact cement . . . put it on with a plumber's brush . . . (cheap metal handled / size of a pencil / buy at Harbor Freight in a bag) 2: it goes on both surfaces that are to be put together . . . let it get 95% dry . . . then put them together. 3: a minimum amount of care will keep it off where you don't want it. May God bless, Dwight
-
No . . . you absolutely DO cement the lining to the kydex . . . just don't glue the outside holster cover to the kydex. May God bless, Dwight
-
No . . . you mold it to the weapon . . . and if you buy it from Tandy . . . get their thicker batch. There should be a shiny side and a dull side. The dull side goes inside like it would lay on and touch the gun . . . the shiny side faces out. Put a row or two of masking tape over the top of the weapon . . . gets rid of the need for a sight channel . . . take it up to just before it gets to the rear sight (that's how I do it) . . . if you've got a piece of thin suede . . . wrap the gun it it . . . it helps with the spacing. Put the grip in a leather padded vice and lay the kydex piece on top of the gun . . . heat that center piece until each side falls down . . . pull the edges together and rub the top with a wet wash cloth . . . it will set the kydex from any bending right now. Lay the gun on one side . . . heat the top side of it . . . and wearing a pair of leather gloves . . . mold the kydex to the weapon . . . over top of the suede. Again . . . once you get it molded good . . . hit it with the wash cloth to stop it from moving. Flip it over . . . do the above steps again on the other side. BE CAREFUL WITH MAGAZINE DISCONNECTS . . . and other levers / buttons / or whatevers . . . don't get them involved deeply in the molding process. Then comes the fun part . . . with the kydex all molded . . . nice and cold . . . put the bottom of it in that leather padded vice . . . so the top of the mold where the sight track of the gun is . . . that part is up on top . . . and level. You should notice a definite "spring" sensation as you try to close the bottoms of the pieces together . . . and what you will do now . . . is reverse the spring. As it is now . . . it will want to spring apart when you squeeze the bottoms together. What you do is apply just enough heat across the top to relax that springiness. Hit it with the wash cloth . . . and when you take it out of the vice . . . the bottoms will want to touch or come within 1/16 of an inch in doing so. When you pull the bottoms apart . . . it will want to spring back together. Trim the kydex only enough to get it inside the leather stitching. Double check the springiness . . . you may have trimmed enough off the edges that you may want to repeat that last heat / mold you did. You then mold the inside . . . leather lining of your holster . . . I like 5/6 oz for this job. Mold the leather as tight to the weapon as you can . . . maintain a sight track . . . be mindful of those buttons and levers on the side of it . . . BE CAREFUL WITH MAGAZINE DISCONNECTS . . . STEER CLEAR OF THEM. I have actually cut totally around them for 1911's . . . just a hole there where the leather and kydex used to be. Here you check and see if you have a decent grip on the gun using the kydex as the spring. It has to at least keep the gun in the leather and kydex if you hold it so the gun conceivably could fall down and out. CONTACT CEMENT THE KYDEX TO THE INNER LINING. Next . . . finish the holster with the outside layer of leather . . . belt loops . . . snaps . . . whatever . . . and sew her up. If you use any glue or contact cement . . . steer clear of the kydex. Wet the holster once it is finished the construction . . . and put it in a hot box to dry . . . 140 degrees F . . . Doing that twice will harden up the whole process like you would not believe. Be careful not to go over 140. You now should have a fairly springy holster. May God bless, Dwight