


Dwight
-
Posts
5,247 -
Joined
-
Last visited
Content Type
Profiles
Forums
Events
Blogs
Gallery
Store
Everything posted by Dwight
-
I'd get some change from 500 bucks on all of them. Seems to be a boat load of folks trying to sell them . . . from about 400 plus shipping to 485 with free shipping . . . and lots of "in between" sellers. May God bless, Dwight
-
I have a fairly new Singer . . . table top portable machine . . . it will do embroidery and a bunch of other stuff . . . I bought it with the eye on the 90 day "send it back if it don't work" idea I had with the seller. I was looking for something that could sew two layers of suede or maybe 2/3 oz veggie tan. When I use it . . . I mostly use carpet thread . . . and it has surprised my britches off at the things it has done or will do. Anything in a shirt or light jacket . . . it'll handle it . . . no sweat. I used it to put my E-6 Navy patch on my short sleeve white shirt. Name tags . . . and the like are a piece of cake with that machine. I wanted to add to the group . . . the below picture . . . mostly for jackets and stuff . . . biker work . . . etc. I live between two towns of of 45K and 35K . . . with lots of police, military reserve, national guard, etc . . . and from the research I've done so far . . . I'd have it all to myself and the little old ladies with their thimbles. Plus there is a huge Harley place a 1/2 hour away . . . and 5 different state prisons plus three county lockups . . . and all them folks need patches sewn on. I wouldn't make a living at it . . . but at a minimum of $5 for the first one and 10 bucks an hour for the rest . . . I was looking at a nice extra few bucks . . . and I don't have to create anything here . . . just stitch the dude down. Most of it hinges on two "interviews" I have to do with a couple of dry cleaner shops. If I can become their supplier . . . I'd be looking at maybe a 100 a month average. May God bless, Dwight
-
Just to sew them on shirts . . . jackets . . . vests . . . etc. May God bless, Dwight
-
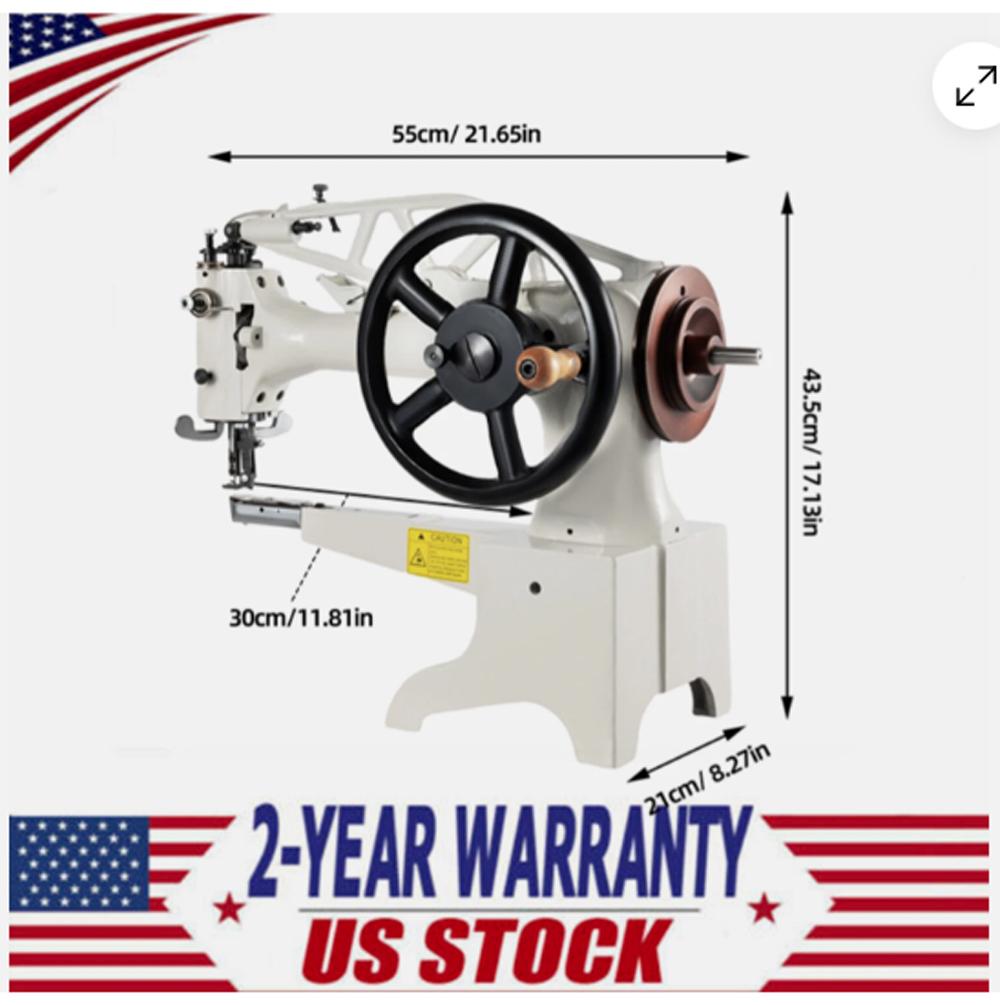
I am looking to get into the patch business as the last one in this area just up and quit. I need suggestions for a patch machine . . . and a quick couple of paragraphs on how they work. Thanks, may God bless, Dwight
-
A bandolier is NOT cut like a belt curve. A belt is made to go around your total round waist . . . the bandolier only needs a curve where it goes over the shoulder. The easiest and least costly way is to make the shoulder curve . . . then lace the edges of it and the two straight pieces (front and back) . . . decorate the curve with appropriate stampings for the person or time period the bandolier would be used. The straight pieces overlap at the bottom with a snap or a rivet. May God bless, Dwight
-

New Tool Idea - Large Leather Shears - Should I make these for sale?
Dwight replied to Stagesmith's topic in Leather Tools
There's a market for virtually anything produced. Price will generally determine how big that market is. May God bless, Dwight -
I don't wear spurs much . . . mainly when I'm in a parade with my cousins . . . But I took all of mine . . . put them in a wood vice that had leather jaws . . . and squeezed them so that when I put them on my boots . . . between the heel and the heel of my boot . . . in that little crease . . . I tightened them up until they did not move . . . I could wear them outside . . . get on a horse . . . off . . . walk around the yard . . . and the spurs stayed on my boots. They're not tight enough to scratch the boots . . . and you certainly wouldn't ride far with them . . . but that is how I wear mine . . . with of course a leather spur strap across the front arch of my boot. May God bless, Dwight
-
Altogether . . . it certainly is most likely a very functional holster . . . just a couple comments One . . . if you look at the bottom backside of the holster . . . from the top of the leading edge . . . all the way around to the second chicago screw . . . the space between the edge and the stitching varies drastically. For a practical holster . . . that's OK . . . but you won't sell many like that. That space needs to be very near uniform all the way around . . . and you do that on a belt sander. It takes a practiced eye . . . and a bunch of practice . . . but when it is done . . . it looks so much better. The dye did not take very uniformly . . . and if you used Feibings . . . make sure you dilute 1 to 1 with thinner . . . and ALWAYS brush a light coat of neatsfoot oil on the hair side of your projects . . . then let is set for 24 hours before dyeing. I always dip dye everything I do . . . and while it takes more dye that way . . . the dye also goes in deeper . . . making scrapes and scratches later on . . . less noticeable. Dip dyeing for me has always also been much more uniform than any other way I've tried. You also might want to take the top of the back piece that lays against your side . . . take it up and round it . . . so that as you look at it . . . leather comes up above the hammer, rear sight, and most importantly if it has one . . . the safety. It is a lot more comfortable that way. But all in all . . . just a few constructive critic words to make your product more tasteful. . . . I do really like the design down the front or it though . . . and the clips are a nice touch. May God bless, Dwight
-
Factory belt finished edge on commercially made belt.
Dwight replied to WMages's topic in How Do I Do That?
After you have done every thing else to the belt . . . except deliver it . . . lay it on it's side . . . use a dauber . . . and lay on several coats of thinned Resolene . . . (50/50 with water) . . . if you flex the belt a bit . . . 1/2 hour after each coat . . . it won't seriously crack . . . and looks really good for a long time. May God bless, Dwight -
Take a piece of 8/9 oz leather . . . use a splitter . . . run off a square piece the same as the thickness of your leather . . . makes the bolo stand out much better than any piece of woven rope . . . Just an opinion from a guy who has several of them May God bless, Dwight
-
They won't. Working them wet . . . you will take them out . . . and when you do they will shrink . . . Nature of the beast. May God bless, Dwight
-
First thing I would do is help him find a diet he could live with. Then I'd follow Leather Repair Center's plan May God bless, Dwight
-
On Facebook Marketplace . . . you can pick up a decent 12 inch wide planer for 100 bucks . . . or at least I did. Then cut your HDPE about 11 1/2 inches wide . . . run it thru the planer. If you do it right . . . all the pieces will be THE EXACT same thickness . . . and can be either screwed down or double sticky back tape . . . put to the table. Take a thin file . . . just BARELY take the length wise edge off the sides . . . your leather will never notice it if you just cut enough off so it is not sharp. The two pieces should slide together really super flat. One thing about it though . . . after about 15 years . . . it has a tendency to become brittle on the edges . . . I have a 3 by 5 piece to prove it. I could probably cut out a piece that would be 2 1/2 by 4 1/2 . . . but I can snap off pieces of the edges in about 3 inches or so. But I gave up on it . . . went to Joann Fabric . . . bought their 3 ft by 5 ft sewing table piece . . . it is the second one now in a little over 10 years . . . cost 75 apiece. To me . . . that is worth twice the price. Hold it down I bought a 4 x 8 sheet of it last spring for a little less than 300 bucks for a different project . . . shop around . . . you may find it . . . I had to go to Columbus Ohio . . . population one million . . . to get it. May God bless Dwight
-
The small mundane safety equipment was called "hearing protection" . . . on two destroyers with 5 inch / 38 twin gun mounts. (that's a bullet that's 5 inches in diameter . . . weighs 39 pounds . . . and can land 12 miles away . . . guaranteed within 500 feet of your landmark . . . the 38 means the barrel is 38 times the diameter of the bullet) We almost pulled up along side ammo ships . . . off loaded the ammo straight to the gun mounts and let er fly. Actually would get done with the bombardment . . . cut the rudder . . . full speed ahead . . . out to the ammo ship in the South China Sea . . . hated like nobody's business to get involved in any of that exercise. There were times when one would have thought everyone except the guys down in the engine spaces were deaf. After a couple hundred rounds . . . if you were close enough . . . your body would shake with every loud noise . . . and you said "huh" for several hours. My first ship did not get "official" recognition for it . . . but we just may have been THE first ship to drop ammo on the Ho Chi Minh trail. We were with the group of ships that spent a bunch of $$$ on 5 inch and 8 inch boo-letts . . . messing with Charlie in the early spring of 1965 . . . pock marking the trail for miles in either direction. Yeah . . . little orange rubber ear plugs would have been darn near wonderful . . . just had not been invented yet. May God bless, Dwight
-
I have been very fortunate thru the years . . . lots of times and places . . . stuff coulda done me in . . . Safety gear has been part of it . . . staying alert is a part of it . . . not taking crazy chances . . . all have helped out. My guardian angel did his thing a couple weeks ago though . . . I have a table saw I bought without a blade guard . . . got it ordered . . . was using it before the guard got here. I sawed down a 24 inch or so piece of 1 x 4 down to 1 x 3 or so . . . had both pieces from the other end of the saw . . . was bringing them back to me . . . over top of the saw . . . and somehow the big piece slipped or something in my hand . . . fell down to the blade that was slowing down . . . hit it just so it would become a 1 x 3 pine rocket. Thing caught me perfectly on my upper gum line . . . above my teeth . . . below my nose. I looked like the guy who just lost to Mike Tyson or something for a couple of days. Honestly . . . my worst industrial accident ever. I got a hole burned in my thumb by 450 Volts aboard ship . . . didn't really even hurt . . . even though I jumped like a white tail bunny . . . that was the second worst . . . Worked maintenance electrician and mechanic for 30 some years . . . 4 of em in the Navy . . . climbed more ladders than I'd like to talk about . . . used more power tools than I could probably name off in the next hour . . . Got a sneaking hunch my guardian angel will wipe his brow and say . . . "Finally . . . he's here . . . " when I walk thru the pearly gate . . . as he has done a great job for me down thru the years. May God bless, Dwight
-
Thanks badhatter . . . probably is . . . just worn down May God bless, Dwight
-
At church Sunday . . . a friend handed me a shoulder holster . . . was given to him by a mutual friend after an auction. It's a rather well made . . . clam shell type . . . using a metal band . . . It's only marking is "Jay Fee" Anybody know anything of the manufacturer?? Thanks . . . may God bless, Dwight
-
Help!!Trouble Uploading Photos - "Upload Failed" Error (Error Code -200)
Dwight replied to Jazz_M's topic in Member Gallery
Get a simple program . . . put it on your computer Adobe photo shop elements 2.0 is a really good one . . . it's 5 bucks on Ebay . . . comes with a disc . . . don't buy one that is a down load as you will forever be plagued with ads and adware Use it to size the photos to 800 by 600 pixels . . . and an overall size of 500 kb or so. Then use the choose files below . . . go to your file on your computer . . . choose the pic . . . and it'll load. You can do a lot with that little photoshop program afterwards as well. May God bless, Dwight -
Crossdraw Slim Jim Holster for Hunting ?
Dwight replied to bcraig's topic in Gun Holsters, Rifle Slings and Knife Sheathes
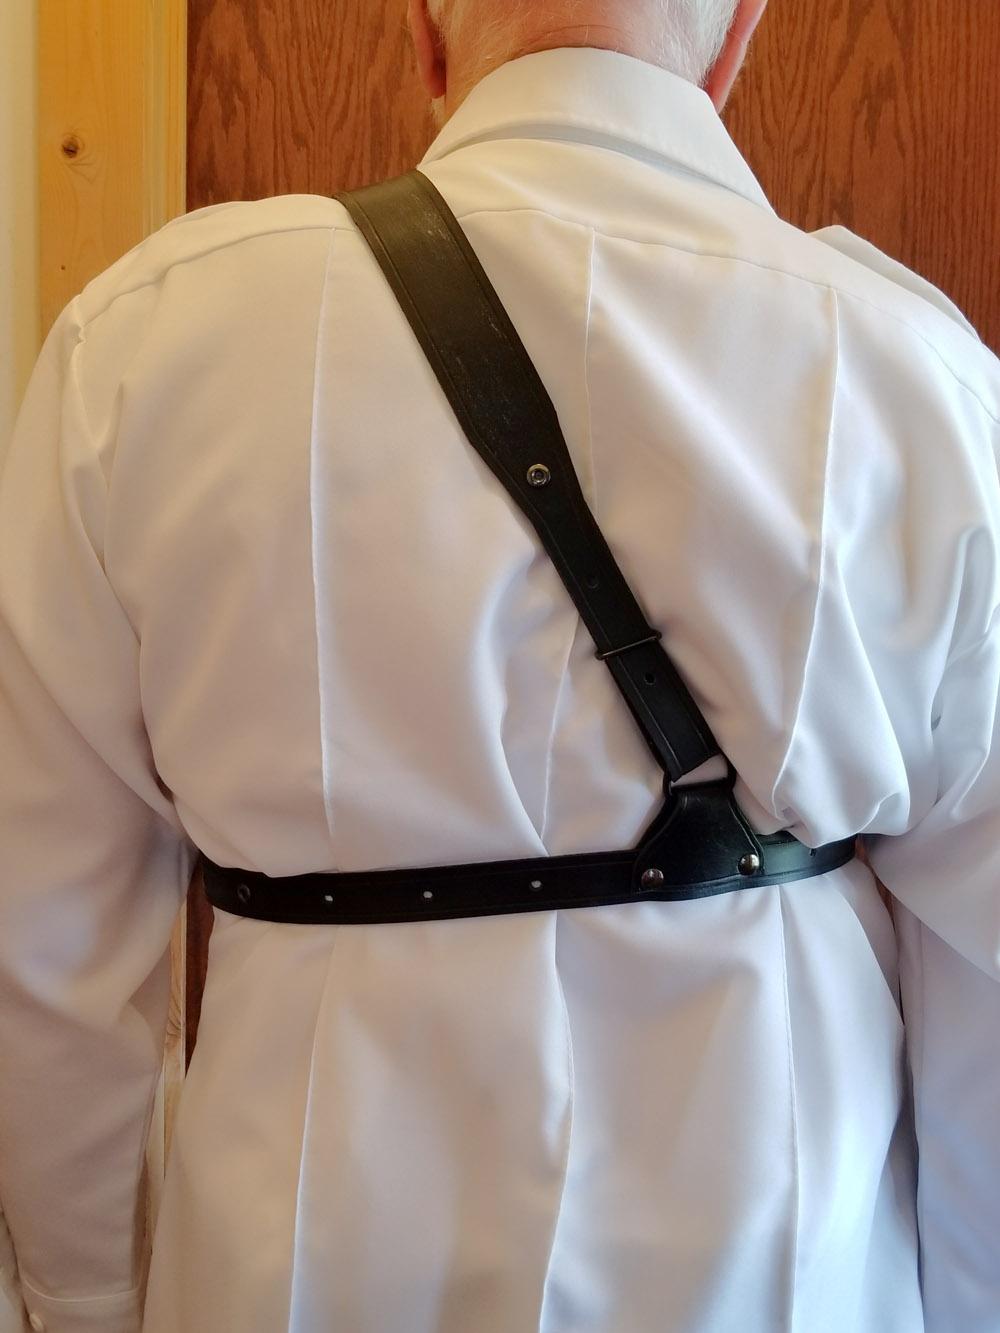
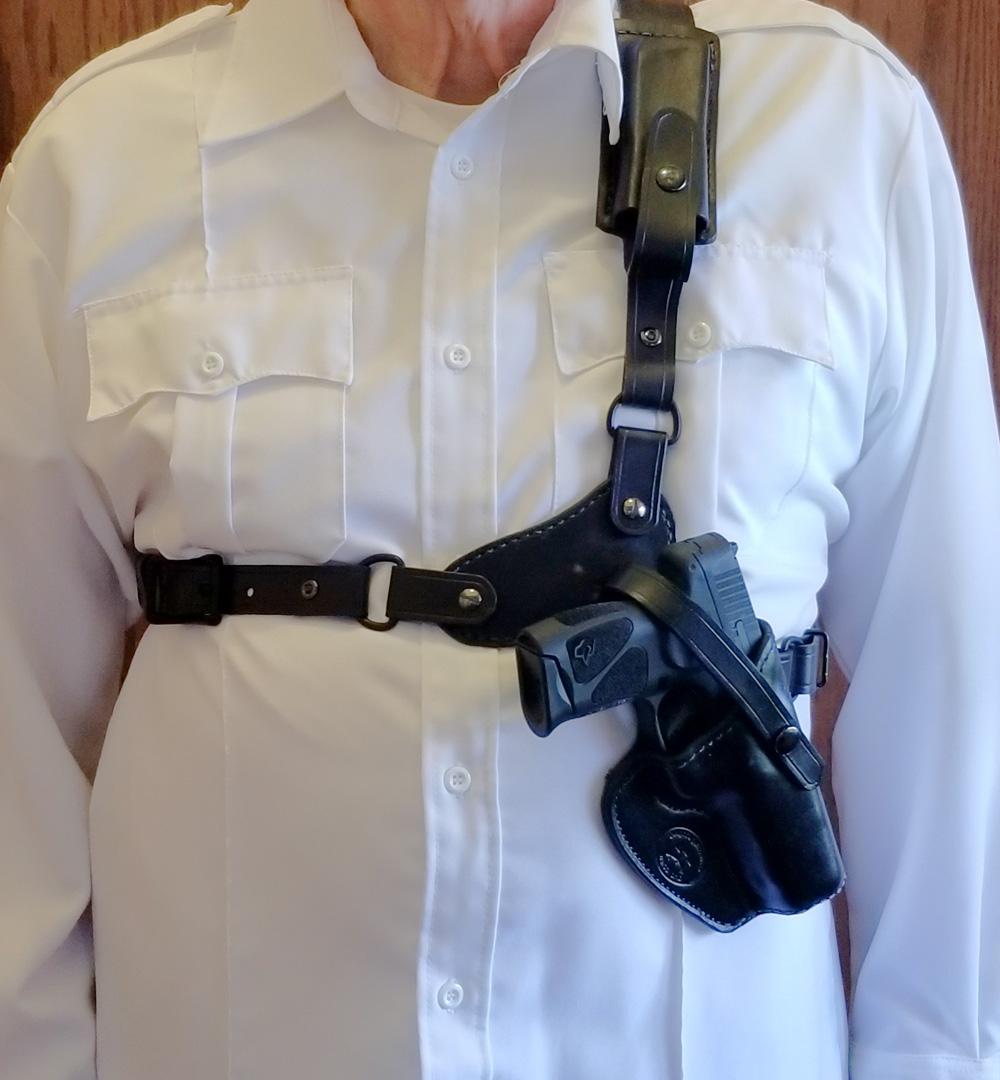
Generally speaking . . . me and the welt don't get together until everything else is done . . . and time to add or not add the welt. Most of the time is is . . . but slim Jims are a different animal . . . the gun is so far down . . . doesn't make a lot of difference. Anyway . . . I get it 100% ready for stitching . . . minus the contact cement . . . fold it over . . . and laying on the work table . . . I check the fit. Most of the time a welt is advantageous . . . sometimes not . . . Make sure we get to see pictures . . . and I'm seriously sorry to hear the shoulder problem. My doc injected something in my right shoulder some 20 years ago . . . very little problems since then. I don't have any "butt" . . . so belts don't do a lot for me . . . I do the suspender routine. Which makes any shoulder rig a good deal for me. May God bless, Dwight -
Sorry bsshog40 . . . personally I've often thought it would be a really nice addition . . . but it probably is more than a 30 minute fix. May God bless, Dwight
-
Crossdraw Slim Jim Holster for Hunting ?
Dwight replied to bcraig's topic in Gun Holsters, Rifle Slings and Knife Sheathes
Making a chest holster is really pretty simple as long as one does not get all wrapped up in technicalities. Take this simple picture of a slim jim . . . instead of a flap going down over the belt . . . a slight oval or round part is cut in the pattern to allow the back of the pistol to lay against your chest. Into this oval . . . three tabs are made that simply go thru a "D" ring . . . and on each side of the holster . . . and are riveted thru the oval. I like an inch and a quarter belt going from the D ring as you see it on the right side . . . it goes all the way around your back . . . and attaches with a snap hook to the D ring you see on the left of the picture. Just make it adjustable enough to wear with a Tee shirt or your favorite cold weather hunting coat. Attached to the top D ring is another strap that goes up over your left shoulder if you want to wear it off center . . . or over your right shoulder if you want it to point pretty much straight down between your legs. Personally . . . I prefer the left shoulder . . . it is more comfortable for me. You can put a thumb break . . . a hammer loop . . . or a suicide strap on it to retain the gun . . . and some guys like a loop that goes down to their britches belt to hold it from flopping if you are running or going down hill in the brush. Seriously . . . this is a simple rig to make . . . and I've never had anyone say it is seriously un-comfortable . . . while I have heard that with cross draw holsters. I've also included a similar rig I did for a guy who wanted one for his plastic fantastic pistola. May God bless, Dwight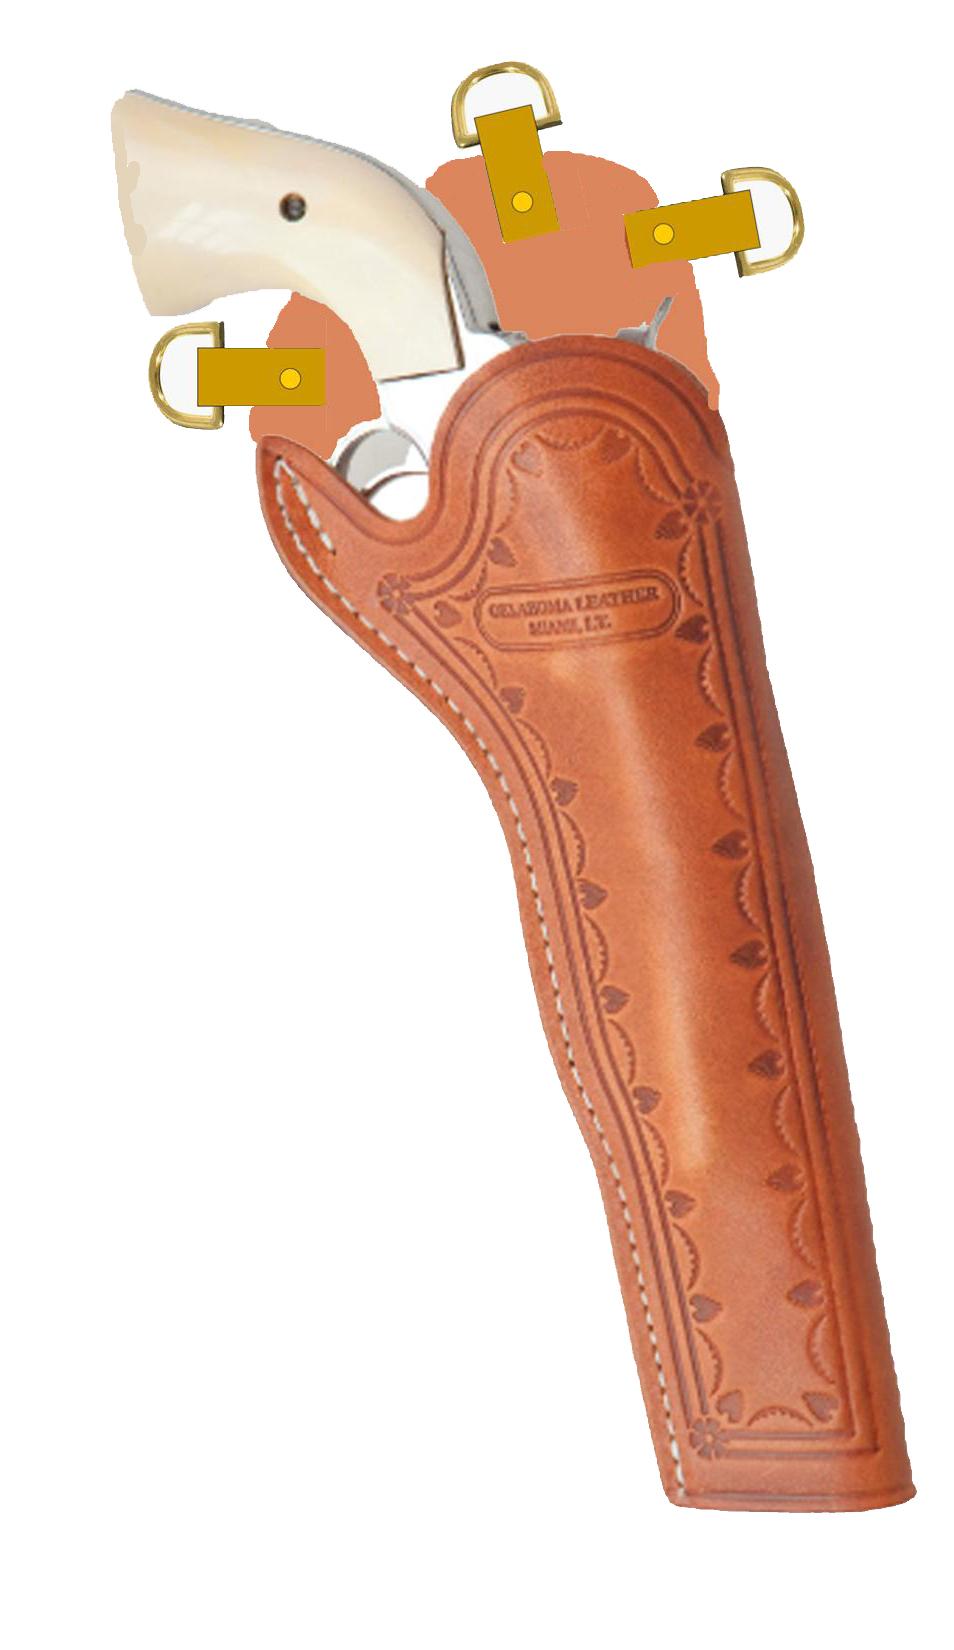
-
The Boss is lifetime warranty as well. The "cast iron" is just advertising gimmikery . . . the aluminum body on mine has lasted a full 25 years . . . has never had a problem . . . and when I have to move it . . . I'm darn sure glad it is aluminum . . . Probably best thought there . . . can you drive to either location for service. I'm 2 hours from Tippmann . . . I call em . . . they tell me they're waiting for me to get there. May God bless, Dwight
-
Crossdraw Slim Jim Holster for Hunting ?
Dwight replied to bcraig's topic in Gun Holsters, Rifle Slings and Knife Sheathes
We have a lot of the same things going for us. I'm 80 . . . and while I can walk pretty good . . . I don't add extra if I don't have to. Given all of the particulars you mentioned . . . I would not do a cross draw . . . I would do a chest holster . . . with probably a hammer thong to hold it in place. I think could be made so it would fit the 45 as well as the Remington clone. Laugh if you will . . . but I would make the holster for the larger of the two (I'm thinking the Remington would be) . . . and letting it also be used for the 45. If there is a big difference in the barrel length . . . a short piece of wooden dowel could be dropped in the toe of the holster to keep the 45 from falling all the way down in. Tie a slim leather thong to that piece of wood . . . and it could be pulled out for the Remington. Cross draw holsters for large pistols are uncomfortable for me . . . chest holsters are much better . . . but you'll have to make that decision. Making the holster standard or rough out . . . makes little difference unless the flesh side is really rough. Don't add a lot of finish to the inside of the holster . . . as the finish is harder than the leather. Also never leave your weapon in the holster when you come back in. Also keep them minimally oiled . . . as the excessive oil will be picked up by the leather . . . then dust . . . and it will act like sandpaper. For what you are doing you should not need to line it . . . just make it and use it . . . Have fun. May God bless, Dwight -
In 2000 . . . I made a deal with a retailer that after the Christmas season . . . he would sell me his used Tippmann Boss for a thousand bucks . . . and put out a new one for display. Christmas came and went . . . I got my cash together and went to see him. Some kids had jammed up the machine . . . and it needed to go back to Tippmann for repair . . . SOOOOooooo . . . he went in the back . . . grabbed a brand new machine . . . and gave it to me for the thousand bucks price. A Tippmann Boss. I still have it . . . have sewn everything from about 3/32 of an inch (207 thread probably) to 3/4 inch . . . (no thread . . . just punched the holes . . . cowboy stitched that holster later) . . . and the number of belts and holsters I've done with 95% 346 thred . . . is well . . . beyond calculation . . . there were so many. I've looked at the others and will give them a possibility of being worth while . . . but the Boss is definitely so. I've also needed work a couple times . . . took it to them . . . they sat it on the desk . . . an hour later . . . me and the Boss are headed home to do more work. And of course there was no charge for their work . . . including once putting in new parts . . . even though we were not 100% convinced that it was necessary. Tippmann ponied up the cost as a Just In Case scenario to keep an old client happy. And I still am. I also have a Cowboy 4500 . . . which now does most of the work . . . but the Boss is there when needed. And I have no doubt it will answer the call when needed to do so. May God bless, Dwight PS: Remember . . . the Boss is the one with the proven track record . . . the others are the new kids on the block. Where do you want to put your money . . . proven track record . . . or possibly good performance. That is the bet you make . . . either way.
-
Help Needed:About wiping the glue and edge paint
Dwight replied to kellyswanson's topic in How Do I Do That?
First thing I would say is toss the glue . . . go to Weldwood contact cement. Much easier and quicker . . . and . . . more accurate to use as far as getting the result you wanted. A note worth thinking about . . . dye will not penetrate glue successfully. Sometimes a bit . . . most times not at all . . . so learn to be careful where you put it. I use cheap little acid brushes . . . get a 100 for 3 bucks or so . . . use one a day . . . get fresh one tomorrow. Edge paint . . . I don't bother with it. My customers in 20 years have never mentioned it one time . . . so for me . . . it's not worth the hassle . . . But on the very very seldom time I do it . . . little round wool dauber on a metal handle . . . dip in the dye . . . shake off most of it . . . and very light short strokes . . . and if you hold your mouth right . . . if the moon is in the right position . . . and if the Ohio river isn't flooding . . . it might work. May God bless, Dwight