


Dwight
-
Posts
5,257 -
Joined
-
Last visited
Content Type
Profiles
Forums
Events
Blogs
Gallery
Store
Everything posted by Dwight
-
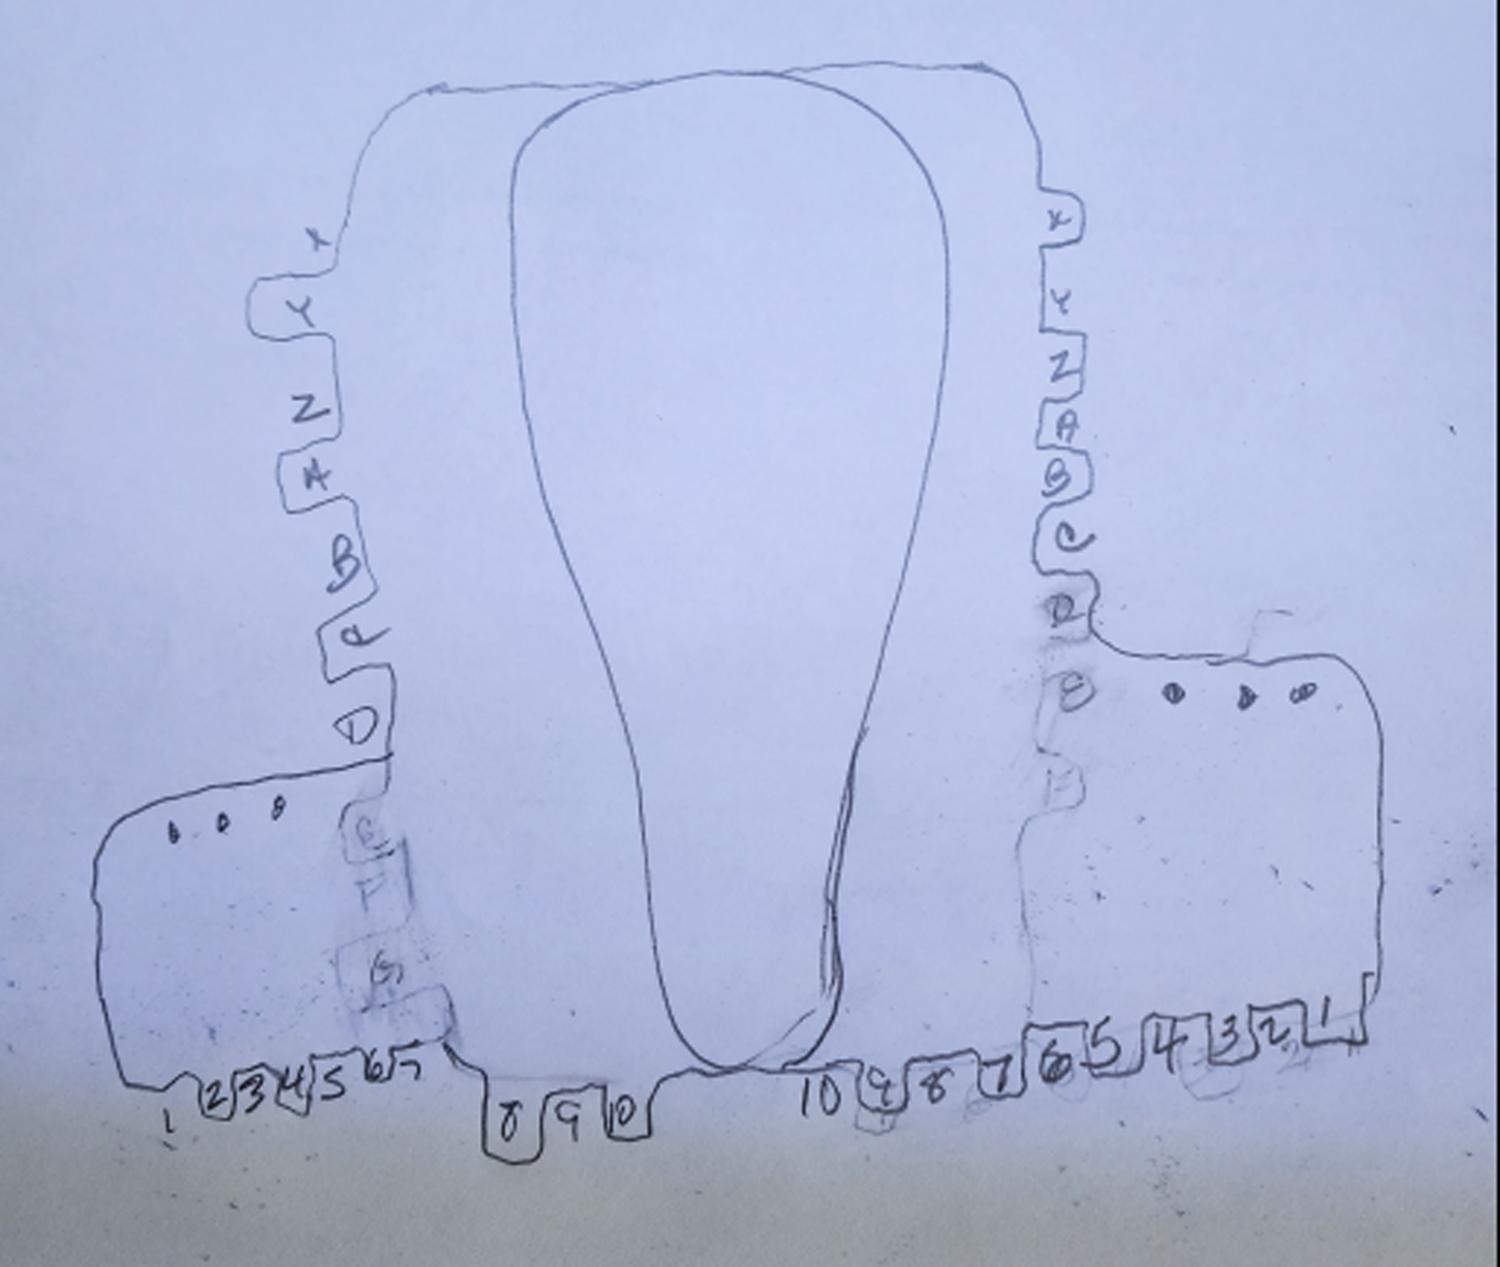
First off . . . I only did this once . . . came out really good. It is a throw-off of the Roman soldiers in Jesus' day . . . how they made their "Caligae" footware. They laid down a substantial thickness of a basic hunk of leather . . . thru which they protruded the little nail like devices that gave them traction in slippery ground . . . something like a baseball players spiked of years ago. Next . . . on top of that they would lay down a piece of leather that would become the shoe part . . . it envelopes your foot . . . has the laces / buckles . . . and holds the shoe onto your foot. It is simply a flat piece of leather that would not be cut out unless the maker knew already the exact measurements. A third layer would then be added. All these layers would follow the general shape as OP's original page. These three layers would then be sewn together using 3 distinct stitch rows. One on the very outside perhaps 1/4 inch from the edge. Second inside the first about 1/4 inch and the third about 1/4 inside the second one. The foot was placed in the proper orientation . . . the leather pulled up . . . and cut off to match the wearer's foot. Sandals were also made this way . . . as were dress sandals . . . but it was designed originally for the Legionaires and for the battlefield. The drawing is not to any kind of scale . . . just showing how you would do it . . . with a bit of a modern twist. Pull the tabs over to the area with the same label . . . run a lace thru theree . . . starting at the toe and going upward. Tie off at the top. Drawing is rough . . . but a picture is worth a thousand words . . . so here is the 1000 word response The real beauty is that this can be made on any flat sewing machine . . . no super equipment required. All the sewing is done with it in the flat layout May God bless, Dwight
-
Yep . . . that's a good way to do it . . . But my problem would be if I had anything more than a couple different belt configurations and maybe one bridle . . . I'd for sure have to put tags on them . . . tell me what the heck it is I made. I'm moving my reloading room . . . and I've had to laugh at myself . . . things in there I have no idea what they are . . . and won't remember until I need it for the job. It's tough getting old. May God bless, Dwight
-
Do you still have the HDD?? I've got a buddy that is fantastic at fixing computer stuff. If you have it . . . I could ask him to take a shot at maybe retrieving the stuff . . . he's usually up for a challenge of most any sort . . . and that would be one. Lemme know. May God bless, Dwight
-
You need to do 3 things: 1: get 120 or 150 grit sandpaper . . . and you may even want to to up to 180 or 200. It looks like you have 80 or 60 grit on there now . . . and it is way too coarse. You also might want to hook up a vacuum to the sander . . . I did with mine . . . it grabs the dust and makes a better experience. 2: move your machine so there is almost zero distance between the sandpaper and the shelf on which the leather will sit. Mine would not move so I made a topper for the table . . . out of 3/16 basswood plywood and contact cemented it to the table. I purposely changed the sanding belt . . . and then placed the plywood shelf up so it was just barely touching the sandpaper. When I started it up . . . it sanded the plywood slightly . . . but left a VERY THIN space between the shelf and the sandpaper . . . THAT is the desired effect. 3: make sure your table is exactly 90 degrees angled from the sandpaper. I sometimes have a problem with seeing my project . . . so I outline where I want the sanding to go with a black ball point pen . . . and I sand it until the ink line just disappears . . . works perfectly. The technique is to slide the project back and forth . . . barely touching for chrome tanned . . . you can apply a bit more pressure with veg tan . . . especially if it is layered thicker . . . like a knife sheath or holster. When you have your desired edge . . . comes the final tricky part you need to do. Turn your project over and VERY LIGHTLY touch the sandpaper. It will take off a little "edge" that the earlier sanding produced. Try it . . . you'll like it. May God bless, Dwight
-
Actually if you do it that way . . . it is about identical to the one Weaver Leather sells for some exorbitant fee . . . I don't want anything in my shop to be intentionally built or made by me that could be interpreted as patent stealing. That's why my design did not use the stiff wire pointer . . . theirs does . . . But going back to your clear plastic . . . do you actually have the plastic? And do you have the drawings? Reason I ask . . . I have a laser engraver that I've never used on plastic / plexiglass. AND . . . what little I have . . . it is really thin . . . wouldn't work for the thicker belts I make. I'd be interested in doing a "shared experience" project if you could supply the drawings and plastic. I'd put it on my machine and see how well . . . or even IF . . . it would work. We would both learn something from the process. So far . . . I've cut 3/16 basswood plywood very successfully . . . but that is about all I've cut. It engraves beautifully. May God bless, Dwight
-
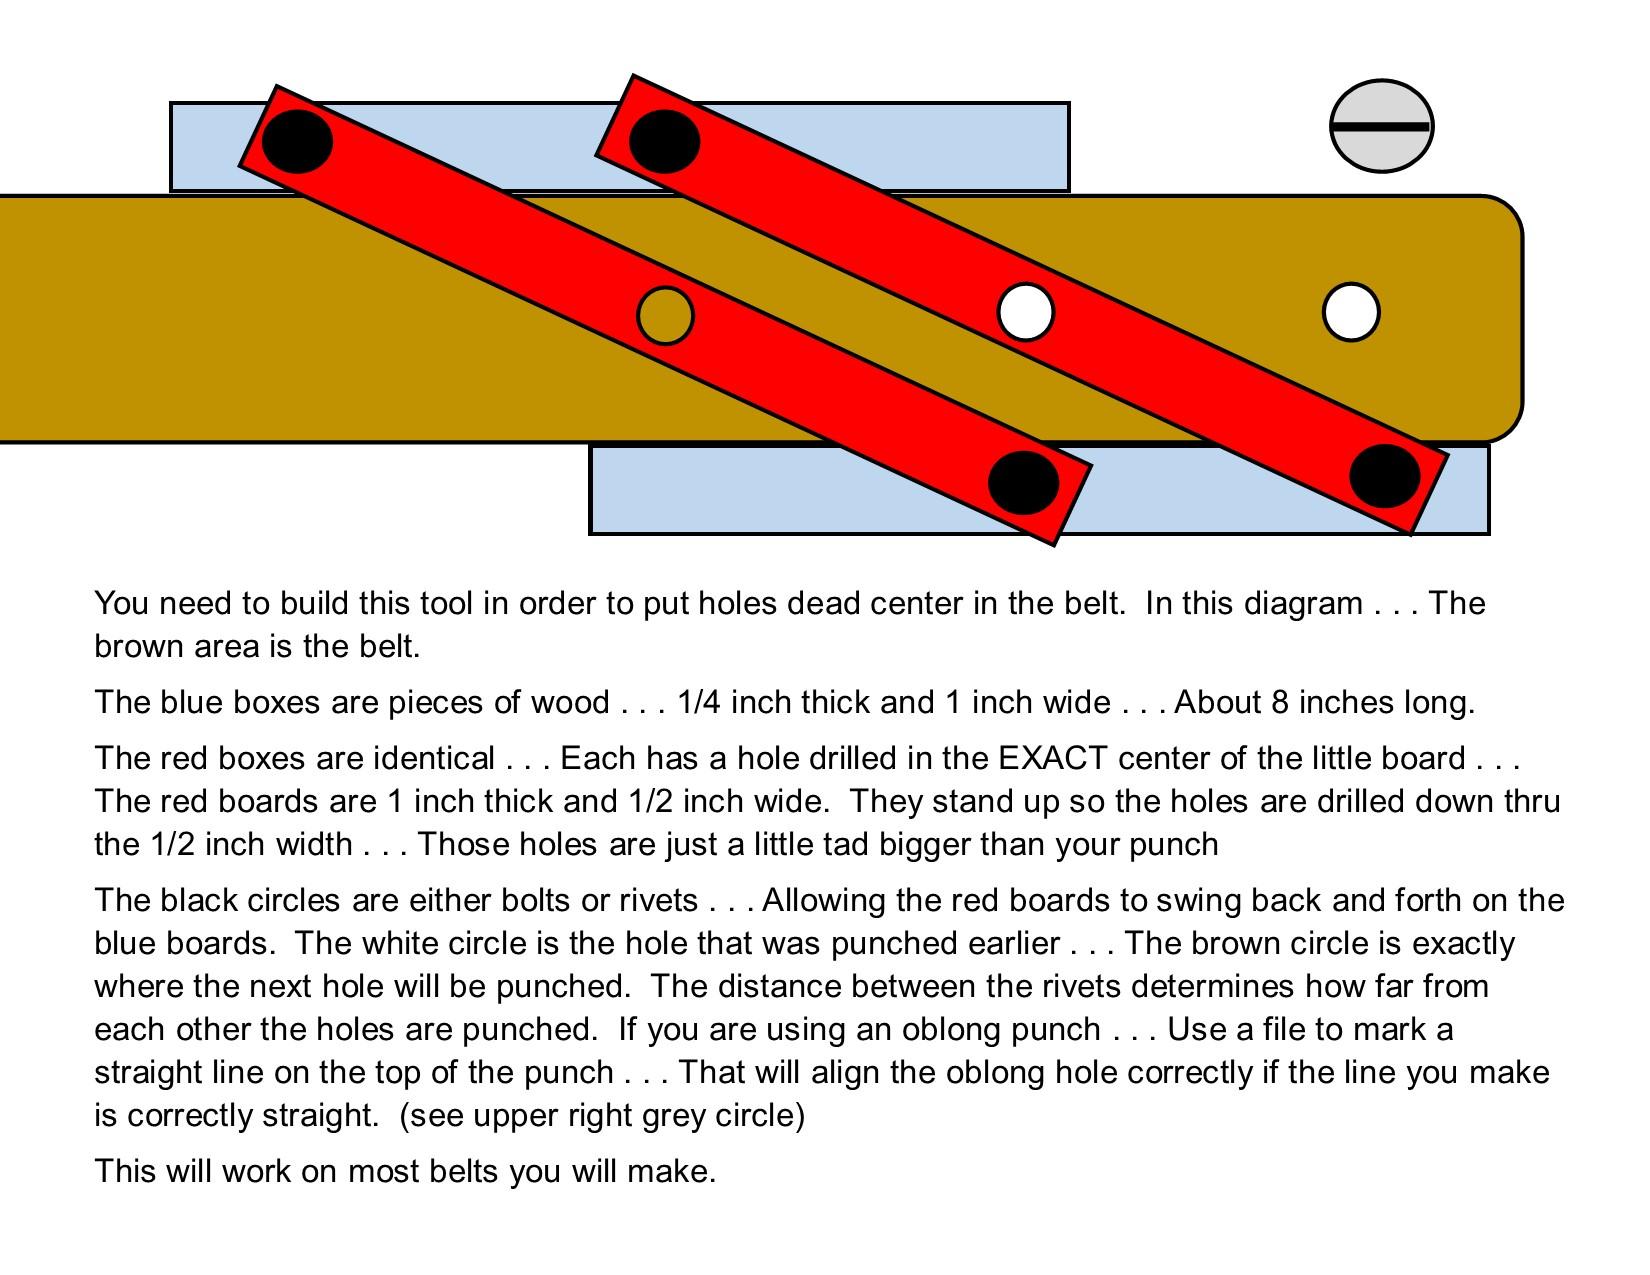
For punching belt holes and not having problems . . . take 2 or 3 hours out of your day and make this little jig. It will darn near end all your belt hole problems . . . May God bless, Dwight
-
Looks good from here . . . May God bless, Dwight
-
I would cut a piece of 3.4 inch pine to fill the hole . . . nice tight fit . . . that would be screwed to a piece of 3/8 inch plywood . . . that would be the size of the outside diameter of the pulley. Tool a really nice little Farmall "M" . . . sitting atop a small plowed field . . . with clouds on the left and right . . . and the IH in the middle above the tractor. Contact cement the tooled image to the plywood . . . get nails used for attaching cloth to a wood project from Hobby Lobby . . . ring the outside of the tooled image with them. Start the tractor . . . sand the pulley real well . . . paint it bright high polish fire engine red . . . call it all done May God bless, Dwight
-

Help with square corners on wet molded pouch
Dwight replied to bigsig11010's topic in How Do I Do That?
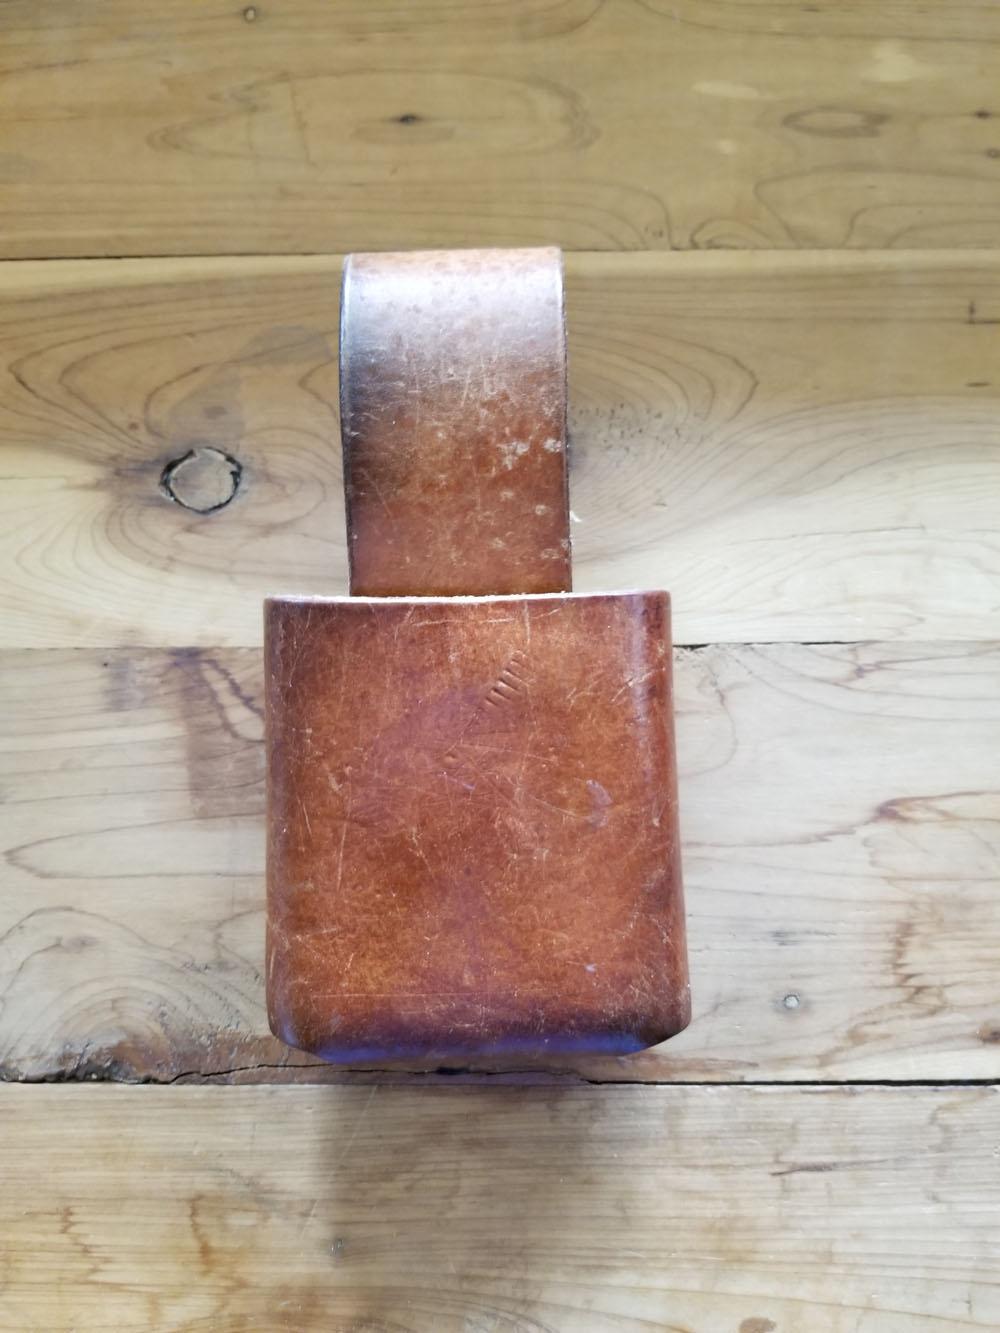
I use two different ways to make boxes . . . the first you see as two pieces of wood . . . the leather is placed between the pieces . . . about 4/5 oz . . . WET LEATHER . . . and it is then placed in a vice . . . it takes about 10 minutes for it to partially dry and take the shape. That will hold a single stack 45ACP mag relatively loosely . . . which is the desired effect. The second way is the leather cell phone case. The bottom 2/3 of an inch or so is solid leather . . . cut out . . . and glued together . . . the inside width of the cell phone case. Once that is made . . . it is taken to a small belt sander that makes all the edges flat and level . . . then it's fastened with contact cement. I wore it for a number of years . . . my new one is made the same way . . . May God bless, Dwight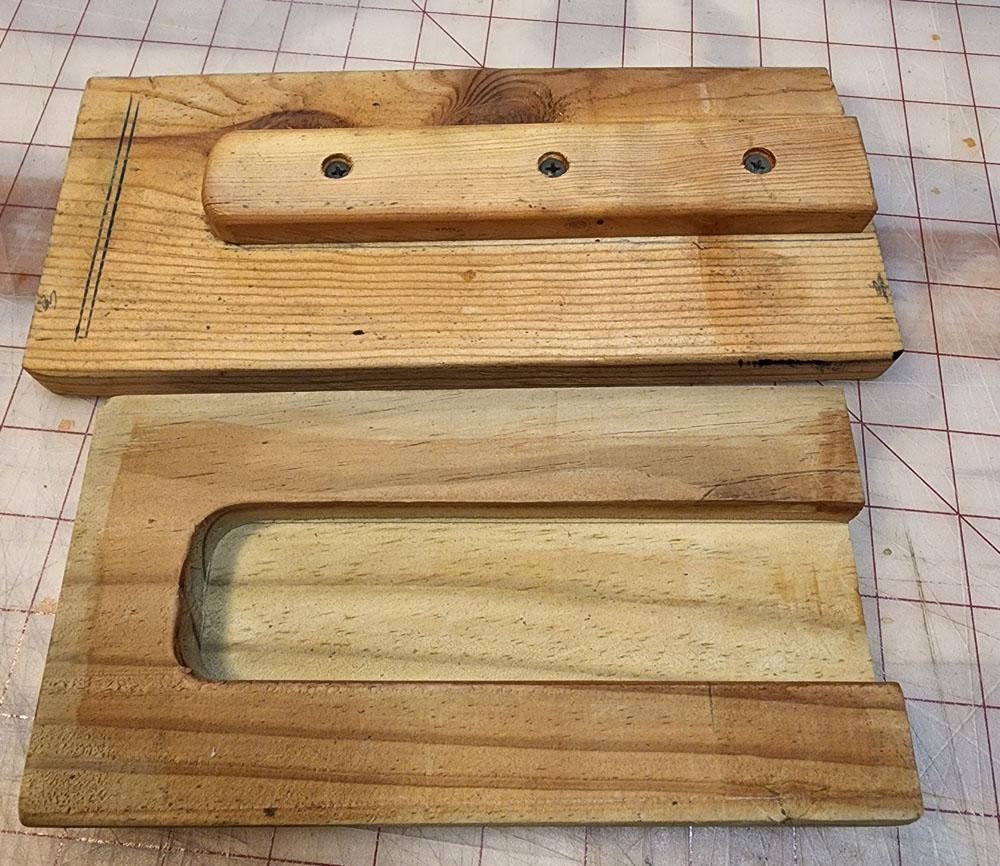
-
Go to google . . . search for "youtube: leather carving shadows I haven't done it . . . but anything I need info on . . . that's how I get it. May God bless, Dwight
-
If you lived a lot closer . . . I'd say load up the pickup with the knife and come on up . . . would be fun to make a sheath for that beauty May God bless, Dwight
-
Lookin good . . . saw Fess Parker as Davy Crockett at the Alamo as a kid . . . never made it, but always wanted to visit the place. Thanks for the picture . . . keep up the good work May God bless, Dwight
-
I have the 4500 . . . which will sew a bit thicker and use some heavier thread . . . but from my perspective . . . the 3200 would very probably do what you need with no trouble. I have nothing but good words to say for the Cowboy sewing machine I own . . . was worried to spend as much as I did for it . . . but am certainly glad I did . . . May God bless, Dwight
-
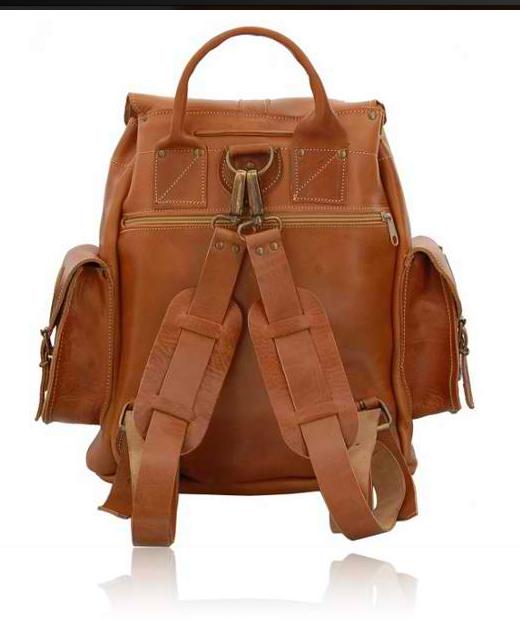
Help wanted for designing a Leather Backpack
Dwight replied to Black Phoenix's topic in How Do I Do That?
I would take my cell phone / camera . . . and go visit a half dozen camper / hunter supply stores. They have oodles of back packs in there . . . Take a bunch of pictures . . . print em when you get home . . . then cut and paste the parts you like best. Personally . . . all my back packs have two main compartments . . . both the full length and width . . . but separated in the middle to only give me half the depth. As well there are two pockets on each side . . . a larger bottom pocket in the back . . . and a smaller one also in the back. As well there is a little slip pocket on the flap cover . . . it lays up on the top . . . for papers / permits / licenses etc. Multiple pockets means you have to fold stuff up tight . . . but you also don't have to sort thru the whole pocket to find just one thing. Kind of a "file cabinet" back pack. I would also consider the one in the pictures if I was in a hurry . . . as it is less complicated to make. But to each his own . . . May God bless, Dwight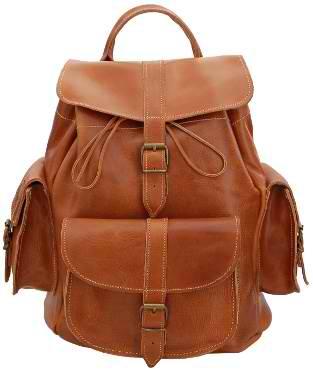
-
Using that pattern . . . I get an end product that I really like . . . as the piece making the front of the belt loop has the hair side showing. A lot of others don't and while it won't hurt the function . . . the flesh side to me is just not as desirable. I think it is "purtyer" this way. I took the knife blade . . . used it for the back template . . . then used that for the template for the front . . . and for a wedge that goes all the way around in the stitching of the sheath. That blade was really thick . . . and I just didn't want to do a fold over . . . so the bottom is three pieces. May God bless, Dwight
-
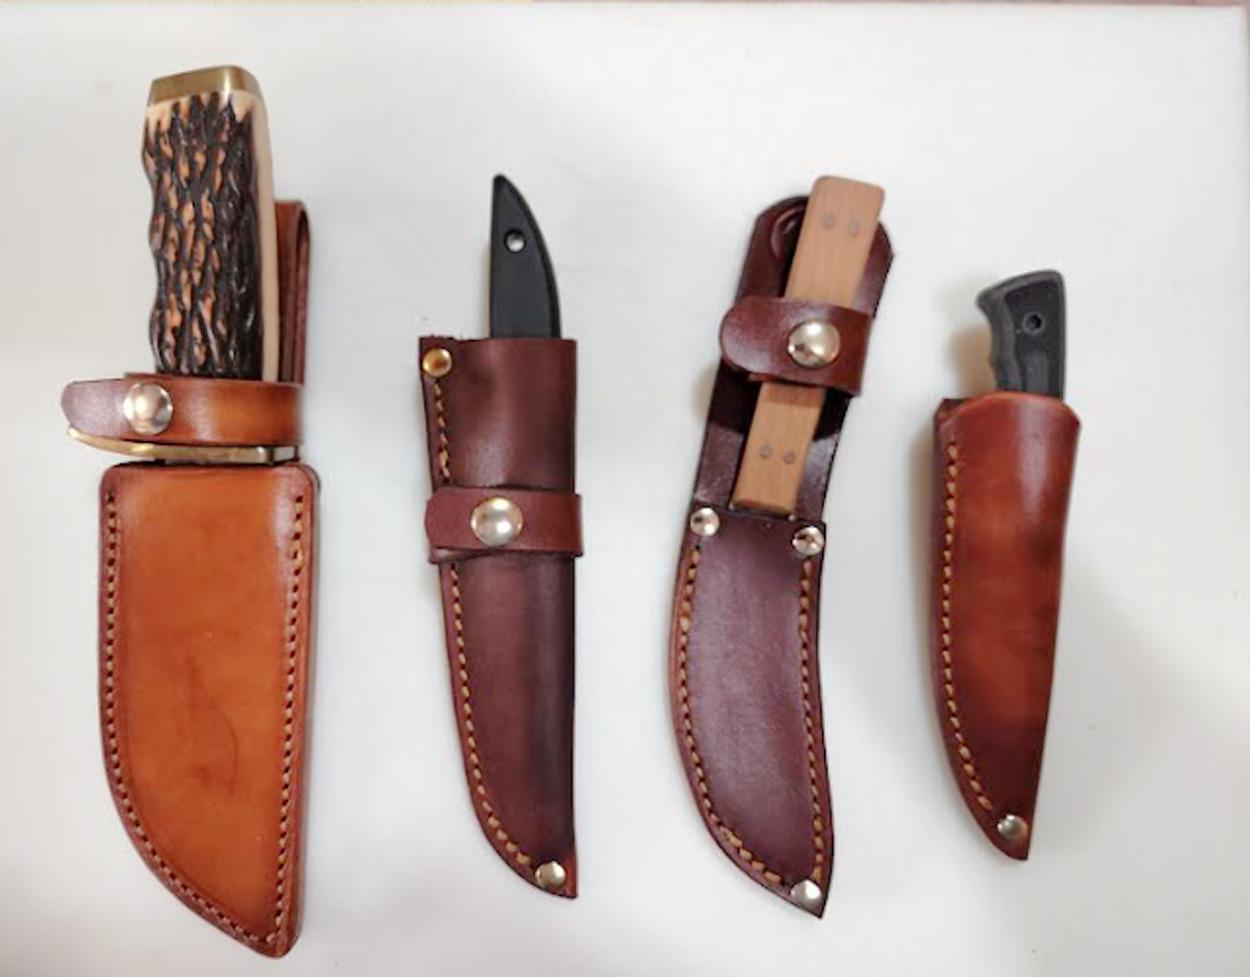
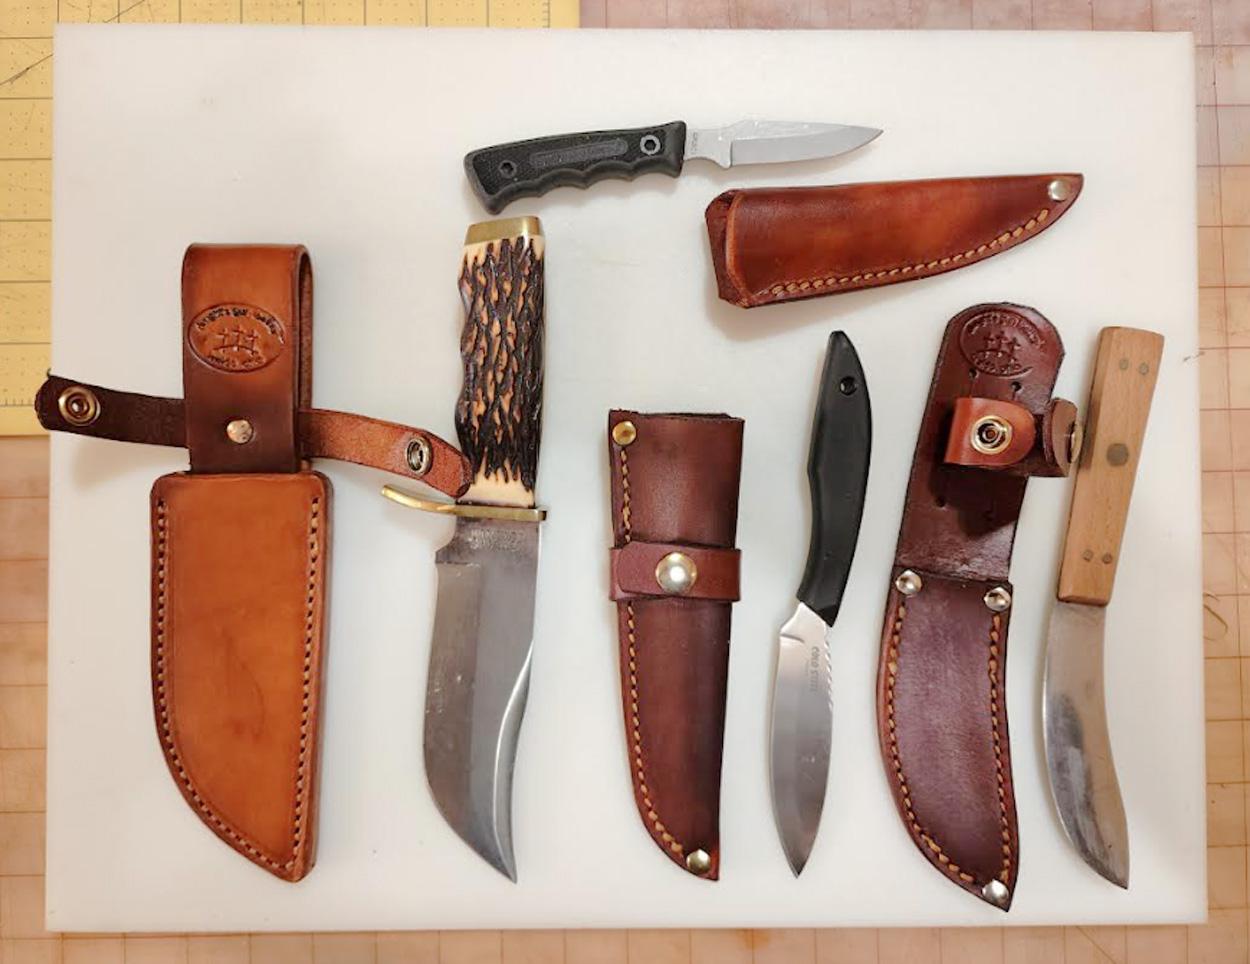
Had a fellow bring me his handful of knives that had no sheath . . . so I made em for him. Here they are. May God bless, Dwight
-
Put a coat of 50/50 Resolene and water on that inside . . . then take a glass slicker while it is still wet . . . slick the fibers down real good . . . let it dry for about 1/2 hour . . . then apply another thin coat . . You'll be good to go May God bless, Dwight
-
What would be the purpose of the conditioner??? Resolene pretty much seals up the leather . . . I've never put on 4 or 5 coats . . . but I'd come close to betting that it would be water proof by then. May God bless, Dwight
-
Finishing Coat
Dwight replied to Cactusman's topic in Dyes, Antiques, Stains, Glues, Waxes, Finishes and Conditioners.
I have never used Pro Resist . . . so I cannot tell you what will happen. All the purses I have ever done either get ONLY an oiled finish . . . or I give them a coat of Resolene . . . 50 / 50 diluted with water. I do that inside and out . . . unless there is some kind of liner inside. My buddy at Tandy said the rub off is probably from the antiquing . . . so you would have to cover the antiquing with either another coat of Pro Resist . . . or Resolene. I've never had any rub off after the Resolene treatment . . . and no dye separation when it gets wet. Find a piece of scrap . . . re-do it to match what your project has done on it . . . then mess with the Resolene or Pro Resist. That's what I would do. May God bless, Dwight -
Resolene will give you a similar effect if you do not dilute it before using it. Try cutting it 50/50 and do a light coat with it. Resolene when thinned makes a really good finish Maybe your product will do the same May God bless, Dwight
-
I was over at the factory on Tuesday . . . had a minor problem with the Boss . . . One of the techs took it (and me) back to his desk . . . went thru it with a fine toothed comb . . . adjusted this and that . . . replaced a small part . . . showed me where I missed on cleaning it up . . . When he was done . . . he ran off a piece that was equivalent of two pieces of 8 oz . . . then he stacked up a pile that just barely went under the carriage . . . and sewed it like a Singer doing silk. We shook hands and he walked me back to the front . . . no charge . . . I like those kinds of companies May God bless, Dwight
-
Thanks . . . didn't know the real name . . . just what Joanne used to sell it as. May God bless, Dwight
-
My Chinese copy of the Singer came with a bobbin that does not hold much like you said. It also said I had to use thread that wound a certain way. I generally use carpet thread for just about anything I sew that is not done on my Cowboy4500 . . . it is strong enough that it can cut your fingers if you try to jerk it and break it. Using a mike . . . it is just a couple thousandths bigger than the cotton thread that came in the machine . . . and it works great so far . . . and I've never been able to pull a seam apart that I've sewn with it. I used to get it at Joann's . . . will have to go to Michaels from now on from what I heard. May God bless, Dwight
-
Between belt and pants
Dwight replied to Stetson912's topic in Gun Holsters, Rifle Slings and Knife Sheathes
Just for kicks and giggles . . . make another one . . . use most of the same techniques . . . Just change one part of it. Make the back completely flat . . . mold the gun over a hard . . . flat . . . table . . . and then put it together. It will be two pieces . . . front and back . . . and in actuality would be called a pancake except for the way it is carried with the belt loop. You will be 100% amazed at how much MORE COMFORTABLE it will be . . . especially if you do not have an extra layer or two of body between your belt and your bones. I have two holsters made that way . . . got the idea from a couple Milt Sparks holsters . . . I sometimes carry a full size . . . all steel . . . 1911 . . . or an officer's model . . . all steel 1911 . . . both weigh in at 3 lbs fully loaded . . . and I can carry them all day and not be noticeably bothered . . . because that back is FLAT against my poor boney body. My usual carry piece is also a 1911 . . . but it is a little Springfield micro compact . . . in .45 ACP . . . looks identical to their EMP model . . . But you did a good job on this one . . . stitching is much more even than my hand stitching . . . which is why I use a machine. One other suggestion . . . try super wetting your leather . . . and forming it with a vacuum sealer of some sort. I use an actual vacuum pump . . . don't really have to do a lot to get the molding to come out the way I want it. Thanks for the pics . . . May God bless, Dwight -
One of the advertisers on here . . . Toledo sewing machine co . . . handles used machines. He may not give you a deal . . . but his machines are good . . . and a used price will save you some money. Buy the used one . . . learn how to use it . . . let it make you the cash for the new one . . . then sell the used one. May God bless, Dwight