


JoeSnuffie
-
Posts
382 -
Joined
-
Last visited
Content Type
Profiles
Forums
Events
Blogs
Gallery
Store
Everything posted by JoeSnuffie
-
I made this a couple days ago. It's a letter stamp jig and could probably be modified to work with most stamps. It's working great for me. Since the materials are cheap and easy to drill, someone with more talent than I have could probably make jigs for letters on a curve or in a circle.
-
 mtroyalguy, an arbor press is on my list of things I need. Before I stamp, I check that the jig is as straight as I can get it and press it down with my hand to give it some impressions to help keep its place. You really have to be careful but if you are, and use a couple light strikes to get it started, then you can whack it good a couple times and it looks great. It's also very important that you're using a very hard and stable surface, something that won't shake or bounce. I don't know what the maximum length would be but I imagine I'd have a really hard time with a word as long as the jig without using a press.
 -
From the album: Leather Things
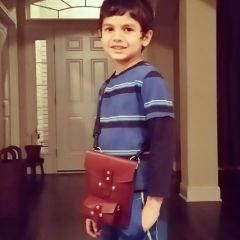
My youngest son posing with the carry case I made him for his Kindle Fire HD. It has simple loops to secure the flaps and a small pocket to hold his charger. He described what he wanted and I guess I got it right because he is really excited about it. -
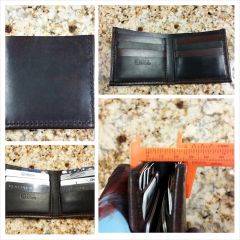 The card slots pieces are 4.5" wide x 2.5" tall. Starting at .5" from the top, I cut out a .5" wide x 2" tall piece on either side, leaving a .5" x .5" tab on either side of the top. I do this on all but the last card slot (the one at the bottom that has my logo in the pic). I mark two horizontal lines on the slots, as well. The first is 1.75" from the top, and this is where I stitch it to the slot behind it. The next line is 2.25" from the top and this is where the slot placed on top will stitch into this one. I get a .5" drop for each card slot that's stacked on top. The line also serves as a glue marker so I know where to put the contact cement. I stack card slots, stitching one on top of the other. In this wallet, I didn't stitch the first slot to the liner so I would have a large pocket, but in others I have stitched it and made it a normal size slot. I skive, glue and fold over in half the tabs towards the center. This means I am only stitching one layer of leather to the liner. On the side along the edge, I trim off .25" from the tab and the same thing applies, I am only stitching one layer of leather. After stitching all the slots together I place them on the liner piece and line them up with the outside and bottom edge. I mark the inside stitch line with a couple holes from an awl, then glue, poke holes with a stitching chisel then I stitch. I'll usually measure things again after stitching the first side of the slots, and sometimes cut a little off of the other side of the liner if I want to tighten things up a bit. As far as keeping the thickness down, the edges that i stitch are pretty thin but the overall thickness is controlled by the leather thickness. This is 2.5oz or about 1mm thick leather. I also like using about a 1.75oz goat skin that makes a much thinner wallet. There are other ways to make slots, using a single piece of leather and cloth dividers inside, but my customers have been asking for wallets like this. I'm sure I'll try other methods though.
 -
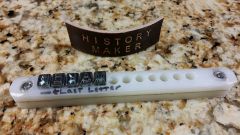
I cut a strip from a cutting board, sanded the surfaces smooth, cut it in half and glued the two pieces together with contact cement. I then scribed a center line and, using a wing divider, marked the center of the holes. After marking the holes it was time to drill. Make sure the material is thick enough so that the shaft of the stamp is completely enclosed in the jig, with none sticking out. You want the jig putting even pressure on the stamp and if any of them are sticking out the back, the mallet will hit the stamp and not the jig. I used a 6mm bit and the holes go all the way through, which makes it easy to pop out the letters with a dowel from the other side. !!!IMPORTANT!!! When drill each hole, after the first, of course, you must place one of the letter stamps in the previous hole. If you fail to do this, the plastic will bend and the hole will not be large enough.After drilling the holes, I countersunk some screws with nuts on either side to keep it all together. You can see that I marked mine to show the orientation and placement of the letters. I did it this way because I hols the jig with my left hand while my right hand holds the mallet. To use, I place the letters in as far as my fingers can press, making them as straight as I can. Then I smack them in with a mallet and use pliers to carefully straighten them. Because the shaft of the letters is tapered, they will be pretty tight once you set them in. I stamp the first word and then pop out the letters by pressing them out from the back with a dowel. They pop out pretty easily. I did this for 1/4" stamps but this could be modified for other sizes.
-
From the album: Leather Things
I got a request from my church for 50 bracelets with "HISTORY MAKER" stamped on them and got to thinking how I could bring the cost down. Time is money and stamping this many letters is a lot of time. I cut a strip from a cutting board, sanded the surfaces smooth, cut it in half and glued the two pieces together with contact cement. I then scribed a center line and, using a wing divider, marked the center of the holes. After marking the holes it was time to drill. Make sure the material is thick enough so that the shaft of the stamp is completely enclosed in the jig, with none sticking out. You want the jig putting even pressure on the stamp and if any of them are sticking out the back, the mallet will hit the stamp and not the jig. I used a 6mm bit and the holes go all the way through, which makes it easy to pop out the letters with a dowel from the other side. !!!IMPORTANT!!! When drill each hole, after the first, of course, you must place one of the letter stamps in the previous hole. If you fail to do this, the plastic will bend and the hole will not be large enough.After drilling the holes, I countersunk some screws with nuts on either side to keep it all together. You can see that I marked mine to show the orientation and placement of the letters. I did it this way because I hold the jig with my left hand while my right hand holds the mallet. To use, I place the letters in as far as my fingers can press, making them as straight as I can. Then I smack them in with a mallet and use pliers to carefully straighten them. Because the shaft of the letters is tapered, they will be pretty tight once you set them in. I stamp the first word and then pop out the letters by pressing them out from the back with a dowel. They pop out pretty easily. I did this for 1/4" stamps but this could be modified for other sizes. This has saved me a lot of time! -
From the album: Leather Things
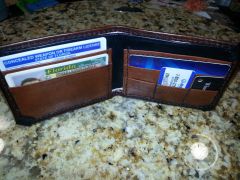
This is another prototype wallet. This one can get pretty fat. It's shown empty and also holding 18 cards. It comes in at just under 1.25 " thick with 18 cards. There are 6 traditional card slots and 2 really deep slots that easily hold 3 cards each, sideways. This is a test piece so the fit and finish aren't what I like but it turned out really nicely for having been handled so roughly, re-cut, re-stitched, re-glued, etc. It's really time consuming but it's how I learn. I try and try and make notes of what fails and what works. -
From the album: Leather Things
I think the edges really turned out great. I sanded, slicked, applied just a little Tandy All In One Acorn Brown for some color then polished with bees wax until my arm was tired. -
From the album: Leather Things
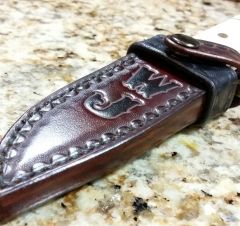
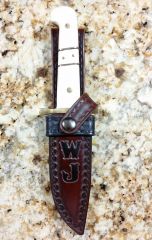
I decided to give my youngest son his first knife. It will be a couple years before he gets to use it but it's his and he's just thrilled about it. The sheath looks bulky because the knife is pretty small. It was a small and very cheap knife that was included with a larger cheap knife I bought to be part of a cowboy shooting costume. I think it really turned out well. -
From the album: Leather Things
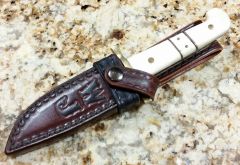
Another view of the sheath. -
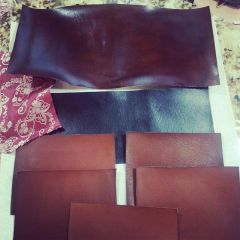
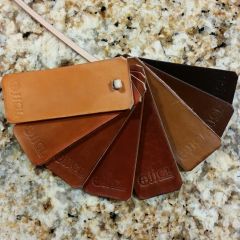 I've had little squares with the colors on them but they were just too small and were easy to misplace. These are large enough to give a good comparison against other objects, which was something I really needed, especially when deciding what color to use in wallets. I figured it was about time to get organized.
 -
 Yep, this stuff. I've been using it for the past 2 months and I love it. I dilute it with about 25% water to thin it out and allow it to penetrate the leather better.It's an off white cream and when it dries, it's water resistant and can be biffed to a beautiful shine. I don't use it on sheaths and holsters, but I do use it on just about anything that bends a lot - bracelets, wallets, belts, etc. I use it after I've dyed and buffed the leather. I apply to both sides and it really makes the flesh side smooth and beautiful. I've found that if I buff really well after I dye, this stuff is all I need to prevent This is especially great with the thin goat skin and kip skin I've been using for wallets. The dye can be really harsh on those thin leathers and the Kiwi Leather Lotion puts the life right back in. It's cheap and can be found at Walmart, by the way. All of these color swatches are finished with only this leather lotion and other oils or sealers. They look great, feel great and the dye doesn't rub off.
 -
From the album: Leather Things
My favorite tans and browns left to right: Tandy Desert Tan, Tandy Acorn Brown, Fiebings Oil Spanish Brown, Fiebings Spirit Tan, Tandy Range Tan, Tandy Range Tan thinned 50% (with alcohol), Fiebings Oil Walnut, Fiebings Oil Dark Chocolate. I was really surprised to see that diluting the Tandy Range Tan with alcohol produced a different tone of brown. Rather than the red tones it came out with grey tones. I assume this is due to a chemical reaction by adding the alcohol Diluted with water, it's just a lighter version of the red tone. -
From the album: Leather Things
I'm working on a nice and somewhat classy design for a thinner wallet. This isn't a minimalist wallet, but it only holds a few cards. I added the smaller slots to hold those smaller cards I seem to be collecting. They never last on a keychain and get lost in a normal card slot. Please excuse the rough stitches, I replaced the original stitching that was thicker and a different color. Hey, it's a prototype. -
From the album: Leather Things
This shows the liner I used. It gives it a little bit of color and unique design. The liner comes from one of my wife's silk saris that she no longer wears. Please excuse the rough stitches, I replaced the original stitching that was thicker and a different color. Hey, it's a prototype. -
From the album: Leather Things
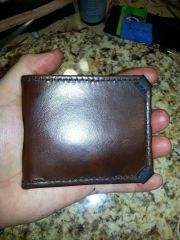
This is the prototype wallet in my hand. Seems a perfect size for me. This is about as small as I can get it and still hold the cards and cash I need. Please excuse the rough stitches, I replaced the original stitching that was thicker and a different color. Hey, it's a prototype. -
Aluminum will still oxidize, but not nearly as damaging as with iron or steel. Usually you just get a light film that can be buffed off. I'm no expert but I've bought chrome tanned leather several times and each time the salt content is different. Once, I had to wash it to remove the insanely heavy salts, and other times there have been no detectable salts, but I'm sure they're still there in tiny amounts. Another reason I wouldn't use chrome tanned is because it doesn't always keep it's shape when molded, though I've had some that got very stiff (this was the one I had to wash to remote the salts) and I had some that was so soft it will never hold a shape. Maybe you're not looking for a shaped case, but if you are you might have better luck with veg tan. I've always read that you shouldn't mix chrome tanned with metals but there are experts here who can give better advice.
-
I've been playing around with the 'hand rubbed' look and have settled on a method that is quick and easy. I thought I'd share it with anyone wanting to try it. The results are very consistent and can be reproduced over and over as long as you use the same dye colors. I'm able to get nearly identical effects from both cow and goat. I start with Tandy Eco-Flo All-In-One in Desert Tan and finish with a darker color or spirit or oil dye. I wet a sponge (wet all the way through but not dripping) and apply a couple dabs of the dye to the sponge. I fold the dyed side of the sponge over on itself and make sure the dye is squished in pretty well and not clumped on the surface. Then I rub this into the leather, using a lot of pressure and circles that are the size of the 'hand rubbed' color variations that I want to produce. I do this a few times until there are no high contrast streaks, but not so much that I have a thick, even coat. I'm not trying to get an even finish, just enough so that it sticks and provides a little resistance to the final dye color. I apply a little more dye as I need it. I let this set up for a couple minutes. I'm not letting it dry, just letting the surface seal a little. Then I get final dye ready. In the pictures you see, I used Fiebing's Pro Oil dye in Walnut. I use a wool dauber an cover a section at a time. The size of this section depends on how well the Tandy dye sealed. I want to make sure the dye doesn't soak right in, rather, i want it to sit on the surface a bit so I can rub it in. In the picture of the wallet shell, I was able to cover half of the piece at a time. After the second dye has been applied, I use a folded paper towel and some pressure to rub this in. The alcohols in the second dye will dissolve the Tandy dye a little and cause them both to mix and form a thicker dye. Since the Tandy dye was applied unevenly, and the rubbing also spreads the dye unevenly, you get a beautiful uneven 'hand rubbed' look. Don't spend too long in one section, though, and rub a little onto the other sections to make sure it all blends nicely. That's it. Just finish the pieces however you want and make something beautiful.
-
From the album: Leather Things
New wallet should be done soon. Once the leather finish dries I can cut and stitch. Goat skin and silk. My amazing wife gave me one of her sari's for some beautiful lining fabric. This wallet will be a little on the thinner side with 2 card slots on the left side. The right side will have one card slot, one horizontal slot between it and the black liner, an in front of the card clot, a smaller piece with 3 vertical slots for camera memory cards or those smaller plastic cards like you get for car insurance or pharmacy and grocery store loyalty programs. Hopefully some progress pictures will help someone else who wants to make a wallet. The pieces are all oversized at this point and I'm not really using a template, just credit cards, dollar bills and such to make sure I have the sizes right. -
 Love the color contrast.
 -
 Thank you. Do you mean as a wallet with the clear windows inside or as a sleeve for a plastic ID holder? I've just recently ventured outside of bracelets and small cowboy items and I'm excited about new ideas.
 -
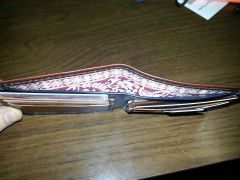
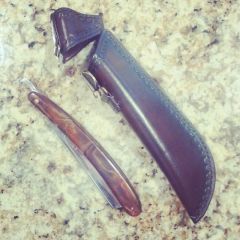
Straight Razor Sheath
JoeSnuffie commented on JoeSnuffie's gallery image in Gallery- Our Leatherwork
 Here's a picture showing the detail of the buckle. On the back it says "GUTOS MODELE DEPOSE"
 -
Straight Razor Sheath
JoeSnuffie commented on JoeSnuffie's gallery image in Gallery- Our Leatherwork
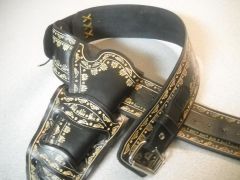
I got the buckles on eBay in 2012 so the details are now gone, but it shows the description as "THREE BRASS BUCKLES CLIP BRONZE BY GUTOS STRAP BOOT EQUES". I can't find anything like them anywhere. I'll post a closeup of a couple of them when I got home. They were so unique that I bought 6 of them with the idea that I'd find a use for them some day. -
Straight Razor Sheath
JoeSnuffie commented on JoeSnuffie's gallery image in Gallery- Our Leatherwork
You're welcome to use the design. It was pretty simple actually. And thank you for the compliment. It really means a lot when you're just starting out. -
Straight Razor Sheath
JoeSnuffie commented on JoeSnuffie's gallery image in Gallery- Our Leatherwork
Thank you. I really appreciate the compliment.