


JoeSnuffie
-
Posts
382 -
Joined
-
Last visited
Content Type
Profiles
Forums
Events
Blogs
Gallery
Store
Everything posted by JoeSnuffie
-

This Week's Wallets
JoeSnuffie replied to corter's topic in Purses, Wallets, Belts and Miscellaneous Pocket Items
Nice designs. Are you splitting the leather yourself or having W&C do it for you? I see you hand cut. How are you getting the curves so consistent. -
 Yes. If you click the image it should open the gallery image with a short description of it. It wasn't too hard to make and saved me a lot of time and the customer a lot of money. Some people might be more picky about the spacing and overall results but it was just what my customer needed to bring the price down. Here's the direct link to it: http://leatherworker.net/forum/index.php?app=galleryℑ=23795
 -
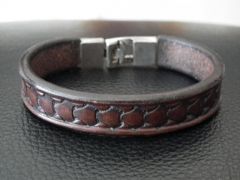 I got the buckle from eBay. I've bought dozens of styles and this is one of my favorites for thicker leather bracelets. It's very secure and surprisingly easy to put on and take off. To attach it to the leather, I scuffed up the inside of the buckle, cut down the leather to a snug fit and used a generous amount of crazy glue. Nearly 3 years later it's as strong a bond as ever. It's very similar to this: http://www.ebay.com/itm/10-Sets-Bronze-Tone-Hook-Clasps-24x12mm-for-Leather-Bracelet-/140899905240?pt=LH_DefaultDomain_0&hash=item20ce49eed8
 -
Wesley's Knife Sheath
JoeSnuffie commented on JoeSnuffie's gallery image in Gallery- Our Leatherwork
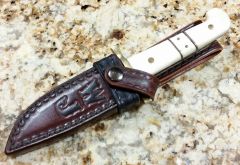 It's stitched into the 'frog'. The belt loop, band and snap are all stitched together and snap onto the sheath with a heavy duty snap on the back. The tightness of the band makes it very difficult to undo the snap in the back but if this were intended for use, I'd probably make the back and belt loop all one piece. Since this is a display piece I was playing around and seeing if I could get creative because that makes it seem less like work and more like entertainment.
 -
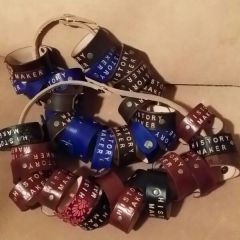
Thanks. This is the letter jig
-
From the album: Leather Things
I just finished bracelets my church ordered for a youth trip. I managed to keep the cost to $6 each by keeping my time per bracelet under 10 minutes. I used my letter jig and they aren't as finely finished as something I'd charge $25 or more for. They turned out just perfect for the price I think. My daughter thinks they're fantastic and she's the age that will be receiving them. -
Thanks, Dirt4fun. Now I have something else to try. One of these days I'll stop feeling uncomfortable when women stare at me in the scrap booking isle. They give me a look that lets me know I'm not welcome.
-
I've asked them about even smaller sizes and I hope I hear back. I'll be ordering a few more colors of this and I'll be set for at least a year or more.
-
I used a rubber mallet. I didn't know if this would work so I wasn't willing to risk more than the $2.99 that the embossing template cost me. The sell a tool that presses it together but I'm not sure how well it would work with leather since it's made for paper. It uses rollers to press it. I embossed some more goat and dyed it.
-
From the album: Leather Things
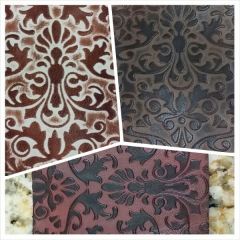
I dyed some pieces of goat that I embossed -
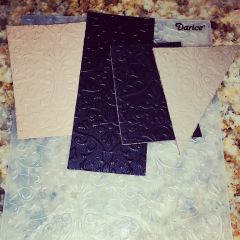
I decided to try using a scrapbooking embossing template on some thin leather. I'm hoping to be able to add some unique accents to wallets. I've had several female customers ask if I can add something 'feminine' to some of the wallets and card wallets I've made and I saw this at the craft store and thought i'd give it a try. I didn't properly case the leather - I was in a hurry just to see if it could be done. Left to right: 1.75oz goat 1.75oz dyed and finished goat (the flesh side seemed to soak in enough water) 2.5oz dyed and finished calf (not enough water wold soak in) 2.5oz calf These are the leathers I use for wallets so that's what I tested. The back of the leather is also embossed, causing the pattern to be more defined than if it were just one sided.
-
From the album: Leather Things
This is using an embossing template available at many craft stores. -
Not finding a suitable place to buy Tiger thread, I ordered 250 meters of .8 mm black braided and waxed thread from China. I only have Tandy braided thread to compare but I really like it. Only took a month to get here. The picture shows it next to Tandy braided thread that's about 1.2mm I'd my cheap caliper is accurate. It's not as stiff and heavily waxed as the Tandy but it's nice and I'll be ordering a few more colors. This is perfect for thinner wallets.
-

From the album: Leather Things
Next to Tandy braided thread. -
 Thanks.
 -
You're right. I just stuffed it with 5 cards and it stretches just fine, but very tight. I guess I was being a little sarcastic.
-
Question About Stitching A Wallet
JoeSnuffie replied to Leprechaunleather's topic in Leatherwork Conversation
I don't do a groove. I'm using thinner and softer leather combined wit braided thread that lays flat anyway. I'm using 1mm and thinner for the shell. If i was using thicker and stiffer leather I suppose I would. I do crease a line where I stitch and use a stitching chisel, though. I do the holes for the front and back of the stitch separately, making the angle of the hole opposite so that the saddle stitch looks great from both sides. -
From the album: Leather Things
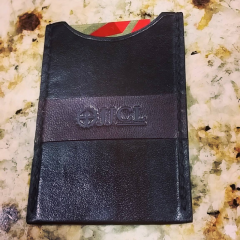
This is another design I'm trying out. This one has a single slot in the middle that can hold 3 cards comfortable and 4 if you want the seams to bust. You can stuff a folded bill or two under the band that's on one side. This band is 1.25oz goat and the body is calf skin skived down to .5mm. -
From the album: Leather Things
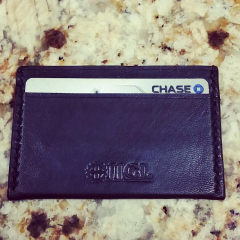
I've got a few orders for something like this so this is my first test piece to make sure I can get it right. 1.75oz goat.There's a card slot on either side with a slot in the middle for folded cash. -
The hand stitching looks great. Just stick your fingers in ice and keep going.
-
They look great. I think we're all ready for the detailed instructions.
-
Not Really Showing Off
JoeSnuffie replied to David Bruce's topic in Purses, Wallets, Belts and Miscellaneous Pocket Items
You'll probably have to paint to get any lighter than the color of the base leather. I use some decent acrylic paints that are thinned just a little with water to get it to soak in a little and bond. It's thin enough that several coats are needed and I haven't noticed it flaking or rubbing off on my kid's belts and bracelets. Also, I am using a more expensive paint, not the cheap craft stuff at WalMart because the cheap stuff would barely bond with the leather. -
OurJud, I'm using veg tanned goat for thinner wallets and card slots. It's thin and very stiff, even after dye, oil, finish and wax. Since you're not interested in dying and finishing yourself you should look for book binding leathers. They have some thin and reasonably stiff leathers that are already finished. Unfortunately, it can be expensive. Typically, though, goat will be a lot stiffer than cow at the same thickness. All of my 1mm veg tanned cow is a little soft, though it still takes stamping. http://www.hollanders.com/index.php/bookbinding-supplies/bookbinding-leather.html This wallet is from 1.75oz, or about .7mm - .8mm veg tanned goat. It is really easy to dye and work with. Oh, and here are the pieces of goat before I stitched it up
-
Sponge is my guess as well but it almost looks like there might have been a white paint applied as well. Maybe it's just because of the dark colors used. Whatever they did, it's beautiful.
-
Tiger Thread Now In The Us
JoeSnuffie replied to Dangerous Beans's topic in Leatherwork Conversation
I started using them a couple months ago and they are superior to the Tandy needles and anything I've gotten at the fabric store.