


JoeSnuffie
-
Posts
382 -
Joined
-
Last visited
Content Type
Profiles
Forums
Events
Blogs
Gallery
Store
Everything posted by JoeSnuffie
-

From the album: Leather Things
Herman Oak drum dyed before a final burnish. This leather wouldn't take water at all and neither wetting or beeswax or Edge Kote did much for it. Sanding also produced a nasty frayed look. I made a mix of plain Elmers school glue with about 2/3 water, painted it on the edge then rubbed it in. I slicked it when it was nearly dry and it got pretty good but still not good enough. This morning I decided to try sanding a little. I used some 220 grit on edges then ran it across a burnishing wheel and now it's ready for some beeswax or saddle soap. I know this might not be the best way but I was getting frustrated and this worked for me. I'll post another pic when I finish it up this evening. -
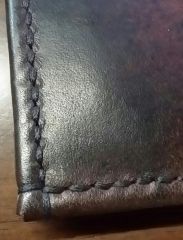
 I pull the thread really tight at the end, then back stitch a couple holes. I make sure I pierce the thread with the needle on the way back to sort of 'lock' it in. I pull both threads through on the same side, whichever is the 'back' or least noticeable, cut them so that just a little is hanging and then I burn them. I use synthetic and it melts to a blob that I flatten down. Never had one back out from this treatment.
 -
Making Belts For Craft Fair
JoeSnuffie replied to paprhangr's topic in Purses, Wallets, Belts and Miscellaneous Pocket Items
Coach makes DIY stitched belts. They cost more than the ones that come finished. Why am I not in on this scam? http://www.coach.com/online/handbags/Product-boxed_cut_to_size_reversible_belt-10551-10051-61945-en?cs=aq0&catId=18909 If you use synthetic thread, I suppose you could cut the thread a little longer before you cut the leather then melt it into a blob so it won't come undone. -
I'll ask my wife how many of the old knives I can have and I'll make a couple more tools. You could use spoons or forks as well but the knives of this set have the thickest steel where I made the cuts. We have too many knives, anyway. It's always the forks and spoons that seem to get lost.
-
I'll post some pics this evening and link to them here. I'll also tell you for sure if it really works like I think it should but I beat, twisted, picked at and pulled a test piece and it didn't fail.
-
I just had a fun time burnishing a belt made from a drum dyed Herman Oak strap. It doesn't really take water and even when it does, it doesn't burnish well. I mixed some Elmers School Glue, the white stuff, at about 1/3 with 2/3 water. I painted it onto the beveled edge then rubbed it in really good with my finger. When it's getting close to try and it's really tacky, I rubbed the edges with my burnishing stick and it seemed to work beautifully. The key seemed to be to wait until it was almost dry. When I get home this evening I'll hit it with something to waterproof it, probably mop and glow then some beeswax. This might not be the best way but it really worked well for me with leather that just didn't want to soak anything in.
-
A glass burnisher might get veg tanned leather a lot smoother for you, requiring less of a coating of 'shiny stuff'. I have leathers that turn out nice and shiny without any help at all and some that would need a lot of help. I guess it depends on the grain. You can apply 50/50 Mop and Glow / Water in thin layers until you get close to the finish you're looking for then one of those leather pastes or waxes to finish it up to a shine.
-
You might try braided thread. It will lay much flatter and looks thinner than the typical stranded type of the same thickness. The thread in the picture is from the 25 yard spools of Tandy stuff. I also hammer it down when I'm done to lay it nice and flat. I also used the 6 prong 3mm Pro Line stitching chisel form Tandy (88045-06) and it seems to work just great. After ordering a few spools of the braided thread I'm sold on it and have ordered 5 more colors of some .8mm.
-
From the album: Leather Things
This is a close up of the Tandy braided thread. -
Prototype Slim Wallet
JoeSnuffie commented on JoeSnuffie's gallery image in Gallery- Our Leatherwork
 You are welcome to borrow. Much of what I know I borrowed from others but the tiny slots is something I managed to come up with on my own out of necessity.
 -
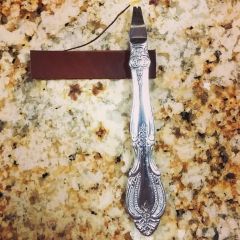
I lost a few tools (I have no idea how since everything was in storage) during a move last year and now I'm a couple edge bevelers short. I found myself needing a really small one last night and remembered seeing someone on eBay selling a similar item a few years ago. This was really easy and fast.
-
From the album: Leather Things
This was a lot easier than I expected. A cheap kitchen knife, a Dremel, a belt sander, a strop and 15 minutes is all I needed. Now I have a great beveler that cuts better than the store bought models. -
I have great results with the tandy safety skiver but I have to strop the blade a lot. I also flip the blade over and hit the other side when I strop. Different leathers skive differently and you'll learn what to do. Softer leathers are a pain in the butt but a sharp blade eventually gets it done. For some really soft leathers, like my 2.5oz calf skin, I will make many light passes, just taking a little off at a time. This stops the binding and stretching that I get if I put enough pressure to get a deeper cut. Experience is an important part that comes with time but what you can do right away is make sure the blade is sharp and, at least with the safety skiver, make sure you strop both side - after all it only takes a couple seconds to remove the blade and flip it over. I only replace the blades when they get nicked or worn to the point they won't sharpen.
-
If you dye then mask the area well, maybe the Krylon Reflect-A-Lite stuff will work. You might also consider using glow in the dark paints as well. They get pretty bright under direct light at night and might enhance the reflective paint a little.
-
On most bracelets, after I dye, I use a 50/50 mix of Mop and Glow and water applied with a very lightly damp sponge. Some leathers need more applications and you can control how shiny it gets by how many coats you apply. This seals the dye in pretty well and stops almost all rub off but I have no idea how it might work for preventing stains on lighter leather. I also apply a diluted Kiwi Leather Lotion as my top coat after some neatsfoot oil. This gives the leather a more 'buttery' feel, makes it pretty water resistant and gives it a nice shine without looking like plastic. I'm no expert and I am sure some here have the perfect solution. This is just what has worked for me.
-
When I make bacon theme bracelets (brown and undyed design), I use Tandy Super Sheen on the undyed leather and that keeps it nice and clean. It also leaves it a little shiny and would crack over time if it were something that bends sharply like a folding wallet.
-
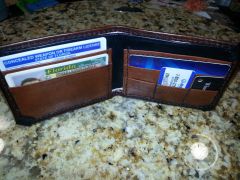
This is all about 2.5oz. it comes in right at 1mm. It's a little bulky for me but it could hold 20 cards or more I bet. I stuffed it with 18 and it seemed like it has a little more room in there somewhere. The wallet I carry is made from 1.75oz goat and I love it.
-
Short Wallet
JoeSnuffie replied to pitman's topic in Purses, Wallets, Belts and Miscellaneous Pocket Items
Love it. So clean and classy. -
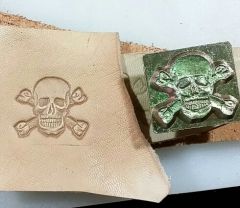
I've done a lot of stamping in thinner leather and it's not difficult if you use a proper backing. I uploaded a picture that explains how I did it. Click it to read the details.
-
From the album: Leather Things
This is just to show that it's possible to get a good stamp in really thin leather. You just have to have a proper backing. I use a scrap 12oz under a scrap, super soft, 2.5oz. I use a c-clamp to press it down because a mallet just won't do the job. -
I run the stitches back on themselves a couple holes then have both thread come out the same side, whichever side will be noticed the least. then I use a lighter to quickly burn then I press the threads down. I've also been using braided thread lately and I make sure I run the needle back through the thread when I back stitch after I've made sure it's all pulled tight. Depending on the thread, and you'll have to figure out how your thread melts, you will leave different lengths when you cut. Just enough to form a tiny ball that can be smashed into the stitch line and be barely noticeable.
-
Anyone Know What Weight Of Leather This Is?
JoeSnuffie replied to bylinesupplyco's topic in How Do I Do That?
This looks like about 2oz. The first pic is 1.75oz and the second is 2.5oz. -
BDAZ, that's a great idea, glad I could at least inspire you a little. When more eyes start looking at this stuff better ideas come out of it.
-
I guess I should have mentioned in this post that this was created for an order of about 50 bracelets by my church to give to students. They wanted me to make this as cheap as possible. I'm not fast on the letters as I should be and it takes me close to 10 seconds per letter. That's 2 minutes per bracelet. With the jig, I'm at about 20 seconds to stamp it all. Since they're the paying customer and are thrilled with the results and the cost savings, I'm happy with the jig. If it were any other customer I'd charge them for a proper stamp to be made for all of it. $100 would get me a delrin stamp in any font and pretty designs, after all. But this customer wants cheap and fast.
-
Kevin, I really like that. I'll have to give that a try, too.