


JoeSnuffie
-
Posts
382 -
Joined
-
Last visited
Content Type
Profiles
Forums
Events
Blogs
Gallery
Store
Everything posted by JoeSnuffie
-
Dye also comes out of my boots and expensive comfy shoes when they get wet. Not a lot but if I rub a cloth over them while wet, you can see the color bleeding off.
-
You can line it with another piece of thin leather or you an use cloth. I like to use 1.75oz cow and goat and I typically line it with silk. These are thinner wallets but it has plenty of heft for the style. Gluing it to another thin piece back to back is a good idea.
-
Some hardware stores might have them and you might be able to find some in a boating store. I've seen the shackles online but never wholesale and I'm pretty sure not made in the USA.
-
Latest Knife And Sheath
JoeSnuffie replied to rawcustom's topic in Gun Holsters, Rifle Slings and Knife Sheathes
Both of these are beautiful. -
Finish Edges Wallet
JoeSnuffie replied to Usenzt's topic in Purses, Wallets, Belts and Miscellaneous Pocket Items
This is the burnisher.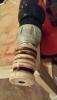
-
Any Way To Fix An Accidental Impression?
JoeSnuffie replied to StrigaMort's topic in How Do I Do That?
With thinner leather, I can turn it over and use a modeling tool to press it out. Sometimes it works, sometimes not. LTC has the best answer in my opintion. -
Newbie Intro And Jewelry Findings Question
JoeSnuffie replied to LeatherLvr's topic in How Do I Do That?
I've never braided leather but if it's chrome tanned you might not need to do anything at all to it. If veg tanned, someone else will have to answer as to best process of cutting, dying finishing and braiding. With the bracelet shown, I stamped, dyed, finished, oiled, etc. and then I cut the ends to fit the clasp and glued them in. I've worn it a few years with no problems and I haven't had a customer tell me of a problem either. Another note on the clasps, there are clasps similar to the one I showed that have a set screw in the back. I have a couple of those as well and it's a tiny screw with a point on it that digs into the leather. -
Finish Edges Wallet
JoeSnuffie replied to Usenzt's topic in Purses, Wallets, Belts and Miscellaneous Pocket Items
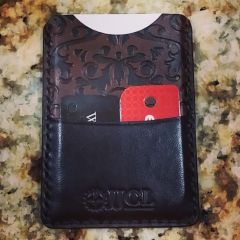
I'll take a picture of the burnisher this evening but this is a card wallet I carry. It's been in my pocket, with keys and coins, for a couple months. The edge isn't perfect but it's holding together well. At the edge is 4 layers of 1.75oz calf skin. It's very thin and soft and seems to hold together quite well with the glue and water mixture.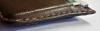
-
Newbie Intro And Jewelry Findings Question
JoeSnuffie replied to LeatherLvr's topic in How Do I Do That?
I use crazy glue to secure clasps like these. I scuff up the inside and cut the leather so it's a tight fit. I've never had one come loose. -
Take a sample piece and try a little rubbing alcohol on a sponge. That might wipe a little off or at least dull it a little. If that doesn't do it, try a little acetone or nail polish remover - just a little. I use alcohol and acetone to strip bad finishes for repairs and you can remove just a little or you can start to remove the dye. You'll probably want to oil after this because it can dry out the leather.
-
Maybe it could work for a pirate as well if I stamp it with a skull and cross bones.
-
From the album: Leather Things
Mahogany and black calf skin. Embossed with a compass rose. -
From the album: Leather Things
This is using Eco Flo that was mixed about 50/50 with alcohol then airbrushed. -
Whats The Hardest Area Of Leather Construction To You?
JoeSnuffie replied to DavidL's topic in How Do I Do That?
Dwight is right about the dye not sinking in on typical leather but the thin calf skin I use gets soaked through. It's soft and pretty porous and you can see the color on the other side unless you do a really light coat. One of the hardest parts for me was consistent cuts of the same items, like wallet pieces. Paper patterns are nice but they aren't precise. I had 2 acrylic templates made with holes to mark the important places and a curve on one side in case I wanted to add one. It's amazing how much time this saves me and it was less than $20 shipped to have them made. I provided them a file made with LibreCAD and I was proud to finally use the CAD class I took 22 years ago. With the rigid template, I can be sure that the lines are always straight and the marks are the same from piece to piece. No more measuring over and over and creasing those curved pieces is super simple now, I just trace the template. -
Whats The Hardest Area Of Leather Construction To You?
JoeSnuffie replied to DavidL's topic in How Do I Do That?
I've been airbrushing dyes lately and I am thrilled with the results over other methods when I'm looking for a nice smooth dye job. It goes on evenly, dries very fast and I can get any shade I want by diluting it and I can easily control how much hits the leather. I also use a fraction of the dye for the same results. Another benefit is that I can get a great even coat on the flesh side without using minimal dye. My airbrush setup is CHEAP! It's rigged from a $20 model car set. For edge finishing, I cut, leaving excess, then I sand it with a belt sander to an even edge. Because I am using 3oz and under leather, I have to be really careful. After I sand, I dye then apply a mix of elmers glue and water and wait for it to dry a little. Then I burnish to a beautiful shine - the burnishing wheel is canvas covered, mounted to an old drill that's attached to the bench, and waxed regularly. The glue mixture really helps those thinner and softer leathers to stick and hold firm and hold a nice burnish. For cutting straight lines, I have a stainless ruler with a thin cork backing that holds the leather quite firmly. I also use a rotary cutter which prevents the leather from bunching up under the blade. For gluing, I use contact cement from the hardware store and apply it carefully with a cotton swab, let it set like the instructions say, then stick together. I also scratch or sand the grain side if its been dyed or finished. Another great tool has been a chasing hammer. It's like a smaller cobbler's hammer, but it's what I need for the smaller items I make. I use it to hammer over the glued pieces for a better bond. It's great for flattening the thread after I stitch as well. And it also works great for making nice folds, whether for a passport case or the rolled edges of a wallet pocket. -
I've found that airbrushing the dye can leave you with almost no rub-off. You also use a fraction of the dye to get the piece done. Many of the Fiebing's oil dyes don't seem to airbrush well, it's like they want to stay really wet to sink in. Eco Flo and Fiebing's alcohol based dyes work well. I usually mix in alcohol to control the color intensity and come Eco Flo colors, like forest green, require several heavy coats to look right, while crimson plays nice with just a couple normal coats. Fiebing's alcohol dyes go on great every time. When I'm done, I let the piece dry then rub it down with a piece of old tshirt and often there isn't enough rub-off to even show. I've been carrying around a card wallet that was airbrushed with a 40/60 mix of Fiebing's Chocolate alcohol dye / Isopropyl Alcohol for about a month and it shows no signs of rubbing off or fading on the edges. I didn't seal it, I just finished it off with Kiwi Leather Lotion. Neetsfoot oil will really darken the chocolate colors, sometimes almost to a black, so be careful with oiling. You don't need to spend a lot of money to start airbrushing, either. I started with a Testors canned air model car kit that I paid less than $20 for at Hobby Lobby.
-
This one is Navy blue and black in calf skin. It's embossed with music notes.
-

From the album: Leather Things
Navy blue and black embossed calf skin -
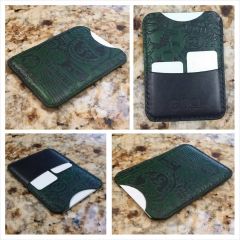
Embossed2PocketBrownBlack
JoeSnuffie commented on JoeSnuffie's gallery image in Gallery- Our Leatherwork
 Thanks. I appreciate the compliment.
 -
 That's a piece of 4-5 oz veg but I've used the tools to bevel several layers of 1.75 oz as well. As long as you keep it sharp it should work with about any leather.
 -
CardWallet EmbossedRussetBlack
JoeSnuffie commented on JoeSnuffie's gallery image in Gallery- Our Leatherwork
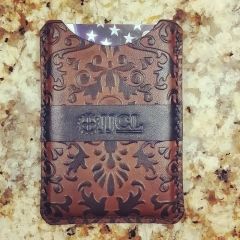 I used a papercraft embosser. They're on clearance this week at Hobby Lobby and usually on sale at most hobby places. http://leatherworker.net/forum/index.php?showtopic=54435
 -
Finish Edges Wallet
JoeSnuffie replied to Usenzt's topic in Purses, Wallets, Belts and Miscellaneous Pocket Items
This edge is rolled over. A Skiver was used to thin it first. This edge is using really thin leather. It's glued together with contact cement then gently sanded on a belt sander. I dye the raw edges and then use a q-tip to soak the edges in a mixture of about 1 part school glue to 2 parts water. Once this soaks in and dries to the point where it gets a little stiff, I use my burnishing wheel and make it pretty. My burnishing wheel is a 1.5" dowel with different size grooves wrapped in waxed duck cloth. This has a bolt through it that's attached to an old drill that I screwed into the side of one of my benches. Works great. If you like, I can take more pics of the edges this produces because they're beautiful and they stand up to abuse of keys, coins and every day use. -
 I love this style.
 -
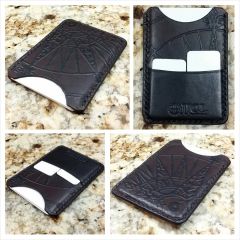
I added a second pocket to this slim card wallet style to hold those small cards. 2 cards fit quite nicely.
-
From the album: Leather Things
I added another pocket to the slim card wallet for those small cards.

