


JoeSnuffie
-
Posts
382 -
Joined
-
Last visited
Content Type
Profiles
Forums
Events
Blogs
Gallery
Store
Everything posted by JoeSnuffie
-

From the album: Tools and Supplies
-
I was going to buy one but I hate buying something I can make. My first try was with a stainless paint scraping knife but it didn't hold an edge for long. I ordered a 5.25" round industrial fabric cutting wheel made of high speed steel. With my dremel, belt sander, piece of steel and wood for a handle and tin solder to hold it together, I made a great round knife. It's perfect for me and that high speed steel blade gets as sharp as the straight razor I shave with and holds an edge for a long time. The fabric cutting wheel cost me $16 shipped and will make 2 or 3 round knives depending on the style you need.
-

Leather Lining Kidskin/goat
JoeSnuffie replied to mrtreat32's topic in Purses, Wallets, Belts and Miscellaneous Pocket Items
You're right. I don't know why, but they don't list the goat as 'goat'. This is a link to one of the goat hides they sell.http://www.ebay.com/itm/310935126425 -
When I first made my knife I sliced the tips of my fingers a lot as I got used to it. I'm happy to report that there hasn't been any blood spilled in over a week.
-
I prefer mine because I can skive very easily with it and it's perfect for cutting out smaller thin pieces with straight lines, like wallet pieces. I mark the cut lines on the flesh side then place rock the round knife from one end to the other. This produces a straight cut without the dragging you sometimes get when dragging a blade.
-
Leather Lining Kidskin/goat
JoeSnuffie replied to mrtreat32's topic in Purses, Wallets, Belts and Miscellaneous Pocket Items
Well I've never seen this site. I guess I was looking at the wrong book binding sites because these prices are really good. Thanks for the link! -
Leather Lining Kidskin/goat
JoeSnuffie replied to mrtreat32's topic in Purses, Wallets, Belts and Miscellaneous Pocket Items
I've bought a few hides from this seller http://www.ebay.com/usr/distantdrums. Considering the price of leather from book binding sources, this isn't too bad. I can usually get 4 - 5 wallets out of the sizes they sell after I work around the unusable parts, so it more than pays for itself. Even bad scars and marks can be hidden easily because most of the pieces are covered by another piece. You just have to make sure you plan ahead to hide scars. The other hides I've bought from ebay were never from the same seller twice. I just search and if it looks good I'd get it. -
Leather Lining Kidskin/goat
JoeSnuffie replied to mrtreat32's topic in Purses, Wallets, Belts and Miscellaneous Pocket Items
I use veg tanned goat and calf split to 1.25oz to 1.75oz fir interiors. I airbrush on the dye and it seems to often soak through the thin leather. The goat is pretty firm even that thin and will be a lot stronger than calf of the same thickness. The calf, while soft, isn't like garment leather and can hold some stamping, makers mark, creasing, etc. I get the goat from a variety of places but have settled on waterhouse leather for the calf skin because they split it at no cost and the price is fair. Not only does this give me the perfect thickness for the wallets I am making, but it makes the flesh side nice and clean. -
It looks similar to this. https://www.youtube.com/watch?v=QRh7Z5my2iQ
-
BK11 Neck Sheath
JoeSnuffie commented on barehandcustoms's gallery image in Gallery- Our Leatherwork
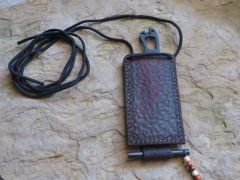 I really like this one. It's really simple but the stamping really makes it look fancy.
 -
Request For Belt Holster Pattern
JoeSnuffie replied to warrior193's topic in Leatherwork Conversation
What you're describing sounds like it will work. For new designs, I usually end up trying and failing at least once before I get it right. -
Thanks! The window is a material that's made for reports, proposals, documentation, etc. The kind you use with one of those binding machines that takes all the papers and puts them on plastic or metal rings. My company hasn't published paper documentation in a few years and we have stacks of this stuff. It's thicker than transparency sheets and seems to wear pretty well. The wallet I carry has an ID pocket on the outside made with this stuff and it's doing fine.
-
I'm getting better at this. Things that used to take a long time are much easier. This is bison and calf. The bison started out about 50% thicker than this and I hand skived it with my home made round knife.
-
From the album: Leather Things
Bison with an ID window. -
Another Wallet
JoeSnuffie replied to JoeSnuffie's topic in Purses, Wallets, Belts and Miscellaneous Pocket Items
I'm using my cell phone, a Samsung Note 3. I have a decent camera but I'm lazy and it's just so easy to post images from my phone. I played with the white balance settings last night and got a lot better results. I think I'll get some better lighting at my bench, as well. The more I sell stuff the more I see the need for better pictures. -
I hammer on a cutting board that allows the prongs to sink in a couple mm and I have gotten in the habit of checking the back side each time to be sure I see the prongs sticking out of the leather. Otherwise I end up making new holes or stretching the tiny hole in a different shape with the needles.
-
Another Wallet
JoeSnuffie replied to JoeSnuffie's topic in Purses, Wallets, Belts and Miscellaneous Pocket Items
Thanks. The inside is 1.75oz calf skin. The outside is about a 4oz chrome tanned piece that I got from a couple lots of scraps. -
I've stitched countless pieces of scrap strips together for practice and I still miss it now and then. Every few stitches I still check the slant of the hole just to make sure I'm doing it right. But still, at least in 1/3 of the pieces I make, I have to clip the thread, pull it back out a couple stitches, then redo it the right way. I'm sure at some point I'll be able to do it without thinking, but I'm not there yet.
-
Are you using stitching chisels or pricking irons? If not that will really help. Also, look for videos on saddle stitching. These two things helped me the most with my stitching. It's really important that each stitch be done exactly the same. When finished, cut the thread close, but leave enough to melt to a ball and poke back in a little.
-
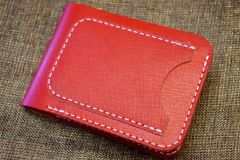 I really like this color.
 -
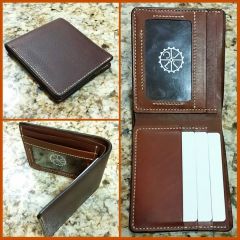
I finished this wallet this evening. I can't seem to get some of these browns to show correctly in a picture. The liner is chocolate and a bit lighter than the picture shows. The shell is pretty close. I like the contrast a lot more than I did when I started.
-
From the album: Leather Things
Finished -
They're actually both brown, but the darker one is chocolate treated with leather lotion, making it very dark. The other, sort of russet colored, is cow. It came from a couple lots of scraps I purchased and as best I can tell this is a chrome / oil tan. Or just chrome that's been heavily oiled and waxed. A lot of these scraps have some really nice looking defects. The rest of this hide has really great spots, scratches and blemishes.
-
How Do You Store Your Pricking Irons?
JoeSnuffie replied to 3wunder's topic in Leatherwork Conversation
Actually, it's Jeff. Joe Snuffie is what drill sergeants called you if they couldn't remember your name. I guess I wan't very memorable because I got called that a few times back in 1993 at Ft. Jackson. It just stuck and I've used it ever since. -
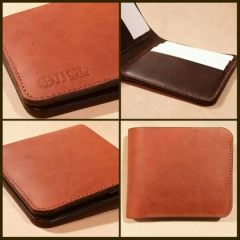
I make my interiors with either goat or calf. Calf is much softer but goat can be split a lot thinner and still be strong. This is made with 1.75oz calf skin. The total width of the liner is 8.5", which allows the pockets to hold business cards. It's about 3.75" tall now but that might get trimmed a little when I do the final fitting. It just depends on how it looks. You can tighten it up a little if you don't want to allow for business cards but you're also going to make it a tight fit for more than one credit card in each pocket. When I use chrome or oil tanned leather for the shell, it always wants to spring open a little at first. I set a cutting board on them with some weight, overnight, and this helps a lot. but usually, after a couple days of use, they're worn in and lay flat on their own.