


JoeSnuffie
-
Posts
382 -
Joined
-
Last visited
Content Type
Profiles
Forums
Events
Blogs
Gallery
Store
Everything posted by JoeSnuffie
-
I use contact cement on the rolled edges unless I'm adding a cloth liner. In that case I stitch as well. I use contact cement from the hardware store and NOT rubber cement. I also dilute the contact cement about 33% with acetone to make it easier to apply with accuracy to leather. Follow the directions on the contact cement and it will not come loose once it cures. It can be pulled apart but the leather will tear, not the glue.
-
The 1mm skives just fine so you can roll the enges over no problem. The .5mm is goat and it comes pretty thin. Also, you're correct about it being a book binding leather. I like it because the grain is much more like cow than the pig skin, though it does have a more pronounced grain than cow.
-
Feeble Attempt At A Wallet
JoeSnuffie replied to RobDude30's topic in Purses, Wallets, Belts and Miscellaneous Pocket Items
I wish my first 3 or 4 wallets turned out like this. A tip for the stitching around the edges: I carefully measure and mark the lines for the stitching on the outside and inside of the shell where it folds over. I measure so that there is a tiny gap between the liner and shell at the edge when folded over. This makes sure the lines will be perfectly straight and not stretched when I stitch. I then use my stitching chisel to make holes on the stitch line that will be on the outside then I flip the leather over and make the holes that will be on the inside. this makes sure the saddle stitch offset is proper. An important note - When I mark the stitch line I place a mark at the beginning and end and then use a straight edge to mark the line.if I find that the leather edge isn't straight after I mark the line I can cut it straight again. When I stitch, I make sure the side I'm stitching is glued in place with contact cement and use an awl to poke through the liner. -
1mm is good for what I call a 'substantial' wallet feel but not quite as hefty as a biker wallet. With the right leather, it can be soft and luxurious. I'm using 1mm calf skin and it oils and waxes to a very soft and flexible texture. The thicker wallet in the pics I shared is made from this. It's not any thicker than my last store bought wallet that was made from .5mm leather because it is a simpler design with fewer pockets and no cloth lining. My personal preference, however, is the thinner goat leather. You'll need to practice a lot. I have a stack of failures that my boys are just thrilled to use and show off to their friends. As you practice, take careful notes on what works and what doesn't. I have stitched things together and then unstitched, adjust and repeated many times. I take a lot of pictures of the pieces under a clear ruled grid for reference. I also started using a free CAD application called LibreCAD to save my successful patterns which is much better than the paper patterns I've drawn.
-
Glad it was useful. I thought about using the forks or spoons but with 3 kids, we seem to lose a lot more of them so when we buy more silverware we have way too many knives. Also, at least with our knives, the blades are pretty thick at the base and give a much thicker tool end than the forks or spoons would.
-
I use thick leather on top of a plastic cutting board on top of granite. The leather lets it go all the way through and the plastic keeps the tips sharp. When I do a sheath I punch one layer at a time. Any miner imperfections in the lineup of the pieces can be fixed with sanding. I also keep the prongs waxed pretty well to make them easier to pull out. Don't rock it or the prongs will bend, I use a plastic bone folder to put pressure on the leather and pull straight out.
-
My 2.5 oz comes in at about 1mm and the 1.75oz is coming in between .66 - .75mm depending on where I measure. Because it's goat it has a much tighter flesh side and just seems a lot thinner than it really is when compared to cow. I wish the US would adopt the metric system and make my measuring a lot easier. And thank you for the compliment, I really appreciate it.
-
For wallets I've started using 1.75oz for thinner wallets and 2.5oz for the thicker ones. I hand stitch everything and it's pretty cheap to do so. you can get a roll of the 3 stranded waxed Tandy thread at many craft shops for just a few dollars and some size 2 needles (if they're not specifically for leather make sure you round off the sharp tips on some fine sandpaper). Once you're ready to spend some more money you can get some 1mm and .8mm braided thread. I think it looks much nicer and is easier for me stitch with but that's just a personal preference. For cheap tools, I've made a couple edge bevelers from cheap stainless knives. http://leatherworker.net/forum/index.php?showtopic=53775 The first wallet is 1.75oz goat and the second is 2.5oz calf skin
-
I start by cutting the blade of a kitchen knife off, leaving about 1 inch. I use a heavy duty, reinforced cutoff wheel with my Dremel. After the blade it cut, I use my belt sander, with a 120 grit belt. I sand it down until it's about the width I want. Then I round off the taper because it looks nice. Note the bowl of water - I don't let the blade heat up too much by dipping it every few seconds. Once I'm happy with the taper, I place the blade on a 2x4 and hammer it to give it a slight bend. I hammer on the side I was cutting on because it has a couple marks where I slipped. I'm going to hit this side with the belt sander anyway. Taper the outside edge of the curve but not to a sharp chisel point - you'll just end up stabbing your fingers. This is the curve with the taper. I'm not sure if there is an ideal curve, but this seems perfect to me. I use 800 grit wet/dry paper to polish out the rough marks and make sure the tip is rounded and stab resistant. I replace the thicker reinforced cutoff wheel with a thin cutoff wheel for more precise grinding of the cutting groove. I hold the knife to the table and rotate the cutoff wheel onto the blade. This gives me pretty good control. I run the Dremel on the lowest speed and take my time. The total groove length is 1/4' from the tip while the cutting edge is set back 1/8" from the tip. Carefully work the cutoff wheel from side to side to make a wider cutting groove. Here are two sizes of bevelers. The cut like butter and are infinitely better than the bevelers I ordered from Tandy. They're a lot cheaper, too.
-

From the album: Tools I've Made
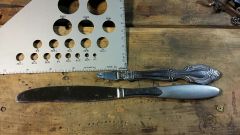
Here are two sizes of bevelers. The cut like butter and are infinitely better than the bevelers I ordered from Tandy. They're a lot cheaper, too. -

From the album: Tools I've Made
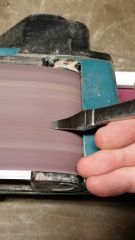
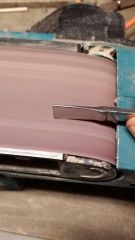
I use 800 grit wet/dry paper to tidy up the cutting edge and square it off. Note the angle, it needs to be like this so you don't ruin the cutting edge. After this I run it over my strop until it's shiny then I use a 1mm thread rubbed with jewelers rouge and strop the inside of the cutting edge using the same angle as used with the sandpaper. -
From the album: Tools I've Made
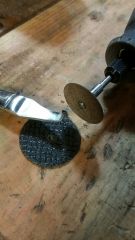
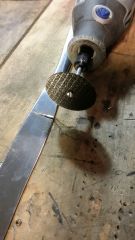
I hold the knife to the table and rotate the cutoff wheel onto the blade. This gives me pretty good control. I run the Dremel on the lowest speed and take my time. The total groove length is 1/4' from the tip while the cutting edge is set back 1/8" from the tip. Carefully work the cutoff wheel from side to side to make a wider cutting groove. -
From the album: Tools I've Made
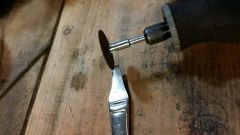
I replace the thicker reinforced cutoff wheel with a thin cutoff wheel for more precise grinding of the cutting groove. -
From the album: Tools I've Made
I use 800 grit wet/dry paper to polish out the rough marks and make sure the tip is rounded and stab resistant. -
From the album: Tools I've Made
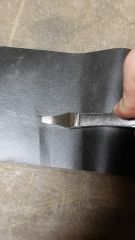
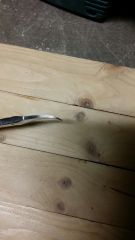
This is the curve with the taper. I'm not sure if there is an ideal curve, but this seems perfect to me. -
From the album: Tools I've Made
Taper the outside edge of the curve but not to a sharp chisel point - you'll just end up stabbing your fingers. -
From the album: Tools I've Made
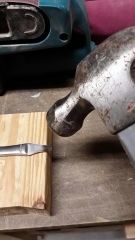
Once I'm happy with the taper, I place the blade on a 2x4 and hammer it to give it a slight bend. I hammer on the side I was cutting on because it has a couple marks where I slipped. I'm going to hit this side with the belt sander anyway. -
From the album: Tools I've Made
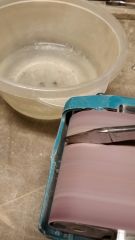
Then I round off the taper because it looks nice. Note the bowl of water - I don't let the blade heat up too much by dipping it every few seconds. -
From the album: Tools I've Made
After the blade it cut, I use my belt sander, with a 120 grit belt. I sand it down until it's about the width I want. -
From the album: Tools I've Made
I use a heavy duty, reinforced cutoff wheel with my Dremel. -
From the album: Tools I've Made
I start by cutting the blade of a kitchen knife off, leaving about 1 inch. -
 Thanks. I did it with a damp sponge and just kept rubbing it in until it was like a sticky film then wiped it down with a clean slightly damp sponge.
 -
From the album: Leather Things
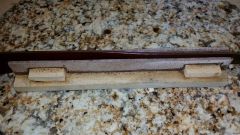
Scrap MDF to the rescue. I got tired of holding wobbly belts to sand the edges. It's about 1 inch tall and holds it steady while providing enough movement to sand the bevel easily if I need to. -
The Right Tools A Beginner Should Be Buying
JoeSnuffie replied to Woodlands's topic in Leatherwork Conversation
If you can get them cheap, the Tandy kits are great for learning basics. When I started out I got one from Hobby Lobby using their 40% off coupon. It's a cheap way to find out if it's something you really enjoy. -
Here's a pic of the glue results. I ended up sanding it down a little and hitting it with a burnishing wheel afterwards. Before the glue, sanding was nearly impossible because the fibers are so soft and waxy. The glue stiffened them up and made them sand just like untreated veg tan. The picture shows the effects of a canvas covered burnishing wheel on the dry leather. No water or wax added. I'll try beeswax or saddle soap when I get home for a nice shine.