


swivelsphinx
-
Posts
114 -
Joined
-
Last visited
Content Type
Profiles
Forums
Events
Blogs
Gallery
Store
Everything posted by swivelsphinx
-
Hey All! I'm working on a molded holster for a 9mm Beretta in 4-6 oz veg tan. I've already molded, trimmed (before stitching) and dyed. I normally would not use Velcro on this kind of project. I just don't like how it looks or feels on harder leathers, and structurally I think it is not the best option either. However, I am going with the customer's preference. What I would like to know is how I should tackle the sewing. I don't have a stitching machine for heavier leathers. and I am not great shakes at non-saddle stitch sewing. However, I am ok with following directions in a sewing book for a single project if there is a new stitch I ought to learn. The base of the "hooked" end of the velcro has a *miniscule* edge. Does anytone have any suggestions on sewing? I have already anchored the pieces with original Barge cement. Thanks!
-
Hi There! Just curious- how much are you looking for the home course stuff? Thanks, swivelsphinx
-

Shark Tales: What Do You Get When...
swivelsphinx replied to swivelsphinx's topic in Exotics, Reptiles, Furs and others
The sand shark I have *is* very sandpapery at the moment! The holster you made is handsome indeed... -
Shark Tales: What Do You Get When...
swivelsphinx replied to swivelsphinx's topic in Exotics, Reptiles, Furs and others
How cool! Thanks! -
Hi horsewreck! Yeah- I hadn't heard of such a thing either! Another leatherworker I know with 20 years more experience said he picked up these "hair on horse hide" pieces at Pensic Wars awhile ago. I will let you know if they turn out to be cow pieces, or something else! I can photograph them and see what the forum thinks they are. Thanks for the Siegel tip!
-
I make drinking horns, and need new wholesale supplier for *polished steer horns*. Crazy Crow and Eagle Craft are a little high priced. Any suggestions? (I already have a good source for water buffalo horn)
-
I am theoretically about to get my hands on some tanned "hair on horse hide". I am planning on stripping the hair off so I can make use of the top-grain. If it looks like a veg tan, I would like to try carving it. My current plan is to do this mechanically rather than chemically. If anyone has alternative suggestions for de-hairing methods involving electric shavers and hand razors, please post!
-
Thanks!
-
Hi Wyvern! Thanks for the encouragement! At the time I wanted to start doing leather carving, the closest location for instruction was an hour away and I had no car. I taught myself using Stohlman's books. I would like to be taught more about "traditional" carving styles, such as Sheridan, so I can expand my skill set.
-
Hey Leatheroo! Good tips! Thank you. Yeah, I *had* this heavy belt on posterboard initially, but at some points it popped off, and I would just keep going on like that for awhile. I have been considering using a long thin piece of plywood instead to mount such projects in future. I will try that Peter Main tip on the next piece I do! I appreciate advice that will improve the quality of my work in the future. The Swivelsphinx *laughs*
-
Hey MADMAX22! You are absolutely right! It would have cut down on the prep time had I used "fresh from the tannery" skirting or similar. I probably would have if the project had not taken nearly 2 years to complete. I had the stuff sitting in my leather pile for a few years, and I wanted to experiment to see what it would take to make it useable for carving. I got my answer!
-
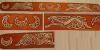
This is the most complex leather carving I have done to date. The design work took over a year to complete. I do not draw knotwork well, so I spent a great deal of time looking at existing zoomorph designs in media ranging from manuscripts to metal castings. Once I found features in several different zoomorphs I liked, it took me awhile to blend features from the master images into composite creatures with 2 different graphics programs. The moons were easier. I based them on small half-moon castings from a pair of sterling earrings. After multiple redrawings, the final version was scanned, and the printout transferred onto the leather. The leather I used was a 10-12 oz reject sole bend from a shoe factory that was somewhat tan/brown to begin with. I had to remove a heavy, dark waxy coating from the flesh side. I did that with a palm sander and a "Super Skivver" prepped it by casing first in a solution of vinegar & water, then a solution of Lexol conditioner &water. The carving was *really* tricky. I used swivel knives, X-acto, and even an old fashioned cuticle knife on the outline, and several mallets of different weights to do the stamping work. The coloring was fun! I blended Fiebing's Tan, Lt. Brown with just a spot of Mohogany. I cut the resulting color by about 1/4 with reducer. I applied this dye to the entire project with brushes. After this dried, I applied an acrylic antique. The final color was Fiebings White Dye. I applied that in multiple layers, which gave the image a lot of depth. I finished the white areas first with satin shene. I waited overnight for it to dry, then added 3 more coats. After another night of drying, I applied a few layers of Atom Wax to the whole thing and buffed between coats. Finally, applied TLC Saddle conditioner to the flesh side to increase the belt's flexibility. Please feel free to critique this piece. ( see photo compostition below)
-
sharkskin
swivelsphinx replied to Kevin King's topic in Purses, Wallets, Belts and Miscellaneous Pocket Items
Nice stuff! -swivelsphinx -
Comment on Wickett and Craig Leather vs. Tandy: Bellies You know, I used to look at bellies from Tandy, and consider them as an option for when I couldn't afford shoulders. Then I tried buying bellies from W&C. You know, I'm still a customer of Tandy, and sometimes they have amazing deals on leather. However, I am not impressed with their bellies. They tend to be kinda tough, lots of crinklly sections, and very irregular in thickness and coloration. The W&C product is an "entirely different animal". Holy Smokes... you can't beat the price! Last time I bought, it was 9 bucks for a whole "economy"belly, and I bought 10. They were abso-freakin' beautiful! Tandy charges over double*per foot*for an inferior product. The W&C product is GORGEOUS. Their thickness is consistent, they look as if they are properly smoothed... and they'll split 'em for ya! The color tends to be pale tan to light salmony pink- they case wonderfully and dye *fabulously*. Unless I'm doing a huge project or require leather for a heavy belt, I do nearly *all* my projects (including intricate carving) in the W&C veg tan bellies. I can't thank the blacksmith who recommended I buy from these folks enough!
-
Back during the winter holidays, I decided to treat myself to some new adventures in exotic leathers. I have wanted to experiment with shark for awhile. So, I checked with various resources, and I found some good sized pieces of sand shark (tiger) at what seemed to be an *amazing* price. $25.00 per piece sized about 24"x 8", tannage unknown. Well, these pieces arrived, and I was enchanted yet mystified. Each piece is a dull reddish brown (with a few light tan spots), and has the texture of 320 grit sandpaper. I suspect they might be veg tan, no finish. I induced (yes, inductive, not deductive reasoning) from responses to another post (special thanks to Ambassador!) that shark can come in a variety of conditions once tanned. I wonder if I guessed correctly that what I have might be "veg tanned, no finish". I'd love to see photos of finished products, before/after leather finishing application pics, and read some more suggestions on methods of prep. Thanks! swivelsphinx
-
Ah HA! Yeah- I was wondering what the variables might be when ordering sharkskin. I have *two* pieces that are tanned. They are a flat brown color, and kinda sandpapery. There are a few small areas where there seems to be no color at all. I think this merits a new topic! Thanks everyone! swivelsphinx
-
sharkskin
swivelsphinx replied to Kevin King's topic in Purses, Wallets, Belts and Miscellaneous Pocket Items
Whoa! Those sound like cool pics- I'd really like to see them, but the link seems to be broken... or my browser's not letting me access the links. Any suggestions on viewing these? -
Hey folks! I received such cool suggestions and observations about stingray when I asked about cutting, I thought I'd post another related topic, this time about cleaning and dye screw ups. I do leather as a "serious sideline" at this point. I sell my work, but my production line is *very* small. So, while I love exotics, I tend to look for seconds and runoffs. Sometimes the coloring on seconds and runoffs is a little on the craptastic side. Occasionally, it's not a matter of poor color, but improper storage that's left the item dusty or somewhat dirtified. I bought a buncha nice "stingray seconds", and one of them was a cheap and cheery lookin' red. I thought it looked a little funny, so I decided to clean it off. I used rubbing alcohol. BIG MISTAKE. I realized too late that the little white spots breaking up the pattern of the 'ray were *not* in fact, little shreds of shop towel. They were breaks in the finish and color, probably caused by the isopr. alcohol. I've never had that happen before- I use rubbing alcohol to clean up my snake skins occasionally. While I *could* cut my losses and use the little cherry red hide as is, I intend to continue messing with it of course! I'd love to get some opinions on the options I am considering... or get some new ones from you all! Op #1: Apply some antiquing and call it a day. Op #2 Get a paint brush, and strategically apply some red spirit or oil dye. Op #3 Really get aggressive with some deglazer, and redress the skin with dye, antique and finish. I'll letcha know what the state the 'ray ends up in the future! -swivelsphinx
-
Hey Everyone! I thought I'd post an update to this topic. Being a cheapskate who doesn't sleep as much as she should, I haunted Ebay in the wee hours for awhile until I hit gold. I found a NIP ceramic blade from Tandy that was *probably* from the late 70's or early 80's! I'll tell ya, while it *probably* could use a machinist's touch to grind it a little, I managed to strop it a bit with red and then white rouge. It works pretty sweet! I still like my conventional metal blades too. I found a local tool sharpener who was able to handle these eeny weenie swivel blades at a *really* reasonable rate- 3.50 a piece. I can do my own stropping, I just have trouble holding an angle on a stone.
-
SWEET! I got great results when I attempted to dye some cobra skin! Turtle wax works on snake skins too!
-
Whoa! I'm *almost done* with the most challenging carving I've ever done! If I can get a good photo, I'll post it!
-
Hi! I have been a member of the site for a few years, and I noticed today that there was mention of an "Adult Forums" area. I would be interested in more information about accessing and participating in these additional forums. Thanks, Tannin Schwartzstein Name: swivelsphinx UserName: swivelsphinx IP Address: 63.209.225.47 Email Address: tschwartzstein@gmail.com
-
Hi! Thanks for the link. I have sent an e-mail to the folks who run it, and asked for clarification on the nature of the Angelus dyes they sell. I thought that Springfield carried the complete line, but didn't happen to see any purple at the time. Maybe I overlooked it. *Grins* They sure do. Huh! None of my suppliers seem to carry it right now- where are you getting yours? Thanks, Swivelsphinx No worries. I appreciate the advice. I do have the old Stolman color charts. I just was lookin' for an easier alternative first! The Swivelsphinx
-
Stingray Hide: Cutting Tools & Methods
swivelsphinx replied to swivelsphinx's topic in Exotics, Reptiles, Furs and others
Hi Dave! A bandsaw? Really! Well, I have one which I usually reserve for woodcutting, or occasionally slicing up catlinite. While I can see the logic in using a tooth for metals (one of the replies here described the "bubbles" of the skin getting an edge as sharp as glass), I was wondering if you support the stingray skin with something before cutting it. It's thinner than any wood I've cut with it and less rigid than copper shingles. I am concerned with the stuff gatting caught in the blade. Do you think I could use a scrollsaw blade designed for metal instead? My scrollsaw is a little easier to control than my bandsaw. Thanks, Swivelsphinx
