swivelsphinx
-
Posts
114 -
Joined
-
Last visited
Content Type
Profiles
Forums
Events
Blogs
Gallery
Store
Everything posted by swivelsphinx
-
 I have not seen Masters. Is it a contact cement like Barge? I have been using original formula Barge. I mostly do smaller projects like bags and collars. I need most of my projects to be bendable after they are finished, which is why I started using Barge to begin with. For some smaller projects where using contact cement is not practical, I occasionally use Titebond's hide glue. Testor's Rubber cement is good if I just need a bond to hold something in place when I sew, or need the cement for a lighter, easily discolored project. -swivelsphinx
 -
Barge is a contact cement. It's available in the us, but is classified as a hazardous material in quantities over the 4 oz tube, which limits the methods that it can be shipped when you are buying in quantity. I like it because it has a stronger bond than Testor's Rubber cement, and is bendable after it dries.
-
Pink Ostrich spur straps w/ bling
swivelsphinx replied to Double U Leather's topic in Saddle and Tack Accessory Items
Those are FABULOUS. -swivelsphinx -
I don't know if you asked the gentleman this, but what's he been doing for maintenence on his boots? Exotics are no different than other leathers- if you want them to stay looking nice, they need some care. In fact, snake may require a little more babying than say, cow because of the delicate nature of the scales. If they get wet, they should be rubbed down gently with a clean absorbant cloth or 'shammy in the direction of the scale before being set out to dry. Occasionally, they may need to be gently cleaned with a leather treatment labeled "safe for exotics". Once in awhile, a conditioner or light wax might be applied too. Boot trees are often recommended when not in use, so they will be less likely to warp or get squashed in travel.
-
Ostrich & Crocodile hides
swivelsphinx replied to Regis's topic in Exotics, Reptiles, Furs and others
Tail leather is additional "footage". It also can help some people distinguish the real thing from embossed cow, or other large lizardy beasts. The "hornback" side is very distinct, but the belly is a little harder to tell from other 'tiles, if the 'dile/'gator is small. Sometimes camians are not distinguished from these other creatures by sellers. I'm envious! I've wanted a 'dile skin to play with for ages! -
I'm a self-taught leather worker who has been fortunate to get advice from professionally trained folks who make everything from shoes to cartridge belts. The nice thing about ostrich necks and legs, is that the leather is fairly thick and durable (at least in comparison to snake). I treat it like doing overlay with deer or elk. If you have a fairly long piece, you can cut the longer/larger hangy bits on the back with something like a cuticle scissor. Then, you may want to "break the finish" of the topgrain belt leather *and* make the back of the ostrich more consistant. I use a palm sander with medium to rough sandpaper. They only need a few passes. You want the texture to be slightly rough on the top grain, and then just somewhat consistant on the ostrich. I give them both a little wipedown with a slightly damp shop rag to get rid of any dust, then apply barge to both pieces. I tend to edge things like belts *after* the two pieces have adhered properly with a smaller sized edger, then touch up the edge with a dye or an antique. People who are picky about such things also may choose to sew the two layers together. I do my punching *after* assembly, but some people don't care for that method, and prefer to puch them then line them up for gluing. If the pieces are smaller than the sander, you can sand by hand, or use a 'rougher. I use a file brush (used to clean files) for littler pieces. For roughing really narrow bits of leather such as for "frames", I get out the Dremel with a course grain barrel. One or two passes should do it. swivelsphinx
-
Fakin' The Snake!
swivelsphinx replied to swivelsphinx's topic in Exotics, Reptiles, Furs and others
I wish I did. The photos from the aution have been removed. If I find one in the future, I'll be happy to post it. swivelsphinx -
Hey: I know snake skins can be dyed... but is there a way to do a nice dye job on a skin that has already been professionally tanned? I am getting a few cobra bellies from Indonesia. They are finished, Greyish to white, and shiny. I would be fine with dying it darker, but I would not know what method or chemicals to use. Thanks!
-
australian salt water croc on ebay
swivelsphinx replied to leatheroo's topic in Exotics, Reptiles, Furs and others
Huh! If it's real, that's a sweet deal. I don't know what your experience with large 'tile skins has been, but in my opinion, if it's *that* old, you should be prepared to condition it with something like Lexol, and rolling it up in a plastic bag for a few days. Old, dry skin can crack or otherwise do damage to the scales. Also, if this skin was intended for decoration it *might* have a thin finish on the surface that you might want to break by rubbing it down with some deglazing before conditioning or use. Nifty! swivelsphinx -
Hey All: I recently bought a "genuine" 14 foot snake skin from Ebay. When it arrived, I took it out of the bag, and unrolled it.... Beautiful... soft.... pliable... medium grey... about 2-3 oz... Oh-Oh... I couldn't believe it. The skin was actually cut in a "snake shape". The scales were so deeply embossed, they had depth. They were bar shaped in the center, and became very small at the sides of the hide. Then I realized what was bothering me so much. Softness: I could crumple the leather without breaking, folding, or otherwise damaging the scales. Odor: Definitely the smell of a garment leather chrome tan. Color: Consistantly mutual grey. No pattern whatsoever. While "true white" snakes exist, they are generally bred for the pet/collector trade. You can bleach the skins, but the patterns tend to remain until they are dyed. This was not a dyed skin. Texture: This was the killing blow to me. I own a very large python skin, which I have softened a bit with a leather conditioner. While bendable, the scales can be bent away from the hide. On this specimen, I tryed prying a few big scales up, and seemed to hit a fibery underside... not scales at all. Scales should not have a "top grain"! I reported my findings to the seller, under the presumption that he did not know that the item was not the real deal. He *seemed* surprised, given the length of the piece. I know that a fresh hide can be stretched considerably, especially when still damp after tanning. Water buffal and cow are pretty big animals- 9-10 ft is not unheard of. I could see getting another 4 feet out of it with mechanical aid. Theoretically, I should be getting my money back. Just a personal experience to share with you all....
-
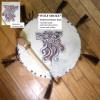
I made this drum from a Missouri River kit. I had to get a roll of rawhide thong because there was not adequate material in the kit. The striker I made out of maple, leather thong, and garment leather. The wolfhead design is pyrographed and pigmented with spirit dyes. Small amounts of acrylic were used on the reverse side because the rawhide was "greasy" and repelled some of the dye. I sealed the design with a little anti-rain sealant. This did not seem to affect the sound of the drum.
-
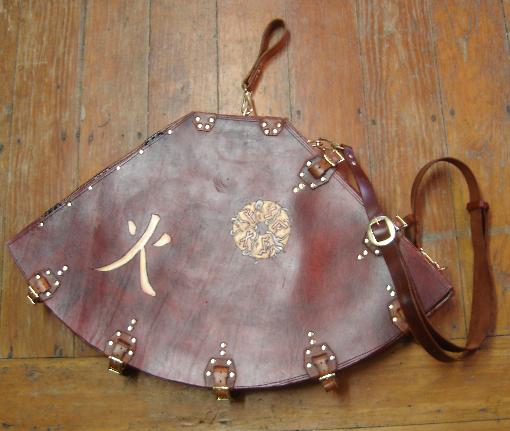
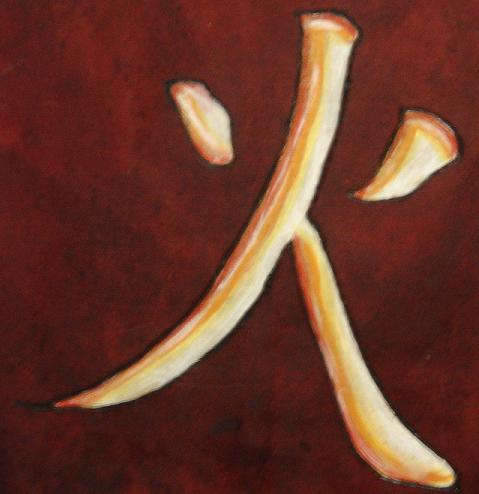
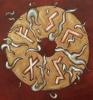
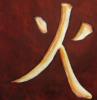
This is a carrying case I made for a pair of 27 inch fire fans. For those of you not familiar with fire spinning, a "fan" is a fan-shaped metal frame tipped with flammable wicks. This set of fans is about 18 inches high and 27 inches wide. This case was made with spare leather, which posed some interesting design challenges. The top and bottom were 8-10 oz leather. The sides were about 4oz. After sewing the "box" section (that's everything beneath the lid), it was clear that I needed a stiffener that would not be damaged by tiki torch fuel residue which might remain on the wicks of the fan. So, I dug out an old mylar infused plastic poster frame and some nylon bag stiffener. I layered them- stiffener in, mylar plastic out. I glued them in place with barge cement, then fused the sides together using plastic weld epoxy. The lid is attatched by three cabinet hinges. It is secured with brass buckles and a few snap closures. It's got two handles- one for shoulder carry, and one for grabbing one-handed and suspending the case from a hook. The body and handles were colored with spirit dyes. The kanji for fire and the five fire associated runes were requested by my friend. I worked the runes into a "fire wheel" design. The designs were etched into the leather with a pyrography set, then pigmented with Cova colors. This piece was done over the span of a year and change.

-
All Blacks Rule!
swivelsphinx replied to celticleather's topic in Purses, Wallets, Belts and Miscellaneous Pocket Items
Hey there celticleather! I was looking at your lovely pictures of that wallet.... the design was done in a very interesting style, seeming to combine inverted carving with the other kind. The outlines (I don't know what to cal them otherwise) don't look like they were done with a swivel knife.. they are too round. I'm a self-taught carver, and would like to know what tool/tools you got for those nice, round, clean lines. Thanks, swivelsphinx -
I like doing degin and illustration work on my leather projects. I have seen a fair number of drum heads that were embellished in color. So, I wanted to try my hand at this. I found that my temp. control pyrography kit worked great for outlining. It left a line with some depth and just a little texture. When it comes to the color options, I've seen acrylics, oils, markers, ink, and recently tried spirit dyes. Acrylics- I am generally never completely comfortable with conventional acrylic paints on leatherwork, particularly drum heads. I always find myself concerned that the paint will eventually loosen and come off. Oils- I don't have alot of experience with oil paint. I hear it works nicely on all sorts of leathers, so long as it is not applied thickly. If I can get some more experience, I would be willing to experiment. The main problem with oil paint for me is that it takes far too long to dry for my custom work. Markers: Oooh... it irritates me a bit that sharpies and AD markers (spirit based markers) can really work well on rawhide. I have alot of respect for illustrators who do their work primarily in markers. However, I do not like that I can generally pick out a drumhead that has been pigmented in marker fairly easily. The marker strokes often give this medium away. The color also tends to have a flat quality. Moreover, I really prefer to mix my own colors, which is not easy with markers. Inks: When these work, they *really* look great! I don't know what kind to try though. I suspect that they must have a spirit or oil base. I am looking to paint them on with a brush. Any suggestions? Leather dye: the color on the piece below was done with spirit dyes. The side in the smaller offset pic was augmented with acrylics, as the surface was a bit greasy, and shed alot of the dye. I have not tried oil dyes, which I suspect will work better on greasier rawhide surfaces. Anyone else been experimenting with leather dyes on rawhide? I would like to hear what other people have been using to color rawhide projects, particularly drums. Thanks, Swivelshinx

-
I'm looking for Al Stohlman's series of books. I lost nearly my entire collection in a fire a few years ago. Used is fine, so long as the pictures are still clear and the writing is readable. Let me know what you have, and how much you want for each title. I have a few- all the "Case making books" and the "Inverted Carving" book. Thanks, SwivelSphinx
-
Excellent! Well, an ex of mine came up with the strap rig you see pictured. I've refined it a little. *All you need to know about that rig is that everything is riveted, and all tabs and straps can be found in Al Stohlman's Case Books!* The straps go into the D rings on the bands via swivel straps now- I used to use a different method which was persnickety. The SwivelSphinx
-
Hey! Thanks for the suggestion. I would like to add a caution. Powder horns are drilled on both ends and plugged. Drinking horns ARE NOT drilled on both ends nor are they plugged! Drinking horns also are usually LINED with either beeswax or a foodsafe acrylic. Chichester may be selling horns cheaper than some, but I find them expensive in comparison to Atlantic Coral, Crazy Crow, and even Eagle Publishing. Remember- "friends don't let friends buy retail " ( ;Thanks! Swivelsphinx I'm a big fan of Moscow Hide & Fur. As I understand it,one of the two US factories that *polish* horns went out of business about 2 years ago, resulting in shortages and price hikes. I used to get *really* huge ones from Eaglecraft!
-
Oi!Thanks for the comments and advice. I was breaking new blades on my wood and steel strap cutters on wax-impregnated latigo. It could be that the blades were not as good as I thought, or that the wood strap cutter is wearing out so the blade has too much flex. I would like to learn how to make better use of the different leather knives- I need to improve my sharpening skills first! I will try your casing suggestions- thank you very much!Talking about casing - are you planning on tooling the black leather or just cutting it?I'm doing both at different times. Thanks for asking!
-
If you like them, that's cool. However, I can give you reasons *why* I don't like them. Application of spirit and oil dyes takes *loads* of practice- it took me a long time to let it "sink in" that they do not behave like paints. The water based dyes behave much more like conventional "modern" paints. I make goods that *have* to stand up to fairly rough treatment- the water based dyes don't stand up to moisture and heat as well. I think it is *good* that Tandy has a water-based line, even though I don't care for it for the work that I do. Some people are not able to work with the oil/spirit products, or have strong convictions towards using "green products" whenever possible. What I took issue with is the fact that there are people who are supposed to be *professionals* telling customers things that are simply not true about the law as it relates to leatherwork.
-
I'll be blunt. The water based "dyes" are *greatly* inferior. They act like cheap, acrylic water colors- they don't soak into the leather properly, and they *run like mad* when exposed to significant moisture. I'd worry about their vulnerability to sweat and weather even with the "water based finishes". Fine for the kiddies, and classroom situations where hazards have to be kept to a minimum, but not for me!
-
Hey. I know this post is old, but I'm gonna respond anyway. If you *really* feel like giving the situation the benefit of the doubt, place a "follow up" call, or send your follow up in an e-mail. Do not under any circumstances offer to drop your price at this point. "Shop rate" for most professionals is $65.00 per hour MINIMUM across the board. Think about what a plumber, tattooist, carpenter or blacksmith would charge per hour. It took me over a decade to realize that there will always be people out there who don't appreciate the value hand labor- it is my job to encourage them to continue to do so, nor yours. If the dude continues to hem and haws, all you can do is leave 'im with contact info, and seek greener pastures. If he wants cheap crap, he can go to the mall or a fleamarket.
-
Hey All: A few days ago, a customer comes into my shop and tells me that his carving teacher told him that spirit and oil dyes have already been banned in California, and that Oil and Spirit dyes are going to be banned in 2009 nationwide. This sounded incredibly unfeasible, as NONE of the suppliers I use have said boo about any such thing, and there is bubkus on the subject when I do Google searches. I recently called Fiebings and The Leather Factory. I was told there was *no* plan to discontinue these lines in the works, and no Federal legislation going into effect that they knew of in the near future. Sheesh!
-
Most Splendid! I always like to say mythic themes in leather work. Hope to get out to Charlton in the New Year to say "Hi"! Unfortunately, public transportation from Worcester to Charlton seems about nil for now! swivelsphinx
-
Hey! Thanks for replying to my post. I think I was not as clear as I should have been. The black latigo was not belly stuff- it was wax/dye impregnated shoulders or sides. That's why I am trying veg tan black bellies the second go around. Due to the fact that my hands are small I have an eye out for "the path of least resistance" when cutting leather. I tend to prefer cutting with strap cutters for strips, and good steel sheers (10 inch Ginghers) for irregular or round shapes. I am planning on tooling some of it. Thanks, Tannin S. Oh! I've never heard that word before- "vinegaroon" eh? I will look it up straight away. Thanks Karl! Tannin S.
-
New leather just arrived today. Veg bellies- natural and black. I was wondering if I could, or *should* soak/case the black ones before working them. I am trying the veg tan bellies in black because the 6-8 oz latigo I got from Tandy last time 'round was so dang hard and stiff it *tore* blades on my wooden strap cutter *and* the steel one! I had to beat the hell out of it with mallets and soak it in conditioner to get it to cut safely. It was an awful lot of effort to get small strips! I'm trying pre-dyed black bellies because solid black is a popular color, but I'd like to save time & money... the black bellies are the same price as the natural ones!