.jpg.dae91e99cf1ee0f26728088c11fe5cf4.jpg)
AdamGadut
-
Posts
69 -
Joined
-
Last visited
Content Type
Profiles
Forums
Events
Blogs
Gallery
Store
Everything posted by AdamGadut
-
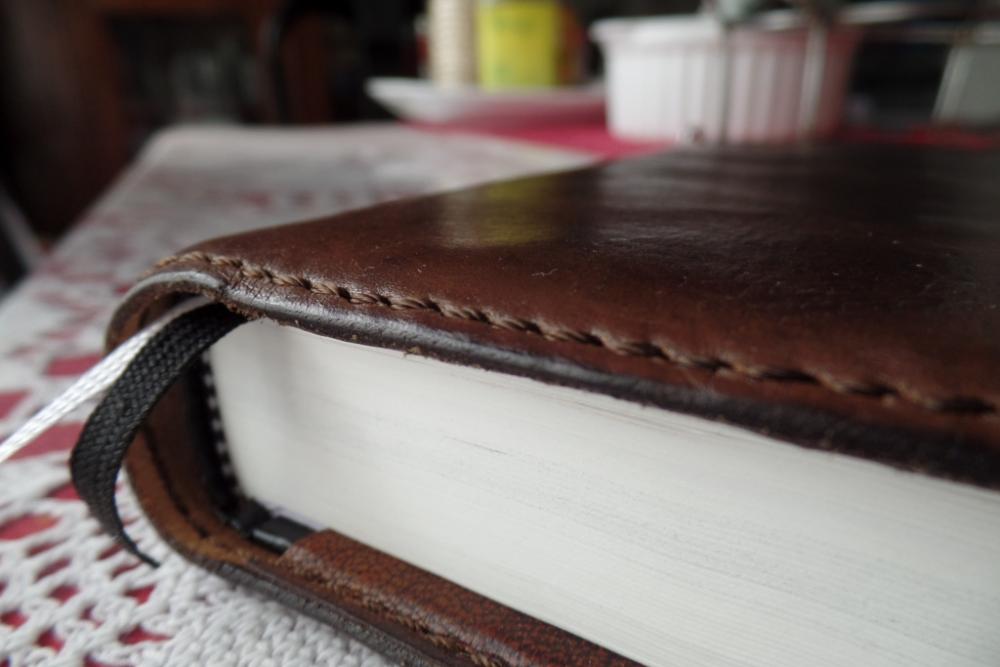
at first look i thought those were burned - pyrography style like on some wood art. Looked great
-
Leather and moisture dont mix well.. as long as your vegetable tanned stuff dont get any close to moisture rich places it wont grow molds.. i had some vegetable tanned goat hide sitting near a window, it rained a every other day and it was a bit windy so some of the cold and moist air seeped in. after a few days, the goat hides grew some molds. but, i had some cow hide - about 5 mm thick - it sat under a bed for over a year now and has been kept dry - never grew molds.
-
.thumb.jpg.b00f1d0635f260ee9e5b9aa4b3eb1080.jpg)
How to lay down wallet pockets straight and even repeatedly
AdamGadut replied to RockyAussie's topic in How Do I Do That?
neat idea -
try Tandy Leather.. they should have a lot of leather hardware to choose from
-
must be from poor tanning process, its from a shop in my country. not entirely foul though, they just build up when i have a lot of goat skins around. - like 3-5 hides in the same spot
-
Dopp Bag
AdamGadut replied to appleman's topic in Purses, Wallets, Belts and Miscellaneous Pocket Items
thats probably cow hide - this is the most common leather available.. that one doesnt look like years old at all. I'm sure it'll last many more years -
Dopp Bag
AdamGadut replied to appleman's topic in Purses, Wallets, Belts and Miscellaneous Pocket Items
looks professional did you use a sewing machine?... -
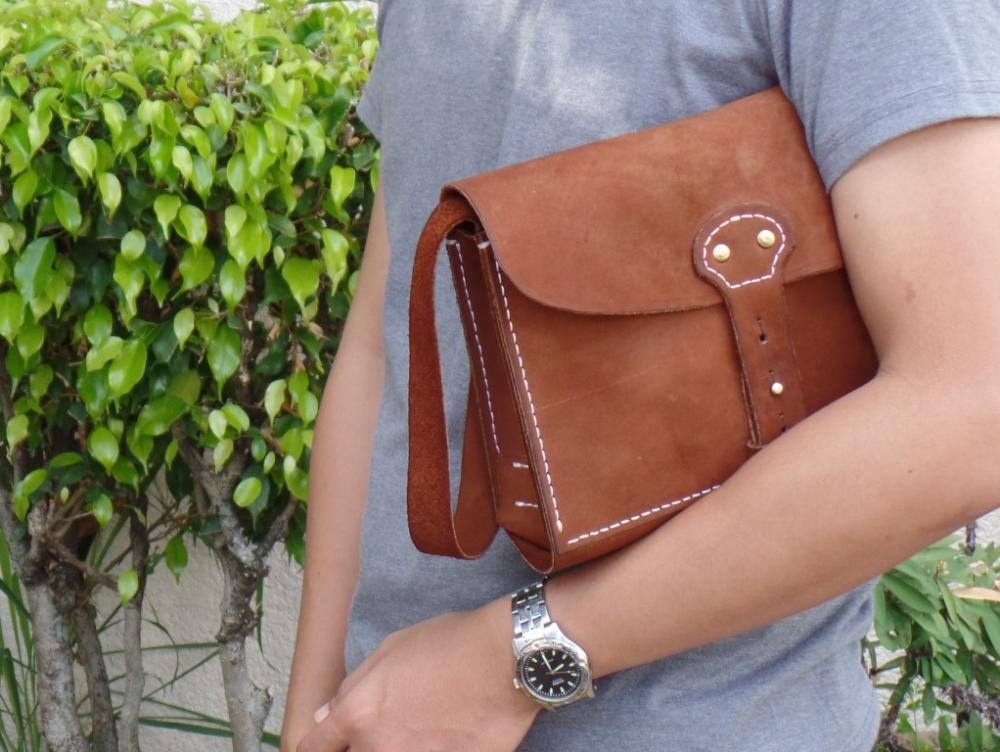
the bag in my profile pic is made out of goat skin - with cow suede lining.. i use goat hide for almost anything.. - wallets, organizers (holds a Phone, passport, cash, pen and cards and other stuff).. this is quiet good leather - you dont need a spliter for it... Not sure if it was from the tanning process that causes it, but I'm observing some scent from goat hides. - they cant seem to get rid of it.
-
Limitations of Last Modifications
AdamGadut replied to AdamGadut's topic in Shoes, Boots, Sandals and Moccassins
for me who doesn't have any experience making those, it would be worth knowing which parts you think would fall apart first and how to prevent those. -
here's a few i have, these were created a year ago
.jpg.f669aceb15c6cc6be86d309b30a4495a.jpg)
-
while some leather designs are timeless, you may also want to be updated with whats generally beautiful for this generation. - Pinterest is a good resource. - not a book, but people in there post what is aesthetically appealing. This is something you may want to consider if you are looking to sell your finished leather items so you are guided what people like.. and in case a book is not enough - Youtube is a good to view - some great channels i know in there are from "Ian Atkinson" - he teaches you from the tools you need, down to how to improve your stitching., - Also - Nigel Armitage The stitching is important for this craft - so this is what you want to improve the most.
-
Limitations of Last Modifications
AdamGadut replied to AdamGadut's topic in Shoes, Boots, Sandals and Moccassins
the cemented construction is known to fail earlier than that of a goodyear welted. Plus, Suede easily catches dust.. is it alright if the suede we have is about 2mm - 2.5mm thick?... - for the top part i mean. - is there an ideal thickness for the top part?. -
Limitations of Last Modifications
AdamGadut replied to AdamGadut's topic in Shoes, Boots, Sandals and Moccassins
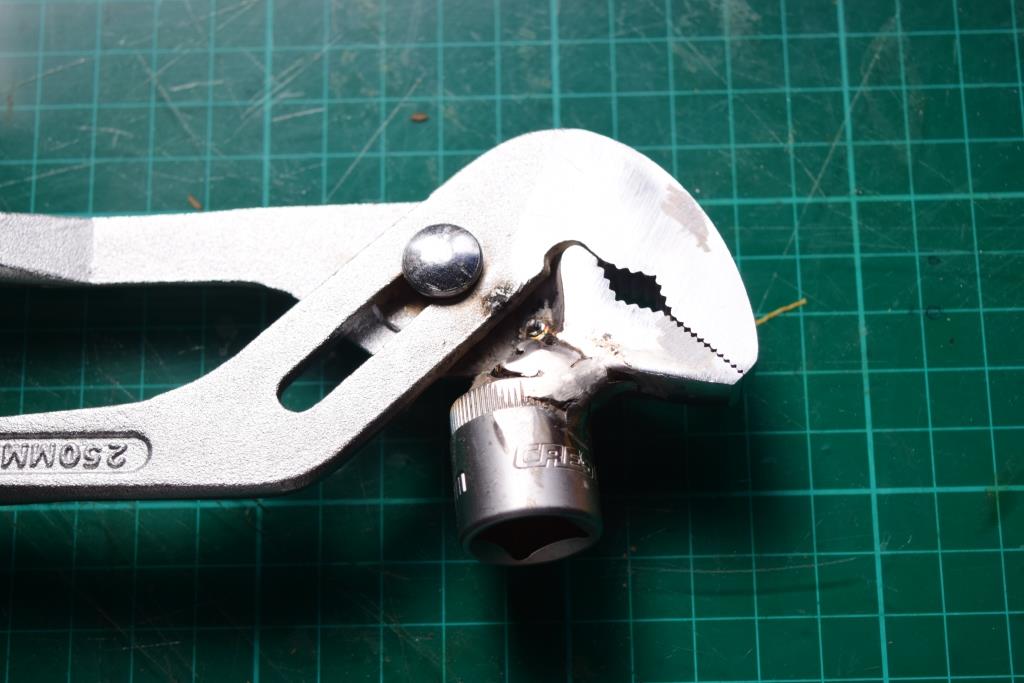
the handle on the pliers are about 18cm long. it had some Rubber grips, that i put back in after the construction. I will sand off a bit the teeth on the plier head so those aren't too sharp. Since its going to be a cemented construction, i wouldn't want to wear this very often... hmmm some casual suede - https://www.google.com.ph/search?q=whole+cut+brown+suede+derby+shoes&source=lnms&tbm=isch&sa=X&ved=0ahUKEwjE6ZCa9rrUAhWImZQKHaIlBL8Q_AUICigB&biw=1350&bih=572#imgrc=ktQgcgL8rLwd5M: not sure if there's some level of difficulty depending on the design. -
Limitations of Last Modifications
AdamGadut replied to AdamGadut's topic in Shoes, Boots, Sandals and Moccassins
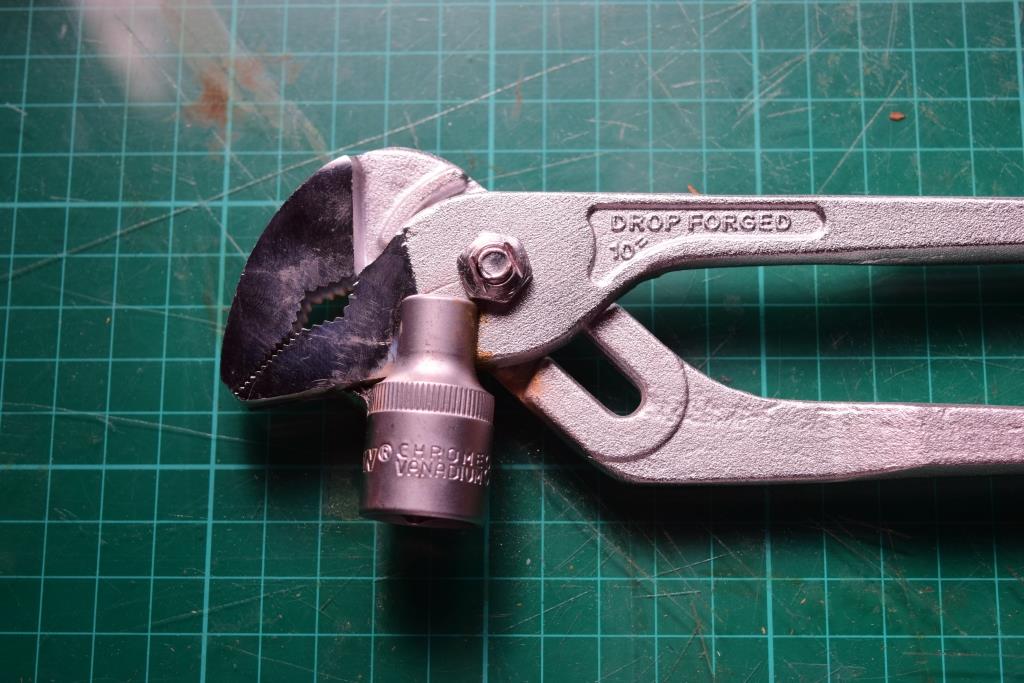
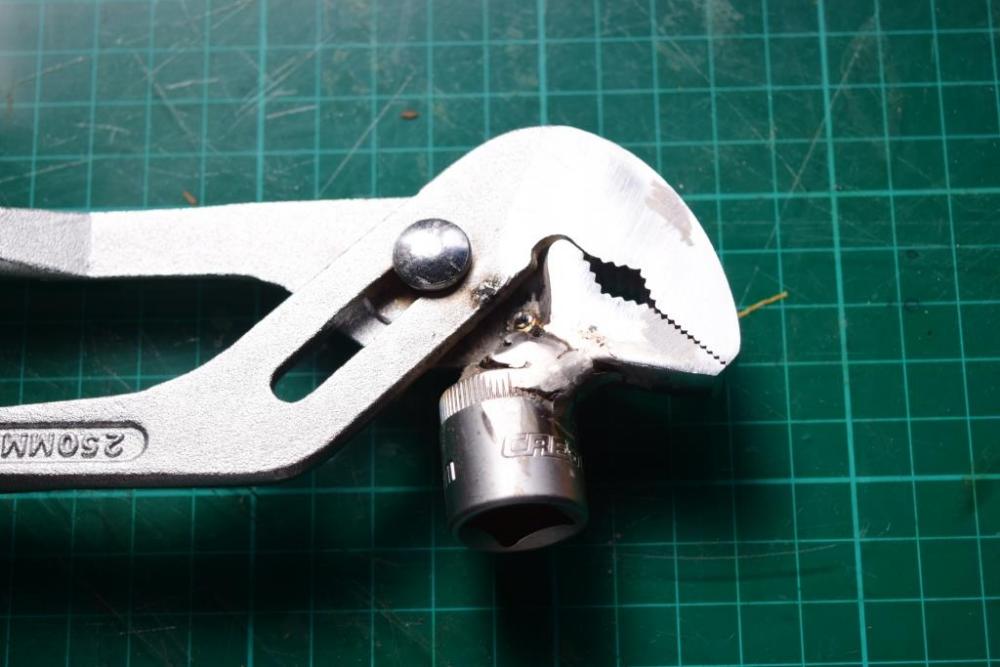
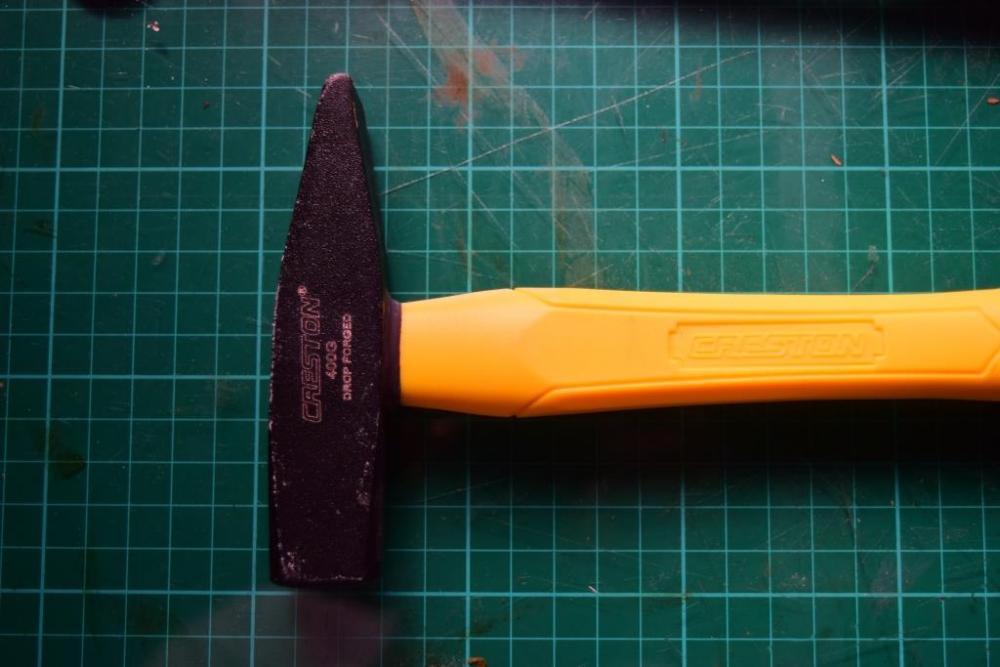
Thanks a lot Brian, I thought about purchasing the tools, but it'll cost me more than three times the price of each due to shipping fees, and too much time to wait.. i tried creating my own versions... These are from the local hardware shop which cost me not even 1/4th the price of the shoemaking tools.. Since i can weld metal, i joined two different pieces to come up with a lasting pliers. Not really the best welding job, but it should be functional. The bottom of the hammer head on the lasting pliers will be covered by a coin. I considered picking this up as well- in place of a french hammer.. I can modify this to suit the purpose.. I'm open for suggestions.

-
Limitations of Last Modifications
AdamGadut replied to AdamGadut's topic in Shoes, Boots, Sandals and Moccassins
are you suggesting to start with the cemented construction?... i was really hoping to do goodyear welted, and i believe this is very difficult without a proper awl.. Just really looking to make my own shoes - not selling them so not thinking too much about the elaborate tools - just the very basic ones to get started at least.. I was looking online for some tools, like the lasting pliers you showed, a french hammer, and a good curved awl. a problem i'm currently having is with the shipment - fees, and often, the Customs we have in our country takes too much heat on imported items - which delays everything from a month to a couple months. I can see how this will significantly delay this project and maybe my responses. I did find a third party Shipping service that will take care of the Customs trouble for me, but they only ship items from US, not from China. So I ordered a book by Laszlo Vass about the subject from Amazon. -
Limitations of Last Modifications
AdamGadut replied to AdamGadut's topic in Shoes, Boots, Sandals and Moccassins
yeah, i meant to make shoes, not boots yet. i really don't have those tools yet that are specialized to do shoemaking. there's literally no shop around that carries those so they'll have to be ordered online. From where i live, shipping takes about a month so it'll take a bit. the ones i have are the typical, well, long nose pliers, a hammer, rubber mallet, some hack saw, and a razor cutter with disposable blades, and i dont even have the curved awl, but i'm looking to make my own. Some of the tools i have i created out of common house hold items. I'm guessing the cork i have here aren't enough to handle some tough lasting. i initially thought oh making my own last- but i see how this will take a whole lot of time to do right, plus i dont have the correct wood.. -
Limitations of Last Modifications
AdamGadut replied to AdamGadut's topic in Shoes, Boots, Sandals and Moccassins
i am yet to cut it in half and add a bolt in the middle to hold it in place.. I've seen in one of Lisa Sorel's video, a Last Maker he did the cut on about 45 degree angle with a bandsaw. -
Limitations of Last Modifications
AdamGadut replied to AdamGadut's topic in Shoes, Boots, Sandals and Moccassins
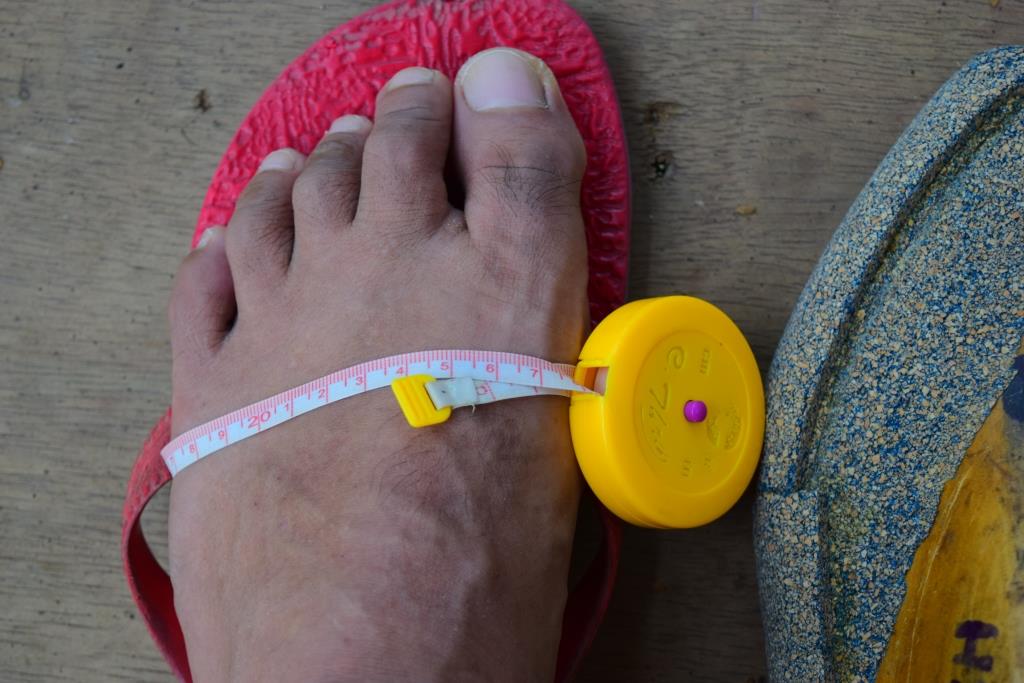
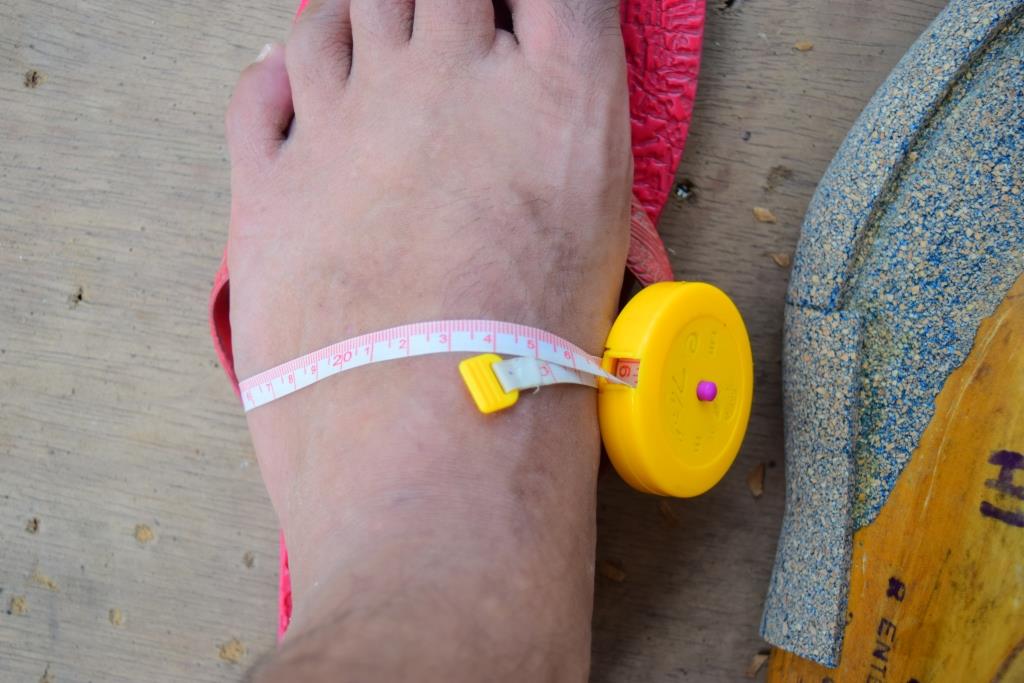
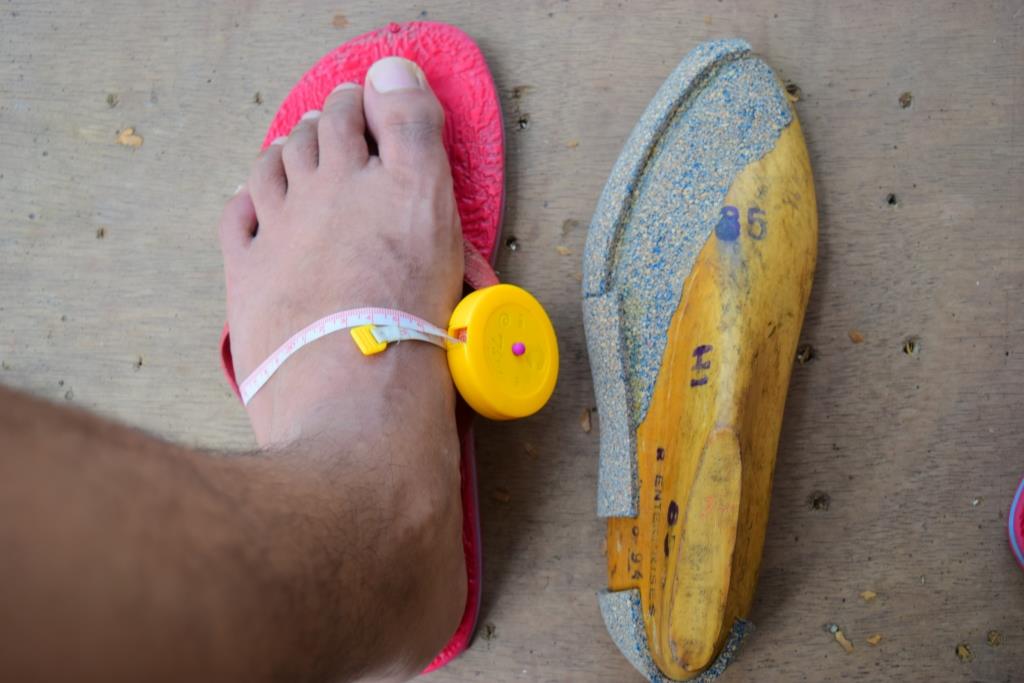
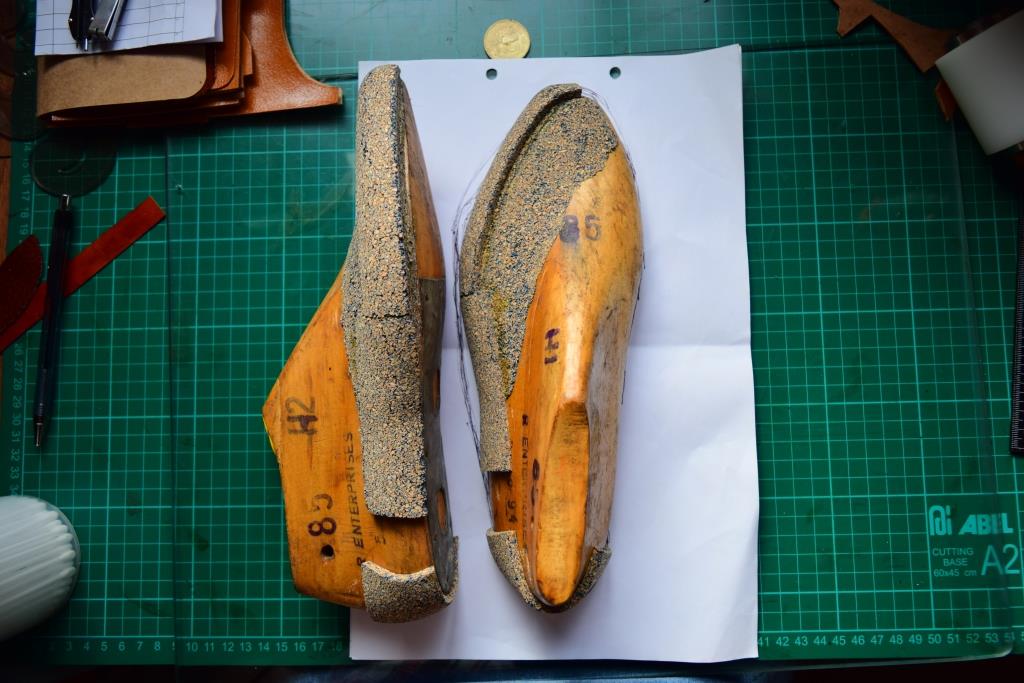
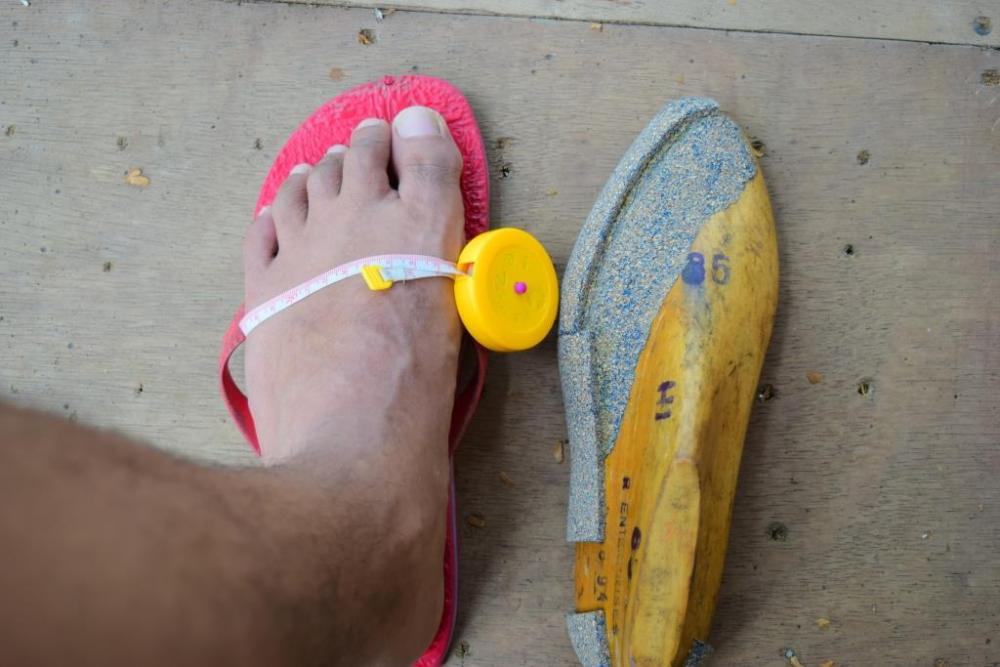
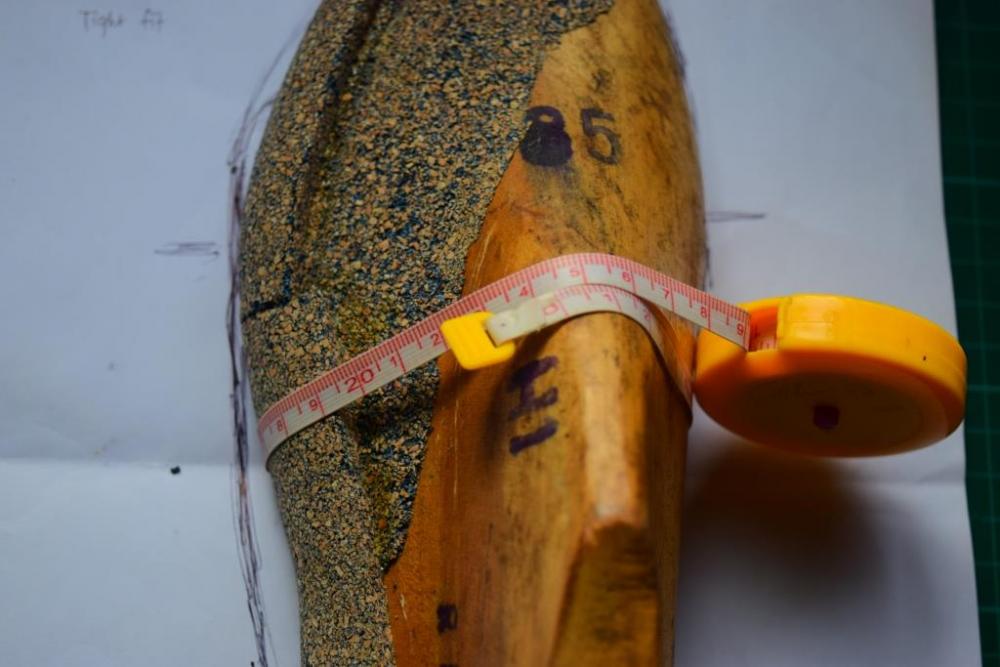
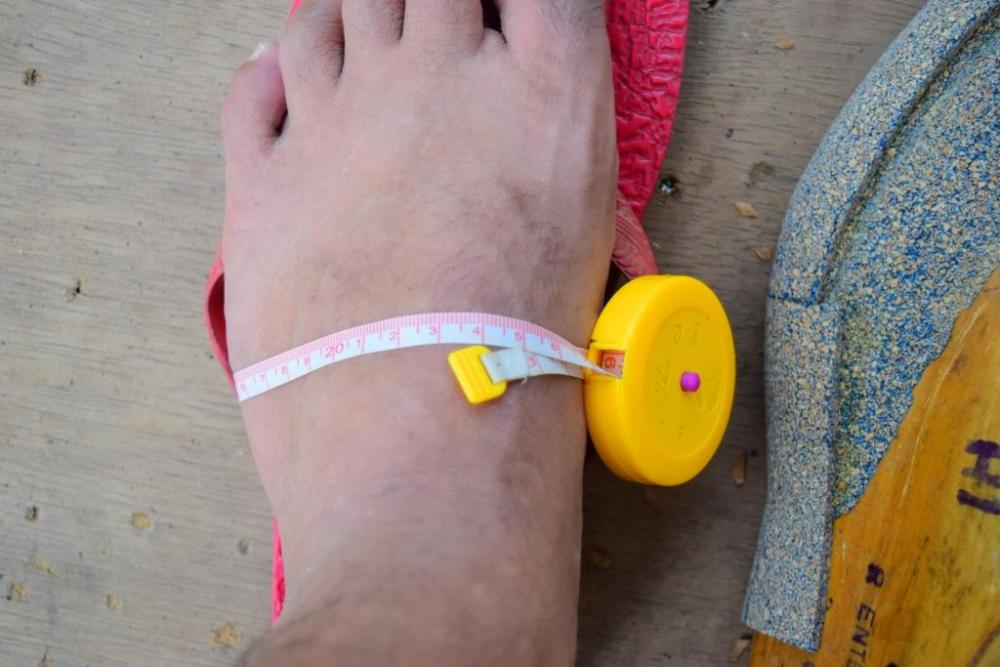
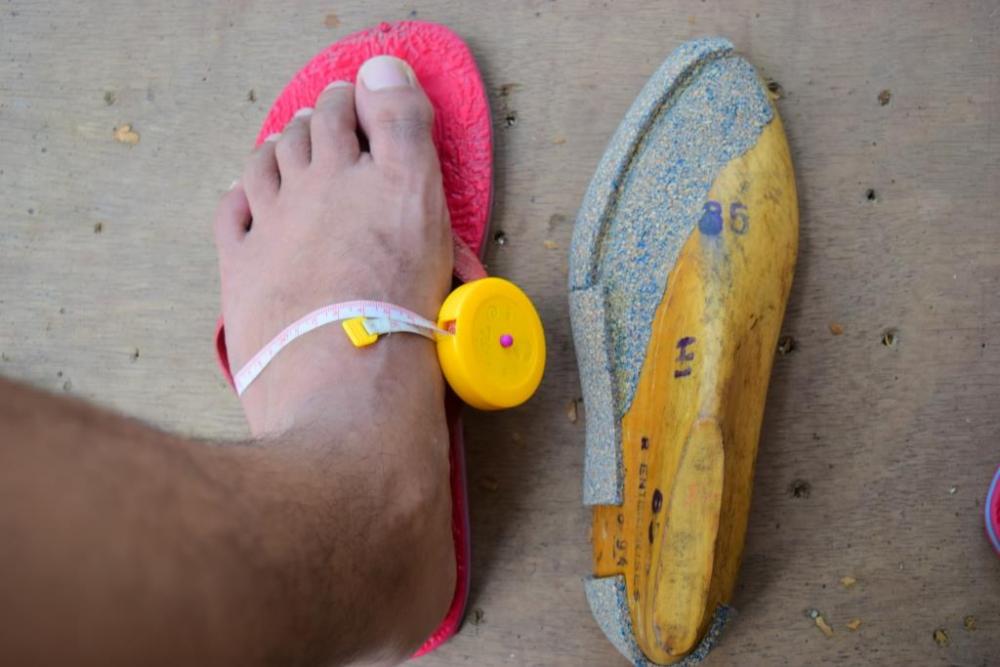
aside from the foot outline, i have here a couple measurements i took. on the below image, the ball of foot in the shoe last has a girth of about 23.7 CM Image H forgive me if my feet couldn't look any better. it has taken a lot of abuse from poorly fitted shoes. I always have to use about a size bigger to accommodate the width. on my foot, the ball part is at 25.7cm - so definitely, i need to add some more material on the last to widen it a bit more. Image I Image J on the instep, on the shoe last, its girth is at 24.5 CM Image K on my foot, the instep girth is at 25.3 cm. So, the last still needs some volume on the inner side - i belive Image L Image M once i get it to the right volume, after trimming it to the shape of the last, i will add a layer of thin leather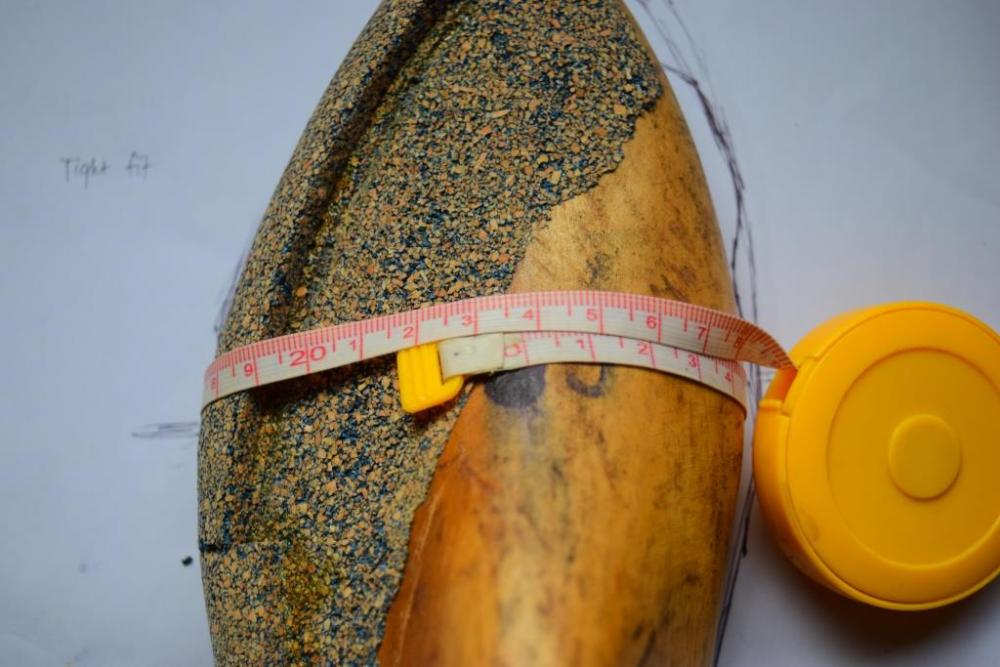

-
Limitations of Last Modifications
AdamGadut replied to AdamGadut's topic in Shoes, Boots, Sandals and Moccassins
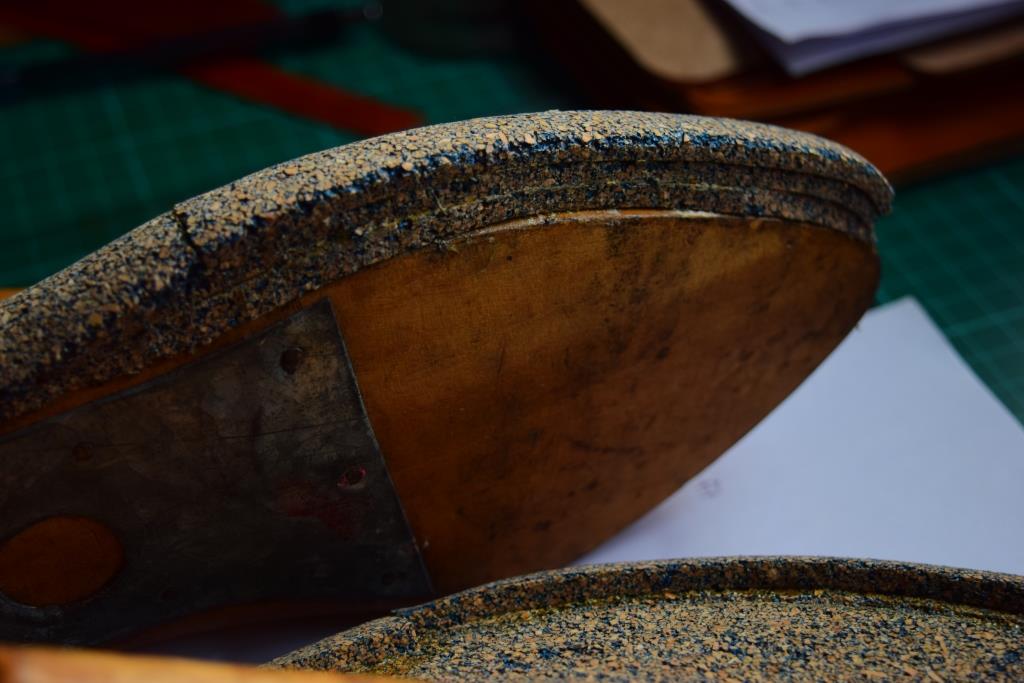
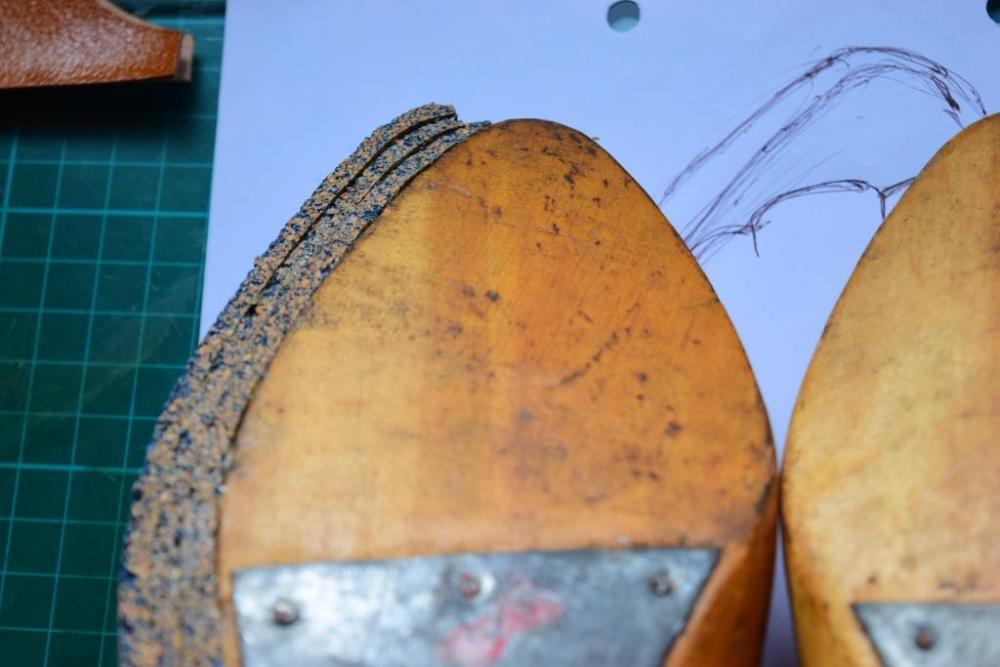
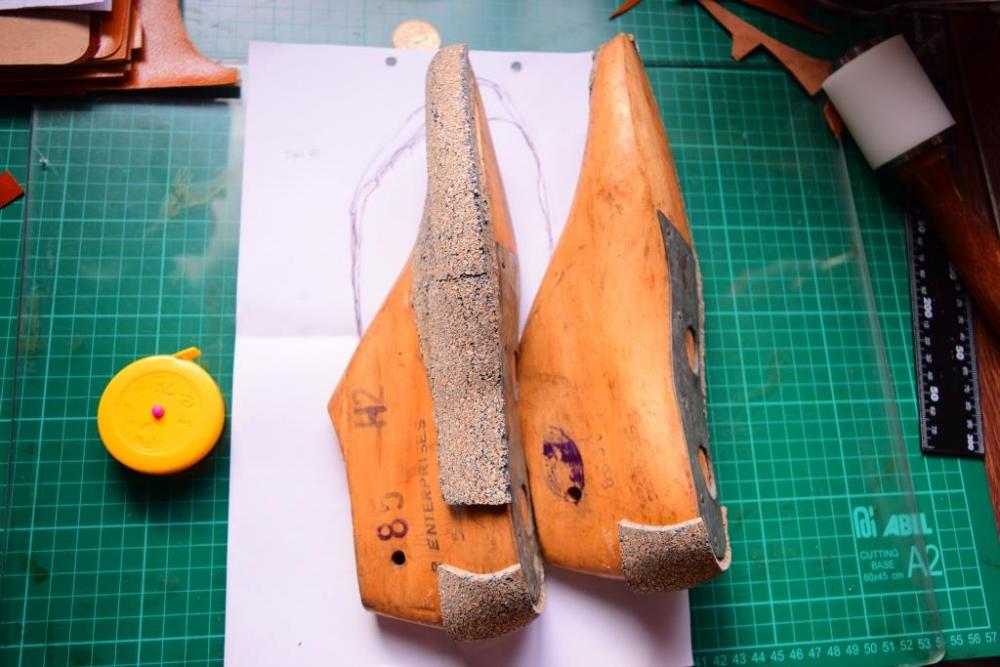
so there's already 3 layers of cork on the outer side. the corkboards i have are cut in small pieces so you see there's actually a part here where the other cork connects. Image D Image E: Image F: the inner sides doesnt have additional filler yet. I am yet to add one layer to the inner sides Image G some more pics coming up
-
Limitations of Last Modifications
AdamGadut replied to AdamGadut's topic in Shoes, Boots, Sandals and Moccassins
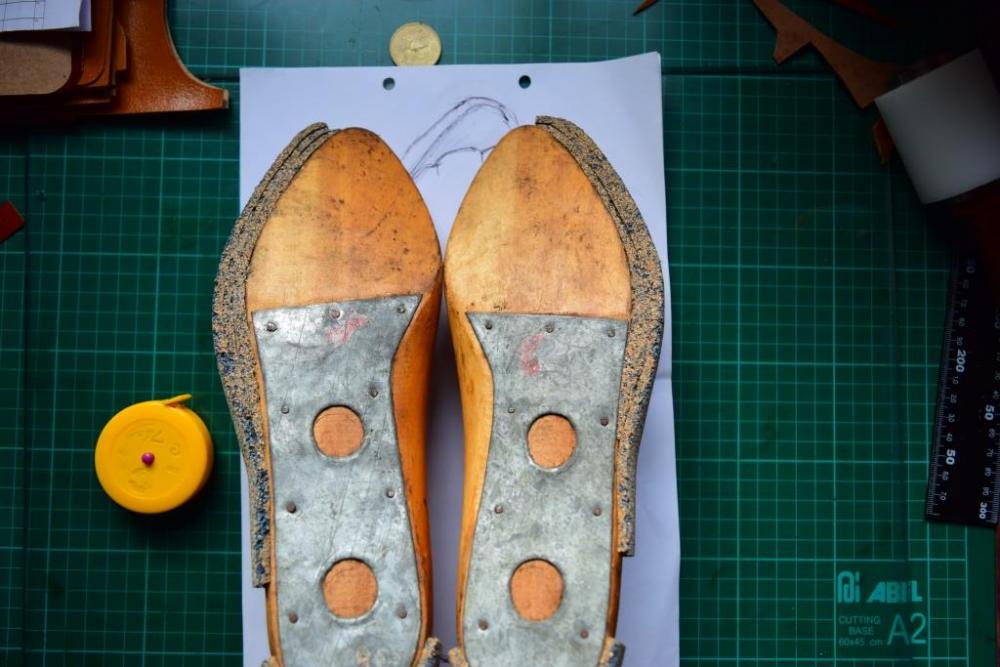
since i can only post up to max 1.46MB, i will have to post multiple times.. as you can see here, my modifications for the last aren't done yet, I'm thinking i need to add one one more layer of cork to the inner side all the way from top to bottom, then another layer that connects the outer side to the heel, and one more layer to the heel lengthening it overall. Then after that, trimming the cork to shape. Image A: on the below image, it may seem the last matches the outline, but up close personal, i see it still needs to be bigger. Image B Image C: Some more pics coming up so hang on.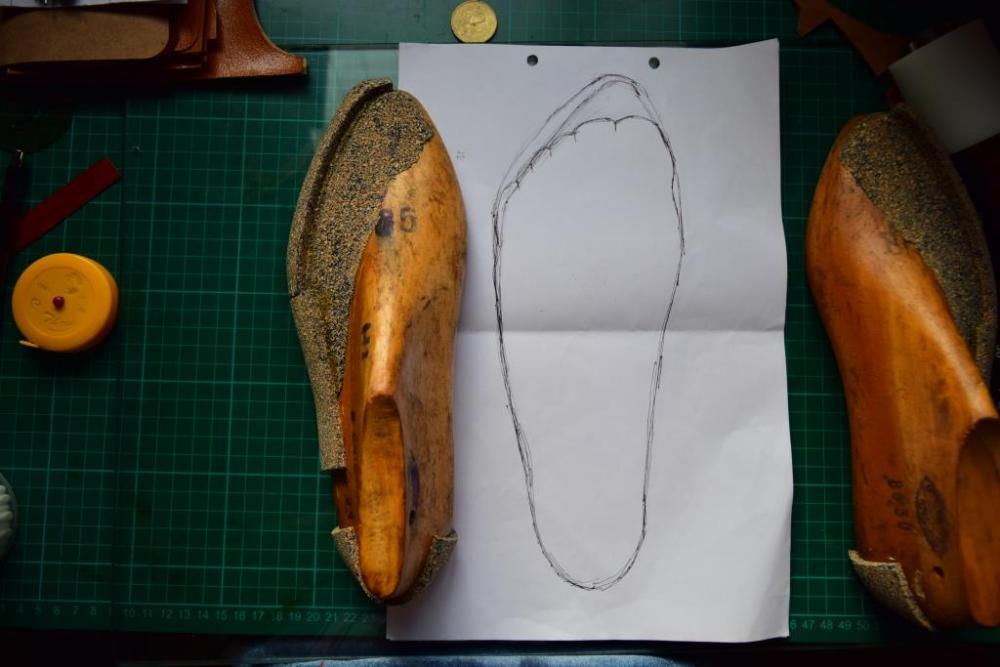


-
Limitations of Last Modifications
AdamGadut replied to AdamGadut's topic in Shoes, Boots, Sandals and Moccassins
Yes a closed footwear. I will post later as soon as i get photos of the last. the areas of the last i have been building up material are on the outer sides and the toes - maintaining that rounded Toe shape for the shoe, and on the heel, extending its length. -
Limitations of Last Modifications
AdamGadut replied to AdamGadut's topic in Shoes, Boots, Sandals and Moccassins
Thanks Electrathon, i will use leather instead. I agree with you about the difficulty in the last. Me making it match my foot has been quiet challenging. I keep trying to compare it side by side with my foot on every change i make, also comparing it on the sketches of my foot's shape. -
Limitations of Last Modifications
AdamGadut replied to AdamGadut's topic in Shoes, Boots, Sandals and Moccassins
Saturn, now that you mentioned autobody filler, i will coat the cork layers i already laid out to reinforce them... thinking about this question now, I imagine the filler material had to be stiff enough to withstand a razor sharp blade for the patterns. thanks a lot -
Thanks a lot Saturn, You made me be confident of the items i have :). . a question, about the tooling leather, for the soles. The ones i have are about 3 mm thick. I'm thinking to use it for the outersole and the mid sole for the goodyear welting. For the outermost sole, pair it with some rubber for traction. is this a good idea?
-
Truely Shoe lasts are very very rare to find. i found a couple stores locally that sells them. One of the stores sells only in dozens and for female foot - with varied sizes. Luckily the other store sells individual pairs for men sizes, BUT, my foot is size 9&1/2 and the last few ones they have are size 8&1/2 and size 8.... Having seen some youtube videos of cordwainers modifying their last shapes by adding cork boards, I went and bought the size 8&1/2 and some cork boards... i havent fully done the modification, but still is about half way and i've added about 3 layers of cork on the outer side. - My feet are fairly wide. As i see the lasts, they still need about a layer of cork more on the inner side... So my question is... Is there a limitation to this modification?.. is 3 layers of cork on one side ok?... seeking the wisdom of those who have done this.