Lobo
-
Posts
1,065 -
Joined
-
Last visited
Content Type
Profiles
Forums
Events
Blogs
Gallery
Store
Everything posted by Lobo
-
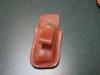
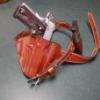 Here are photos of one I made up for a customer a few months ago. For a 1911-style pistol with 3-inch barrel/slide group. Much like an Askins' Avenger in overall detail, belt slot on the aft side, tunnel loop on the fore side. (photos taken prior to final finishing). Don't care much for the SOB style myself, but the customer wants one I will do it.
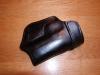

-
Denster is right on the money with his advice. Keep in mind the thickness of the various parts of the handgun when outlining the stitching pattern. Also, keep in mind the thickness of the leather being used (8-9 oz. shoulders will require more clearance than 6-7 oz. leather). The heavier weight leathers will provide a solid fit, even when the clearances are increased to permit their use. The lighter weight leathers must be very closely fitted to provide the same degree of retention.
-
There are at least as many reasons not to line a holster as there are reasons to consider a lining. Linings were popular for many years because they were thought to reduce holster wear on a polished and blued handgun. Allow me to address some of the linings in common use: 1. Suede: sueded leather provides a lovely and soft feeling lining for a holster, in great demand. Unfortunately, there are several problems with suede linings: (a) sueded leather has far more surface area than veg-tanned leather, meaning that there is a far greater tendency to absorb and hold moisture (moisture, held in close proximity to a handgun, equals more tendency to induce corrosion); ( almost all sueded leather available is chrome tanned, meaning that the salts used in the tanning process remain in the finished leather, and these chemical salts can AND DO cause damage to blued guns, hard surface coatings (like manganese phosphate, very popular right now), and even so-called stainless steel; all can be etched indelibly by these chemical salts. 2. Glove leathers and other soft-finished leathers are almost always chrome tanned, with the same chemical salts that are harmful to a fine finished firearm. 3. Chamois leather has been used by some makers. Also very nice to look at, and very soft to the touch, chamois is chrome tanned and contains the same chemical salts; also chamois is WELL KNOWN for its ability to attract and absorb moisture. 4. Felt, and other fabrics, have been used by some makers. It only takes a moment to think about how easily these materials attract and hold moisture! My advice to customers, based upon over 40 years of carrying a handgun and 37 years of making holsters, is this: A. Never, ever store a valuable handgun in a leather holster or case! B. Get into the habit of removing the handgun at the end of every day and wiping it down with a lightly oiled cloth, store it overnight separate from the holster (this also allows the holster to shed any moisture that it has absorbed during the course of the day). That said, I'll be right up front here: I have customers who demand linings, and I provide holsters lined with either suede or glove leather to meet these demands. I even charge those customers extra for the linings! I have a few lined holsters myself that I use with old heirloom blued steel pieces, but I follow the guidelines (see item B. above) to truly protect those fine old pieces. You want to try some fabric linings? Go ahead! Invite the moisture in, hold it next to your prized and valuable sidearm! Keep your handgun wrapped up in that environment all day, and all night! Hopefully, should you ever need it, it will do what you expect it to do (maybe). Most of my production (about 100 units per month) is for concealed carry applications, vegetable tanned cowhide, finished with neatsfoot oil compound (provides lasting protection, filling the voids in the leather fibers, provides good flexibility to avoid cracking or splitting) and surface sealed with Fiebing's Bag Kote (old saddle-maker's recipe for weather protection). I'll keep doing things my way. Please feel free to try any new thing that grabs your interest. Best wishes to you.
-
I always prefer the dummy guns. As pointed out, no worries about damaging them. Also the expense of the dummy is usually recovered with the first project. Dummy guns are not made for every handgun model, so I also use actual firearms for much of my production. Last year I had several requests for holsters to fit a handgun model that has been out of production for about 30 years (after a million or more had been produced). So, I bought the pistol, filled 4 orders right away, and have made 6 or 8 more since then. The expense of the pistol has been fully recovered, some profit has been made, and I expect to make a dozen holsters or more each year off of this one pistol. From a practical standpoint, it appears that some major holster makers stop producing holsters for a handgun when it has been out of production for a few years. It just doesn't fit in with their business plan (volume production for items in general demand). This leaves an opening in the market for small producers to serve the needs of those owning older handguns. That's okay with me! It allows me to make a decent profit on the investment in a quality handgun, and take a tax deduction on the cost of another addition to my gun collection!
-
A new set just finished for a customer
Lobo replied to Peterk's topic in Gun Holsters, Rifle Slings and Knife Sheathes
My ONLY bike is a Harley Davidson Dyna Super Glide! All of my grandchildren have T-shirts with the image of Old Grampa on his toy! -
A new set just finished for a customer
Lobo replied to Peterk's topic in Gun Holsters, Rifle Slings and Knife Sheathes
Exceptionally nice work. Thanks for posting. Your customer has a good point about extreme detailing on the exterior, it does create more edges on which the outer garment can catch. One of the strong points of the pancake design has always been that it allows the outer garment to slide across the holster surface easily. There seems to be a lot of confusion in customers' minds about detailed casing/boning. Some big-name makers make a big deal out of extremely high detail on the outer holster surfaces. While this is all well and good, to me it indicates that maybe the leather they are using is pretty light, thin stuff. I use 8-9 oz. for most holster applications, and it is not possible to get that high detail on the outer surfaces. But, properly formed, the important detailing is on the INSIDE, closely fitted around the handgun. -
You done good, my friend.
-
Nice looking work. Price? I think there are a lot of people out there who buy the brand name. Some seem to delight in ordering from a well-known company, paying through the nose, and waiting months to get their holster. A little snob value there maybe? I see about $15 or so in materials, probably an hour or so to pattern the piece, plus a couple of hours to make the holster, and probably an hour or so fiddling with the dying work and final finish. So, in my mind, the customer should be willing to pay around $120-plus for it. But we know that many folks just won't do that. The flip side of the question is this: how many people will he show it to, and how much will he brag about a low price? Will that bring too many other customers to your door, all expecting custom design and production work at discount catalog prices? In other words, if you give the man a bargain price I would suggest that you emphasize to him that this is a one-time deal, let him know that you've done him a favor! Otherwise, you might just find yourself working for fast-food restaurant wages again and again and again! For what it is worth, when I have a special order for a design that is likely to be popular with other customers, I have found that I can make half a dozen identical items in very little more time than doing one single piece. Then I have five more that I can sell in the coming weeks or months, maximizing the profit from one special order. (Example: $15 materials plus four hours labor for one unit; $90 materials plus 7 or 8 hours labor for six units. Assume a sale price of $60 for the one unit, you now have made about $11 per hour on that sale. Assume a sale price of $60 each for six units <$360 total>, and you now have made about $35 per hour for a day's work). I also do this when I have a customer wanting a holster for a handgun I don't have. Customer brings me their handgun for patterning and fitting, and it is a fairly popular handgun, I go ahead and make several, deliver one to the customer, and sell the others. If sales are good, I go ahead and order out a dummy gun for that handgun and add it to the product line. (Did this last year, lady wanted a holster for a Ruger SP101, which I didn't have. Made 5 units in about 5 hours time and about $30 materials cost. Sold all five for $49 each, so I made over $40 per hour for my time. Added a SP101 dummy gun, now I make a few every month). As for myself, all I have ever asked is a fair week's pay for an honest day's work!
-
Trying a new design (new for me)
Lobo replied to Lobo's topic in Gun Holsters, Rifle Slings and Knife Sheathes
Thanks for your very humorous comments. I enjoyed reading this very much. I hope to see your postings again in the future. Best regards, -
Trying a new design (new for me)
Lobo replied to Lobo's topic in Gun Holsters, Rifle Slings and Knife Sheathes
Yes, photos were taken while still damp and final finish had not been applied. Thanks for your comments. I routinely do anywhere from 6 or 8 to 20 pieces at a time, cutting down on the time considerably by not having to set up every operation separately. I budget no more than an hour per piece, including all processes. My retail prices start at $39 and go up to about $69 for regular production items, so I can't dawdle around at any stage. A typical week yields 20 to 25 pieces out the door at a cost of about $100 for materials, total labor of about 20 hours, and total revenue of about $900 to about $1200. Call me anything you like (vain, villainous, money hungry, or just plain old Capitalist pig), I'm not too good to work for $40 or $50 per hour WHEN I HAVE TO! Special orders, that is another matter. I price those out on a time and materials basis. Customer wants to design the piece? No problem, is Mr. Customer ready to pay for the time and materials? I do approx. 80 to 120 units per month. I also have another business, so I can only commit a few hours per day, a few days per week, to the leather work. Not to sound terribly crass, but what the heck: if there ain't no profit there, old Lobo ain't wasting his time on it! Over the past 37 years I have made a lot of holsters for practice, and thrown quite a few into the trash. Now, I make them only for profit. Always ready to try something new, always up for a new challenge, but I'm not about to give it away. I realize that we have a new administration in Washington, DC, and my business plan might not be politically correct (I know that I won't get any "stimulus funding"), but the word "profit" has not become a dirty word around my house yet! Many of the posts you will see on this forum are from serious artists that create fabulous works, many for their own edification and gratification. That is all well and good, and I will not try to compete with those fine folks (even if I had the skills they display regularly to the rest of us). For me, this has always been a business, and unless there is a profit to be made, all we have is a hobby. Please don't misunderstand; I am not denigrating those who take their art very seriously, I respect that and appreciate it. I try to be productive every day. I appreciate every opportunity presented to me. But I don't want to go to bed any night without knowing that I have been productive that day. Money isn't everything, but it is how we keep score in this life! Thanks again for your comments. Glad that I had the opportunity to get that nonsense off my chest. Best regards, -
Thank you, my friends. What works for me this week might work for you next week. I look forward to seeing what works for you!
-
Trying a new design (new for me)
Lobo replied to Lobo's topic in Gun Holsters, Rifle Slings and Knife Sheathes
Thanks for the input. I like them both, but you are looking at photos of a fully finished holster (ready to deliver to the customer) as opposed to a holster ready to finish. I think they both look pretty good, but I'm a little bit prejudiced maybe? Thanks for your opinion. I appreciate your input. -
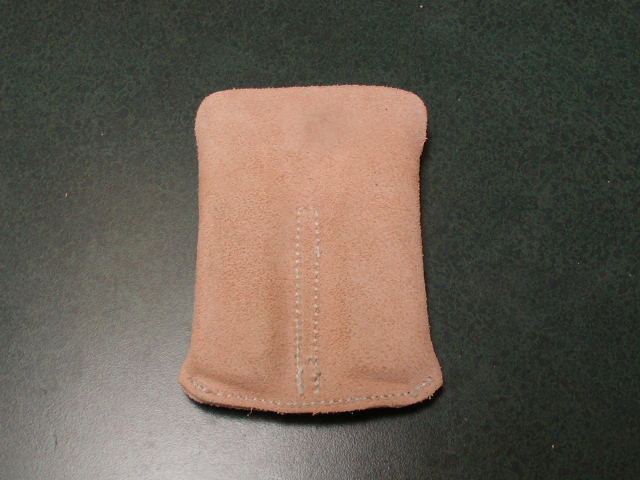
Received an order a couple of weeks back from a prior customer who needs four more holsters. Always glad to hear from folks like that! Mr. Customer also had an idea in mind for a magazine pouch to fit into his back pocket. The parameters were: 1. to fit two 8-round mags for a 1911 .45 cal. pistol; 2. to be completely inside the pocket with no protrusion; (3) profiled to minimize printing on the outside of the holster (to give the appearance of a wallet). I tried several paper patterns, which I shared with the customer. My first concerns were (a) stitching to index the mags for constant positioning in the pocket; ( number of stitch lines, which increases overall dimensions due to the folding of the leather necessary at each stitch line; © protecting the pocket material from abrasion, and the skin for sharp mag edges; (d) making the finished piece so that a single mag can be withdrawn without pulling the pouch from the pocket with it. After several attempts, I came up with a pouch he liked. Using 4-5 oz. veg-tanned leather, I looped the outer edges in to a single stitch line (rather than two or three, depending upon how the edges were designed). The lighter leather is sufficiently strong for the task and will give good protection to the pocket and skin. I left the rough side out to add friction within the pocket, and the smooth side allows the mags to slide in and out much more easily. Total finished dimensions are 4.25 inches width, 5.75 inches high. Dropped right into the back pocket of my jeans and Dockers. Mr. Customer is very happy with it, and has now ordered a couple more for his other magazines. Materials: about 0.5 sq. ft. 4-5 oz. veg tanned leather. Time to cut, sew and form: 10 minutes. Finish required: a couple of coats of Bag Kote to seal the exterior (not done in the photos). Adding another product to my production line now. I think that I can do a dozen or more per hour when working with multiples in production. Retail price? $25. Mr. Customer gets the first one for free!
-
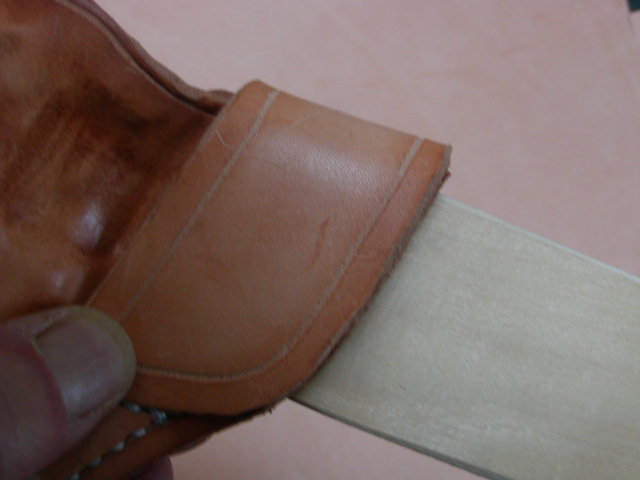
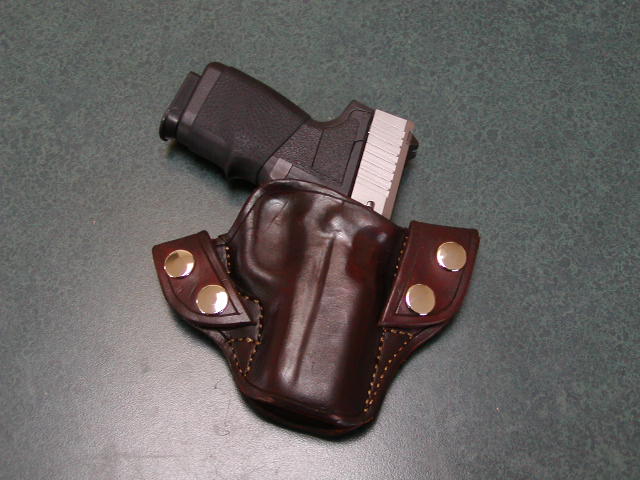
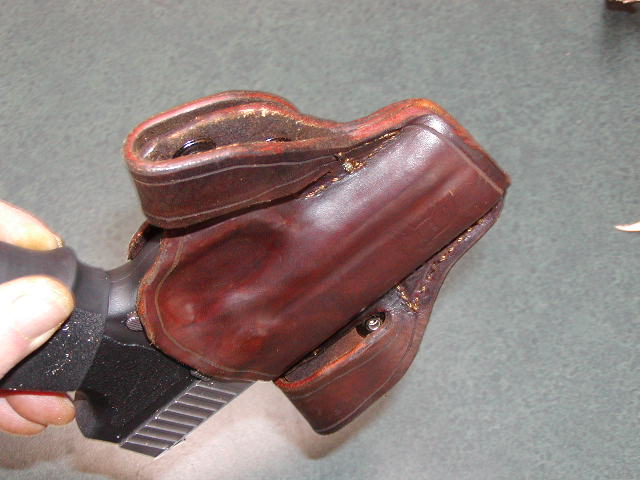
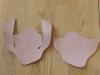
Wife had to work through the weekend, so I settled in to complete last week's special orders (7 holsters, in addition to my regular production). While doing those I decided to add another holster that I have been thinking about for quite some time, see how it works out. Last year I started making a variation on the basic pancake style which, instead of belt slots, secures to the belt with a leather loop and snap. This eliminates the need to unfasten the belt and thread the belt loops when putting the holster on or taking it off. That design has been well received and sales have been consistently good. The modification I envisioned was a different way to build the snap-loop that should reduce bulk at the belt line a little bit and provide a cleaner look to the finished product. So, here's how it went: 1. Patterning (one-time effort, as the pattern can be re-used). 2. Cutting the pieces (8 minutes). 3. Assembly and sewing (9 minutes). 4. Wet-forming and molding (15 minutes). 5. Hardware attachment (6 minutes). 6. Dying, oiling, and finishing (7 minutes). Total time (less patterning time): 45 minutes. (Bear in mind that I'm doing several at a time; single units require more time). Total materials: about 1/2 sq. ft. 8-oz. shoulder, 4 snaps. Estimated cost: $4. Photos: 1. Older modification of pancake with snap loop up, over, behind belt, up to snap. 2. Cut pattern for new modification (note cuts to become belt loop). 3. Forming belt loops over 1/4" X 1.5" wooden mandrel (makes sure belt will clear easily). 4. Holster, formed, dyed, hardware attached (awaiting final finish of neatsfoot oil and Bag Kote). 5. Detail of belt loops. 6. Retention test (will the formed holster retain the handgun when inverted?). 7. Photo taken in mirror of new holster on the hip (also showing old Grampa Lobo's slender figure). OK, product development appears to be a success. The bulk at the belt-line where the attachments are is reduced by one layer of leather, and the new down-turned stap can be cut to the contour of the holster and stitch-line, with a pleasant finished look. Room for two snaps fore and aft, a little added security in the event one snap ever fails. Production time is within my target of less than one hour per production holster. Costs are minimal. These can go out the door at $49 or so and I'll feel good about it. I think I'll add this one to the production line-up!


-
Exceptionally nice work.
-
As noted above, the two sides of the holster are laid out side by side and flat. The reinforcement strip is sewn to each side. Then the reinforcement strip is folded to align the two holster sides for stitching. The difficult part is getting the length of the reinforcement strip right so that the holster fits the pistol properly. That said, in my experience such reinforcement is not really needed IF the holster is made of sufficiently heavy leather (8 oz is best). With the lighter leathers (6-7 oz.) reinforcement might be a good idea, but the reinforcement itself needs to be of heavy leather to offer any advantage. Most of these designs are merely marketing ploys, as the reinforcement actually provides little additional strength to the holster mouth, especially on the IWB holsters.
-
A truly comfortable shoulder holster?
Lobo replied to Lobo's topic in Gun Holsters, Rifle Slings and Knife Sheathes
I was refering to the strap to the beltline. -
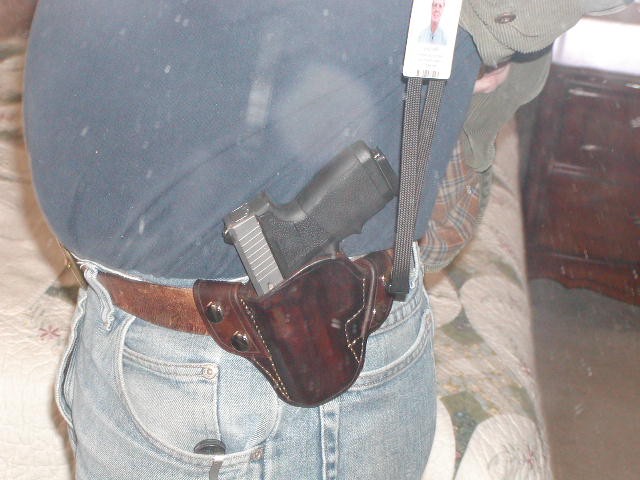
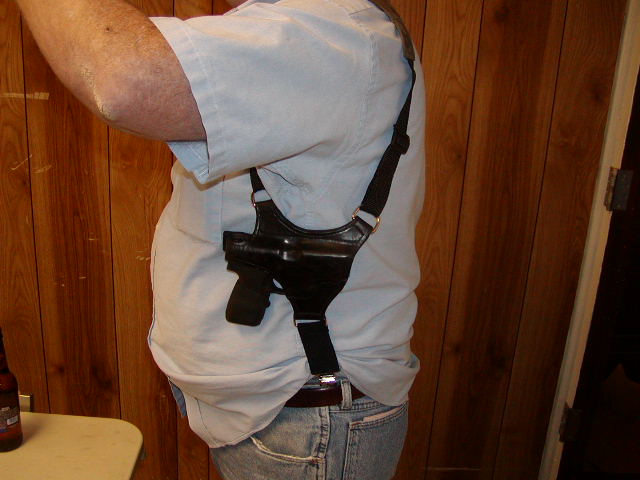
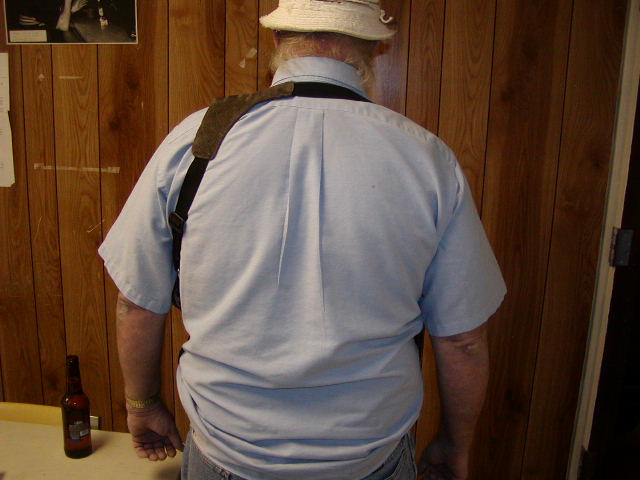
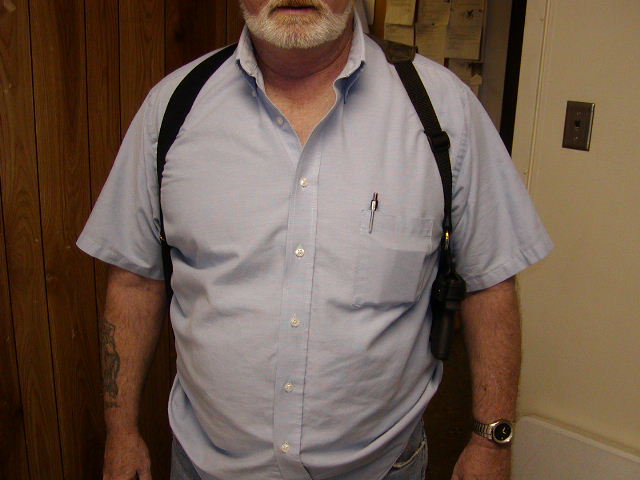
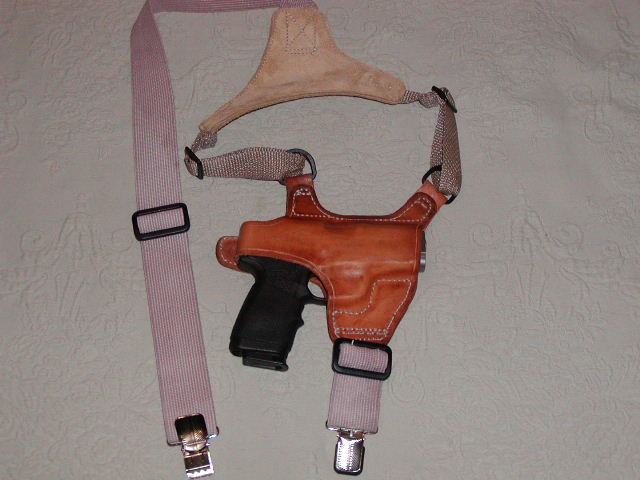
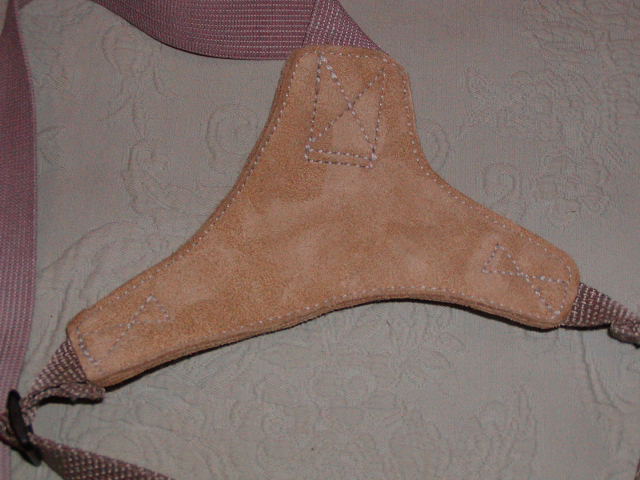
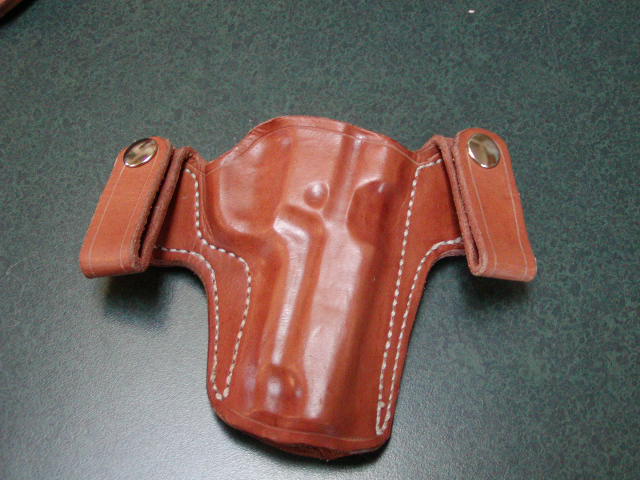
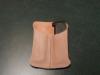
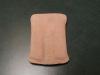
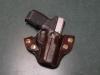
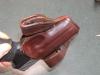
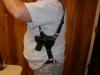
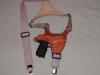
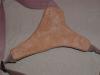
About 4 months ago a friend of mine inquired about shoulder holsters. He cannot wear a belt due to an old back injury and (as most of us know) any firearm worth carrying is difficult to secure inside a waistband without a belt. I was right in the middle of my comments about my experiences with shoulder holsters through the years (uneven weight distribution, resulting in constant shifting of the harness, every time you get into or out of a car, bend over, etc., the harness needs to be adjusted back to the proper position; most wearers tend to tighten the harness to prevent this movement, thus restricting upper body movement when wearing the shoulder holster) when I saw that he wears suspenders. That gave me something to think about. I made up the black holster shown in the first couple of photos for him. He has been wearing it for about 3 months now, and he has given me some feedback that resulted in a few modifications to the basic design. The tan holster shown in photos is a pre-production prototype that I have been using and evaluating for over a month. So far, I am very pleased with it. Basic thumb-break horizontal holster design, suspended by 1-inch heavy-duty nylon straps and a suede leather shoulder pad. The weight is supported in very nearly a straight down line, so the shoulder pad has less tendency to be displaced in normal movement. The off-side strap is made of heavy woven elastic, 1.5" width, with a steel alligator clip to secure to the waistline. A similar strap holds the holster side to the waistband to prevent "slapping" of the holster. General comments: 1. The suede leather shoulder pad is very comfortable, conforming to the shoulder, and the sueded leather provides just enough friction to retain position under normal body movement. 2. The elastic strap to the off-side does not have to be tightly adjusted. When opened to the length necessary to reach the waistband and clipped, the strap can then be pulled about 4 inches or so, tensioning the elastic without any discomfort. In normal movement of the body, the elastic expands and contracts easily and comfortably. 3. The elastic tie-down on the holster side requires no tensioning at all, serving mainly to prevent the holster from flopping and slapping during movement. My experience with the tan holster leads me to believe that this strap can be eliminated completely without noticeable effect. 4. The pistol shown is a Kahr P40 .40 S&W, 16.1 oz. empty weight. I barely notice the weight when wearing this holster. I have also worn this holster with a Kimber Pro Carry II .45 ACP (28 oz. empty weight) and it is also very comfortable. Putting in a full-size steel frame M1911 .45 pistol, or the Browning Hi Power with 15 rounds loaded (about 40 oz. weight), and the weight becomes noticeable but not objectionable. The harness stays in place, and no shifting of position was experienced during a 100 yard jog. 5. Holster is easy to put on and take off, requiring only a few seconds to do either. 6. Same harness can be adjusted to fit from about a size 34 to a size 50-plus. 7. Concealment is excellent with no noticeable lumps or protrusions from the shoulder pad or straps. I have worn it under a short-sleeved shirt in public. Access to the pistol is good, even when the outer garment is fastened at the front, since the drawing hand can simply be inserted from under the bottom of the outer garment. Plans for the production model: A. Eliminate the holster-side tie-down strap. B. Shoulder pad of a single layer of 4-5 oz. suede leather, using suede backers where the nylon and elastic straps are sewn in. This will reduce bulk somewhat, allowing better conformation to the shoulder. Also reduces production time by not having to sew around the perimeter of a two-layer shoulder pad. C. Offer a choice of alligator clip or leather strap with snap to secure the off-side strap at the waist or belt. NOTE: Since beginning this project it has been brought to my attention that a couple of other makers have produced similar designs. So, while my project resulted from independent work, it appears that I am not the first person to try this approach. Questions: I would appreciate comments and suggestions. Also, your input on retail pricing will be appreciated. I'm planning an initial production run of a couple of dozen units by the end of this month. Thanks.


-
Dan: I have made pancake style holsters for 37 years. Some remain in service today that are 30 years old. So there is nothing wrong with the basic pancake that I know of. That said, I find the snap-loop belt attachment more comfortable to wear. There is no little lump fore and aft of the holster to wear into my tired old hip. And it is certainly easier to put on and take off. I make IWB holsters for those that demand them. Personally, I can't wear one for any length of time, and I don't understand how anyone would want all that bulk crammed in between their body and their waistline. But they do, so I take their money and produce the product. The fact of the matter is that at least 1/3 of my customers order a second holster, and many order several more. Maybe my primary mission in life if helping people learn what works and what doesn't? So be it. Next challenge (and one that I am actively working on right now): a truly comfortable shoulder holster. One that doesn't shift constantly, every time you get into a car and out of a car, every time you bend over. One that doesn't have to be cinched up so tight to prevent movement of the harness that it restricts upper body movement. I'm almost there, and I will post some results when I have a product ready for the market. Also in the process of adding matching belts to my product line. Lots of folks want a matching set of holster, belt, mag pouch, etc. I have a nice heavy-duty holster belt design coming on line next week. Thanks for your comments. Best wishes.
-
Here are a couple more holsters I just shipped out. Those with a good eye will see that this old guy uses the same basic pattern for IWB and OWB. Keeps things simple for me, and I like simple! 1. IWB, oiled tan finish 2. matching mag pouch for IWB 3. OWB, brown.


-
If you are making a holster for your own use, the trial and error approach will work. If you are making a holster with expectations that someone is going to pay for it, get it right the first time. Have the customer give you the parameters to be met, make sure they are reasonable, then proceed with the project. Best wishes.
-
Burnishing Holsters?
Lobo replied to Twosons's topic in Gun Holsters, Rifle Slings and Knife Sheathes
Any cylindrical piece of hardwood can be made into a good edge burnishing tool. I have used sewing thread spools and wooden dowels of various diameters for years. On the thread spools, insert a machine screw of proper diameter through the hole, secure it with a nut at the top, and the exposed area of the machine screw can be chucked into a drill press or drill that can be held stationary. Hardwood dowels up to 1/2" diameter can be chucked directly into my drill press. I burnish edges while the holster is still damp from the forming process. Simply work the finished edges against the turning hardwood and it will polish beautifully, compressing the leather fibers to a nicely contoured and polished edges. While your hardwood tool is turning a round file can be used to easily cut grooves of varying width and depth, suitable for working edges on a single-layer area, double-layer area, welted seams, etc. When you dye the finished piece, some dyes (notably water-based) can cause the exposed leather edges to expand and display rough fibers again. Run it over the burnishing tool again and those disappear. -
Last month I received an order for two holsters, to be produced to customer's design and finished with the classic neatsfoot oil finish. Customer's design called for a 1.5" belt attachment. Both holsters were modified Askins Avenger style with belt slot and tunnel loop. I finished both, sent photos to Mr. Customer for approval, got paid, and shipped. Just the way things are supposed to work out. A week or so later Mr. Customer contacted me, said neither holster would fit on his belt. It seems that he uses a very thick and heavy-duty gun belt (good idea, as both holsters are for S&W N-frame magnums, but I wish he had told me, or I had asked, sooner). So, he sent them back to me for modifications. First, I tried using a little mink oil on the points in question while stretching over a tapered hardwood mandrel. This yielded very little success. So, not wanting to completely re-make both holsters, I had to start thinking about another approach. Can an oil-finished holster be reformed, recased? I had some worries about that. I have seen a holsters over the years that had been water-saturated sufficiently to overcome surface sealants and soak the leather enough to make it supple again; but in every case the resulting finish was a little ugly (mottled, irregular distribution of the neatsfoot oil, displaced surface coatings clinging here and there, etc). Having few other options, I decided to try it. I completely soaked the holsters in hot tap water for about one-half hour, leaving both completely saturated and limp. Then I completely re-formed both to the guns. Leaving the guns in place, I then progressively worked the tapered hardwood mandrel through the slots and loops, forcing them to overall widths of 1.6" and overall clearances of 0.32". These dimensions should accomodate a belt made of two layers of 8-9 oz. cowhide (far thicker than any Sam Browne police duty belt), or a lineman's tool belt, or a weightlifter's belt, or a money belt stuffed with filthy lucre, etc. Fortunately, none of the stitching pulled through the leather or broke. That would have ended the experiment immediately. During the drying process I left the mandrel in place and repeatedly scoured the outer surfaces with a rough cloth soaked in isopropyl alcohol, removing all the finish and oil possible. After drying, the mandrel was removed, leaving positively cavernous proportions to the belt openings (compared to anything I have done in the past). Then I applied a couple of light coatings of neatsfoot oil (not wanting to overly saturate the leather, which had already been oiled when made originally), allowed that to settle overnight, followed by a liberal coating of Fiebing's Bag Kote. The resulting finish was quite nice, and the leather has regained its proper stiff structure. If anything, the second round of boning improved on the original, as the leather was worked completely a second time. So, lessons learned: 1. Yes, properly done, you can re-form, re-case, re-bone an oil-finished holster and get a good result. Time involved is considerably greater than expended when the holster was originally made (if I ever receive a request to do this again on a holster that has been soaked and needs re-done, I plan on charging appropriately for the time. In all, I figure about 4 hours for the process on these two holsters. Doing one would take nearly as long). 2. I have added another question to my "always ask on special orders" list; NOT ONLY WHAT WIDTH OF BELT WILL YOU BE USING, BUT WHAT THICKNESS OF BELT?
-
It is best to know the pocket dimensions so you don't end up with something that won't fit into the pocket. I like to make the holster so it can be readily removed from the pocket when necessary (without unfastening the pants, etc, to get it out). The main design item I try to achieve is the "ears" on the holster (sufficient to reliably catch on the corners of the pocket so the pistol can be drawn without the holster coming with it). Also, it is best not to form the holster too tightly to the handgun, to allow an easy draw (retention of the weapon isn't a problem, the pocket does that until the handgun is needed).
-
Yes, scorching the leather would result in what you have shown. Try taking a wooden dowel of about 1/2" diameter, chuck it into a drill press (or drill that can be held stationary), with a round file cut several grooves of varying width (easily done while the dowel is turning. You now have a burnishing tool. While the leather is still damp from the forming process is a good time to burnish edges. Allow each edge to receive a good polishing in the groove of appropriate width. This will smooth and polish the leather, forcing all the little "fuzzies" back into the leather edge. Very attractive result that will also continue to accept dye properly. Note that some dyes (notably the water-based) will cause the leather to expand, pushy up new little "fuzzies", so a little touch-up with the burnishing tool is frequently necessary. Many folks use waxes or other products in their burnishing. Nice results, but not really all that necessary for a nice finished edge.