Lobo
-
Posts
1,065 -
Joined
-
Last visited
Content Type
Profiles
Forums
Events
Blogs
Gallery
Store
Everything posted by Lobo
-
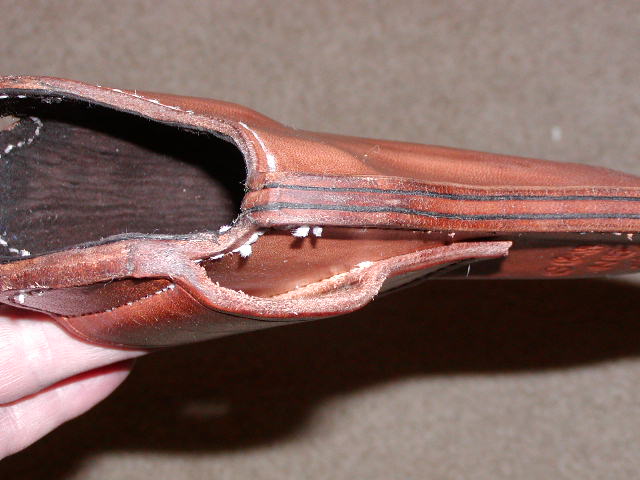
Pancake Holster for Kahr PM9
Lobo replied to JeffGC's topic in Gun Holsters, Rifle Slings and Knife Sheathes
Very nice workmanship. Good basic design. Carry angle looks to be pretty steep, but that is a matter of personal preference as much as anything else. I remember Butch Cassidy and the Sundance Kid, watched it at a cheap theater in Kansas City while being inducted into the US Army in 1968. Keep after it, you're doing nice work. And you are right, there is a great deal of information available right here, right now, that has never been generally available before. Best regards. -
Very good advice, well written and on point. Best regards.
-
Clicker dies? Never owned one. Multi-ton presses? Never used one. Just an old-fashioned guy here, patterning every piece by hand, cutting every piece by hand, assembling every piece by hand, fitting every piece by hand. You younger folks make an old grampa-man like me feel older than I should! I've only shipped 16 items this week, and I only have 22 orders in production right now, thinking about how much of my holiday weekend I will need to spend in the shop working. My goodness, if I invest a few thousand in clicker dies, then a few thousand more in a clicker press, then a few thousand more in a press to form my holsters, why I might cut my production time down from 40-45 minutes (per unit produced) to who knows what? I take orders for one week. Then I spend a week cutting each piece (by hand), assembling each piece (by hand), sewing each piece. Then I spend a few hours dying everything, in separate processes based upon colors desired. Then I spend a few hours fitting each piece to the handgun it is intended for. Then I spend a few hours each day for a few days in the finishing process (oiling and final surface finishes). So far, my customers seem to be quite happy with a 2 to 3 week turnaround time on orders. So far, I haven't spent a dime on clicker dies, clicker presses, forming presses, etc, etc, etc. So, you may call me old-fashioned, and you'd be quite right. You may call me old school, and you'd be right. You can call me anything you like, but you might just have to call me long-distance because this little business of mine is making money every day and my wife likes to travel! Why make simple things so complicated?
-
TwinOaks has described it well. Only thing I would add is this: your patten will contract significantly upon forming because of the width/thickness of the handgun, and contouring the finished holster to fit the hit. 7-inches across right now will probably be closer to 5-inches across when fitted and finished. Best regards.
-
Springfield XD40SC Pancake Holster
Lobo replied to ArcherBen's topic in Gun Holsters, Rifle Slings and Knife Sheathes
Very nice work. Congratulations on your recent marriage. Best wishes! -
Thank you, Mike. I have worried about starting a website, not wanting to create a monster that generates more orders than I can possibly fulfill, not wanting to be like so many others that take orders and leave customers waiting and waiting and waiting for a response. I chose to publish an informational website, with no ordering links. This way, customers have to contact me directly to place and confirm an order. I can be right up-front with production and delivery times, so the customer can make a buying decision accordingly. During the first 24 hours my little website has generated over 400 hits, with more than a dozen e-mail inquiries, and 3 orders. Not too bad for an old retired copper who couldn't make heads or tails of a computer terminal ten years ago! As a one-man operation, I continue to be concerned about demand exceeding my ability to produce. The demand is certainly out there, so anyone willing to set his sails and enter the waters will receive some traffic. I just don't want to become another supplier with a bunch of unhappy potential customers whose orders never get filled and delivered. Best regards,
-
Johan: I don't think I have ever met anyone having such language skills!
-
Well, as some of you might recall from a couple of months ago, I recently leased some commercial space for my production facility. This has actually worked out quite well. Everything is out of the house, my wife can relax a little more not having to deal with piles of materials, supplies, and correspondence everywhere. Paz en la casa (Spanish for "peace in the house", which is always a good thing). And I have a small cooler to keep my adult beverages at proper temperature (as well as out of mama's sight). Best of all, I can make a SERIOUS mess during a frenzy of production, and not worry about cleaning it up before mama gets home! Yesterday, I spent a few hours putting up a website. I chose to do strictly an informational site, no ordering links or other stuff. Web-hosting via Yahoo, using the Yahoo web-design tools, took me about 3 hours to prepare. Cost is very reasonable (2 or 3 orders pays everything for a year). The big concern for me is being swamped with orders and not being able to respond to anyone within a reasonable period of time. During the first 24 hours I have received over a dozen e-mails and several orders, so it appears that this will work quite nicely after all. Since I have been producing an average of about 20 to 25 items per week for several months (without website exposure), I think that I can take this little business just a bit further very soon. The next few weeks will tell me just how hard I am going to have to work. Still working on a few new projects and products. Everything looks promising for now. Anyway, the new home of Lobo Gun Leather is in the Corona Building, overlooking the historic Arkansas River in Pueblo, Colorado. The new website is www.lobogunleather.com. Let me know what you think, if you care to. Best regards to all.
-
05-19-09 9:40PM Mountain Time: I have received multiple replies from forum members, and it appears likely that I will be able to start this project soon. Thanks to all who have expressed interest.
-
05-19-09 9:40PM Mountain Time: Multiple responses received, several forum members have expressed interest, so it looks like I should be able to get going on this project soon. Thanks to all who have followed through.
-
Burnishing edges on a holster
Lobo replied to LeatherCaptain's topic in Gun Holsters, Rifle Slings and Knife Sheathes
We just can't argue with perfection, can we? Nice work. -
Randy: I use similar weight leathers for my IWB holsters. I use a two-prong Tee-nut with 6-32 screw, length 3/8", when setting the snap base through 2-layer wings on the IWB. Hole punch of approx. size for the shaft of the Tee-nut, set the T-nut with a mallet, mount your belt strap with snap base and screw, done deal. Your local hardware stores may be slim on Tee-nuts and screws, as those around here are. I buy in bulk, and have several hundred sets on hand. If you need a few for a single project or to experiment with, drop me a PM with your mailing address and I will send you a few sets. Happy to help if I can.
-
Hi, folks. I posted in the 'help wanted' section yesterday, looking for an artist to do the carving on my holsters. I would appreciate hearing from any of you who are interested in the work. Thanks.
-
Hello, all. I am a holster maker, and I have a couple of customers interested in hand-carved holsters in the Sheridan style (floral, leaves). I do not do any carving, so in order to meet these requests I need a collaborator for the project. If this works out well, I might add the carved pieces to my regular offerings. So it is possible that there might be regular orders. If interested, please send a PM with your e-mail address. I will send a photo of an original piece showing the pattern desired. Then you can give me a price quote to duplicate the style. I would appreciate a photo or two of your work. I will be happy to send photos of some of my work so that you may see how your work would be displayed. If we come to an agreement, I would cut the holster pieces then send to you for carving. When finished, you can send back to me for completion of the project. Initial contract would probably be for one or two items and, if that works out, we might do several at a time. The carver will be given full credit for the work, and may stamp or sign each piece on the back side for recognition. I will also stamp the holsters with my trademark on the back side. I look forward to hearing from accomplished artisans.
-
By edger, I assume you mean edge beveling tool. These tools are generally sold in several sizes, identified by a number (typically 1 through 6). The smaller the number, the smaller the cut. For most work in the 8-9 oz. leather I find that a #3 gives good results.
-
Don't ever forget that if you take depreciation on any asset, then sell that asset at any time in the future, you will have to declare the sales revenue as income (recaptured depreciation). Example: You purchase a $1000 tool for business use, then take a 5-year depreciation schedule, deducting $200 per year on that tool. After 5 years the tool has been fully depreciated. If you then sell that tool for $500, you must declare that amount as recaptured depreciation, and you will have to pay income taxes on that amount. There are some circumstances in which you may trade that item for a similar item, then start a new depreciation schedule on the new item. Depending upon the values involved, it could be very important to get competent advice from a tax professional. I have seen several folks learn this lesson the hard way!
-
Burnishing edges on a holster
Lobo replied to LeatherCaptain's topic in Gun Holsters, Rifle Slings and Knife Sheathes
Your customer is lucky to have you! That is a lot of work you have done. Best regards, -
Here is a process that has worked for me. 1. On stiff paper (like a file folder), using a ruler, draw two horizontal lines to represent the belt, spaced at the belt width. 2. Place your handgun or forming piece over the belt, at the height and carry angle you wish for it to ride in the holster on your belt. 3. Trace the outline of the handgun onto the paper at that point. 4. Mark critical areas of the handgun onto the traced pattern (safeties, magazine release, ejection port, trigger, etc). These are areas we want to make sure receive no interference or undue pressure from the holster. 5. Measure the thickness of the handgun, then divide that amount by two (if the handgun is 1 inch thick, the result is 1/2 inch). 6. Using a ruler and any handy rounded objects, mark a line around the handgun's shape at that distance from the traced outline. This establishes the stitching lines. 7. Using the ruler and any handy rounded object, draw the outline of the holster, as you wish it to be upon completion. Avoid square corners and tight inside radiused designs as they can be very difficult to finish. Mark the belt slots in the desired location. 8. Cut out the finished pattern with scissors. 9. Lay the pattern on a piece of leather, right side up, and trace the outline onto the leather. This will be the outer shell of the holster. 10. Lay the pattern on a piece of leather, upside down, and trace the outline onto the leather. This will be the inside shell of the holster. 11. Cut the leather pieces as closely as possible on the traced lines. Tools that can work are sharp utility knives, Xacto knives, or heavy-duty shears. Keep your cutting tools perpendicular to the leather being cut to avoid angled cuts; you want a nice square cut in relation to the leather surface. 12. On one cut leather piece (either side), lay your paper pattern onto the piece to show where the stitched areas are, and trace those areas onto the leather. 13. On those areas (outside the outline of the handgun) apply cement, then cement the two holster pieces together. (Rubber cement, contact cement, Tanners Bond all work well; for the occasional or one-time project you may get away with Elmer's Glue All). 14. Now is a good time to dress down the edges of the leather so that they are a perfect match. You may dampen the edges slightly, then use a belt or drum sander to mate up the edges, then using an edge beveler you can bevel all edges evenly. 15. Using the paper pattern, transfer your stitching pattern onto the front side of the holster, then do your sewing work. 16. After sewing, transfer your belt slots from your pattern onto the front side of the holster, and cut the belt slots. Note: if you do not have a slot-cutting tool, try a 1/4" round punch at each end, then finish with a sharp wood chisel between the two round holes to form an even slot. Any minor irregularity can be cleaned up with a sharp knife or Dremel tool. 17. Dampen the leather, then insert your handgun into the holster, do your forming work (including shaping the holster to finished profile to ride on the belt properly). 18. After thorough drying you may apply dyes, burnish the edges, then finish the leather. Don't rush these steps, allow plenty of time for drying between each process. 19. Any necessary hardware (snaps, etc) can then be attached. You now have a finished holster with neat clean edges and perfectly mated belt slots. I hope this helps. A variety of straight edges (rulers, etc) and rounded shapes (jar lids, coins, whatever) can be a big help to those of us who cannot draw well. Many common shop tools can be pressed into service to achieve a reasonable result in cutting, shaping, and finishing edges, etc. Good luck. Please post again with your results.
-
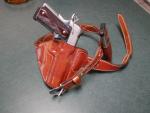
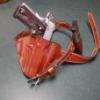
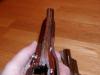
Gun holster shoulder harness
Lobo replied to Rayban's topic in Gun Holsters, Rifle Slings and Knife Sheathes
Dennis: The harness features a suede leather pad in a "Y" configuration directly over the carry-side shoulder. Straps down to the holster are (as nearly as possible) in a straight-down line, which supports the weight with less tendency to pull horizontally as the X-style harnesses do. The third leg of the "Y" is where the 1.5" elastic strap is sewn in, which extends behind the neck and over the off-side shoulder, then down to the belt-line. The holster itself is a cased and boned holster with thumb-break retention. In the production models I have eliminated the strap from holster bottom to belt-line, finding that it really isn't needed. The handgun shown is a Kahr P40 (polymer frame, stainless upper, .40 S&W caliber), a fine little piece that weighs only 16.1 oz. empty, is very accurate and easy to shoot well. The holster pictured was a prototype; this design has been revised and tested by several experienced people, and revised again. It is now in production in the final version and is selling quite nicely. -
New c5leather iwb design.
Lobo replied to C5LEATHER's topic in Gun Holsters, Rifle Slings and Knife Sheathes
Very nice looking work there. Interesting use of the stud fasteners instead of a conventional snap. I'm curious as to whether or not this type fastener might cause problems, popping open, especially after some wear takes place. If this is something you have used for a length of time, I'd appreciate hearing your comments. -
Burnishing edges on a holster
Lobo replied to LeatherCaptain's topic in Gun Holsters, Rifle Slings and Knife Sheathes
OK, here are a couple of welted-seam holsters. One is undyed oiled tan finish, one is dyed. At the seam there are actually 5 layers of leather with the linings. These were done with the wax mentioned above. Not perfect, but not too bad I think.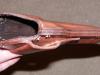
-
would anyone like some ostrich hide?
Lobo replied to trapmonkey's topic in Gun Holsters, Rifle Slings and Knife Sheathes
With the ostrich skin in the weight you describe, I would suggest using veg-tanned cowhide of about 4 to 6 oz. weight as a lining (cement the ostrich skin to the cowhide, cut and form the pieces with the smooth cowhide on the interior). This should result in a very durable finished product that will hold its shape very well, also providing a nice smooth lining Interesting project for the right person, someone experienced in exotic leathers -
Burnishing edges on a holster
Lobo replied to LeatherCaptain's topic in Gun Holsters, Rifle Slings and Knife Sheathes
Monica has it right, in my opinion. Burnishing the edges involves compressing the fibers. When the holster is wetted after the burnishing this causes those fibers to expand, thus basically undoing the burnishing work. Using a heat source during the drying will make this effect even worse. I like to do the final burnishing after the wet-forming has been completed, and prior to final finish application. For years I simply burnished the edges before the leather had completely dried after the forming process, essentially using only the water in the piece. Now that I am doing more volume work, I have found it easier and quicker to do the burnishing after all of my work has thoroughly dried (I don't use a heat source, simply air-drying). I've also found that using a little wax is a big improvement, both in finish quality and in speeding up the process. I use a 50/50 mixture of beeswax and parafin, simply rubbing the wax over the edges quickly, then put it on the burnishing tool where the friction and heat quickly transfers the wax evenly and forcing it into the exposed fibers. I have the wax made up in pieces of about 2 ounces each. Each piece will easily do dozens of holsters, belts, etc. Send me a PM with your mailing address and I'll send you some to try out. I'm sure that you will like it. -
Very nice craftsmanship. Edges look very nice. Stitching looks pretty good. I think you see where an improvement can be made, here and there, and your next one will be professional quality work. Best regards.
-
Tom: You are making better sense than most would recognize. As to your idea of a "grid" or "chart", that will take some effort to accomplish, and the results might still be somewhat iffy. I like to get a definite measurement from the customer before cutting the pieces for a belt.